2015 AUDI S3 SEDAN display
[x] Cancel search: displayPage 115 of 282
....,
N
0 > co
rl I.O
"'
"'
"'
rl
@ Tips
In some models, the maximum vehicle speed
can only be reached in the auto and dynamic
modes.
Selecting the driving mode
A ppl ies to vehicles: with Audi drive select
You con choose between comfort, auto, dynamic
and individual* .
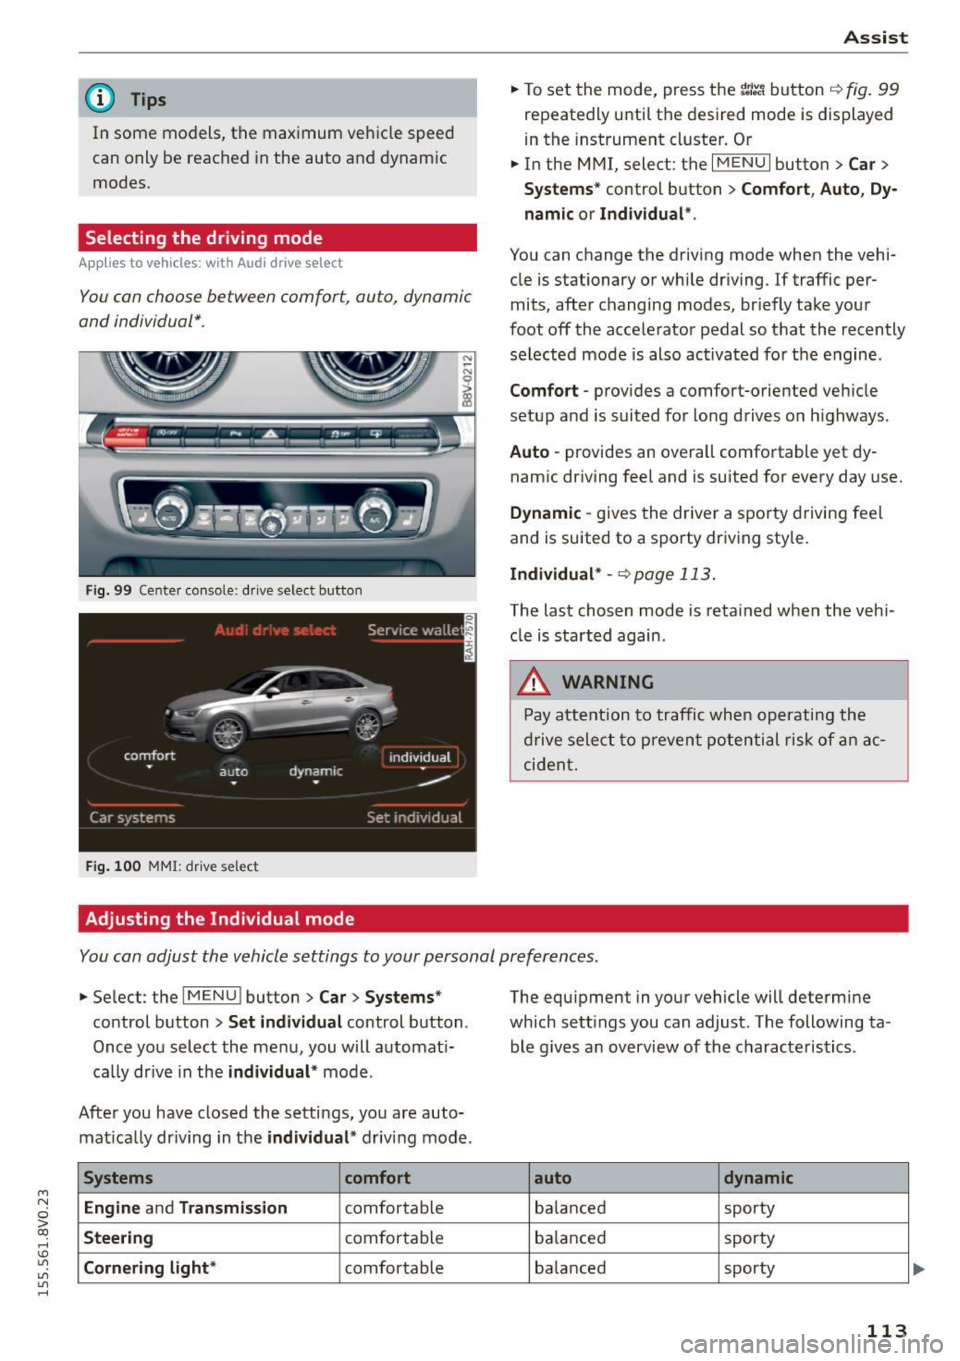
Fig. 99 Center console: dr ive selec t button
Fig . 100 MMI : drive select
Adjusting the Individual mode Assist
.,.
To set the mode, press the r:1:.~ button ~ fig. 99
repeatedly until the desired mode is displayed
in the instrument cluster. Or
.,. In the MMI, select: the
I MENU I button >C ar>
Systems"
control button > Comfort, Auto, Dy
namic or Individual ".
You can change the driving mode when the vehi
cle is stationary or while driving.
If traffic per
mits, after changing modes, briefly take your
foot off the accelerator pedal so that the recently
selected mode is also activated for the engine .
Comfort -provides a comfort-oriented vehicle
setup and is suited for long drives o n highways.
Auto -provides an overall comfortable yet dy
namic driving feel and is suited for every day use.
Dynamic -gives the driver a sporty driving feel
and is suited to a sporty driving sty le.
Individual* -<=>page 113.
The last chosen mode is retained when the veh i
cle is started again .
.&, WARNING
-Pay attention to traffic when operating the
drive select to prevent potential risk of an ac
cident.
You con adjust the vehicle settings to your personal preferences .
.,. Select : the IMENU ! button> Car> Systems*
control button > Set individual control button .
Once you select the menu, you will automat i
ca lly dr ive in the
individual* mode .
After you have closed the settings, you are auto mat ically dr iving in the
individual * driving mode .
Systems comfort
Engine
and Transmission comfortable
Steering comfortable
Cornering light* comfortable The equipment
in your vehicle will determine
which sett ings you can adjust. The following ta
ble g ives an overview of the characteristics .
auto dynamic
balanced sporty
balanced sporty
ba lanced sporty
113
Page 117 of 282
M N
0 > co ,...., \!) ..,.,
..,.,
..,., ,....,
Parking systems
General information
Applies to vehicles: with rea r parking sys te m s/park in g system
p lus/rearview camera
Depending on your vehicle's equipment, various
parking aids will help you when parking and ma
neuvering.
The
rear parking system is an audible parking aid
that warns you of obstacles
behind the vehicle
¢ page 116.
The parking system plus assists you when park
ing by audibly and visually indicating objects de
tected
in front of and behind the vehicle
¢ page 116.
The rearview camera shows the area behind the
vehicle in the MMI display. This display assists
you when you are cross or parallel parking. The
parking system plus functions are also available
¢page 117.
A WARNING ,--
- Always look for traffic and check the area
around your vehicle by looking at it directly
as well. The parking system cannot replace
the driver's attention. The driver is a lways
responsible when entering or leaving a park
ing space and during similar maneuvers .
- Please note that some surfaces, such as
clothing, are not detected by the system.
- Sensors and cameras have blind spots in
which people and objects cannot be detect
ed . Be especially cautious of small children
and animals .
- Always pay attention to the area around the
vehicle - using the rearview mirror, too.
- The sensors can be displaced by impacts or
damage to the radiator grille, bumper,
wheel housing and the underbody . The park
ing system may become impaired as a re
sult . Have an authorized Audi dealer or au
thorized Audi Service Facility check their
function.
- Make sure the sensors are not obstructed by
st ickers, deposits or other materials.
If they
are the sensor function could be impaired .
'
Parking systems
For additional information on cleaning, re
fer to
¢ page 235.
@ Note
- Some objects are not detected or displayed
by the system under certain circumstances:
- Objects such as barrier chains, trailer draw
bars, vertical poles or fences
- Objects above the sensors such as wall ex
tensions
- Objects with specific surfaces or struc
tures such as chain link fences or powder
snow
- If you continue driving closer to a low-lying
object, it may disappear from the sensor
range. Note that you will no longer be
warned about this obstacle.
- The sensors can be displaced by impacts or
damage to the radiator grille, bumper,
wheel housing and the underbody. The park
ing system may become impaired as a re
sult. Have an authorized Audi dealer or au
thorized Audi Service Facility check their
function.
(D Tips
- The system may provide a warning even
though there are no obstacles in the cover
age area in some situations, such as:
- certain road surfaces or for long grass .
- external ultrasonic sources e.g. from
cleaning vehicles.
- heavy rain, snow, or thick vehicle exhaust.
- We recommend that you practice parking in
a traffic-free location or parking lot to be
come familiar with the system. When doing
this, there should be good light and weather
conditions.
- You can change the volume and pitch of the
signals as well as the display¢
page 121 .
-What appears in the MMI display is some
what time-delayed.
- The sensors must be kept clean and free of
snow and ice for the park assist to operate .
115
Page 118 of 282
Parking syste m s
Rear parking system
Description
Applies to veh icles: w ith rear parking system
The rear parking system is an audible parking
aid.
Des crip tion
There is a sensor in the rear bumper cover. If
these detect an obstacle, audible signals warn
you .
Make sure the sensors are not covered by stick
ers, deposits or any other obstructions as it may
impair the sensor function. For information on
cleaning, refer to
c:::;,page 235.
The range at which the sensors begin to measure
is approximately:
Side rear 3 ft (0.90
m)
Side center 5.2 ft (1.60
m)
The closer you get to the obstacle, the shorter
the interval between the audible signals . A con
tinuous tone sounds when the obstacle is less
than approximately 1 foot (0.30 meters) away.
Do not continue backing up
c:::;, .&. in General infor
mation on page 115, ¢0in General information
on page
115!
If the distance to an obstacle remains constant,
the volume of the distance warning gradually drops after about four seconds (this is not apply
in the continuous tone range).
Activa ting
The parking system activates automatically when
the reverse gear is se lected. You will hear a brief
confirmation tone.
116
Parking system plus
Description
App lies to vehicles: with parking system plus
The parking system plus provides audio and visu
al signals when parking .
=
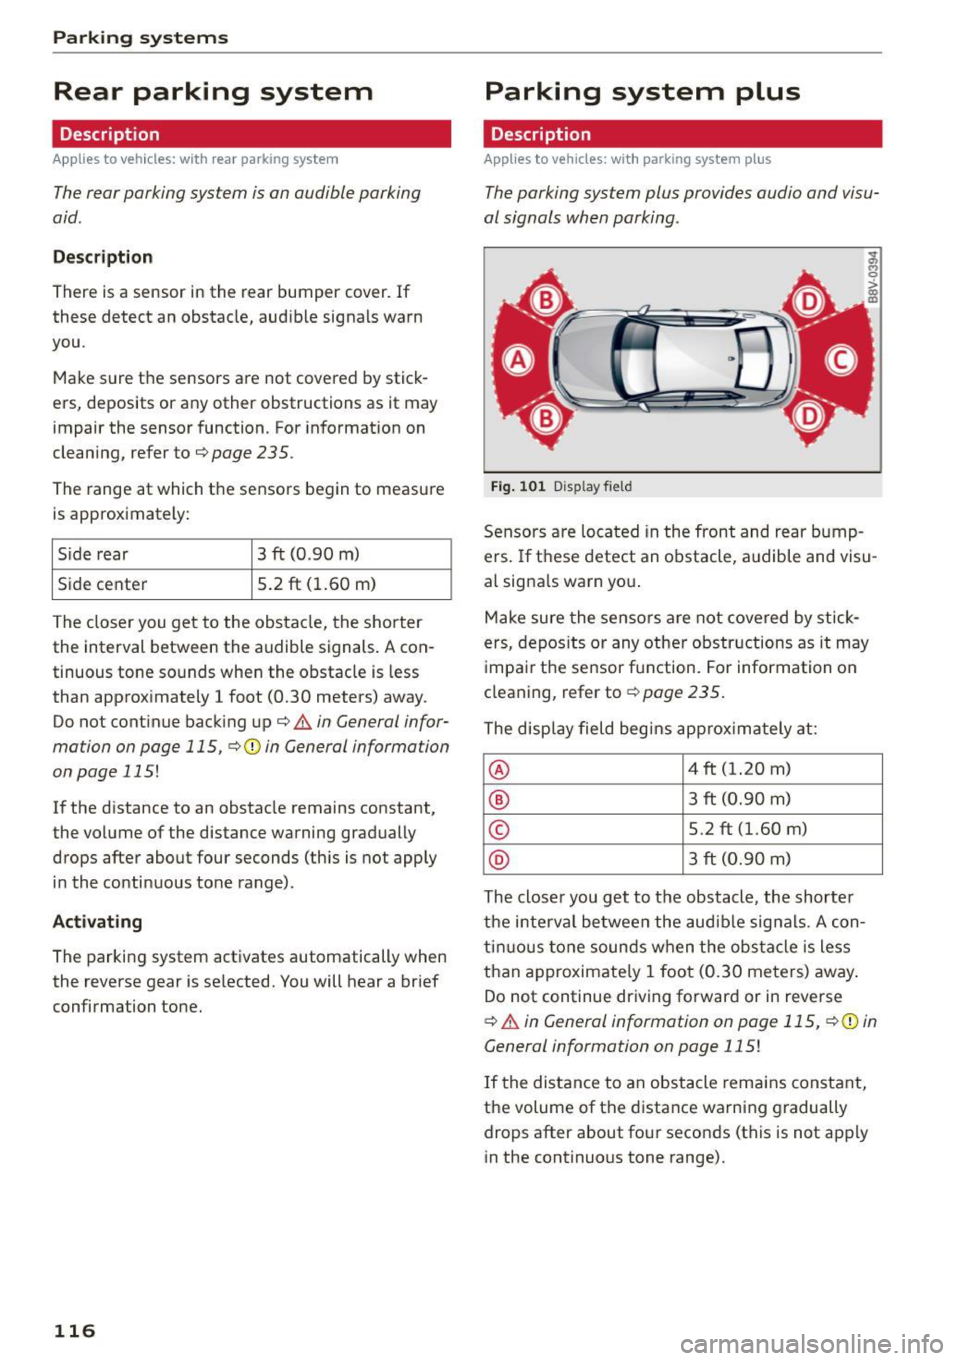
Fig. 101 D isp lay fie ld
Sensors are located in the front and rear bump
ers. If these detect an obstacle, audible and visu
al signa ls warn you .
Make sure the sensors are not covered by stick
ers, depos its or any other obstructions as it may
impair the sensor function. For information on
cleaning, refer to
c:::;, page 235.
The display field begins approximately at:
® 4 ft (1.20 m)
® 3 ft (0.90 m)
© 5.2 ft (1.60 m)
® 3 ft (0.90 m)
The closer you get to the obstacle, the shorter
the interval between the audible signals . A con
tinuous tone sounds when the obstacle is less
than approximate ly 1 foot (0.30 meters) away.
Do not continue driving forward or in reverse
c:::;, .&. in General information on page 115, c:::;,@) in
General information on page
115!
If the distance to an obstacle remains constant,
the volume of the distance warning gradually
drops after about four seconds (this is not apply
in the continuous tone range).
Page 119 of 282
....,
N
0 > co
rl I.O
"'
"'
"'
rl
Switching on/off
Applies to vehicles: with parking system plus
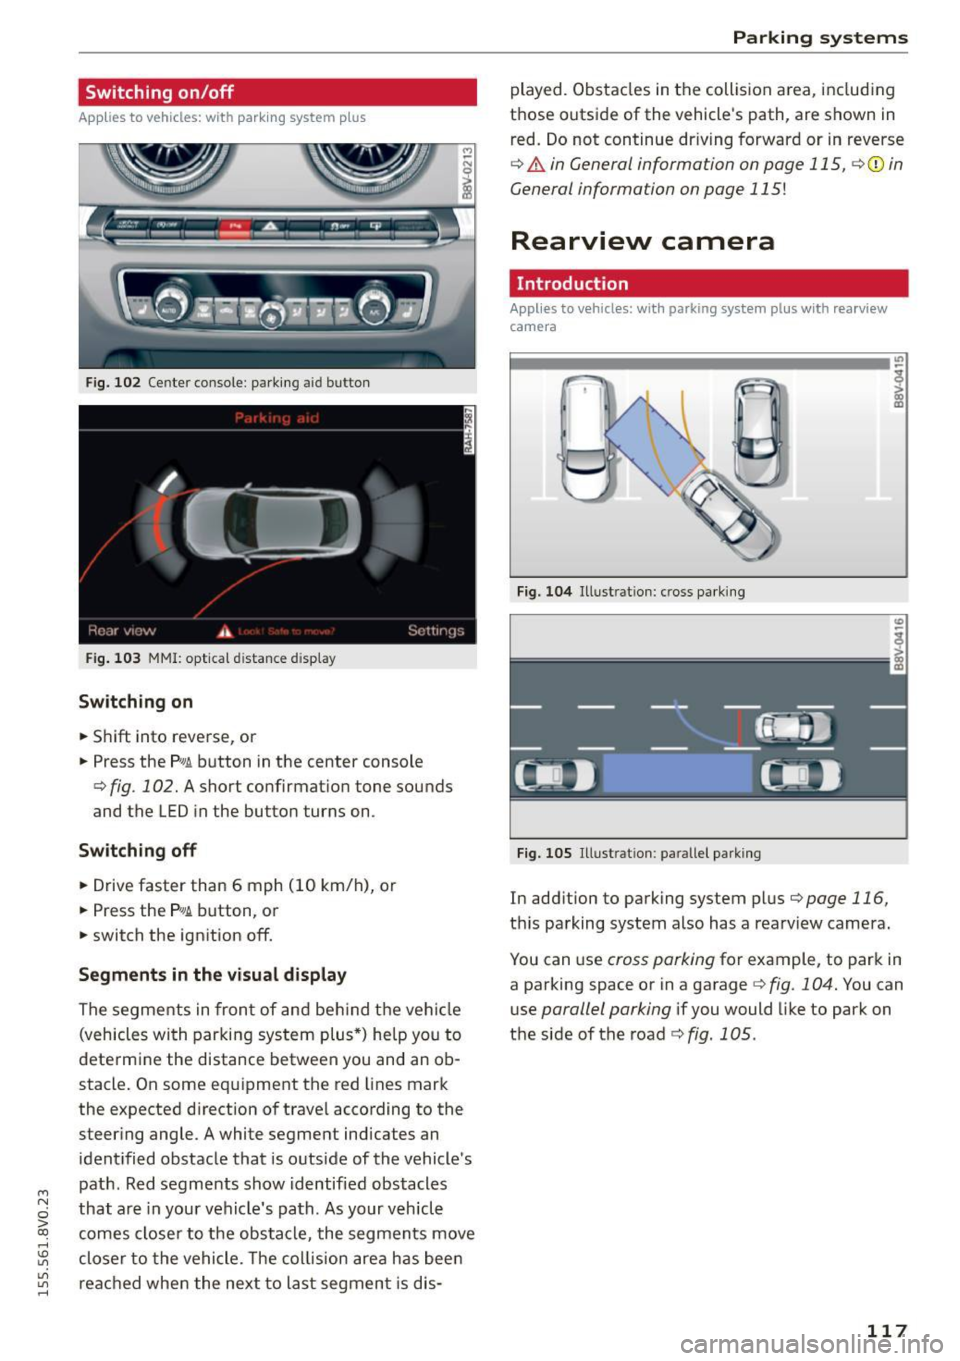
F ig. 102 Ce nter console: parking a id button
Fig. 103 MMI: opt ical d istance d isplay
Switching on
• Shift into reverse, or
• Press the
p,g ~ button in the center console
¢ fig . 102. A short confirmat ion tone sounds
and the LED in the butto n turns on .
Switching off
• Drive faster than 6 mph (10 km/h), or
• Press the
P,g~ button, or
• switch the ignition off.
Segments in the visual display
The segments in fron t of and behind the vehicle
(vehicles with parking system plus*) he lp you to
determine the distance between you and an ob
stacle. On some equipment the red lines mark
the expected d irection of trave l according to the
steer ing angle . A white segment indicates an
identified obstacle that is outside of the vehicle's
path . Red segments show identified obstacles
that are in your vehicle's path. As your vehicle
comes closer to the obstacle, the segments move
closer to the vehicle. The collision area has been
reached when the next to last segmen t is dis-
Parking systems
played. Obstacles in the collision a rea, including
those outside of the veh icle's path, are shown in
red. Do not continue dr iving forward or in reverse
¢ & in General information on page 115, ¢(i) in
General information on page 115!
Rearview camera
Introduction
Applies to vehicles: wit h parking sys tem plus with rearview
camera
Fig. 104 Illust rat ion : cross parking
Fig. 105 Illust ration : pa ralle l park ing
In add ition to parking system plus ¢page 116,
this parking system also has a rearv iew camera.
You can use
cross parking for example, to park in
a parking space or in a garage
¢ fig . 104. You can
use
parallel parking if you would like to park on
the side of the road
¢ fig. 1 OS.
117
Page 120 of 282
Parking syste m s
General information
App lies to vehicles: with parking system p lus with rearview
camera
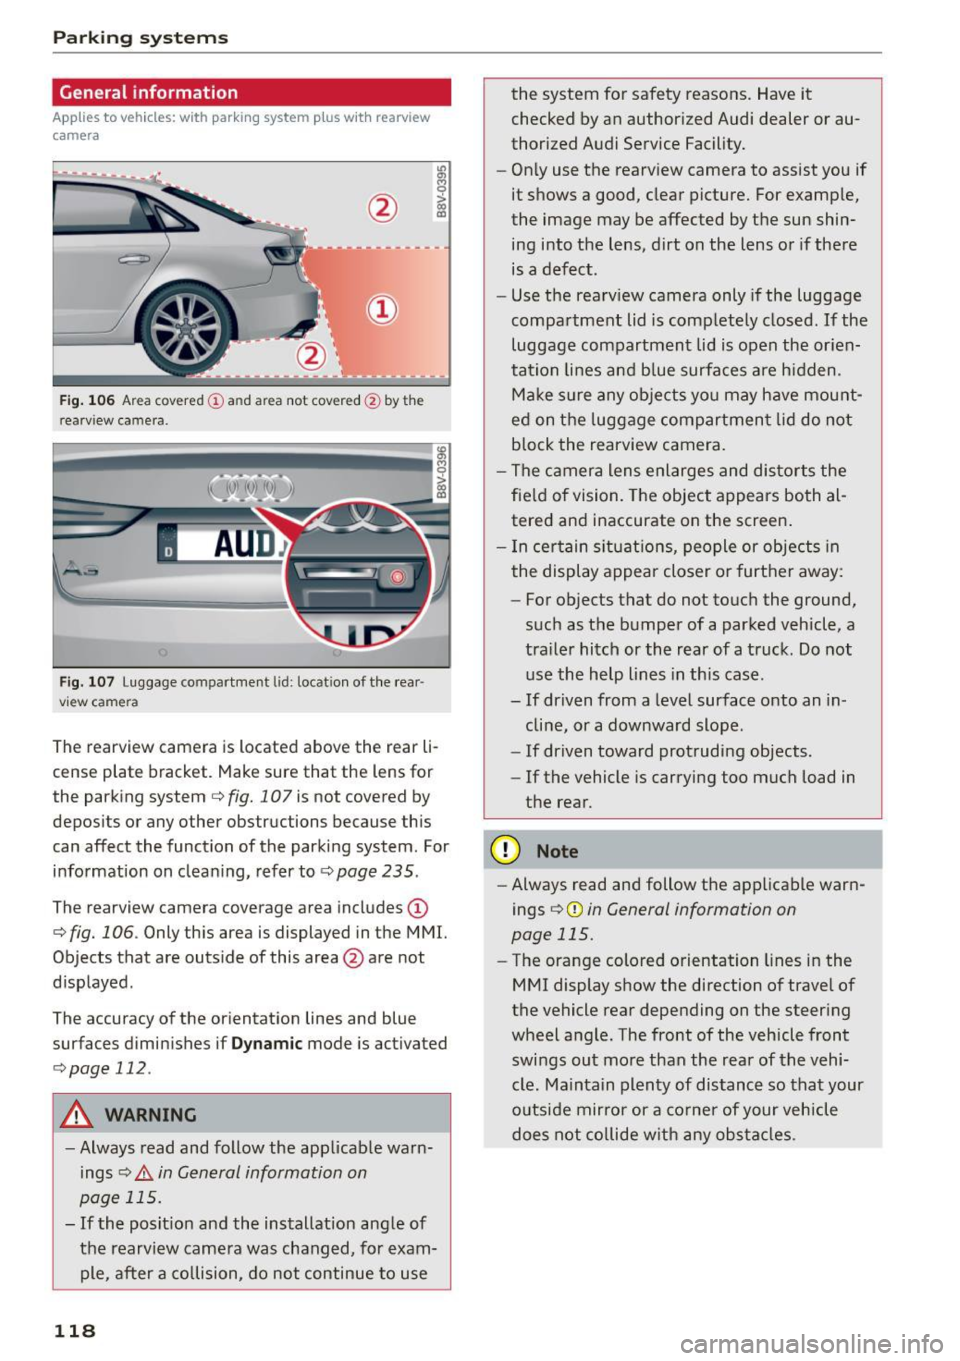
F ig . 106 Ar ea covered (!) an d area not cove red@ by th e
r earv iew ca mera .
Fig. 107 Luggage compartment lid : locat ion of the rear
vi ew came ra
The rearview camera is located above the rear li
cense plate bracket . Make sure that the lens for
the parking system
c::> fig. 107 is not covered by
deposits or any other obstructions because th is
can affect the function of the parking system . For
information on cleaning, refer to
c::> page 235 .
The rearview camera coverage area includes (D
c::> fig. 106. Only this area is displayed in the MMI.
Objects that are outside of this area @are not
displayed .
The accuracy of the or ientation lines and blue
surfaces diminishes if
D yn am ic mode is activated
c::> page 112.
A WARNING
-Always read and follow the app licable warn
ings
c::> .&. in General information on
page 115.
- If the posit ion and the installation ang le of
the rearview camera was changed, for exam ple, after a co llision, do not continue to use
118
the system for safety reasons. Have it
checked by an author ized Audi dealer or au
thorized Audi Service Facility.
- On ly use the rearview camera to assist you if
it shows a good, clear picture. For examp le,
the image may be affected by the sun shin
ing into the lens, dirt on the lens or if there
is a defect.
- Use the rearv iew camera only if the luggage
compartment lid is completely closed.
If the
luggage compartment lid is open the or ien
tation lines and b lue surfaces are h idden.
Make s ure any objects yo u may have mount
ed on t he luggage compartmen t lid do not
block the rearview camera.
- The camera lens enlarges and distorts the
fie ld of vision. The object appears both al
tered and inaccurate on the screen .
- I n ce rtain si tuat ions, people or objects in
the display appea r closer or further away:
- For objects that do not to uch the ground,
such as the bumper of a parked vehicle, a
tra ile r hitch or the rear of a truck. Do not
use the help lines in this case.
- If driven from a level surface onto an in
cline, or a downward slope .
- If driven toward protruding objects.
- If the vehicle is carrying too much load in
the rear.
(D Note
- Always read and follow the applicable warn
ings
c::> (D in General information on
page 115.
- The orange colored o rientation lines in the
MMI display show the direction of trave l of
the vehicle rear depending on the steer ing
wheel a ngle . The front of the vehicle front
swings out more than the rear of the vehi
cle. Ma intain plenty of distance so that your
o utside mirror or a co rne r of your vehicle
does not co llide w ith any ob stacl es .
Page 121 of 282
....,
N
0 > co
rl I.O
"'
"'
"'
rl
Switching on/off
Applies to vehicles: with parking system plus w it h rearv iew
camera
Switching on
• Shift into reverse, or
• Press the
P~A button in the center console
¢page 117, fig. 102. A short confirmation
tone sounds and the LED in the button turns
on.
Switching between the rearview camera and
optical display
• Press the Graphic control button ®
r::!.>page 119, fig . 108 to see the optica l display.
• Press the
Rear view contro l button to see the
rearview camera image.
Switching off
• Drive faster than 6 mph (10 km/h), or
• Press the
P,qA button, or
• switch the ign ition off.
@ Tips
The v isual display in the left pa rt of the dis
play should he lp you detect the critical veh icle
areas.
Cross parking
Appl ies to vehicles : with parking system plus with rearview
camera
This view may be used when parking in a garage
or in a parking space.
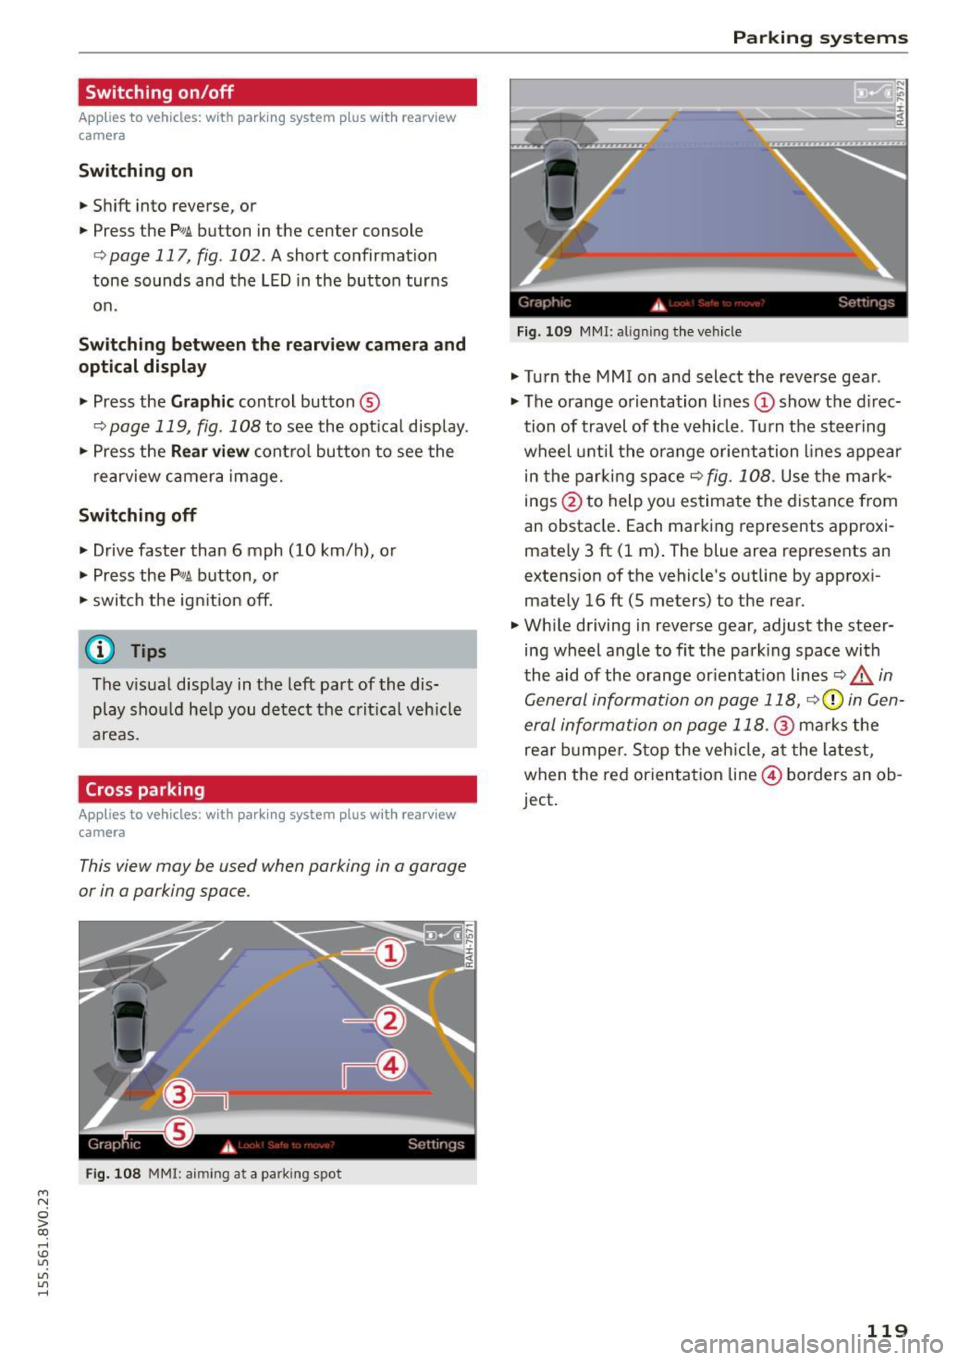
Fi g. 108 MMI: aiming at a park ing spot
Parking systems
Gr,11;t I( i._ S,·T .. 1',lJ',
Fig. 109 MMI : aligning t he veh icle
• Turn the MM I on and select the reverse gear .
• The orange orientation lines
(D show the direc
tion of travel of the vehicle . Turn the steering
wheel unt il the orange orientation lines appear
in the parking space¢
fig. 108. Use the mark
in gs @ to help you estimate the distance from
an obstacle . Each marking represents approxi
mately 3 ft (1 m) . The blue area represents an
extens ion of the vehicle 's outline by approxi
mate ly 16 ft (5 meters) to the rear.
• Wh ile driving in reverse gear, adjust the steer
ing wheel angle to fit the park ing space with
the aid of the orange or ientat ion lines
Q A in
General information on page 118,
r::!.>0 in Gen
eral information on page 118.@
marks the
rea r bumper . S top the vehicle, at the latest,
when the red orienta tion line © borders an ob
ject.
119
Page 122 of 282

Parking systems
Parallel parking
Applies to veh icles: w ith pa rk in g system p lus w it h rearv iew
camera
This view may be used when parallel parking
along the side of a street .
Fig. 110 MMI: blue surface aligned wit h parking spot
Fig. 111 MMI: contact of the blue curved line with the curb
Park ing on the right is described here. It is iden
tical when parking on the left .
If there is an obstacle next to the park ing space
(such as a wall), refer to "Information for parking
next to obstacles" ¢
page 120 .
.,. Turn on the right turn signal.
.,. Position your vehicle next to a parked vehicle in
front of the desired parking space. The distance
to this veh icle should be approximately 3 ft (1
m) .
.,. Turn the MMI on and select the reverse gear .
The park ing system is turned on and the
cross
parking indicator is displayed.
.,. Press the control button on the MMI-controls
to select
(D ¢ fig. 110. The parallel parking in
dicator is displayed .
.,. Back up and al ign your vehicle so the blue area
@ borders on the rear end of the vehicle behind
you or on the parking space line¢.&.
in Gener-
120
al information on page 118, ¢(Din General in
formation on page 118 .
The blue area repre
sents an extension of the vehicle's outline by
approximately 16
ft (5 meters) to the rear. The
long side of the blue area should be on the
curb . The entire b lue area must fit into the
parking space .
.,. With the vehicle stopped, turn the steering
wheel to the right as far as it will go .
.,. Back into the parking space until the blue curve
¢
fig. 111 touches the curb¢.&. in General in
formation on page 118, ¢(Din General infor
mation on page 118.
Stop the vehicle .
.,. With the vehicle stopped, turn the steering
wheel to the left as far as it will go .
.,. Continue to back into the parking space until
the vehicle is parked parallel to the curb¢.&.
in General information on page 118, ¢CI) in
General information on page 118 .@
marks
the rear bumper. Stop the vehicle, at the latest,
when the red orientat ion line @ borders an ob
ject. Keep an eye on the front of your vehicle
while doing this.
Parking next to obstacles
If there is an obstacle (such as a wall) next to the
parking space, position the veh icle so there is
more space on that side. Position the long side of
the blue surface so that there is suff icient space
from the obstacle. The surface must not be
touching . You will also need to start turning the
steering wheel much earlier. The blue curve
¢ fig. 111 must not touch the obstacle and
should have sufficient room .
(D Note
Keep enough distance from the curb to avo id
damage to the rims.
¢j) Tips
The left or right orientation lines and surfaces
will be disp layed, depending on the turn sig
nal being used.
Page 123 of 282

M N
0 > co ,...., \!) 1.1"1
1.1"1
1.1"1
,....,
Adjusting the display and the warning tones
App lies to vehicles: with pa rking system p lus/rearv iew cam
era
The display and warning tones con be adjusted in
the MMI.
~ Select: the I MENU ! button >Car> Systems *
control button > Driver assistance > Parking
aid.
Display
On* -
optical display is shown for the parking sys
tem plus, rearview camera image is shown for
parking system plus with rearv iew camera *.
Off -when the parking system is switched off, on
l y audible signals are given.
Warning tones
Front volume -
Volume for the front and side*
area
Rear volume -Volume for the rear area
Front frequency -Frequency for the front and
side* area
Rear frequency -Frequency for the rear area
Entertainment volume lowering -When the
parking system is turned on, the volum e of the
audio/video source is lowered.
The newly adjusted value is briefly heard from
the signal generator.
- The warning tones can also be adjusted di
re ctly from the visual d isplay or the rearview
camera image*. Simply press the
Settings
control button.
- The settings a re automatically stored and
ass igned to the remote control key that is in
use.
Error messages
Ap plies to vehicles: with park ing system p lus/rearv iew cam
era
There is an error in the system if the LED in the
p, ,1 A. button is blinking and you hear a continuous
Parking systems
alarm for a few seconds after switching on the
parking system or when the parking system is al
ready activated .
If the error is not corrected be
fore you switch
off the ignition, the LED in the P1
1,
button w ill blink the next time you switch on the
parking system by shift ing into reverse .
Parking system plus*
If a sensor is faulty, the~ symbol will appear in
front of/behind the vehicle in the MMI display. If
a rear sensor is faulty, only obstacles that are in
areas @and @are shown ¢
page 116, fig. 101.
If a front sensor is faulty, only obstacles that are
i n areas © and @are shown .
Drive to an authorized Audi dealer or authorized
Audi Serv ice Facility immediately to have the
malfunction corrected .
121