2014 SUBARU TRIBECA parking brake
[x] Cancel search: parking brakePage 8 of 426
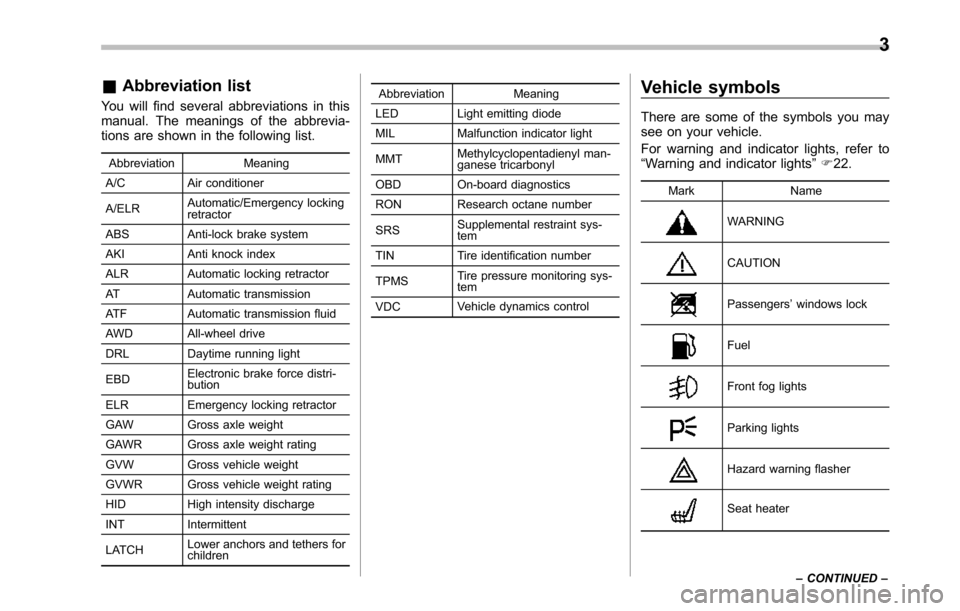
&Abbreviation list
You will find several abbreviations in thismanual. The meanings of the abbrevia-tions are shown in the following list.
Abbreviation Meaning
A/C Air conditioner
A/ELRAutomatic/Emergency lockingretractor
ABSAnti-lock brake system
AKI Anti knock index
ALR Automatic locking retractor
AT Automatic transmission
ATF Automatic transmission fluid
AWD All-wheel drive
DRL Daytime running light
EBDElectronicbrake force distri-bution
ELR Emergency locking retractor
GAW Gross axle weight
GAWR Gross axle weight rating
GVW Gross vehicle weight
GVWRGross vehicle weight rating
HID Highintensity discharge
INT Intermittent
LATCHLower anchors and tethers forchildren
Abbreviation Meaning
LED Light emitting diode
MIL Malfunction indicator light
MMTMethylcyclopentadienyl man-ganese tricarbonyl
OBD On-board diagnostics
RON Research octane number
SRSSupplemental restraint sys-tem
TIN Tire identification number
TPMSTire pressure monitoring sys-tem
VDCVehicle dynamics control
Vehicle symbols
There are some of the symbols you maysee on your vehicle.
For warning and indicator lights, refer to“Warning and indicator lights”F22.
Mark Name
WARNING
CAUTION
Passengers’windows lock
Fuel
Front fog lights
Parking lights
Hazard warning flasher
Seat heater
3
–CONTINUED–
Page 142 of 426
CAUTION
If the pointer exceeds the normaloperating range, safely stop thevehicle as soon as possible.
Refer to“Engine overheating”F9-14.
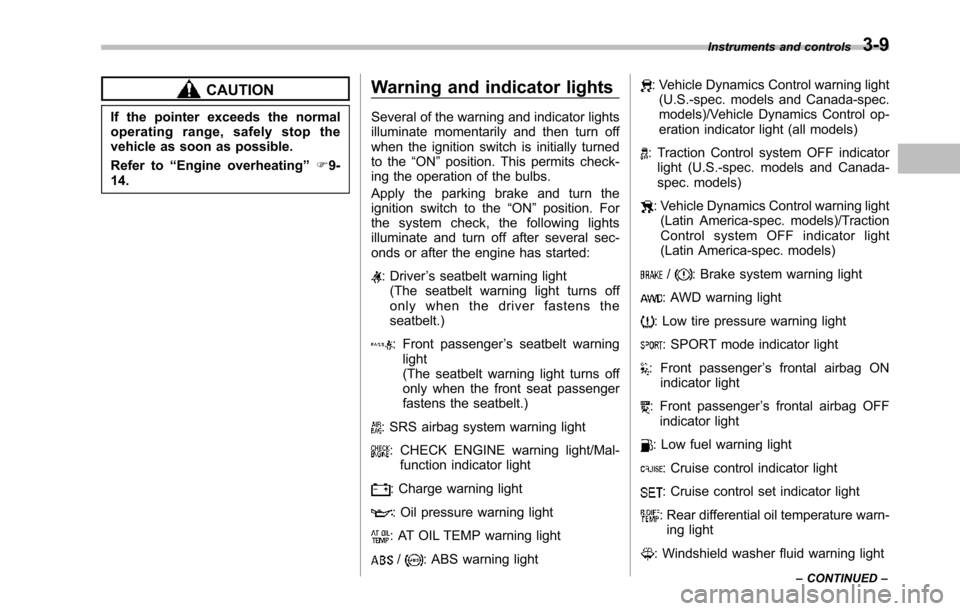
Warning and indicator lights
Several of the warning and indicator lightsilluminate momentarily and then turn offwhen the ignition switch is initially turnedto the“ON”position. This permits check-ing the operation of the bulbs.
Apply the parking brake and turn theignition switch to the“ON”position. Forthe system check, the following lightsilluminate and turn off after several sec-onds or after the engine has started:
: Driver’s seatbelt warning light(The seatbelt warning light turns offonly when the driver fastens theseatbelt.)
: Front passenger’s seatbelt warninglight(The seatbelt warning light turns offonly when the front seat passengerfastens the seatbelt.)
: SRS airbag system warning light
: CHECK ENGINE warning light/Mal-function indicator light
: Charge warning light
: Oil pressure warning light
: AT OIL TEMP warning light
/: ABS warning light
: Vehicle Dynamics Control warning light(U.S.-spec. models and Canada-spec.models)/Vehicle Dynamics Control op-eration indicator light (all models)
: Traction Control system OFF indicatorlight (U.S.-spec. models and Canada-spec. models)
: Vehicle Dynamics Control warning light(Latin America-spec. models)/TractionControl system OFF indicator light(Latin America-spec. models)
/: Brake system warning light
: AWD warning light
: Low tire pressure warning light
: SPORT mode indicator light
: Front passenger’s frontal airbag ONindicator light
: Front passenger’s frontal airbag OFFindicator light
: Low fuel warning light
: Cruise control indicator light
: Cruise control set indicator light
: Rear differential oil temperature warn-ing light
: Windshield washer fluid warning light
Instruments and controls3-9
–CONTINUED–
Page 149 of 426
3-16Instruments and controls
gether with the brake system warning lightif the EBD system becomes malfunction-ing. For further details of the EBD systemmalfunction warning, refer to“Brake sys-tem warning light”F3-16.
NOTE
If the warning light behavior is asdescribed in the following, the ABSsystem may be considered normal.
.The warning light illuminates rightafter the engine is started but turns offimmediately, remaining off..The warning light remains illumi-nated after the engine has been started,but it turns off when the vehicle speedreaches approximately 8 mph (12km/h)..The warning light illuminates duringdriving, but it turns off immediately andremains off.
When driving with an insufficient batteryvoltage such as when the engine is jumpstarted, the ABS warning light may illumi-nate. This is due to the low battery voltageand does not indicate a malfunction.When the battery becomes fully charged,the light will turn off.
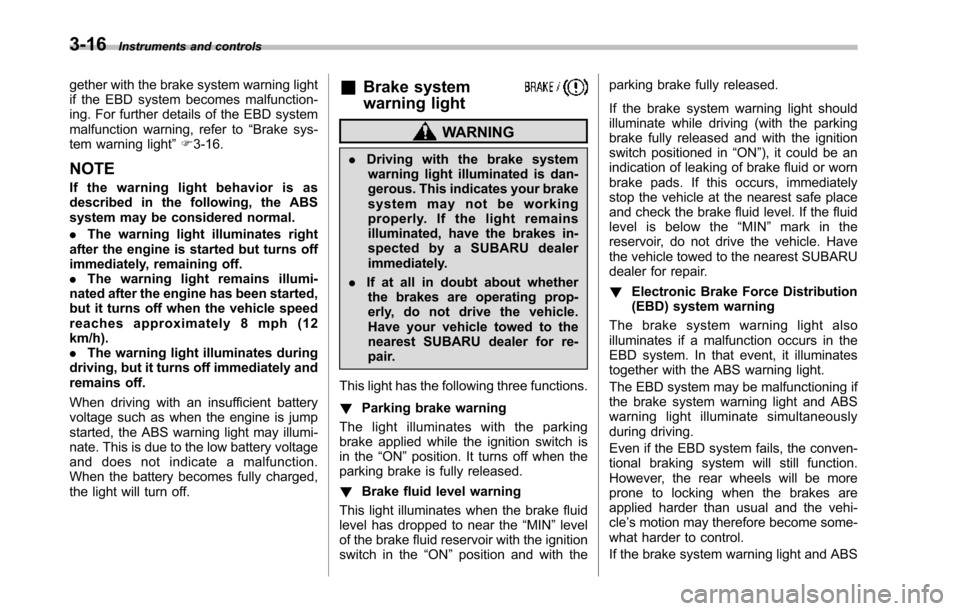
&Brake system
warning light
WARNING
.Driving with the brake systemwarning light illuminated is dan-gerous. This indicates your brakesystem may not be workingproperly. If the light remainsilluminated, have the brakes in-spected by a SUBARU dealerimmediately.
.If at all in doubt about whetherthe brakes are operating prop-erly, do not drive the vehicle.Have your vehicle towed to thenearest SUBARU dealer for re-pair.
This light has the following three functions.
!Parking brake warning
The light illuminates with the parkingbrakeapplied while the ignition switch isin the“ON”position. It turns off when theparking brake is fully released.
!Brake fluid level warning
This light illuminateswhen the brake fluidlevel has dropped to near the“MIN”levelof the brake fluid reservoir with the ignitionswitch in the“ON”position and with the
parking brake fully released.
If the brake system warning light shouldilluminate while driving (with the parkingbrake fully released and with the ignitionswitch positioned in“ON”), it could be anindication of leaking of brake fluid or wornbrake pads. If this occurs, immediatelystop the vehicle at the nearest safe placeand check the brake fluid level. If the fluidlevel is below the“MIN”mark in thereservoir, do not drive the vehicle. Havethe vehicle towed to the nearest SUBARUdealer for repair.
!Electronic Brake Force Distribution(EBD) system warning
The brake system warning light alsoilluminates if a malfunction occurs in theEBD system. In that event, it illuminatestogether with the ABS warning light.
The EBD system may be malfunctioning ifthe brakesystem warning light and ABSwarning light illuminate simultaneouslyduring driving.
Even if the EBD system fails, the conven-tional braking system will still function.However, the rear wheels will be moreprone to locking when the brakes areapplied harder than usual and the vehi-cle’s motion may therefore become some-what harder to control.
If the brake system warning light and ABS
Page 150 of 426
warning light illuminate simultaneously,take the following steps.
1. Stop the vehicle in the nearest safe,flat place.
2. Shut down the engine, apply theparking brake, and then restart it.
3. Release the parking brake. If bothwarning lights turn off, the EBD systemmay be malfunctioning.
Drive carefully to the nearest SUBARUdealer and have the system inspected.
4. If both warning lights illuminate againand remain illuminated after the enginehas been restarted, shut down the engineagain, apply the parking brake, and checkthe brake fluid level.
5. If the brake fluid level is not below the“MIN”mark, the EBD system may bemalfunctioning. Drive carefully to thenearest SUBARU dealer and have thesystem inspected.
6. If the brake fluid level is below the“MIN”mark, DO NOT drive the vehicle.Instead, have the vehicle towed to thenearest SUBARU dealer for repair.
&Low fuel warning light
CAUTION
Immediately put fuel in the tankwhenever the low fuel warning lightilluminates. Engine misfires as aresult of an empty tank could causedamage to the engine.
The low fuel warning light illuminateswhen the tank is nearly empty approxi-mately 2.6 US gal (10 liters, 2.2 Imp gal). Itonly operates when the ignition switch isin the“ON”position. When this lightilluminates, fillthe fuel tank immediately.
NOTE
This light does not turn off unless thetank is replenished up to an internalfuel quantity of approximately 4.0 USgal (15 liters, 3.3 Imp gal).
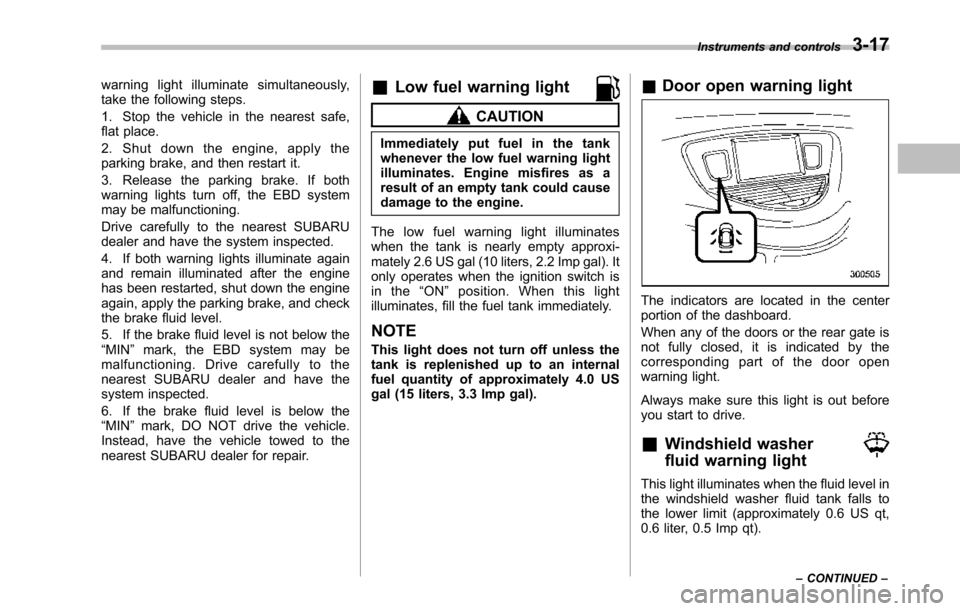
&Door open warning light
The indicators are located in the centerportion of the dashboard.
When any of the doors or the rear gate isnot fully closed, it is indicated by thecorresponding part of the door openwarning light.
Always make sure this light is out beforeyou start to drive.
&Windshield washer
fluid warning light
This light illuminates when the fluid level inthe windshield washer fluid tank falls tothe lower limit (approximately 0.6 US qt,0.6 liter, 0.5 Imp qt).
Instruments and controls3-17
–CONTINUED–
Page 162 of 426
&Daytime running light system
WARNING
The brightness of the illumination ofthe high beam headlights is reducedby the daytime running light system.The light switch must always beturned to the“”position when itis dark outside.
The high beam headlights will automati-cally illuminate at reduced brightnesswhen the engine has started, under thefollowing conditions.
.The select lever is in a position otherthan the“P”position.
.The parkingbrake is fully released.
.The light switch is in the“OFF”or“”position.
NOTE
When the light switch is in the“”position,the front side marker lights,parking lights and license plate lightsare also illuminated.
Turn signal lever
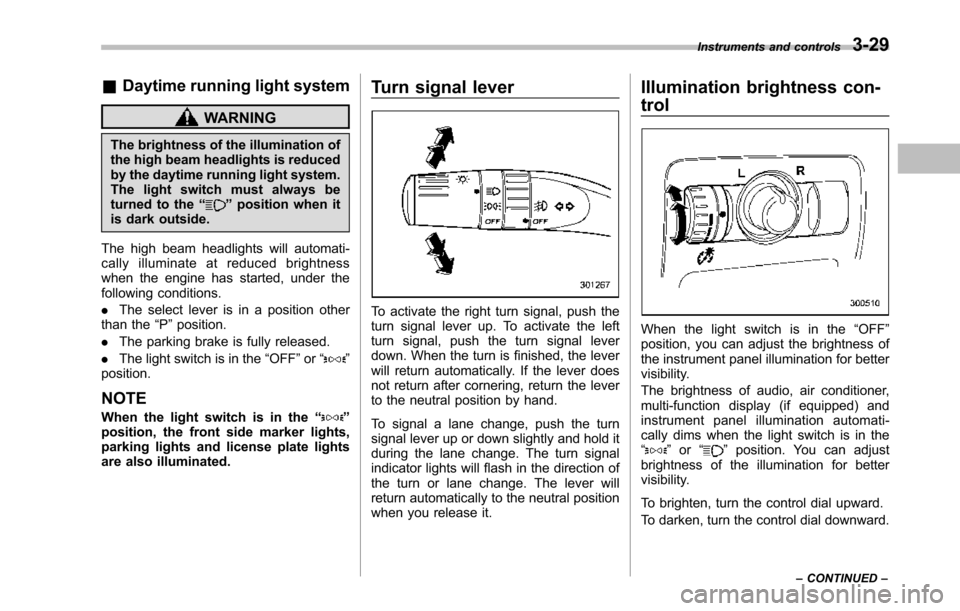
To activate the right turn signal, push theturn signal lever up. To activate the leftturn signal, push the turn signal leverdown. When the turn is finished, the leverwill return automatically. If the lever doesnot return after cornering, return the leverto the neutral position by hand.
To signal a lane change, push the turnsignal lever up or down slightly and hold itduring the lane change. The turn signalindicator lights will flash in the direction ofthe turn or lane change. The lever willreturn automatically to the neutral positionwhen you release it.
Illumination brightness con-
trol
When the light switch is in the“OFF”position, you can adjust the brightness ofthe instrument panel illumination for bettervisibility.
The brightnessof audio, air conditioner,multi-function display (if equipped) andinstrument panel illumination automati-cally dims when the light switch is in the“”or“”position. You can adjustbrightness of the illumination for bettervisibility.
To brighten, turn the control dial upward.
To darken, turn the control dial downward.
Instruments and controls3-29
–CONTINUED–
Page 220 of 426
Rear Seat Entertainment
(RSE) system operation (if
equipped)
If your vehicle is equipped with the RearSeat Entertainment (RSE) system, youcan listen to the audio via the vehiclespeakers. Push the“RSE AUX”button toplay a DVD using the Rear Seat Entertain-ment system.
For detailed operating procedures, refer tothe Owner’s Manual supplement for theRear Seat Entertainment (RSE) system.
NOTE
.To watch a DVD in the front seatsusing the monitor of the navigationsystem, park the vehicle in a safelocation and apply the parking brake.Images of the DVD will not be displayedon the front monitor unless the parkingbrake is applied..The harman/kardon®audio systemis a stereo system with 2 channels. If aharman/kardon®audio system isequipped, the Rear Seat Entertainment(RSE) system may not generate asatisfying realistic sound when playing5.1 channel audio sources.
Precautions to observe when
handling a compact disc
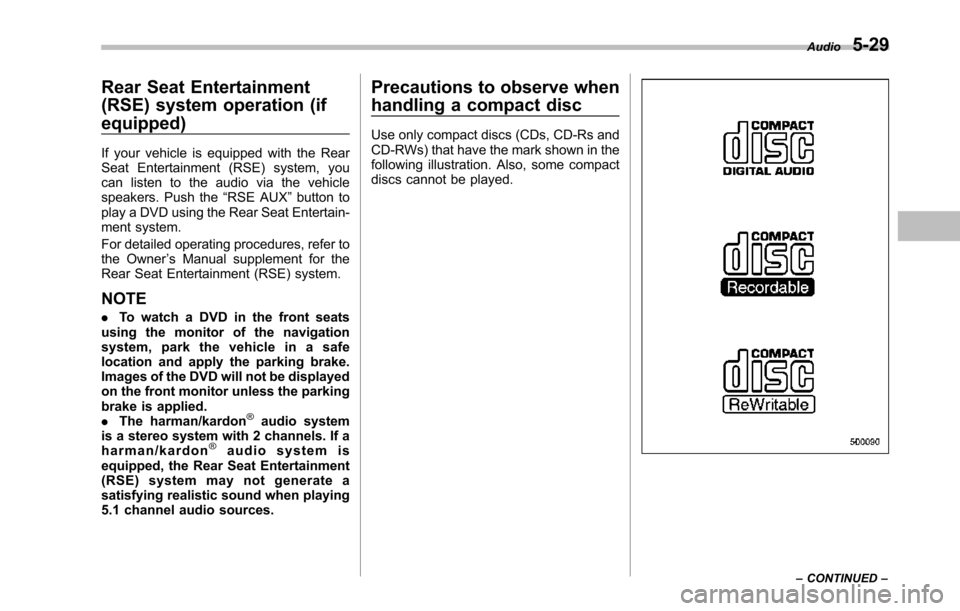
Use only compact discs (CDs, CD-Rs andCD-RWs) that have the mark shown in thefollowing illustration. Also, some compactdiscs cannot be played.
Audio5-29
–CONTINUED–
Page 248 of 426
Fuel...................................................................... 7-2Fuel requirements............................................... 7-2Fuel filler lid and cap........................................... 7-3
State emission testing (U.S. only)...................... 7-5
Preparing to drive............................................... 7-7
Starting the engine.............................................. 7-7
Stopping the engine............................................ 7-8
Remote engine start system (dealer option)..... 7-8Starting your vehicle........................................... 7-9Remote start safety features................................ 7-9Entering the vehicle while it is running via remotestart.................................................................. 7-9Entering the vehicle following remote engine startshutdown.......................................................... 7-9Pre-heating or pre-cooling the interior of thevehicle............................................................. 7-10Service mode..................................................... 7-10Remote engine start transmitter programmingand programmable feature option..................... 7-10System maintenance.......................................... 7-11
Automatic transmission..................................... 7-12Select lever........................................................ 7-13Shift lock function.............................................. 7-14Selectionof manual mode.................................. 7-16Driving tips........................................................ 7-17SPORT mode..................................................... 7-18
Power steering................................................... 7-18
Braking............................................................... 7-19Braking tips....................................................... 7-19Brake system.................................................... 7-19Disc brake pad wear warning indicators............. 7-20
ABS (Anti-lock Brake System).......................... 7-20ABS system self-check...................................... 7-21ABS warning light.............................................. 7-21
Electronic Brake Force Distribution (EBD)system............................................................. 7-22Steps to take if EBD system malfunctions.......... 7-22
Vehicle Dynamics Control system.................... 7-23Vehicle Dynamics Control system monitor.......... 7-25Traction Control system OFF switch................... 7-25
Tire pressure monitoring system (TPMS)........ 7-27
Parking your vehicle......................................... 7-28Parking brake.................................................... 7-28Parking tips....................................................... 7-29
Cruise control.................................................... 7-29To set cruise control.......................................... 7-30To temporarily cancel the cruise control............. 7-31To turn off the cruise control.............................. 7-31To change the cruising speed ............................ 7-31Cruise control indicator light.............................. 7-32Cruise control set indicator light........................ 7-32
Starting and operating
7
Page 254 of 426
Preparing to drive
You should perform the following checksand adjustments every day before youstart driving.
1. Check that all windows, mirrors, andlights are clean and unobstructed.
2. Check the appearance and conditionof the tires. Also check tires for properinflation.
3. Look under the vehicle for any sign ofleaks.
4. Check that the hood and rear gate arefully closed.
5. Check the adjustment of the seat.
6. Check the adjustment of the insideand outside mirrors.
7. Fasten your seatbelt. Check that yourpassengers have fastened their seatbelts.
8. Check the operation of the warningand indicator lights when the ignitionswitch is turned to the“ON”position.
9. Check the gauges, indicator and warn-ing lights after starting the engine.
NOTE
Engine oil, engine coolant, brake fluid,washer fluid and other fluid levelsshould be checked daily, weekly or atfuel stops.
Starting the engine
CAUTION
.Do not operate the starter motorcontinuously for more than 10seconds. If the engine fails tostart after operating the starterfor 5 to 10 seconds, wait for 10seconds or more before tryingagain.
.If you restart the engine while thevehicle is moving, shift the selectlever into the“N”position. Donot attempt to place the selectlever of a moving vehicle into the“P”position.
1. Apply the parking brake.
2. Turn off unnecessary lights and ac-cessories.
3. Shift the select lever to the“P”or“N”position (preferably“P”position). Thestarter will only operate when the selectlever is at the“P”or“N”position.
4. Turn the ignition switch to the“ON”position and check the operation of thewarning and indicator lights. Refer to“Warning and indicator lights”F3-9.
5. Turn the ignition switch to the“START”positionwithoutdepressing the accelera-
tor pedal. Release the key immediatelyafter the engine has started.
If the engine does not start, try thefollowing.(1) Turn the ignition switch to the“LOCK”position and wait for at least10 seconds. After checking that theparking brake is firmly set, turn theignition switch to the“START”positionwhile depressing the accelerator pedalslightly (approximately a quarter of thefull stroke).Release the acceleratorpedal as soon as the engine starts.(2) If this fails to start the engine, turnthe ignition switch back to the“LOCK”position and wait for at least 10seconds.Then fully depress the accel-erator pedal and turn the ignitionswitch to the“START”position. If theengine starts, quickly release theaccelerator pedal.(3) If this fails to start the engine, turnthe ignition switch again to the“LOCK”position.After waiting for 10 secondsor longer, turn the ignition switch to the“START”position without depressingthe accelerator pedal.(4) If the engine still refuses to start,contact your nearest SUBARU dealerfor assistance.
6. Confirm that all warning and indicatorlights have turned off after the engine has
Starting and operating7-7
–CONTINUED–