2014 SUBARU TRIBECA center console
[x] Cancel search: center consolePage 19 of 426
14
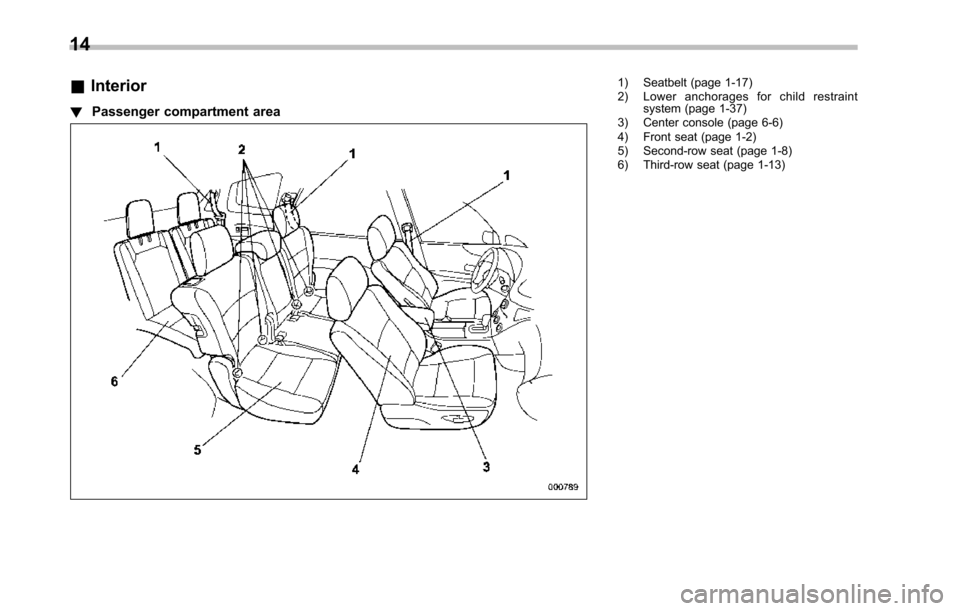
&Interior
!Passenger compartment area
1) Seatbelt (page 1-17)2) Lower anchorages for child restraintsystem (page 1-37)3) Center console (page 6-6)4) Front seat (page 1-2)5) Second-row seat (page 1-8)6) Third-row seat (page 1-13)
Page 59 of 426

1-28Seat, seatbelt and SRS airbags
viceable parts. For required ser-vicing of front seatbelt retractorsequipped with seatbelt preten-sioners, see your nearestSUBARU dealer.
.When discarding front seatbeltretractor assemblies or scrap-ping the entire vehicle due tocollision damage or for otherreasons, consult your SUBARUdealer.
&System monitors
A diagnostic system continually monitorsthe readiness of the seatbelt pretensionerwhile the vehicle is being driven. Theseatbeltpretensioners share the controlmodule with the airbag system. Therefore,if any malfunction occurs in a seatbeltpretensioner, the SRS airbag systemwarning light will illuminate. For details,refer to“SRS airbag system monitors”F1-71.
&System servicing
WARNING
.When discarding a seatbelt re-tractor assembly or scrappingthe entire vehicle damaged by a
collision, consult your SUBARUdealer.
.Tampering with or disconnectingthe system’s wiring could resultin accidental activation of theseatbelt pretensioner and/or air-bag or could make the systeminoperative, which may result inserious injury. Do not use elec-trical test equipment on anycircuit related to the seatbeltpretensioner and airbag sys-tems. For required servicing ofthe seatbelt pretensioner, seeyour nearest SUBARU dealer.
CAUTION
The front sub sensors are locatedon both sides of the radiator panel,and the airbag control module in-cludingthe impact sensors is lo-cated under the center console. Ifyou need service or repair in thoseareas or near the front seatbeltretractors, we recommend that youhave an authorized SUBARU dealerperform the work.
NOTE
If the front part of the vehicle isdamaged in an accident to the extentthat the seatbelt pretensioner does notoperate, contact your SUBARU dealeras soon as possible.
&Precautions against vehicle
modification
Always consult your SUBARU dealer ifyou want to install any accessory parts toyour vehicle.
CAUTION
Do not perform any of the followingmodifications. Such modificationscan interfere with proper operationof the seatbelt pretensioners.
.Attachment of any equipment(bush bar, winches, snow plow,skid plate, etc.)other than genu-ine SUBARU accessory parts tothe front end.
.Modification of the suspensionsystem or front end structure.
.Installation of a tire of differentsize and construction from thetires specified on the vehicleplacard attached to the doorpillar or specified for individual
Page 85 of 426
1-54Seat, seatbelt and SRS airbags
the child restraint system. Turn the ignitionswitch to the“ON”position and make surethat the front passenger’s frontal airbagON indicator turns off and the OFFindicator illuminates.
If the ON indicator still remains illuminatedwhile the OFF indicator turns off, take thefollowing actions.
.Ensure that no article is placed on theseat other than the child restraint systemand the child occupant.
.Ensure that there is no article left in theseatback pocket.
If the ON indicator still remains illuminatedwhile the OFF indicator turns off aftertaking relevant corrective actions de-scribed above, relocate the child restraintsystem to one of the rear seating positionsrecommended in this Owner’s Manual andimmediately contact your SUBARU dealerfor an inspection.
NOTE
When a child who has outgrown a childrestraint system or a small adult isseated in the front passenger’s seat,the SUBARU advanced frontal airbagsystem may or may not activate thefront passenger’s SRS frontal airbagdepending on the occupant’s seatingposture. If the front passenger’s SRS
frontal airbag is activated (the ONindicator remains illuminated whilethe OFF indicator turns off), take thefollowing actions.
.Ensure that no article is placed onthe seat other than the occupant..Ensure that there is no article left inthe seatback pocket.
If the ON indicator still remains illumi-nated while the OFF indicator turns offdespite the fact that the actions notedabove have been taken, seat the child/small adult in the rear seat and im-mediately contact your SUBARU dealerfor an inspection. Even if the systemhas passed the dealer inspection, it isrecommended that on subsequent tripsthe child/small adult always take therear seat.
Children who have outgrown a childrestraint system should always wear theseatbelt irrespective of whether the airbagis deactivated or activated.
!Conditions in which front passen-ger’s SRS frontal airbag is activated
The front passenger’s SRS frontal airbagwill be activated for deployment uponimpact when any of the following condi-tions is met regarding the front passen-ger’s seat.
.When the seat is occupied by an adult.
.When a heavy article is placed on theseat.
When the front passenger’s seat is occu-pied by an adult, observe the followingprecautions. Failure to do so may lessenthe load on the front passenger’s seat,deactivatingthe front passenger’s SRSfrontal airbag despite the fact that the seatis occupied by an adult.
.Do not allow the second-row seatoccupant to lift the front passenger’s seatcushion using his/her feet.
.Do not place any article under the frontpassenger’s seat, or squeeze any articlefrom behind and under the seat. This maylift the seat cushion.
.Do not squeeze any article betweenthe front passenger’s seat and side trim/pillar, door or center console box. Thismay lift the seat cushion.
!If the passenger’s frontal airbagOFF indicator illuminates andthe ON indicator turns off evenwhen the front passenger’s seatis occupied by an adult
This can be caused by the adult incor-rectly sitting in the front passenger’s seat.Turn the ignition switch to the“LOCK”position. Ask the front passenger to setthe seatback to the upright position, sit up
Page 103 of 426
1-72Seat, seatbelt and SRS airbags
&SRS airbag system servicing
WARNING
.When discarding an airbag mod-ule or scrapping the entire vehi-cle damaged by a collision, con-sult your SUBARU dealer.
.The SRS airbag has no user-serviceable parts. Do not useelectrical test equipment on anycircuit related to the SRS airbagsystem. For required servicing ofthe SRS airbag, consult yournearest SUBARU dealer. Tamper-ing with or disconnecting thesystem’s wiring could result inaccidental inflation of the SRSairbag or could make the systeminoperative, which may result inserious injury.
CAUTION
If you need service or repair in areasindicated in the following list, havethe work performed by an author-ized SUBARU dealer. The SRS air-bag control module, impact sensorsand airbag modules are stored inthese areas.
.Under the center console
.Inside each front fender
.Steering wheel and column andnearby areas
.Top of the dashboard on frontpassenger’ssideandnearbyareas
.Each front seat and nearby area
.Inside each center pillar
.In each roof side (from the frontpillar to a point over the second-row seat)
.Between the second-row seatcushion and rear wheel houseon each side
.Under the second-row centerseat
In the event that the SRS airbag isdeployed, replacement of the systemshould be performed only by an author-ized SUBARU dealer. When the compo-nents of the SRS airbag system arereplaced, use only genuine SUBARUparts.
NOTE
In the following cases, contact yourSUBARU dealer as soon as possible.
.The front part of the vehicle was
involved in an accident in which onlythe driver’s SRS frontal airbag or bothdriver’sandfrontpassenger’sSRSfrontal airbags did not deploy..The pad of the steering wheel, thecover over the front passenger’s SRSfrontal airbag, or either roof side (fromthe front pillar to a point over thesecond-row seat) is scratched,cracked, or otherwise damaged..Center pillar, rear wheel house orrearfloor pan, or an area near theseparts, was involved in an accident inwhich the SRS side airbag and SRScurtain airbag did not deploy..The fabric or leather of either frontseatback is cut, frayed, or otherwisedamaged..The rear part of the vehicle wasinvolved in an accident in which noSRS airbag was deployed.
&Precautions against vehicle
modification
WARNING
To avoid accidental activation of thesystem or rendering the systeminoperative, which may result inserious injury, no modificationsshould be made to any components
Page 186 of 426
to the OFF position as soon as theoutside dusty condition clears.
NOTE
When driving on a dusty road or behinda vehicle that emits unpleasant exhaustgases, set the air inlet selection buttonto the ON position.
From time to time, return the air inletselection button to the OFF position todraw outside air into the passengercompartment.
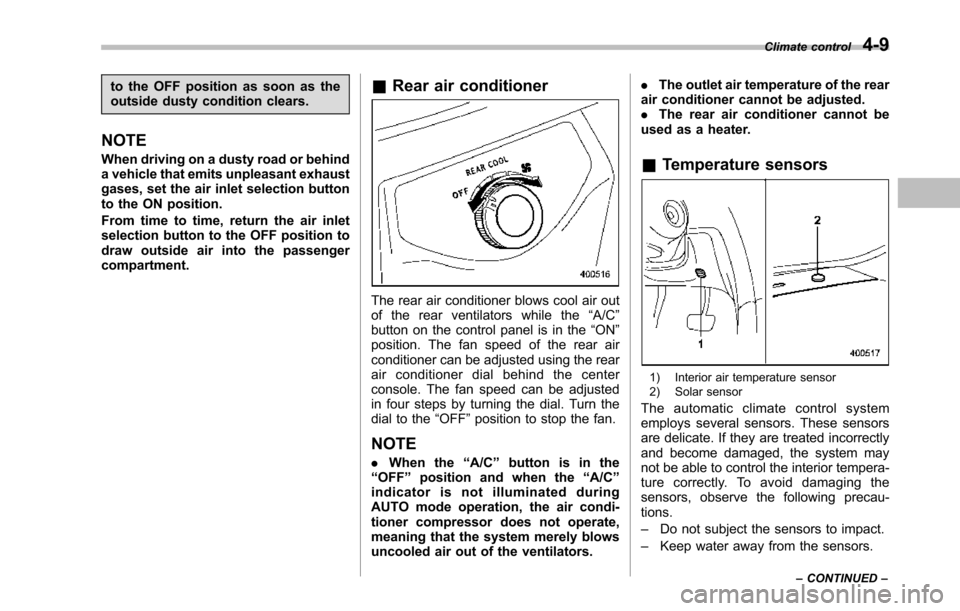
&Rear air conditioner
The rear air conditioner blows cool air outof the rear ventilators while the“A/C”button on the control panel is in the“ON”position. The fan speed of the rear airconditionercan be adjusted using the rearair conditioner dial behind the centerconsole. The fan speed can be adjustedin four steps by turning the dial. Turn thedial to the“OFF”position to stop the fan.
NOTE
.When the“A/C”button is in the“OFF”position and when the“A/C”indicator is not illuminated duringAUTO mode operation, the air condi-tioner compressor does not operate,meaning that the system merely blowsuncooled air out of the ventilators.
.The outlet air temperature of the rearair conditioner cannot be adjusted..The rear air conditioner cannot beused as a heater.
&Temperature sensors
1) Interior air temperature sensor2) Solar sensor
The automatic climate control systememploys several sensors. These sensorsare delicate. If they are treated incorrectlyand become damaged, the system maynot be able to control the interior tempera-ture correctly. To avoid damaging thesensors, observe the following precau-tions.
–Do not subject the sensors to impact.
–Keep water away from the sensors.
Climate control4-9
–CONTINUED–
Page 219 of 426
5-28Audio
Auxiliary input jack
You can connect an external audio deviceto the vehicle’s audio system and playback audio via the vehicle’s speakers.
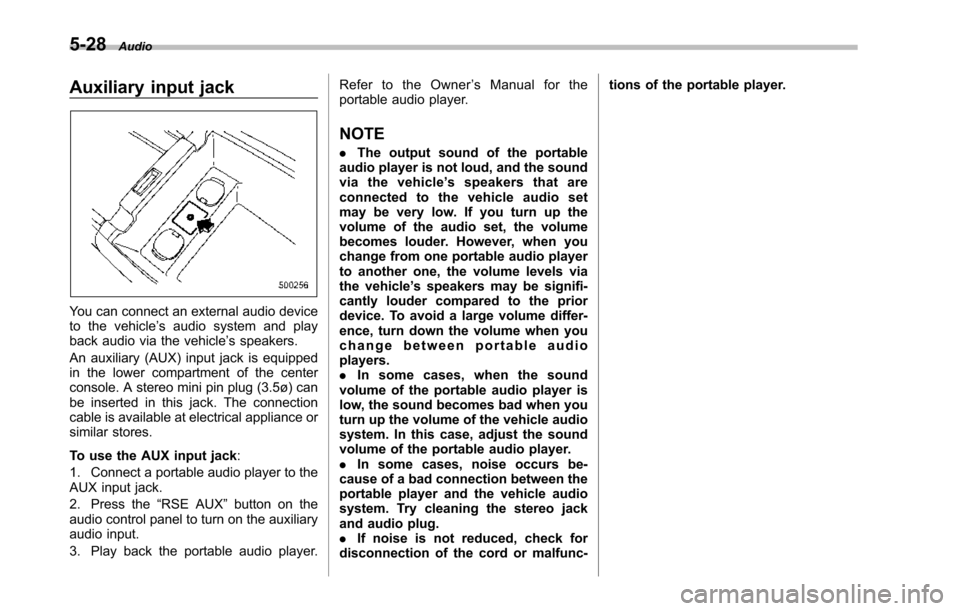
An auxiliary (AUX) input jack is equippedin the lower compartment of the centerconsole. A stereo mini pin plug (3.5ø) canbe inserted in this jack. The connectioncable is available at electrical appliance orsimilar stores.
To use the AUX input jack:
1. Connect a portable audio player to theAUX input jack.
2. Press the“RSE AUX”button on theaudio control panel to turn on the auxiliaryaudio input.
3. Play back the portable audio player.
Refer to the Owner’sManualfortheportable audio player.
NOTE
.The output sound of the portableaudio player is not loud, and the soundvia the vehicle’sspeakersthatareconnected to the vehicle audio setmay be very low. If you turn up thevolume of the audio set, the volumebecomes louder. However, when youchange from one portable audio playerto another one, the volume levels viathe vehicle’s speakers may be signifi-cantly louder compared to the priordevice. To avoid a large volume differ-ence, turn down the volume when youchange between portable audioplayers..In some cases, when the soundvolume of the portable audio player islow, the sound becomes bad when youturn up the volume of the vehicle audiosystem. In this case, adjust the soundvolume of the portable audio player..In some cases, noise occurs be-cause of a bad connection between theportable player and the vehicle audiosystem. Try cleaning the stereo jackand audio plug..If noise is not reduced, check fordisconnection of the cord or malfunc-
tions of the portable player.
Page 222 of 426
Interior light......................................................... 6-2Dome light.......................................................... 6-2Cargo area light.................................................. 6-3Rear gate light.................................................... 6-3Map light............................................................. 6-3Automatic ambient light for center console area(if equipped)...................................................... 6-4
Sun visors........................................................... 6-4Sun visor extension plate.................................... 6-5Vanity mirror with light........................................ 6-5
Storage compartment......................................... 6-6Glove box........................................................... 6-6Center console box............................................. 6-6Rear console....................................................... 6-7Overhead console............................................... 6-8
Cupholder........................................................... 6-8Front passenger’s cup holder.............................. 6-8Second-row seat cup holders.............................. 6-9Third-row seat cup holders.................................. 6-9
Bottle holders...................................................... 6-9
Accessory power outlets................................... 6-10
Coat hook........................................................... 6-12
Shopping bag hook............................................ 6-13
Floor mat............................................................ 6-13
Cargo area cover (if equipped)......................... 6-14Using the cover................................................. 6-14To remove the cover.......................................... 6-15To install the cover housing............................... 6-15
Convenient tie-down hooks.............................. 6-16
Under-floor storage compartment.................... 6-16
HomeLink®Wireless Control System (ifequipped)........................................................ 6-17Garage door opener programming in theU.S.A............................................................... 6-18Programming rolling-code-protected garage dooropeners in the U.S.A........................................ 6-19Programmingfor entrance gates and garage dooropeners in Canada........................................... 6-20Programming other devices............................... 6-21Operating the HomeLink®Wireless ControlSystem............................................................ 6-21ErasingHomeLink®button memory.................... 6-21In case a problem occurs................................... 6-21
Rear view camera (if equipped)........................ 6-21How to use the rear view camera....................... 6-22Viewing range on the screen.............................. 6-23Help line............................................................ 6-24
Interior equipment
6
Page 225 of 426

6-4Interior equipment
(automatic illumination - ON)..The doors are unlocked using theremote keyless entry transmitter.
.The ignition switch is turned from the“Acc”position to the“LOCK”position.
The automatically illuminated map lightsremain illuminated for several secondsand then gradually turn off after all doorsare closed.
While the lights are illuminated, if any ofthe following operations are performed,the map lights turn off immediately.
.The ignition switch is turned from the“LOCK”position to the“Acc”or“ON”position.
.All doors and the rear gate are lockedusing the remote keyless entry transmitter.
The setting of the period for which the lightremains illuminated (OFF delay timer) canbe changed by a SUBARU dealer. Con-tact your SUBARU dealer for details.
NOTE
If any of the doors or the rear gate isnot completely closed, the map lightswill remain illuminated as a result.However, the map lights are automati-cally turned off by the battery drainageprevention function to prevent thebattery from discharging. For details,
refer to“Battery drainage preventionfunction”F2-6.
&Automatic ambient light for
center console area (if
equipped)
The automatic ambient light illuminateswhen the ignition switch is in the“ON”position and the light control switch is inthe“”position or“”position. Thelight dimly illuminates the area around thecenter console. The light turns off whenthe light control switch is in the“OFF”position. Also, the brightness of the light isadjusted by the illumination brightnesscontrol dial.
Sun visors
To block out glare, swing down the visors.
To use the sun visor at a side window,swing it down and move it sideways.