2014 SUBARU TRIBECA center console
[x] Cancel search: center consolePage 227 of 426
6-6Interior equipment
Storage compartment
CAUTION
.Always keep the storage com-partment closed while driving toreduce the risk of injury in theevent of sudden stops or anaccident.
.Do not store spray cans, contain-ers with flammable or corrosiveliquids or any other dangerousitems in the storage compart-ment.
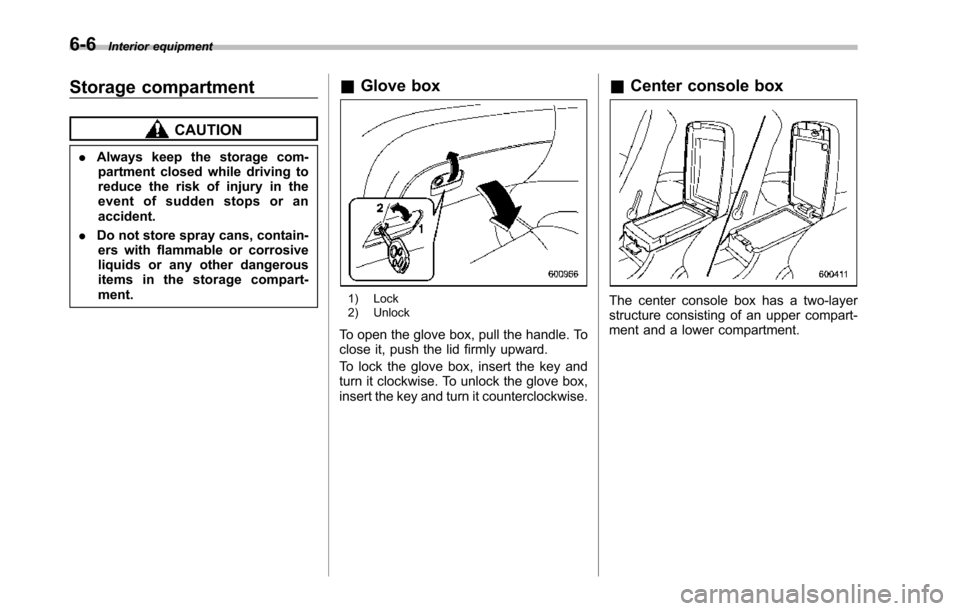
&Glove box
1) Lock2) Unlock
To open the glove box, pull the handle. Toclose it, push the lid firmly upward.
To lock the glove box, insert the key andturn it clockwise. To unlock the glove box,insert the key and turn it counterclockwise.
&Center console box
The center console box has a two-layerstructure consisting of an upper compart-ment and a lower compartment.
Page 228 of 426
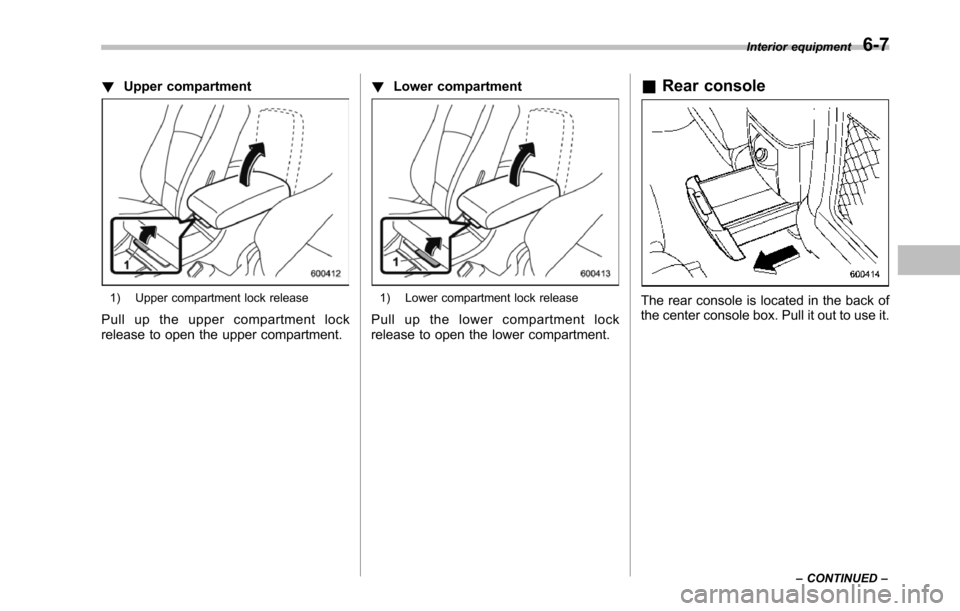
!Upper compartment
1) Upper compartment lock release
Pull up the upper compartment lockrelease to open the upper compartment.
!Lower compartment
1) Lower compartment lock release
Pull up the lower compartment lockrelease to open the lower compartment.
&Rear console
The rear console is located in the back ofthe center console box. Pull it out to use it.
Interior equipment6-7
–CONTINUED–
Page 229 of 426
6-8Interior equipment
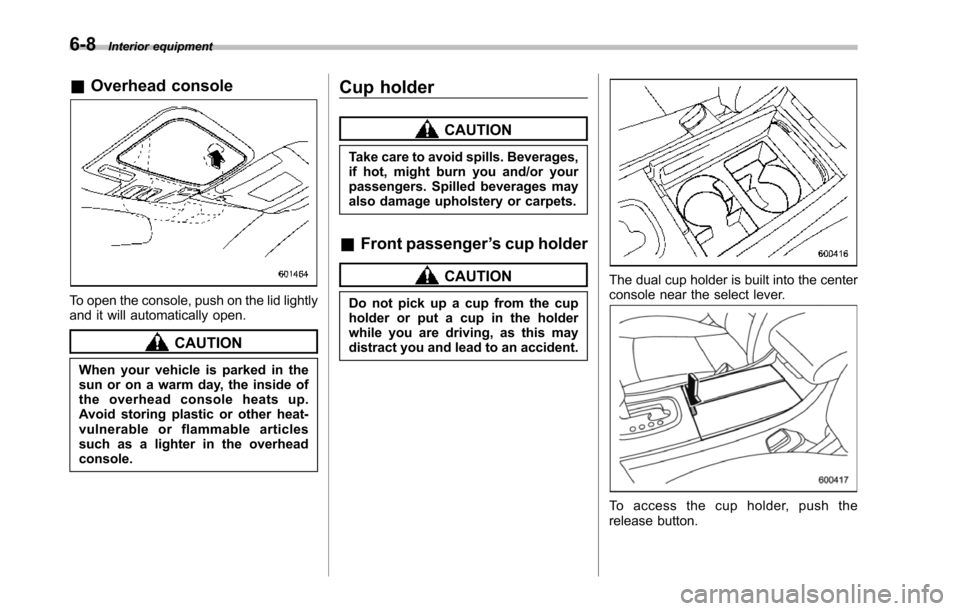
&Overhead console
To open the console, push on the lid lightlyand it will automatically open.
CAUTION
When your vehicle is parked in thesun or on a warm day, the inside ofthe overhead console heats up.Avoid storing plastic or other heat-vulnerable or flammable articlessuch as a lighter in the overheadconsole.
Cup holder
CAUTION
Take care to avoid spills. Beverages,if hot, might burn you and/or yourpassengers. Spilled beverages mayalso damageupholstery or carpets.
&Front passenger’s cup holder
CAUTION
Do not pick up a cup from the cupholder or put a cup in the holderwhile you are driving, as this maydistract you and lead to an accident.
The dual cup holder is built into the centerconsole near the select lever.
To a c c e s s t h e c u p h o l d e r , p u s h t h erelease button.
Page 231 of 426
6-10Interior equipment
trim can be used to hold beverage bottlesand other items.Accessory power outlets
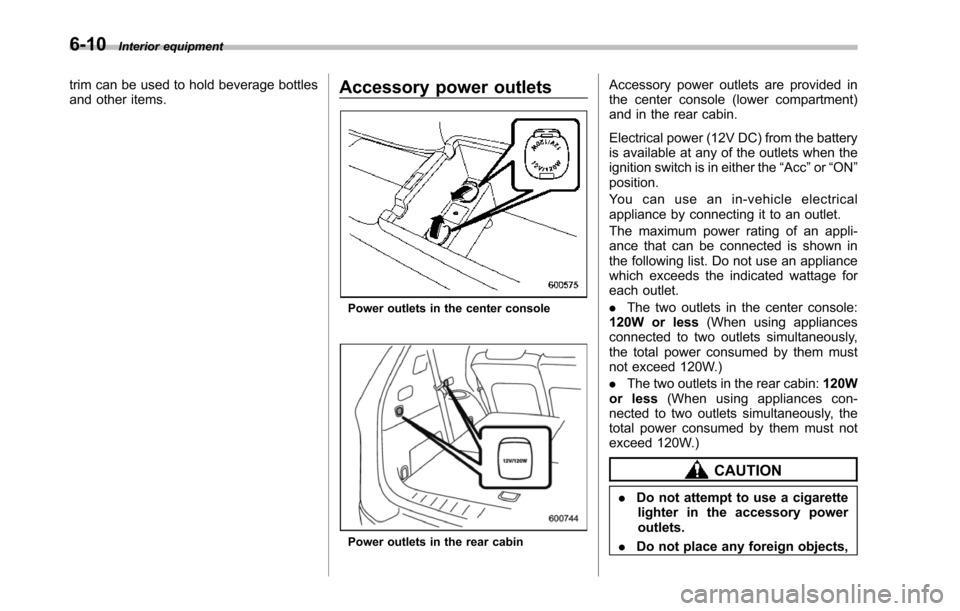
Poweroutlets in the center console
Power outlets in the rear cabin
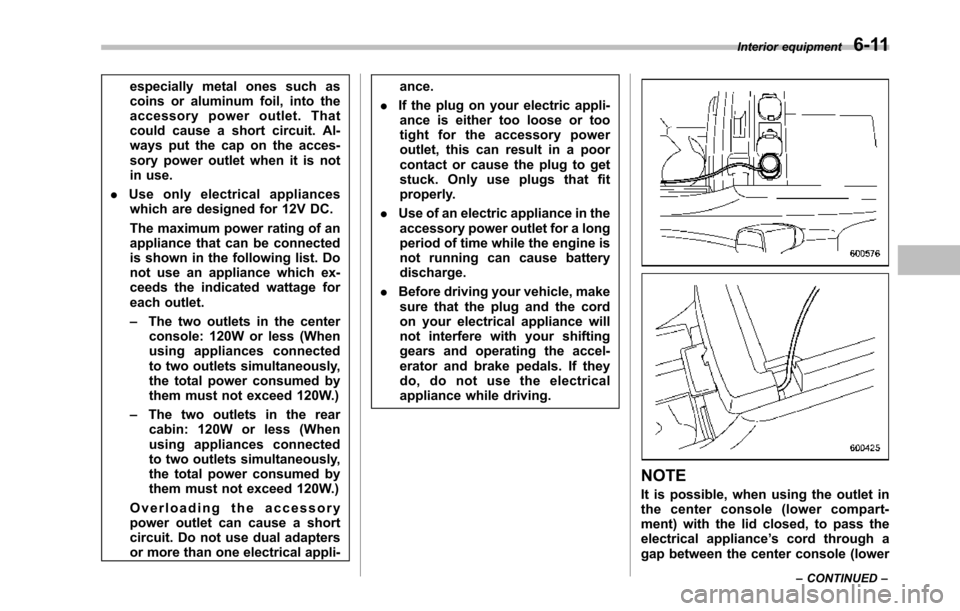
Accessory power outlets are provided inthe center console (lower compartment)and in the rear cabin.
Electrical power (12V DC) from the batteryis available at any of the outlets when theignition switch is in either the“Acc”or“ON”position.
Yo u c a n u s e a n i n - v e h i c l e e l e c t r i c a lappliance by connecting it to an outlet.
The maximum power rating of an appli-ance that can be connected is shown inthe following list. Do not use an appliancewhich exceeds the indicated wattage foreach outlet.
.The two outlets in the center console:120W or less(When using appliancesconnected to two outlets simultaneously,the total power consumed by them mustnot exceed 120W.)
.The two outlets in the rear cabin:120Wor less(When using appliances con-nected to two outlets simultaneously, thetotal power consumed by them must notexceed 120W.)
CAUTION
.Do not attempt to use a cigarettelighter in the accessory poweroutlets.
.Do not place any foreign objects,
Page 232 of 426
especially metal ones such ascoins or aluminum foil, into theaccessory power outlet. Thatcould cause a short circuit. Al-ways put the cap on the acces-sory power outlet when it is notin use.
.Use only electrical applianceswhich are designed for 12V DC.
The maximum power rating of anappliance that can be connectedis shown in the following list. Donot usean appliance which ex-ceeds the indicated wattage foreach outlet.
–The two outlets in the centerconsole: 120W or less (Whenusing appliances connectedto two outlets simultaneously,the total power consumed bythem must not exceed 120W.)
–The two outlets in the rearcabin: 120W or less (Whenusing appliances connectedto two outlets simultaneously,the total power consumed bythem must not exceed 120W.)
Overloading the accessorypower outlet cancause a shortcircuit. Do not use dual adaptersor more than one electrical appli-
ance.
.If the plug on your electric appli-ance is either too loose or tootight for the accessory poweroutlet, this can result in a poorcontact or cause the plug to getstuck. Only use plugs that fitproperly.
.Use of an electric appliance in theaccessory power outlet for a longperiod of time while the engine isnot running can cause batterydischarge.
.Before driving your vehicle, makesure that the plug and the cordon your electrical appliance willnot interfere with your shiftinggears and operating the accel-erator and brake pedals. If theydo, do not use the electricalappliance while driving.
NOTE
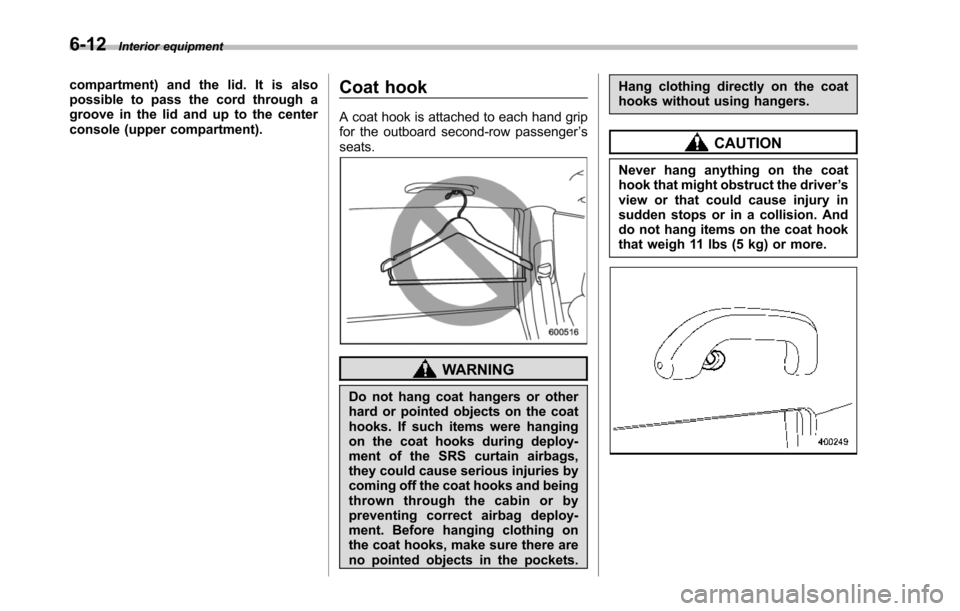
It is possible, when using the outlet inthe center console (lower compart-ment) with the lid closed, to pass theelectrical appliance’s cord through agap between the center console (lower
Interior equipment6-11
–CONTINUED–
Page 233 of 426
6-12Interior equipment
compartment) and the lid. It is alsopossible to pass the cord through agroove in the lid and up to the centerconsole (upper compartment).
Coat hook
A coat hook is attached to each hand gripfor the outboard second-row passenger’sseats.
WARNING
Do not hang coat hangers or otherhard or pointed objects on the coathooks. If such items were hangingon the coat hooks during deploy-ment of the SRS curtain airbags,they could cause serious injuries bycoming off the coat hooks and beingthrown through the cabin or bypreventing correct airbag deploy-ment. Before hanging clothing onthe coat hooks, make sure there areno pointed objects in the pockets.
Hang clothing directly on the coathooks without using hangers.
CAUTION
Never hang anything on the coathook that might obstruct the driver’sview or that could cause injury insudden stops or in a collision. Anddo not hang items on the coat hookthat weigh 11 lbs (5 kg) or more.
Page 332 of 426
Cleaning the interior
Use a soft, damp cloth to clean the climatecontrol panel, audio equipment, instru-ment panel, center console, combinationmeter panel, and switches. (Do not useorganic solvents.)
&Seat fabric
Remove loose dirt, dust or debris with avacuum cleaner. If the dirt is caked on thefabric or hard to remove with a vacuumcleaner, use a soft blush then vacuum it.
Wipe the fabric surface with a tightlywrung cloth and dry the seat fabricthoroughly. If the fabric is still dirty, wipeusing a solution of mild soap and luke-warmwater then dry thoroughly.
If the stain does not come out, try acommercially available fabric cleaner. Usethe cleaner on a hidden place and makesure it does not affect the fabric adversely.Use the cleaner according to its instruc-tions.
NOTE
When cleaning the seat, do not usebenzine, paint thinner, or any similarmaterials.
&Leather seat materials
The leather used by SUBARU is a highquality natural product which will retain itsdistinctive appearance and feel for manyyears with proper care.
Allowing dust or road dirt to build up on thesurface can cause the material to becomebrittle and to wear prematurely. Regularcleaning witha soft, moist, natural fibercloth should be performed monthly, takingcare not to soak the leather or allow waterto penetrate the stitched seams.
A mild detergent suitable for cleaningwoolen fabrics may be used to removedifficult dirt spots, rubbing with a soft, drycloth afterwards to restore the luster. Ifyour SUBARU is to be parked for a longtime in bright sunlight, it is recommendedthat the seats and headrests be covered,or the windows shaded, to prevent fadingor shrinkage.
Minor surface blemishes or bald patchesmay be treated with a commercial leatherspray lacquer. You will discover that eachleather seat section will develop soft foldsor wrinkles, which is characteristic ofgenuine leather.
&Synthetic leather upholstery
The synthetic leather material used on theSUBARU may be cleaned using mild soap
or detergent and water, after first vacuum-ing or brushing away loose dirt. Allow thesoap to soak in for a few minutes and wipeoff with a clean, damp cloth. Commercialfoam-type cleaners suitable for syntheticleather materials may be used whennecessary.
NOTE
Strong cleaning agents such as sol-vents, paint thinners, window cleaneror gasoline must never be used onleather or synthetic interior materials.
&Climate control panel, audio
panel, instrument panel,
console panel, switches,
combination meter, and other
plastic surface
Use a soft, damp cloth to clean the climatecontrol panel, audio equipment, instru-ment panel, center console, combinationmeter panel, and switches.
CAUTION
.Do not use organic solvents suchas paint thinners or fuel, orstrongcleaning agents that con-tain those solvents.
.Do not use chemical solvents
Appearance care10-5
–CONTINUED–
Page 412 of 426
Braking..................................................................... 7-19Tips . . . . . . . . . . . . . . . . . . . . . . . . . . . . . . . . . . . . . . . . . . . . . . . . . . . . . . . . . . . . . . . . . . . . . . 7-19Breaking-in of new brake pads and linings................... 11-20BulbChart.................................................................. 12-12Replacing............................................................. 11-36
CCargo areaCover................................................................... 6-14Light....................................................................... 6-3Tie-down hooks..................................................... 6-16Catalytic converter....................................................... 8-3CenterConsole.................................................................. 6-6Ventilators............................................................... 4-4ChangingCoolant................................................................ 11-11Flat tire................................................................... 9-6Oil andoil filter...................................................... 11-8Charge warning light.................................................. 3-13CHECKENGINE warning light/Malfunction indicatorlight....................................................................... 3-12CheckingBrake pedal free play............................................ 11-19Brake pedal reserve distance................................. 11-19Coolant level........................................................ 11-11Fluid level (automatic transmission fluid).................. 11-14Fluid level (brake fluid).......................................... 11-17Fluidlevel (power steering fluid).............................. 11-16Fluid level (washer fluid)........................................ 11-28
Oil level (engine oil)................................................ 11-7Oil level (front differential gear oil).......................... 11-15Child restraint systems................................................ 1-29Installation of a booster seat.................................... 1-36Installation with A/ELR seatbelt ................................ 1-32Lower and tether anchorages................................... 1-37Top tether anchorages............................................ 1-40Child safety................................................................... 5Locks.................................................................... 2-21ChimeKey........................................................................ 3-4Light..................................................................... 3-27Seatbelt................................................................. 3-10CleaningAluminum wheels................................................... 10-3Interior.................................................................. 10-5Ventilation grille...................................................... 4-10Climate control systemAutomatic............................................................... 4-5Clock................................................................ 3-22, 3-24Coat hook.................................................................. 6-12Compass........................................................... 3-38, 3-41Console..................................................................... 6-6Coolant........................................................... 11-11, 12-7Cooling system........................................................ 11-10Corrosionprotection.................................................... 10-4Cruise control............................................................ 7-29Indicator light......................................................... 3-22Set indicator light.................................................... 3-22Cup holder................................................................. 6-8Front passenger’s.................................................... 6-8
Index14-3