2014 SUBARU TRIBECA spare tire
[x] Cancel search: spare tirePage 316 of 426
WARNING
Do not use oil or grease on thewheel studs or nuts when the sparetire is installed. This could cause thenuts to become loose and lead to anaccident.
15. Turn the jack handle counterclockwiseto lower the vehicle.
CAUTION
There are 2 types of wheel nutwrenches that apply to differentlengths.
For models with silver-colored alu-minumwheels, the 10.8-inch (275mm) wheel nut wrench is equippedas a maintenance tool. And formodels with optional chrome-fin-ished wheels, the 13.2-inch (335mm) wheel nut wrench is equippedas well. Confirm the equipped wheelnut wrench type when you replace atire. If the wheel nut wrench is thedifferent type, it cannot be tightenedto the specified torque.
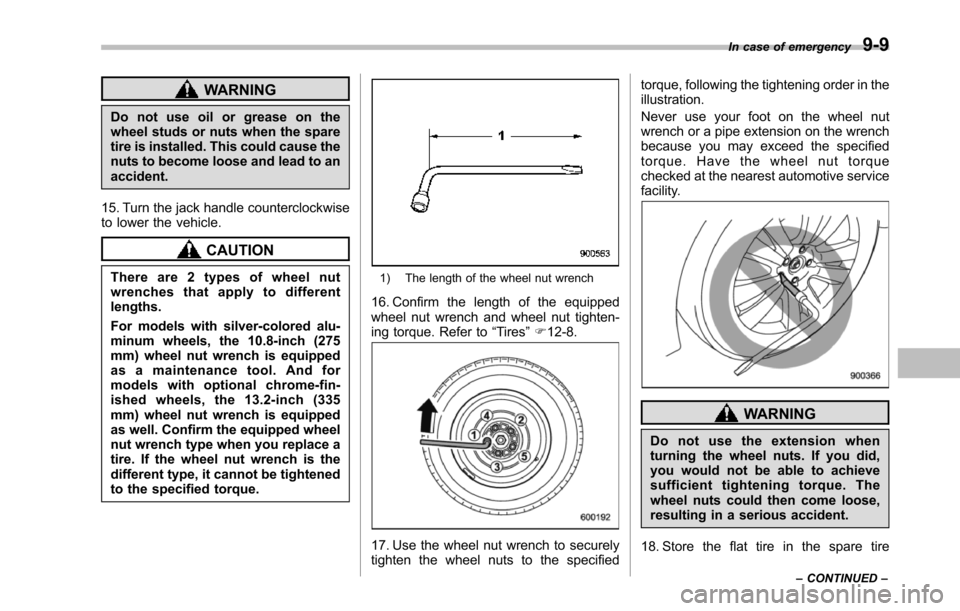
1) The length of the wheel nut wrench
16. Confirm the length of the equippedwheel nut wrench and wheel nut tighten-ing torque. Refer to“Tires”F12-8.
17. Use the wheel nut wrench to securelytighten thewheel nuts to the specified
torque, following the tightening order in theillustration.
Never use your foot on the wheel nutwrench or a pipe extension on the wrenchbecause you may exceed the specifiedtorque. Have the wheel nut torquechecked at the nearest automotive servicefacility.
WARNING
Do not use the extension whenturning the wheel nuts. If you did,you would not be able to achievesufficient tightening torque. Thewheel nuts could then come loose,resulting in a serious accident.
18. Store the flat tire in the spare tire
In case of emergency9-9
–CONTINUED–
Page 317 of 426

9-10In case of emergency
holder.
Refer to“Spare tire”F9-2 for its location,instructions and precautions.
CAUTION
.When stowing a flat tire in thespare tire holder, turn the hoistshaft end only slowly. If it isturned quickly, the wheel disc ofthe flat tire could be damaged.
.Afull-sizeflattireshouldbestowed in the spare tire holderin an emergency only. After hav-ing the flat tire repaired, immedi-ately swap it with the temporaryspare tire.
.Remember that the tread width ofa flat tire is wider than that of thetemporary spare tire. When car-rying a flat tire stowed in thespare tire holder, make sure thetire does not touch any obsta-cles.
WARNING
Never place a tire or tire changingtools in the passenger compartmentafter changing wheels. In a suddenstop or collisions, loose equipment
could strike occupants and causeinjury. Store the tire and all tools inthe proper place.
&Tire pressure monitoring
system (TPMS)
The tire pressure monitoring system pro-vides the driver with the warning messageindicated by sending a signal from asensor that is installed in each wheelwhen tire pressure is severely low.
The tire pressure monitoring system willactivate only when the vehicle is driven.Also, this system may not react immedi-ately to a sudden drop in tire pressure (forexample, a blow-out caused running overa sharp object).
WARNING
If the low tire pressure warning lightilluminates while driving, neverbrake suddenly and keep drivingstraight ahead while gradually redu-cing speed. Then slowly pull off theroad to a safe place. Otherwise anaccident involving serious vehicledamageand serious personal injurycould occur.
Check the pressure for all four tiresand adjust the pressure to the COLDtire pressure shown on the vehicleplacard on the door pillar on thedriver’s side. If this light still illumi-nates while driving after adjustingthe tire pressure, a tire may havesignificant damage and a fast leakthat causes the tire to lose airrapidly. If you have a flat tire, replaceit with a spare tire as soon aspossible.
When a spare tire is mounted or awheel rim is replaced without theoriginal pressure sensor/transmitterbeing transferred, the low tire pres-sure warning light will illuminatesteadily afterblinking for approxi-mately one minute. This indicatesthe TPMS is unable to monitor allfour road wheels. Contact your
Page 355 of 426

11-22Maintenance and service
not be functioning normally. In this event,go to a SUBARU dealer to have thesystem inspected as soon as possible.
While the vehicle is driven, friction be-tween tires and the road surface causesthe tires to warm up. After illumination ofthe low tire pressure warning light, anyincrease in the tire pressures caused byan increase in the outside air temperatureor by an increase in the temperature in thetires can cause the low tire pressurewarning light to turn off.
System resetting is necessary when thewheels are changed (for example, aswitch to snow tires) and new TPMSvalves are installed on the newly fittedwheels. Have this work performed by aSUBARU dealer following wheel replace-ment.
It may not be possible to install TPMSvalves on certain wheels that are on themarket. Therefore, if you change thewheels (for example, a switch to snowtires), use wheels that have the same partnumber as the standard-equipmentwheels. Without four operational TPMSvalve/sensors on the wheels, the TPMSwill not fully function and the warning lightin the instrument panel will illuminatesteadily after blinking for approximatelyone minute.
When a tire is replaced, adjustments arenecessary to ensure continued normaloperation of the tire pressure monitoringsystem. As with wheel replacement, there-fore, you should have the work performedby a SUBARU dealer.
WARNING
If the low tire pressure warning lightdoes not illuminate briefly after theignition switch is turned ON or thelight illuminates steadily after blink-ing for approximately one minute,you shouldhave your Tire PressureMonitoring System checked at aSUBARU dealer as soon as possi-ble.
If this light illuminates while driving,never brake suddenly and keepdriving straight ahead while gradu-ally reducing speed. Then slowlypull off the road to a safe place.Otherwise an accident involvingserious vehicle damage and seriouspersonal injury could occur.
If this light still illuminates whiledriving after adjusting the tire pres-sure, a tire may have significantdamage and a fast leak that causesthe tire to lose air rapidly. If you havea flat tire, replace it with a spare tire
as soon as possible.
When a spare tire is mounted or awheel rim is replaced without theoriginal pressure sensor/transmitterbeing transferred, the low tire pres-sure warning light will illuminatesteadily after blinking for approxi-mately one minute. This indicatesthe TPMS is unable to monitor allfour road wheels. Contact yourSUBARU dealer as soon as possiblefor tire and sensor replacement and/or system resetting. If the lightilluminates steadily after blinkingfor approximately one minute,promptly contact a SUBARU dealerto have the system inspected.
&Tire inspection
Checkon a daily basis that the tires arefree from serious damage, nails, andstones. At the same time, check the tiresfor abnormal wear.
Contact your SUBARU dealer immedi-ately if you find any problem.
NOTE
.When the wheels and tires strikecurbs or are subjected to harsh treat-ment as when the vehicle is driven on arough surface, they can suffer damage
Page 356 of 426
that cannot be seen with the naked eye.This type of damage does not becomeevident until time has passed. Try notto drive over curbs, potholes or onother rough surfaces. If doing so isunavoidable, keep the vehicle’s speeddown to a walking pace or less, andapproach the curbs as squarely aspossible. Also, make sure the tires arenot pressed against the curb when youpark the vehicle..If you feel unusual vibration whiledriving or find it difficult to steer thevehicle in a straight line, one of thetires and/or wheels may be damaged.Drive slowly to the nearest authorizedSUBARU dealer and have the vehicleinspected.
&Tire pressures and wear
Maintaining the correct tire pressureshelps to maximize the tires’service livesand is essential for good running perfor-mance. Check and, if necessary, adjustthe pressure of each tire (including thespare) at least once a month (for example,during a fuel stop) and before any longjourney.
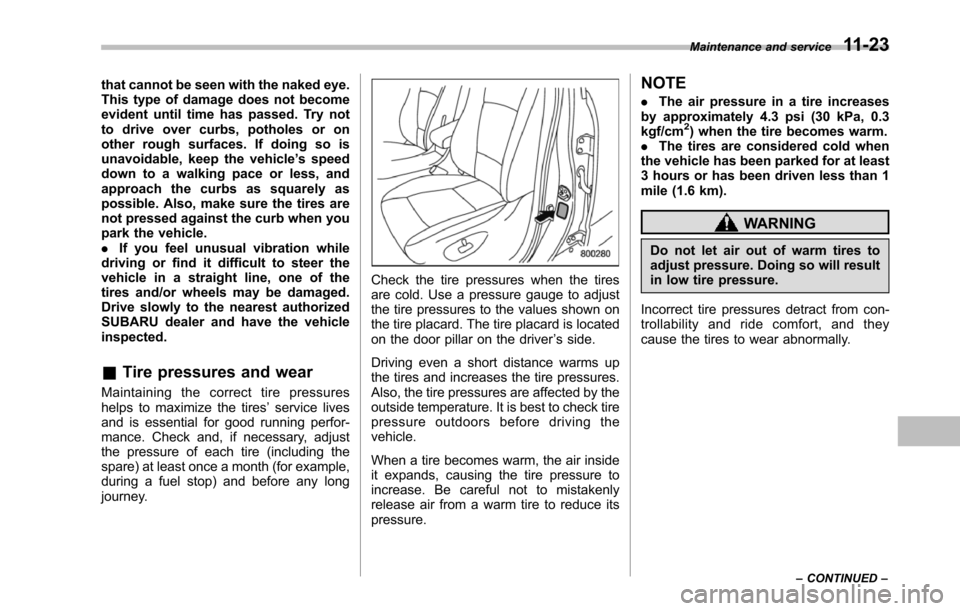
Check the tire pressures when the tiresare cold. Use a pressure gauge to adjustthe tirepressures to the values shown onthe tire placard. The tire placard is locatedon the door pillar on the driver’s side.
Driving even a short distance warms upthe tires and increases the tire pressures.Also, the tire pressures are affected by theoutside temperature. It is best to check tirepressure outdoors before driving thevehicle.
When a tire becomes warm, the air insideit expands, causing the tire pressure toincrease. Be careful not to mistakenlyreleaseair from a warm tire to reduce itspressure.
NOTE
.The air pressure in a tire increasesby approximately 4.3 psi (30 kPa, 0.3kgf/cm2) when the tire becomes warm..The tires are considered cold whenthe vehicle has been parked for at least3 hours or has been driven less than 1mile (1.6 km).
WARNING
Do not let air out of warm tires toadjust pressure. Doing so will resultin low tire pressure.
Incorrect tire pressures detract from con-trollability and ride comfort, and theycause the tires to wear abnormally.
Maintenance and service11-23
–CONTINUED–
Page 385 of 426
12-8Specifications
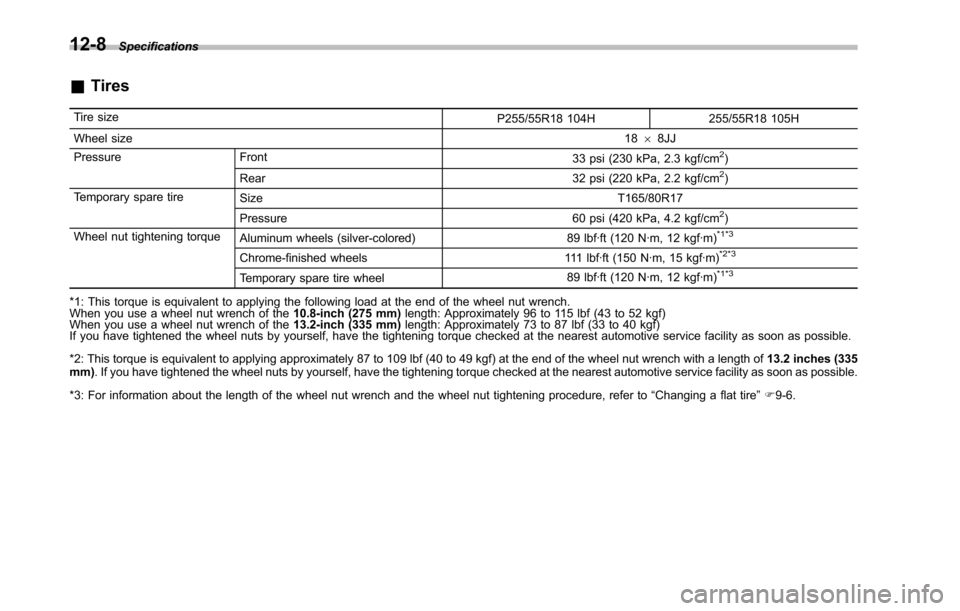
&Tires
Tire sizeP255/55R18 104H 255/55R18 105H
Wheel size1868JJ
Pressure Front33 psi (230 kPa, 2.3 kgf/cm2)
Rear 32 psi (220 kPa, 2.2 kgf/cm2)
Temporary spare tireSize T165/80R17
Pressure 60 psi (420 kPa, 4.2 kgf/cm2)
Wheel nut tightening torqueAluminum wheels (silver-colored) 89 lbf·ft (120 N·m, 12 kgf·m)*1*3
Chrome-finished wheels 111 lbf·ft (150 N·m, 15 kgf·m)*2*3
Temporary spare tire wheel89 lbf·ft (120 N·m, 12 kgf·m)*1*3
*1: This torque is equivalent to applying the following load at the end of the wheel nut wrench.When you use a wheel nut wrench of the10.8-inch (275 mm)length: Approximately 96 to 115 lbf (43 to 52 kgf)When you use a wheel nut wrench of the13.2-inch (335 mm)length: Approximately 73 to 87 lbf (33 to 40 kgf)If you have tightened the wheel nuts by yourself, have the tightening torque checked at the nearest automotive service facility as soon as possible.
*2: This torque is equivalent to applying approximately 87 to 109 lbf (40 to 49 kgf) at the end of the wheel nut wrench with a length of13.2 inches (335mm). If you have tightened the wheel nuts by yourself, have the tightening torque checked at the nearest automotive service facility as soon as possible.
*3: For informationabout the length of the wheelnut wrenchand the wheel nut tightening procedure, refer to“Changinga flat tire”F9-6.
Page 398 of 426
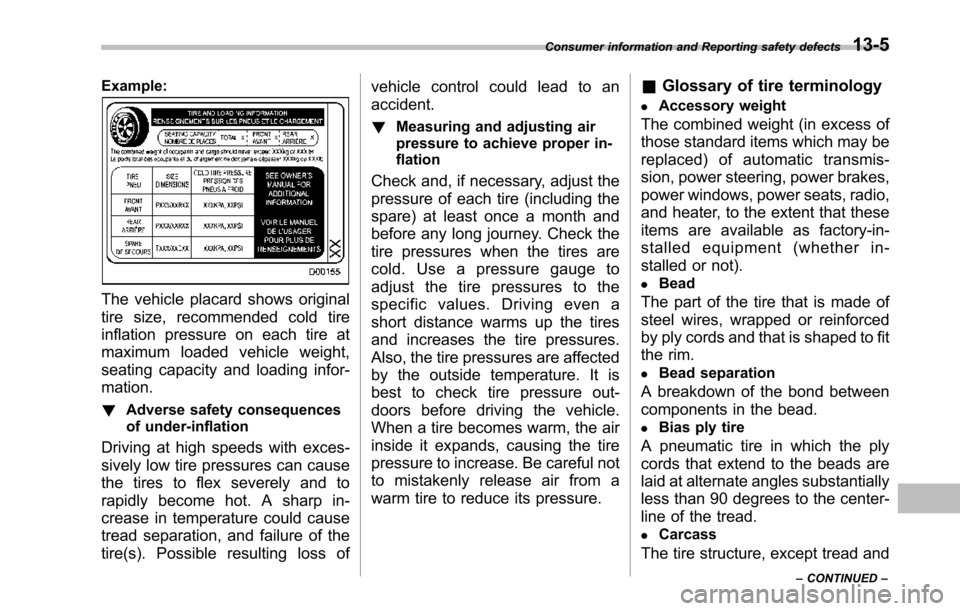
Example:
The vehicle placard shows original
tire size, recommended cold tire
inflation pressure on each tire at
maximum loaded vehicle weight,
seating capacity and loading infor-
mation.
!Adverse safety consequences
of under-inflation
Driving at high speeds with exces-
sively low tire pressures can cause
the tires to flex severely and to
rapidly become hot. A sharp in-
crease in temperature could cause
tread separation, and failure of the
tire(s). Possible resulting loss of
vehicle control could lead to an
accident.
!Measuring and adjusting air
pressure to achieve proper in-
flation
Check and, if necessary, adjust the
pressure of each tire (including the
spare) at least once a month and
before any long journey. Check the
tire pressures when the tires are
cold. Use a pressure gauge to
adjust the tire pressures to the
specific values. Driving even a
short distance warms up the tires
and increases the tire pressures.
Also, the tire pressures are affected
by the outside temperature. It is
best to check tire pressure out-
doors before driving the vehicle.
When a tire becomes warm, the air
inside it expands, causing the tire
pressure to increase. Be careful not
to mistakenly release air from a
warm tire to reduce its pressure.
&Glossary of tire terminology
.Accessory weight
The combined weight (in excess of
those standard items which may be
replaced) of automatic transmis-
sion, power steering, power brakes,
power windows, power seats, radio,
and heater, to the extent that these
items are available as factory-in-
stalled equipment (whether in-
stalled or not).
.Bead
The part of the tire that is made of
steel wires, wrapped or reinforced
by ply cords and that is shaped to fit
the rim.
.Bead separation
A breakdown of the bond between
components in the bead.
.Bias ply tire
A pneumatic tire in which the ply
cords that extend to the beads are
laid at alternate angles substantially
less than 90 degrees to the center-
line of the tread.
.Carcass
The tire structure, except tread and
Consumer information and Reporting safety defects13-5
–CONTINUED–
Page 407 of 426
13-14Consumer information and Reporting safety defects
XXX kg or XXX lbs.
4.The resulting figure equals the
available amount of cargo and
luggage load capacity. For exam-
ple, if the“XXX”amount equals
1,400 lbs (635 kg) and there will be
five- 150 lbs (68 kg) passengers in
your vehicle, the amount of avail-
able cargo and luggage load capa-
city is 650 lbs. (1,400!750 (56
150) = 650 lbs).
5.Determine the combined weight
of luggage and cargo being loaded
on the vehicle. That weight may not
safely exceed the available cargo
and luggage load capacity calcu-
lated in Step 4.
6.If your vehicle will be towing a
trailer, load from your trailer will be
transferred to your vehicle. Consult
this manual to determine how this
reduces the available cargo and
luggage load capacity of your ve-
hicle.
Uniform tire quality grading
standards
This information indicates the rela-
tive performance of passenger car
tires in the area of treadwear,
traction, and temperature resis-
tance. This is to aid the consumer
in making an informed choice in the
purchase of tires.
Quality grades can be found where
applicable on the tire sidewall be-
tween tread shoulder and maxi-
mum section width. For example:
Treadwear 200 Traction AA Tem-
perature A
The quality grades apply to new
pneumatic tires for use on passen-
ger cars. However, they do not
apply to deep tread, winter type
snow tires, space-saver or tempor-
ary use spare tires, tires with
nominal rim diameters of 12 inches
or less, or to some limited produc-
tion tires.
All passenger car tires must con-
form to Federal Safety Require-
ments in addition to these grades.
&Treadwear
The treadwear grade is a compara-
tive rating based on the wear rate of
the tire when tested under con-
trolled conditions on a specified
government test course.
For example, a tire graded 150
would wear one and one-half (1-
1/2) times as well on the govern-
ment course as a tire graded 100.
The relative performance of tires
depends upon the actual conditions
of their use, however, and may
depart significantly from the norm
due to variations in driving habits,
service practices and differences in
road characteristics and climate.
&Traction AA, A, B, C
The traction grades, from highest to
lowest, are AA, A, B and C. Those
grades represent the tire’s ability to
stop on wet pavement as measured
under controlled conditions on spe-
Page 418 of 426
Folding down......................................................... 1-10Forward and backward adjustment............................. 1-8Head restraint adjustment....................................... 1-12Reclining................................................................. 1-9SecurityAlarm system........................................................ 2-16ID plate................................................................... 2-3Immobilizer.............................................................. 2-3Indicator light................................................... 2-4, 3-21Shock sensors....................................................... 2-20Select lever............................................................... 7-13Position indicator................................................... 3-21Shift lock function................................................... 7-14Shift lock release................................................... 7-14Shock sensors........................................................... 2-20Shopping bag hook.................................................... 6-13Snow tires........................................................ 8-10, 11-21Snowy and icy roads.................................................... 8-9Sounding a panic alarm.............................................. 2-11Spare tire.................................................................... 9-2Spark plugs...................................................... 11-13, 12-7Specifications............................................................ 12-2Speedometer............................................................... 3-6SPORT mode............................................................ 7-18Indicator light......................................................... 3-21SRSCurtain airbag........................................................ 1-60Frontal airbag........................................................ 1-49Side airbag........................................................... 1-60SRS airbag (Supplemental Restraint System airbag) ... 5, 1-45
SRS airbag systemMonitors................................................................ 1-71Servicing............................................................... 1-72Warning light.......................................................... 3-11Starting the engine...................................................... 7-7State emission testing (U.S. only).................................. 7-5Steering wheelPower................................................................... 7-18Tilt . . . . . . . . . . . . . . . . . . . . . . . . . . . . . . . . . . . . . . . . . . . . . . . . . . . . . . . . . . . . . . . . . . . . . . . . 3-44Stop light................................................................. 11-39Stopping the engine..................................................... 7-8Storage compartment................................................... 6-6Sun shade................................................................. 2-27Sun visors.................................................................. 6-4SupplementalRestraint System airbag (SRS)................ 1-45Synthetic leather upholstery......................................... 10-5
TTachometer................................................................. 3-7Temperature gauge...................................................... 3-8Temperature warning lightAT OIL TEMP......................................................... 3-13Rear differential oil.................................................. 3-13Temporary spare tire.................................................... 9-5Tether (child restraint system).............................. 1-37, 1-40Third-row seats.......................................................... 1-13Access to the third-row seat..................................... 1-14Folding down......................................................... 1-15Head restraint adjustment........................................ 1-16Tie-down hooks.......................................................... 9-15Tilt steering wheel....................................................... 3-44
Index14-9