2014 SUBARU TRIBECA buttons
[x] Cancel search: buttonsPage 113 of 426
2-8Keys and doors
door locking switches.
&Key lock-in prevention func-
tion
This function prevents the doors frombeing locked with the key still in theignition switch.
!Behavior with key lock-in preven-tion function operational
.With either the driver’s or front passen-ger’s door open, the doors automaticallyremain unlockedeven if the“”side of thedoor locking switch is pushed.
.It is possible to lock the all doors andthe rear gate by holding the“”side of thedoor locking switch pushed for 3 secondswith the driver’sdooropenandthenclosing the driver’s door.
!Behavior with key lock-in preven-tion function non-operational
.If the lock lever is turned to the rear(“LOCK”) position with the driver’s dooropen and the driver’s door is then closedwith the lock lever in that position, thedriver’s door is locked.
.If the spare key is used to lock thedriver’sdoorfromtheoutsideofthevehicle, the door is locked.
This function’soperational/non-opera-
tional setting can be changed by aSUBARU dealer. Contact a SUBARUdealer for details.
NOTE
When leaving the vehicle, make sureyou are holding the key before lockingthe doors.
Remote keyless entry system
CAUTION
.Do not expose the remote trans-mitter to severe shocks, such asthose experienced as a result ofdroppingor throwing.
.Do not take the remote transmit-ter apart except when replacingthe battery.
.Do not get the remote transmitterwet. If it gets wet, wipe it dry witha cloth immediately.
.When you carry the remote trans-mitter on an airplane, do notpress the button of the remotetransmitter whilein the airplane.When any button of the remotetransmitter is pressed, radiowaves are sent and may affectthe operation of the airplane.When you carry the remote trans-mitter in a bag on an airplane,take measures to prevent thebuttons of the remote transmitterfrom being pressed.
This device complies with Part 15 ofthe FCC Rules and with RSS-210 ofIndustry Canada. Operation is subject
Page 117 of 426
2-12Keys and doors
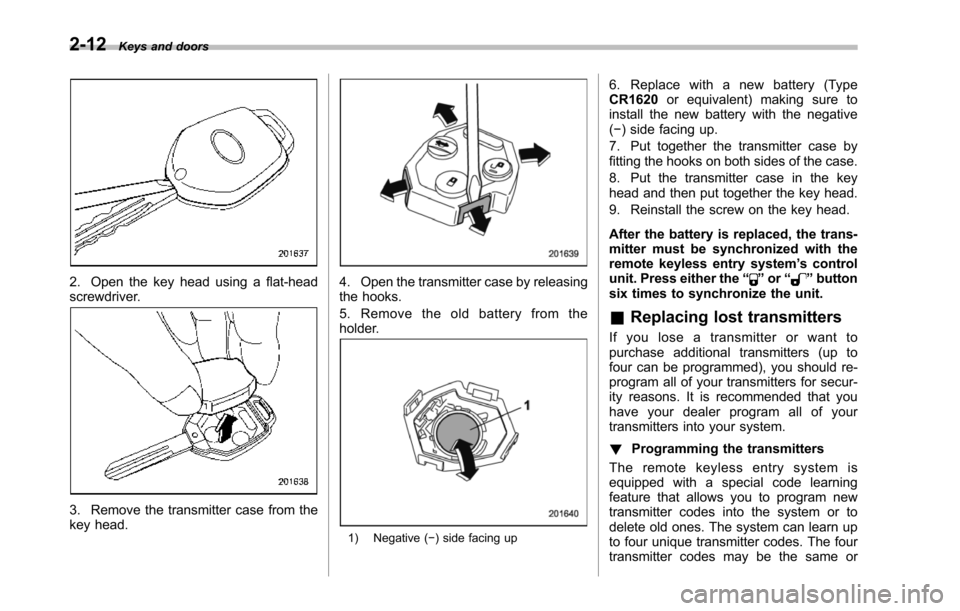
2. Open the key head using a flat-headscrewdriver.
3. Remove the transmitter case from thekey head.
4. Open the transmitter case by releasingthe hooks.
5. Remove the old battery from theholder.
1) Negative (!) side facing up
6. Replace with a new battery (TypeCR1620or equivalent) making sure toinstall the new battery with the negative(!) side facing up.
7. Put together the transmitter case byfitting thehooks on both sides of the case.
8. Put the transmitter case in the keyhead and then put together the key head.
9. Reinstall the screw on the key head.
After the battery is replaced, the trans-mitter must be synchronized with theremote keyless entry system’s controlunit. Press either the“”or“”buttonsix times to synchronize the unit.
&Replacing lost transmitters
If you lose a transmitter or want topurchase additional transmitters (up tofour can be programmed), you should re-program all of your transmitters for secur-ity reasons. It is recommended that youhave your dealer program all of yourtransmittersinto your system.
!Programming the transmitters
The remote keyless entry system isequipped witha special code learningfeature that allows you to program newtransmitter codes into the system or todelete old ones. The system can learn upto four unique transmitter codes. The fourtransmitter codes may be the same or
Page 182 of 426
Automatic climate control
system
NOTE
.Operate the automatic climate con-trol system when the engine is running..The blower fan rotates at a lowspeed when the engine coolant tem-perature is low.
Forefficient defogging or dehumidify-ing in cold weather, press the“A/C”button..The vehicle has a rear air condi-tioner. The fan speed of the rear airconditioner can be adjusted, but otheradjustments (outlet air temperature, airdistribution, etc.)are not possible forthe rear air conditioner. For details,refer to“Rear air conditioner”F4-9.
The automatic climate control systemautomatically controls outlet air tempera-ture, fan speed, airflow distribution, airinlet control, and air conditioner compres-sor operation. It activates when the“AUTO”button is pressed, and is used tomaintain a constant, comfortable climatewithin the passenger compartment.
The temperature can be set within a rangeof 65 to 858F (18 to 328C).
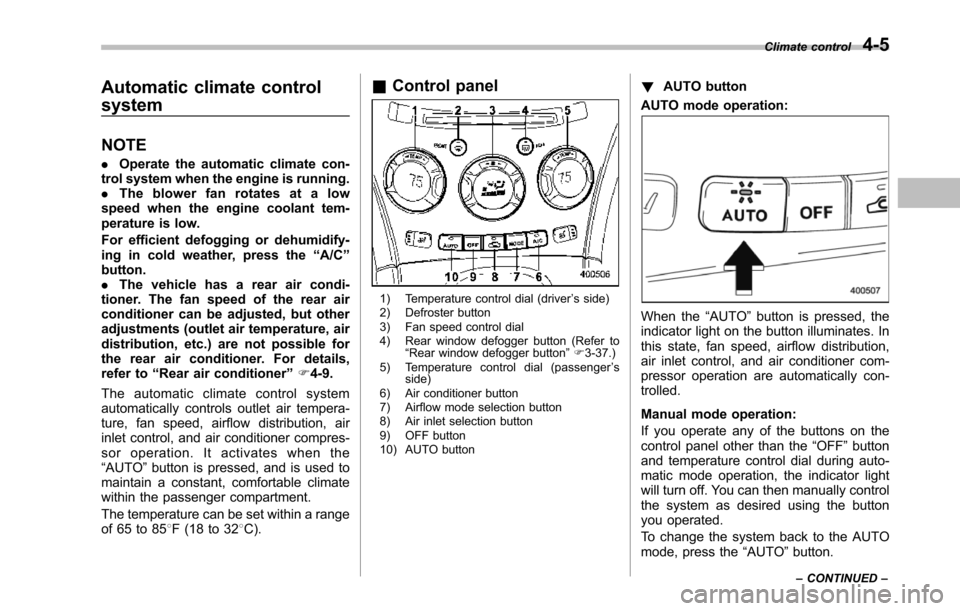
&Control panel
1) Temperature control dial (driver’s side)2) Defroster button3) Fan speed control dial4) Rear window defogger button (Refer to“Rearwindow defogger button”F3-37.)5) Temperature control dial (passenger’sside)6) Air conditioner button7) Airflow mode selection button8) Air inlet selection button9) OFF button10) AUTO button
!AUTO button
AUTO mode operation:
When the“AUTO”button is pressed, theindicator light on the button illuminates. Inthis state, fan speed, airflow distribution,air inlet control, and air conditioner com-pressor operation are automatically con-trolled.
Manual mode operation:
If you operate any of the buttons on thecontrol panel other than the“OFF”buttonand temperature control dial during auto-matic mode operation, the indicator lightwill turn off. You can then manually controlthe system as desired using the buttonyou operated.
To change the system back to the AUTOmode, press the“AUTO”button.
Climate control4-5
–CONTINUED–
Page 192 of 426
Antenna system.................................................. 5-2Printed antenna................................................... 5-2FM reception....................................................... 5-2
Installation of accessories.................................. 5-2
Audio set............................................................. 5-3Type A audio set................................................. 5-3Type B audio set................................................. 5-3
Type A audio set (if equipped)........................... 5-4Radio operation................................................... 5-4Compact disc player operation........................... 5-10
Type B audio set (if equipped).......................... 5-15Radio operation................................................. 5-15Built in CD changer operation ............................ 5-21
Audio control buttons....................................... 5-26MODE button..................................................... 5-26
Auxiliary input jack............................................ 5-28
Rear Seat Entertainment (RSE) systemoperation (if equipped)................................... 5-29
Precautions to observe when handling acompact disc................................................... 5-29
Audio
5
Page 198 of 426
NOTE
While you are holding down either sideof the“TUNE TRACK”button, thetuning frequency will not stop chan-ging even if the frequency of a recei-vable station is reached.
!Seek tuning
If you press the“”or“”side of the“SEEK FLDR”button (7), the radio willautomatically search for a receivablestation and stop at the first one it finds.This function may not be available, how-ever, when radio signals are weak. In suchasituation,performmanualtuningtoselect the desired station.
!Automatic tuning (SCAN)
Press the“SCAN”button (8) to change theradio to the SCAN mode. In this mode, theradio scans through the radio band until astation is found. The radio will stop at thestation for 5 seconds while displaying thefrequency, after which scanning will con-tinue until the entire band has beenscanned from the low end to the highend. Press the“SCAN”button again tocancel the SCAN mode and to stop on anydisplayed frequency.
Press the“”or“”side of the“SEEKFLDR”button (7) again to cancel the scanmode and to stop on any displayed
frequency.
When the“SCAN”button is pressed forautomatic tuning, stations are scanned inthe direction of low frequencies to highfrequencies only.
Automatic tuning may not function prop-erly if the station reception is weakened bydistancefrom the station or proximity totall buildings and hills.
!Selecting preset stations
Presetting a station with a preset button(10) allows you to select that station in asingle operation. Up to six, AM, FM1 andFM2 stations each may be preset.
!How to preset stations
1. Press the“FM AM”button (2) to selectFM1, FM2, or AM reception.
2. Press the“SCAN”button (8) or tunethe radio manually until the desired stationfrequencyis displayed.
3. Press and hold one of the presetbuttons (10) to store the frequency. If thebutton is pressed briefly, the precedingselection will remain in memory.
NOTE
.If the connection between the radioand battery is broken for any reasonsuch as vehicle maintenance or radioremoval, all stations stored in the
preset buttons are cleared. If thisoccurs, it is necessary to reset thepreset buttons..If a cell phone is placed near theradio, it may cause the radio to emitnoise when it receives calls. This noisedoes not indicate a radio malfunction.
!Satellite radio mode (if equipped)
To receive satellite radio, it is necessary toinstall the SUBARU genuine satellitereceiver (optional part) and to enter intoa contract with a satellite radio networkservice such as“Sirius XMTMsatelliteradio”(for U.S.A. only)or“Sirius satelliteradio”(for Canada only). For details,please contact your SUBARU dealer.
!Sirius satellite radio (for Canadaonly)
Sirius satellite radio is a recent innovationthat allows the listener to experiencedigital sound quality and to have a greatervariety of channels.
Use of satellite radio (Sirius) requires atuner, antenna and a service contract. Fordetails, please contact your SUBARUdealer or visit Sirius Satellite Radio atwww.sirius.ca or call 1-888-539-7474 formore information. Sirius, the Sirius doglogo, channel names and logos are trade-marks of SIRIUS Satellite Radio Inc.
Audio5-7
–CONTINUED–
Page 200 of 426
buttons (10) to store the channel. If thebutton is pressed briefly, the precedingselection will remain in memory.
NOTE
If the connection between the radio andbattery is broken for any reason suchas vehicle maintenance or radio re-moval, all channels stored in the presetbuttons are cleared. If this occurs, it isnecessary to reset the preset buttons.
!Display selection
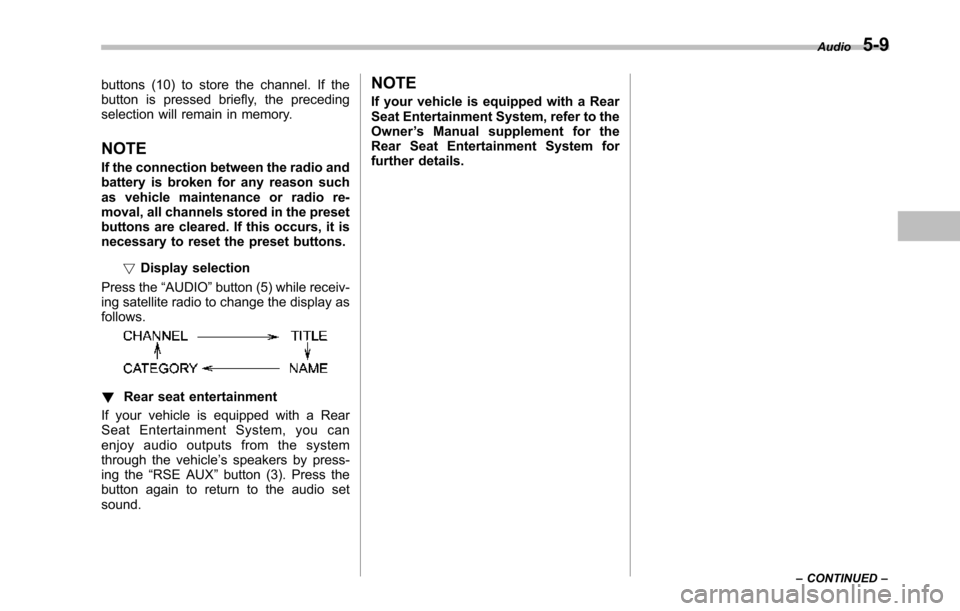
Press the“AUDIO”button (5) while receiv-ing satellite radio to change the display asfollows.
!Rear seat entertainment
If your vehicle is equipped with a RearSeat Entertainment System, you canenjoy audio outputs from the systemthrough the vehicle’s speakers by press-ing the“RSE AUX”button (3). Press thebutton again to return to the audio setsound.
NOTE
If your vehicle is equipped with a RearSeat Entertainment System, refer to theOwner’s Manual supplement for theRear Seat Entertainment System forfurther details.
Audio5-9
–CONTINUED–
Page 209 of 426
5-18Audio
NOTE
While you are holding down either sideof the TUNE/TRACK button, the tuningfrequency will not stop changing evenif the frequency of a receivable stationis reached.
!Seek tuning (SEEK)
If you press the“”or“”side of the“SEEK FLDR”button (7), the radio willautomatically search for a receivablestation and stop at the first one it finds.This function may not be available, how-ever, when radio signals are weak. In suchasituation,performmanualtuningtoselect the desired station.
!Scan tuning (SCAN)
Press the“SCAN”button (8) to change theradio to the SCAN mode. In this mode, theradio scans through the radio band until astationis found. The radio will stop at thestation for 5 seconds while displaying thefrequency, after which scanning will con-tinue until the entire band has beenscannedfrom the low end to the highend. Press the“SCAN”buttonagain tocancel the SCAN mode and to stop on anydisplayed frequency.
Press the“”or“”side of the“SEEKFLDR”button (7) again to cancel the scanmode and to stop on any displayed
frequency.
When the“SCAN”button is pressed forautomatic tuning, stations are scanned inthe direction of low frequencies to highfrequencies only.
Automatic tuning may not function prop-erly if the station reception is weakened bydistance from the station or proximity totall buildings and hills.
!Selecting preset stations
Presetting a station with a preset buttonallows you to select that station in a singleoperation. Up to six AM, FM1 and FM2stations each may be preset.
!How to preset stations
1. Press the“FM AM”button (2) to selectFM1, FM2 or AM reception.
2. Press the“SCAN”button (8) or tunethe radio manually until the desired stationfrequency is displayed.
3. Press and hold one of the presetbuttons to store the frequency. If thebutton is pressed briefly, the precedingselection will remain in memory.
NOTE
.If the connection between the radioand battery is broken for any reasonsuch as vehicle maintenance or radioremoval, all stations stored in the
preset buttons are cleared. If thisoccurs, it is necessary to reset thepreset buttons..If a cell phone is placed near theradio, it may cause the radio to emitnoise when it receives calls. This noisedoes not indicate a radio malfunction.
!Satellite radio mode (if equipped)
To receive satellite radio, it is necessary toinstall the SUBARU genuine satellitereceiver (optional part) and to enter intoa contract with a satellite radio networkservice such as“Sirius XMTMsatelliteradio”(for U.S.A. only) or“Sirius satelliteradio”(for Canada only). For details,please contact your SUBARU dealer.
!Sirius satellite radio (for Canadaonly)
Refer to“Sirius satellite radio (for Canadaonly)”F5-7.
!Sirius XMTMSatellite Radio Acti-vation (for U.S.A. only)
Refer to“Sirius XMTMSatellite RadioActivation (for U.S.A. only)”F5-8.
!Satellite radio reception
Refer to“Satellite radio reception”F5-8.
Page 210 of 426
!Displaying satellite radio ID oftuner
When you activate satellite radio, youshould have your satellite radio tuner IDready because each tuner is identified byits unique satellite radio tuner ID.
The satellite radio ID will be needed whenyou activate satellite radio and receivesatellite radio customer support.
The satellite radio ID can be found on theaudio display by tuning the channel to“0”.
Turn the“TUNE/TRACK”button (4) toselect the satellite radio channel.
!Band selection button
Push the“SAT”button (1) when the radiois off to turn on the radio.
Push the“SAT”button when the radio ison to select SAT1, SAT2 or SAT3 recep-tion.
!Channel selection
Press“”of the“TUNE TRACK”button(4) to select the next channel and press“”of the button to select the previouschannel.
Keep pressing“”of the button tochange to the next channel continuouslyand keep pressing“”of the button tochange to the previous channel continu-ously.
!Category selection
Press“”or“”of the“SEEK FLDR”button (7) to display the current category.Press“”again to select the nextcategory, and press“”again to selectthe previous category.
!Channel scan
Press the“SCAN”button (8) to change theradio to the SCAN mode. In this mode, theradio scans through the channels until astation is found. The radio will stop at thestation for 5 seconds while displaying thechannel number, after which scanning willcontinue until the entire channel has beenscanned from the low end to the high end.
Also during the category selection, chan-nel scan can be performed in that cate-gory.
Press the“SCAN”button again to cancelthe SCAN mode and to stop on anydisplayed channel.
!Selecting preset channels
Presetting a channel with a preset button(10) allows you to select that channel in asingle operation. Up to six, SAT1, SAT2and SAT3 channels each may be preset.
!How to preset channels
1. Press the“SAT”button (1) to selectSAT1, SAT2 and SAT3 reception.
2. Press the“SCAN”button (8) or the“TUNE TRACK”button (4) to select thechannel.
3. Press and hold one of the presetbuttons (10) to store the channel. If thebutton is pressed briefly, the precedingselection will remain in memory.
NOTE
If the connection between the radio andbattery is broken for any reason suchas vehicle maintenance or radio re-moval, all channels stored in the presetbuttons are cleared. If this occurs, it isnecessary to reset the preset buttons.
!Display selection
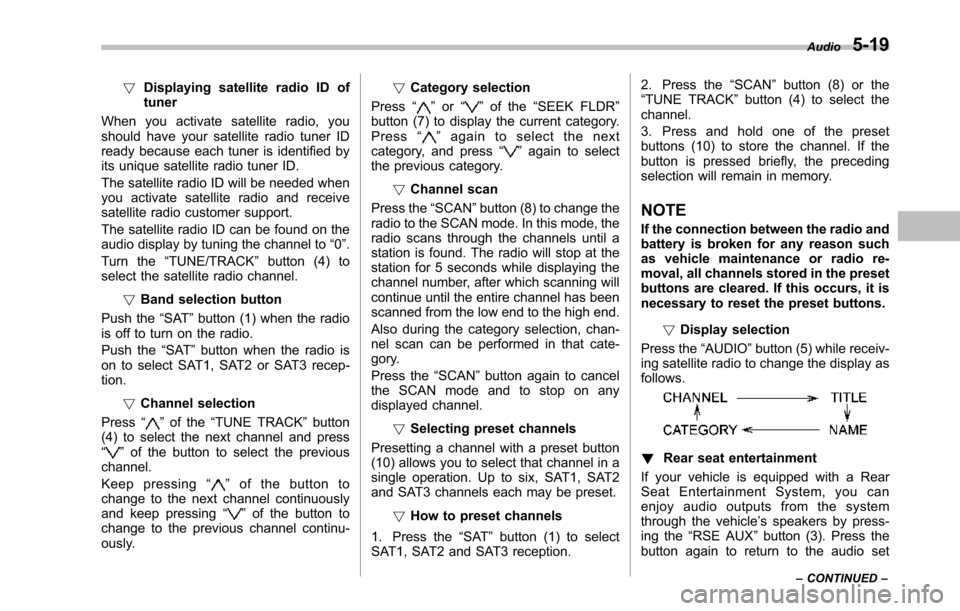
Press the“AUDIO”button (5) while receiv-ing satellite radio to change the display asfollows.
!Rear seat entertainment
If your vehicle is equipped with a RearSeat Entertainment System, you canenjoy audio outputs from the systemthrough the vehicle’s speakers by press-ing the“RSE AUX”button (3). Press thebutton again to return to the audio set
Audio5-19
–CONTINUED–