Page 57 of 222

X
Pull either of the release levers 0043back-
wards.
The lower tailgate is unlocked.
X Swivel the lower tailgate downwards to
open.
The lower tailgate is held in the hori-
zontal position by means of the two
retaining straps.
! When folded down, the lower tailgate
can bear loads up to maximum of 220 lbs
(100 kg).
Observe the information on loading the
vehicle (Y page 108).
For information on vehicle weights, see
“Vehicle specification” (Y page 215).Closing the tailgate(s) on the coupé
G
WARNING
To prevent possible personal injury,
always keep hands and fingers away from the
cargo compartment opening when closing
the tailgate(s). Be especially careful when
small children are around. X
Swivel the lower tailgate upwards to
close. Allow the two release levers to
engage audibly.
X Swivel the upper tailgate downwards to
close. G
WARNING
When leaving the vehicle, always remove the
key from the starter switch, take it with
you, and lock the vehicle. Do not leave chil-
dren unattended in the vehicle, or with
access to an unlocked vehicle. A child’s
unsupervised access to a vehicle could
result in an accident and/or serious per-
sonal injury. Opening and closing the retractable
soft top (cabriolet only)
You can fully open the retractable soft top
with the key. Opening and closing
55>> Controls. Z
Page 58 of 222

Key with remote control
0043
0038Lock button
0044 0035Opening the retractable soft top
0087 0034Unlock button
X Opening: Press button 0035on the key for
approximately two seconds.
The retractable soft top opens.
i Pressing symbols 0034,0038or0035 on the
key with remote control while opening
the retractable soft top will interrupt
the opening procedure.
X Closing: Press symbol 0055on the
retractable soft top switch (Y page 55).G
WARNING
When closing the retractable soft top, make
sure there is no danger of anyone being
harmed by the closing procedure.
i The remote control has an operating
range of approximately 50 ft (15 meters).
Take care that you do not open your vehi-
cle’s retractable soft top inadvertently. Opening the tailgate on the cabriolet
X
Press button 0034on the key twice.
X Pull the release handle in handle
recess 0043of the tailgate.
The tailgate is unlocked.
X Swivel the tailgate downwards to open. Opening and closing the rear soft top
(cabriolet only)
You can open the rear soft top to ease load-
ing and unloading. X
Opening: Push release levers 0043, located
to the left and right of the retaining
clip, upwards.
X Swivel the rear soft top upwards to open. G
WARNING
To prevent possible personal injury,
always keep hands and fingers away from the
cargo compartment opening when closing
the rear soft top. Be especially careful
when small children are around. 56
Opening and closing>> Controls.
Page 59 of 222

X
Closing: Swivel the rear soft top down-
wards to close.
X Pull soft top down.
X Pull release levers 0043, located to the left
and right of the retaining clip, down-
wards.
X Make sure the rear soft top is correctly
locked in place on both sides. Closing the tailgate on the cabriolet
G
WARNING
To prevent possible personal injury,
always keep hands and fingers away from the
cargo compartment opening when closing
the tailgate. Be especially careful when
small children are around.
! When closing the tailgate, you must
first close the rear soft top. Otherwise
you might break the release levers of the
rear soft top.
X Swivel the tailgate upwards to close. Let
the tailgate lock into place. G
WARNING
When leaving the vehicle, always remove the
key from the starter switch, take it with
you, and lock the vehicle. Do not leave chil-
dren unattended in the vehicle, or with
access to an unlocked vehicle. A child’s
unsupervised access to a vehicle could
result in an accident and/or serious per-
sonal injury. Starter switch positions
Starter switch
005A
For removing key
0047
Ignition (power supply for all elec-
trical consumers) and driving posi-
tion
0048
Starting the drive system
i
When you switch on the ignition, the
indicator and warning lamps (except
low‑beam headlamp indicator lamp,
high‑beam headlamp indicator lamp, and
turn signal indicator lamps unless acti-
vated) in the instrument cluster come on.
The indicator and warning lamps (except
low‑beam headlamp indicator lamp,
high‑beam headlamp indicator lamp, and
turn signal indicator lamps if activated)
will go out when the drive system is run-
ning. This indicates that the respective
systems are operational.
i When you start the drive system, READY
READY
appears in the multifunction display.
The warning and indicator lamps will go
out.
The pointer of the power gauge moves
from "OFF“ to "0“ (Y page 81). Starter switch positions
57>> Controls. Z
Page 60 of 222

Seats
Safety notes
G
WARNING
All seat adjustments, as well as fastening
of seat belts, must be done before the vehi-
cle is operated. G
WARNING
When adjusting the seat, make sure no one
becomes trapped.
Do not adjust the driver’s seat while driv-
ing. Adjusting the seat while driving could
cause the driver to lose control of the vehi-
cle.
Never ride in a moving vehicle with the seat
backrest in an excessively reclined posi-
tion as this can be dangerous. You could
slide under the seat belt in a collision. If
you slide under the seat belt, it could apply
force at the abdomen or neck, potentially
causing serious or fatal injuries. The seat
backrest and seat belts provide the best
restraint when the wearer is in a position
that is as upright as possible and seat belts
are properly positioned on the body.
Your seat must be adjusted so that you can
correctly fasten your seat belt.
Observe the following points:
R Adjust the seat backrest until your arms
are slightly angled when holding the
steering wheel.
R Adjust the seat to a comfortable seating
position that still allows you to reach the
accelerator/brake pedal safely. The
position should be as far back as possi-
ble with the driver still able to operate
the controls properly.
R Never place hands under the seat or near
any moving parts while a seat is being
adjusted.
Failure to do so could result in an accident
and/or serious personal injury.
Observe the notes on the air bag system. G
WARNING
Children 12 years old and under must be
seated and properly secured in an appro-
priately sized infant restraint, toddler
restraint, or booster seat recommended for
the size and weight of the child. For addi-
tional information, see “Children in the
vehicle”.
A child’s risk of serious or fatal injuries
is significantly increased if the child
restraints are not properly secured in the
vehicle and/or the child is not properly
secured in the child restraint. G
WARNING
Contact an authorized electric drive smart
center if the seats have become damaged.
The seat is an integral part of the vehicle’s
safety system in the same way as seat belts
and air bags. Damage to the seats may
reduce their ability to protect the occu-
pants in an accident. Seat adjustment
0043
Seat backrest tilt
0044 Seat fore and aft adjustment
Seat backrest tilt X
Adjusting: Sit down on the front seat.
X Pull adjustment lever 0043upwards and
adjust the seat backrest until your arms
are slightly angled when holding the
steering wheel. 58
Seats>> Controls.
Page 61 of 222

X
Release adjustment lever 0043when the
desired seat backrest tilt is reached.
When you hear an audible click, the seat
backrest is again fixed into place.
X Check for proper engagement before
driving.
i When adjusting the tilt of the backrest
without any load on the seat then hold on
to the backrest with one hand.
Seat fore and aft adjustment X
Pull adjustment handle 0044upwards and
slide the seat to a seating position that
still allows you to reach the accelerator/
brake pedal safely.
X Release adjustment handle 0044when the
desired seating position is reached.
When you hear an audible click, the seat
is again fixed into place.
X Check for proper engagement before
driving.
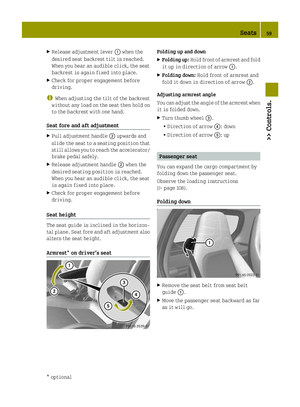
Seat height The seat guide is inclined in the horizon-
tal plane. Seat fore and aft adjustment also
alters the seat height.
Armrest* on driver’s seat Folding up and down
X
Folding up: Hold front of armrest and fold
it up in direction of arrow 0043.
X Folding down: Hold front of armrest and
fold it down in direction of arrow 0044.
Adjusting armrest angle
You can adjust the angle of the armrest when
it is folded down.
X Turn thumb wheel 0087.
R Direction of arrow 0085: down
R Direction of arrow 0083: up Passenger seat
You can expand the cargo compartment by
folding down the passenger seat.
Observe the loading instructions
(Y page 108).
Folding down X
Remove the seat belt from seat belt
guide 0043.
X Move the passenger seat backward as far
as it will go. Seats
59>> Controls.
* optional Z
Page 62 of 222

X
Hold the backrest with one hand back.
X Pull adjustment lever 0044upwards and
unlock the seat backrest.
X Fold the seat backrest forward.
Folding back X
Pull adjustment lever 0044upwards and
unlock the seat backrest.
X Fold the seat backrest backward.
When you hear an audible click, the seat
backrest is again fixed into place.
X Check for proper engagement before
driving.
X Place the seat belt back in seat belt
guide 0043. G
WARNING
When folding the passenger seat backrest
back to its upright position, please make
sure
R nobody becomes trapped
R no obstacles are jammed in the lock
R the adjustment lever has audibly locked
into position
A properly engaged passenger seat back-
rest will help to prevent stored objects in
the cargo compartment from being thrown
about and injuring vehicle occupants dur-
ing
R braking
R vehicle maneuvers
R an accident Seat heating*
The seat heating allows you to heat the
driver’s and passenger seat electrically. The seat heating has two levels.
The indicator lamps on seat heating
switch
0043come on to show which heating
level you have selected. Level Indicator lamps on the switch
off
No indicator lamp on
1
One indicator lamp on
2
Two indicator lamps on
X
Make sure the key is in starter switch
position 1.
X Switching on: Press seat heating
switch 0043repeatedly until the desired
seat heating level is reached.
X Switching off: Press seat heating
switch 0043repeatedly until all indicator
lamps go out.
i Switch on the seat heating and, at the
same time, reduce the temperature in the
vehicle interior. The high‑voltage bat-
tery then consumes less energy.
! If the seat heating is malfunctioning,
the indicator lamp(s) on the switch
come(s) on briefly when you press the
switch and then go(es) out again. Contact
an authorized smart center. 60
Seats>> Controls.
* optional
Page 63 of 222

Mirrors
Adjust the interior and exterior rear view
mirrors before driving so that you have a
good view of the road and traffic condi-
tions. Exterior rear view mirrors
G
WARNING
Exercise care when using the passenger-
side exterior rear view mirror. The mirror
surface is convex (outwardly curved surface
for a wider field of view). Objects in mirror
are closer than they appear. Check your
interior rear view mirror and glance over
your shoulder to determine whether any
vehicles are in the ’blind spot’ of your field
of vision, before changing lanes.
Power exterior rear view mirrors The operating control is on the door
control panel.
X
Make sure the key is in starter switch
position 1.
X Selecting the mirror: Turn knob0043to the
left for the driver’s side exterior rear
view mirror or to the right for the
passenger side exterior rear view mir-
ror.
X Adjusting the mirror: Move adjustment
button 0044up, down, left, or right to the
desired setting. Exterior rear view mirror heating After switching on the rear window
defroster, the exterior rear view mirrors
will be heated automatically. This pre-
vents icing up the exterior rear view mir-
rors and also creates a clear view when the
exterior rear view mirrors have fogged up.
If the rear window defroster is automati-
cally deactivated after approximately
10 minutes of operation, the exterior rear
view mirror heating also deactivates.
X
Make sure the key is in starter switch
position 1.
X Switching on: Switch on the rear window
defroster (Y page 103).
The exterior rear view mirror heating is
switched on.
X Switching off: Switch off the rear window
defroster (Y page 103).
The exterior rear view mirror heating is
switched off.
i The exterior rear view mirror heating
also switches off if the key is turned to
starter switch position 0. Interior rear view mirror
X
Adjusting the mirror: Manually move the
interior rear view mirror up, down, left,
or right to the desired setting.
X Selecting the antiglare position: Tilt
the interior rear view mirror to the
antiglare position by moving lever 0043
forward or backward. Mirrors
61>> Controls. Z
Page 64 of 222

Seat belts
Fastening the seat belts
G
WARNING
Always fasten your seat belt before driving.
Always make sure all of your passengers are
properly restrained.
Failure to wear and properly fasten and
position your seat belt greatly increases
your risk of injuries and their likely
severity in an accident. You and your
passenger should always wear seat belts.
If you are ever in an accident, your injuries
can be considerably more severe without
your seat belt properly buckled.
Without your seat belt buckled, you are
much more likely to hit the interior of the
vehicle or be ejected from it. You can be
seriously injured or killed.
In the same crash, the possibility of injury
or death is lessened if you are properly
wearing your seat belt. Air bags can only
protect you if you are properly wearing
your seat belt. G
WARNING
Children 12 years old and under must be
seated and properly secured in an appro-
priately sized infant restraint, toddler
restraint, or booster seat recommended for
the size and weight of the child. For addi-
tional information, see “Children in the
vehicle”.
A child’s risk of serious or fatal injuries
is significantly increased if the child
restraints are not properly secured in the
vehicle and/or the child is not properly
secured in the child restraint. G
WARNING
Never let more people ride in the vehicle
than there are seat belts available. Make
sure everyone riding in the vehicle is cor-
rectly restrained with a separate seat belt.
Never use a seat belt for more than one per-
son at a time. G
WARNING
Never ride in a moving vehicle with the seat
backrest in an excessively reclined posi-
tion as this can be dangerous. You could
slide under the seat belt in a collision. If
you slide under it, the belt would apply
force at the abdomen or neck, causing ser-
ious or even fatal injuries. The seat back-
rest and seat belt provide the best
restraint when the wearer is in a position
that is as upright as possible and the belt
is properly positioned on the body. G
WARNING
Observe ”Safety notes“ (Y page 35). 0043
Seat belt outlet
0044 Seat belt guide
0087 Latch plate
0085 Seat belt buckle
0083 Release button
X Fastening the seat belt: With a smooth
motion, pull the seat belt out of seat belt
outlet 0043.
X Place the shoulder portion of the seat
belt across the top of your shoulder and
the lap portion across your hips. 62
Seat belts>> Controls.