Page 145 of 222

The TIN is a unique identifier which facil-
itates efforts by tire manufactures to
notify purchasers in recall situations or
other safety matters concerning tires and
gives purchasers the means to easily iden-
tify such tires.
The TIN is comprised of “Manufacturer’s
identification mark” 0044, “Tire size”0087,
“Tire type code” 0085, and “Date of manufac-
ture” 0083.
i For illustration purposes only. Actual
data on tires are specific to each vehicle
and may vary from data shown in above
illustration.
DOT (Department of Transportation) Tire branding symbol
0043which denotes the
tire meets requirements of the U.S. Depart-
ment of Transportation.
Manufacturer’s identification mark Manufacturer’s identification mark
0044
denotes the tire manufacturer.
New tires have a mark with two symbols.
Retreaded tires have a mark with four sym-
bols. For more information on retreaded
tires (Y page 127).
Tire size Code
0087indicates the tire size. Tire type code Tire type code
0085may, at the option of the
manufacturer, be used as a descriptive
code for identifying significant charac-
teristics of the tire.
Date of manufacture Date of manufacture
0083identifies the week
and year of manufacture.
The first two figures identify the week,
starting with “01” to represent the first
full week of the calendar year. The second
two figures represent the year.
For example, “3202” represents the 32nd
week of 2002. Tire ply material
i
For illustration purposes only. Actual
data on tires are specific to each vehicle
and may vary from data shown in above
illustration.
This marking tells you about the type of
cord and number of plies in the side-
wall 0043and under the tread 0044. Tire and loading terminology
Accessory weight The combined weight (in excess of those
standard items which may be replaced) of
transmission, power steering, power
brakes, power windows, power seats, radio, Tires and wheels
143>> Operation. Z
Page 146 of 222
.
Air pressure The amount of air inside the tire pressing
outward on each square inc")
and heater, to the extent that these items
are available as factory-installed equip-
ment (whether installed or not).
Air pressure The amount of air inside the tire pressing
outward on each square inch of the tire. Air
pressure is expressed in pounds per square
inch (psi), or kilopascal (kPa) or bars.
Aspect ratio Dimensional relationship between tire
section height and section width expressed
in percentage.
Bar Another metric unit for air pressure. There
are 14.5038 pounds per square inch (psi) to
1 bar; there are 100 kilopascals (kPa) to
1 bar.
Bead The tire bead contains steel wires wrapped
by steel cords that hold the tire onto the
rim.
Cold tire inflation pressure Tire inflation pressure when your vehicle
has been sitting for at least 3 hours or
driven no more than 1 mile (1.6 km).
Curb weight The weight of a motor vehicle with standard
equipment including the maximum capa-
city of fuel, oil, and coolant, and, if so
equipped, air conditioning and additional
optional equipment, but without passen-
gers and cargo.
DOT (Department of Transportation) A tire branding symbol which denotes the
tire meets requirements of the U.S. Depart-
ment of Transportation. GAWR (Gross Axle Weight Rating) The GAWR is the maximum permissible axle
weight. The gross vehicle weight on each
axle must never exceed the GAWR for the
front and rear axle indicated on the cer-
tification label located on the driver’s
door B‑pillar.
GVW (Gross Vehicle Weight) The GVW comprises the weight of the vehi-
cle including fuel, tools, installed acces-
sories, passengers and cargo. The GVW must
never exceed the GVWR indicated on the
certification label located on the driver’s
door B‑pillar.
GVWR (Gross Vehicle Weight Rating)
This is the maximum permissible vehicle
weight of the fully loaded vehicle (weight
of the vehicle including all options, pas-
sengers, fuel, and cargo. It is indicated on
certification label located on the driver’s
door B‑pillar.
Kilopascal (kPa)
The metric unit for air pressure. There are
6.9 kPa to 1 psi; another metric unit for air
pressure is bars. There are 100 kilopas-
cals (kPa) to 1 bar.
Maximum load rating The maximum load in kilograms and pounds
that can be carried by the tire.
Maximum loaded vehicle weight
The sum of curb weight, accessory weight,
total load limit and production options
weight.
Maximum permissible tire inflation
pressure
This number is the greatest amount of air
pressure that should ever be put in the tire.144
Tires and wheels>> Operation.
Page 147 of 222
.
Occupant distribution The distribution of occupants in a vehicle
at their design")
Normal occupant weight
The number of occupants the vehicle is
designed to seat, multiplied by 68 kilo-
grams (150 lbs).
Occupant distribution The distribution of occupants in a vehicle
at their designated seating positions.
Production options weight The combined weight of those installed
regular production options weighing over
5 lbs (2.3 kilograms) in excess of those
standard items which they replace, not
previously considered in curb weight or
accessory weight, including heavy duty
brakes, ride levelers, roof rack, heavy duty
battery, and special trim.
PSI (Pounds per square inch) A standard unit of measure for air pres-
sure.
Recommended tire inflation pressure The recommended tire inflation pressure
for normal driving conditions is listed on
the Tire and Loading Information placard
located on driver’s door B‑pillar and pro-
vides best handling, tread life and riding
comfort.
Rim A metal support for a tire or a tire and tube
assembly upon which the tire beads are
seated.
Sidewall The portion of a tire between the tread and
the bead. TIN (Tire Identification Number) Unique identifier which facilitates
efforts by tire manufacturers to notify
purchasers in recall situations or other
safety matters concerning tires and gives
purchasers the means to easily identify
such tires. The TIN is comprised of “Man-
ufacturer’s identification mark”, “Tire
size”, “Tire type code” and “Date of manu-
facture”.
Tire load rating
Numerical code associated with the maxi-
mum load a tire can support.
Tire ply composition and material used
This indicates the number of plies or the
number of layers of rubber-coated fabric
in the tire tread and sidewall. Tire manu-
facturers also must indicate the ply mate-
rials in the tire and sidewall, which
include steel, nylon, polyester, and others.
Tire speed rating
Part of tire designation; indicates the
speed range for which a tire is approved.
Total load limit
Rated cargo and luggage load plus 68 kilo-
grams (150 lbs) times the vehicle’s desig-
nated seating capacity.
Traction
Force exerted by the vehicle on the road via
the tires. The amount of grip provided.
Tread
The portion of a tire that comes into con-
tact with the road. Tires and wheels
145>> Operation. Z
Page 148 of 222
 of tread remains.
Uniform Tire Quality Grading Standards A tire in")
Treadwear indicators
Narrow bands, sometimes called “wear
bars” that show across the tread of a tire
when only 1
/ 16 in (1.6 mm) of tread remains.
Uniform Tire Quality Grading Standards A tire information system that provides
consumers with ratings for a tire’s trac-
tion, temperature and treadwear. Ratings
are determined by tire manufacturers
using U.S. government testing procedures.
The ratings are molded into the sidewall of
the tire.
Vehicle maximum load on the tire Load on an individual tire that is deter-
mined by distributing to each axle its
share of the maximum loaded vehicle
weight and dividing it by two. Winter driving
Before the onset of winter, have your vehi-
cle winterized at an authorized electric
drive smart center.
This service includes:
R Check of anticorrosion and antifreeze
concentration.
R Addition of washer concentrate to the
water of the windshield/rear window.
Use a windshield washer concentrate
labeled for winter which is formulated
for temperatures below freezing point
(Y page 218).
R 12 V battery test. The capacity of the
12 V battery test drops with decreasing
ambient temperature.
R Tire change. Winter tires
G
WARNING
Winter tires with a tread depth of less
than 1
/ 6 in (4 mm) must be replaced. They
are no longer suitable for winter opera-
tion.
Always use winter tires at temperatures
below 45 ¦(7¥) and whenever wintry road
conditions prevail. Not all M+S rated tires
provide special winter performance. Make
sure the tires you use show the mountain/
snowflake marking 004Don the tire side-
wall. These tires meet specific snow trac-
tion performance requirements of the Rub-
ber Manufacturers Association (RMA) and
the Rubber Association of Canada (RAC) and
have been designed specifically for use in
snow conditions. Use of winter tires is the
only way to achieve the maximum effective-
ness of the ABS and ESP ®
in winter opera-
tion.
For safe handling, make sure all mounted
winter tires are of the same make and have
the same tread design.
For information on winter tires for your
vehicle model, see the "Technical data"
section (Y page 216).
Always observe the speed rating of the win-
ter tires installed on your vehicle. If the
maximum speed for which your tires are
rated is below the speed rating of your
vehicle, you must place a notice to this
effect where it will be seen by the driver.
Such notices are available at your tire
dealer or any authorized electric drive
smart center. Snow chains*
! Remember that snow chains must always
be compatible with the tire sizes of a
vehicle. Snow chains that are approved
by smart are only permitted for the fol-
lowing tire size: 146
Winter driving>> Operation.
* optional
Page 149 of 222

175/55 R15 on the rear axle.
For safety reasons, smart recommends
that you only use snow chains that have
been approved by smart.
Information on this is available from any
smart center.
Please refer to the separate operating
instructions for detailed information on
mounting the snow chains.
Snow chains should only be driven on
snow-covered roads at speeds not to
exceed 30 mph (50 km/h). Remove chains
as soon as possible when driving on roads
without snow.
Please observe the following guidelines
when using snow chains:
R Using snow chains is not permissible
with all wheel/tire combinations
(Y page 216).
R Use snow chains in pairs and on rear
wheels only. Follow the manufacturer’s
mounting instructions.
R Use of snow chains may be prohibited
depending on location. Always check
local and state laws before mounting
snow chains. G
WARNING
When mounting or removing snow chains,
always park your vehicle on level ground,
engage the parking brake, and switch off
the drive system. The vehicle could other-
wise move and injure yourself or other road
users. G
WARNING
When mounting and removing snow chains,
ensure that you and your vehicle are at a
safe distance from moving traffic. Not
doing so could endanger other road users or
even lead to you being injured by the vehi-
cles behind you. G
WARNING
The vehicle’s handling changes when driv-
ing with snow chains on any kind of road surface. This means that you should always
adapt your driving style to suit the current
road and weather conditions.
! If snow chains that do not meet require-
ments are mounted, they may scrape
against the body or axle components when
the vehicle is in motion. This could
result in damage to the rim/tire or vehi-
cle. Driving instructions
Drinking and driving
G
WARNING
Do not drink alcohol or take drugs and drive
or allow anyone to drive who has been
drinking alcohol or taking drugs. Even a
small amount of alcohol or drugs can affect
your reflexes, perceptions and judgment.
The possibility of a serious or even fatal
accident are greatly increased when you
drink or take drugs and drive. Pedals
G
WARNING
Make sure absolutely no objects are
obstructing the pedals’ range of motion.
Keep the driver’s footwell clear of all
obstacles. If there are any floormats* or
carpets in the footwell, make sure the ped-
als still have sufficient clearance.
During sudden acceleration or braking
maneuvers, the objects could get caught
between or beneath the pedals and restrict
your ability to brake or accelerate. This
could lead to accidents and/or injury. Power assistance
G
WARNING
With the drive system inactive, there is no
power assistance for the brake and steering Driving instructions
147>> Operation.
* optional Z
Page 150 of 222

systems. In this case, it is important to
keep in mind that a considerably higher
degree of effort is necessary to brake and
steer the vehicle. Adapt your driving
accordingly. Brakes
G
WARNING
Make sure not to endanger any other road
users when carrying out braking maneu-
vers.
Refer to the description of the hydraulic
brake assistant (Y page 48).
! Because the ESP ®
operates automati-
cally, the ignition must be switched off
when the parking brake is being tested
on a brake test dynamometer. Active
braking action through the ESP ®
may oth-
erwise seriously damage the brake sys-
tem which is not covered by the smart
Limited Warranty.
Brake pad wear or a leak in the brake system
may be the reason for low brake fluid level
in the brake fluid reservoir.
The brake fluid level in the brake fluid
reservoir may be too low if the brake warn-
ing lamp in the instrument cluster comes
on (Y page 23) although the parking brake
is released.
Have the brake system inspected immedi-
ately. Contact an authorized electric drive
smart center.
All checks and service work on the brake
system should be carried out by qualified
technicians only. Contact an authorized
electric drive smart center.
Only install brake pads and use brake fluid
recommended by smart. Inclines G
WARNING
Resting your foot on the brake pedal will
cause excessive and premature wear of the
brake pads.
It can also result in the brakes overheat-
ing, thereby significantly reducing their
effectiveness and your ability to stop the
vehicle in sufficient time to avoid an acci-
dent.
Please observe the following guidelines to
avoid that the permitted maximum speed is
exceeded when driving on downhill grades:
R Do not move the gear selector lever to N.
R Recuperation is limited, if:
-the high-voltage battery is fully
charged or too cold
- the power electronics or the electric
motor is overheated.
When driving down long and steep grades,
do not depress the brake pedal perma-
nently. Depress it in intervals instead to
reduce the vehicle speed.
High and low stresses After hard braking, it is advisable to drive
on for some time, rather than immediately
park, so that the air stream will cool down
the brakes faster.
If your brake system is normally only sub-
jected to moderate loads, you should occa-
sionally test the effectiveness of the
brakes by applying above-normal braking
pressure at higher speeds. This will also
enhance the grip of the brake pads.
G
WARNING
Make sure not to endanger any other road
users when carrying out these braking
maneuvers. 148
Driving instructions>> Operation.
Page 151 of 222

Wet road surface
G
WARNING
After driving in heavy rain for some time
without applying the brakes or through
water deep enough to wet brake components,
the first braking action may be somewhat
reduced and increased pedal pressure may
be necessary to obtain expected braking
effect. Maintain a safe distance from vehi-
cles in front.
To help prevent brake disc corrosion after
driving on wet road surfaces (particularly
salted roads), it is advisable to brake the
vehicle with considerable force prior to
parking. The heat generated serves to dry
the brakes. G
WARNING
Make sure not to endanger any other road
users when carrying out these braking
maneuvers.
Limited braking effect on salted roads Remember that the effect of the brakes can
be limited on salted road surfaces. A layer
of salt can form on brake discs and brake
pads, considerably reducing the friction
between the brake disc and the brake pad.
The effect is most noticeable after long
trips without braking, e.g. on the highway,
and after the vehicle has been parked for
several hours.
G
WARNING
The accumulation of salt on brake discs and
brake pads reduces braking effectiveness
and increases the distance necessary to
come to a complete standstill. This could
potentially cause an accident and/or per-
sonal injury.
To avoid this risk, you should
R brake carefully every now and then on
salted roads in order to remove any layer
of salt on the brake disc and brake pad, but do so without endangering any other
road users
R keep a good safe distance from the vehi-
cle in front and drive carefully
R press the brake carefully at the end of the
trip and again when beginning the next
trip in order to remove any salt residues
from the brake disc
New brake pads Only install brake pads recommended by
smart.
G
WARNING
If other than recommended brake pads are
installed, or other than recommended brake
fluid is used, the braking properties of the
vehicle can be degraded to an extent that
safe braking is substantially impaired.
This could result in an accident. G
WARNING
New brake pads will not achieve their opti-
mal braking effect until after several hun-
dred miles (kilometers). This means that
you must compensate for the reduced brak-
ing effect by pressing harder on the brake
pedal and adapt your driving style accord-
ingly. The same applies after brake pads or
brake discs have been changed. Drive sensibly - save energy
Energy consumption, to a great extent,
depends on driving habits and operating
conditions.
To save energy you should:
R Drive carefully and maintain a suitable
distance from the vehicle in front.
R Avoid frequent acceleration and decel-
eration.
R Keep tires at the recommended inflation
pressures.
R Remove carriers* when not in use. Driving instructions
149>> Operation.
* optional Z
Page 152 of 222

R
Remove unnecessary loads.
R Have all maintenance work performed at
the intervals specified in the Mainte-
nance Booklet and as required by the
Maintenance System. Contact an author-
ized electric drive smart center.
Energy consumption is also increased by
driving in stop-and-go traffic, on short
trips, and in hilly areas. Tires
G
WARNING
If you feel a sudden significant vibration
or ride disturbance, or you suspect that
possible damage to your vehicle has occur-
red, you should turn on the hazard warning
flashers, carefully slow down, and drive
with caution to an area which is a safe dis-
tance from the road.
Inspect the tires and the vehicle underbody
for possible damage. If the vehicle or tires
appear unsafe, have the vehicle towed to the
nearest smart center or tire dealer for
repairs.
Treadwear indicators (TWI) are required by
law. These indicators are located in six
places on the tread circumference and
become visible at a tread depth of approx-
imately 1
/ 16 in (1.6 mm), at which point the
tire is considered worn and should be
replaced.
The treadwear indicator appears as a solid
band across the tread. G
WARNING
Although the applicable federal motor
vehicle safety laws consider a tire to be
worn when the treadwear indicators (TWI)
become visible at approximately 1
/ 16 in
(1.6 mm), we recommend that you do not allow
your tires to wear down to that level. As
tread depth approaches 1
/ 8 in (3 mm), the
adhesion properties on a wet road are
sharply reduced. Depending upon the weather and/or road
surface (conditions), the tire traction var-
ies widely.
Specified tire inflation pressures must be
maintained. This applies particularly if
the tires are subject to high loads (e.g.
high speeds, heavy loads, high ambient
temperatures). G
WARNING
Do not drive with a flat tire. A flat tire will
affect your ability to steer or brake and may
cause you to lose control of the vehicle.
Continued driving with a flat tire or driv-
ing at high speed with a flat tire will cause
excessive heat build-up and possibly a
fire.
For more information, see “Tires and
wheels” (Y page 127). Hydroplaning
Depending on the depth of the water layer
on the road, hydroplaning may occur
resulting in a loss of control, even at low
speeds and with new tires. Reduce vehicle
speed, avoid track grooves in the road and
apply brakes cautiously when it is raining. Tire traction
The safe speed on a wet, snow covered or icy
road is always lower than on a dry road.
You should pay particular attention to the
condition of the road whenever the outside
temperatures are close to the freezing
point. G
WARNING
If ice has formed on the road, tire traction
will be substantially reduced. Under such
weather conditions, drive, steer and brake
with extreme caution.
smart recommends winter tires
(Y page 146) with a minimum tread depth of 150
Driving instructions>> Operation.
 1
1 2
2 3
3 4
4 5
5 6
6 7
7 8
8 9
9 10
10 11
11 12
12 13
13 14
14 15
15 16
16 17
17 18
18 19
19 20
20 21
21 22
22 23
23 24
24 25
25 26
26 27
27 28
28 29
29 30
30 31
31 32
32 33
33 34
34 35
35 36
36 37
37 38
38 39
39 40
40 41
41 42
42 43
43 44
44 45
45 46
46 47
47 48
48 49
49 50
50 51
51 52
52 53
53 54
54 55
55 56
56 57
57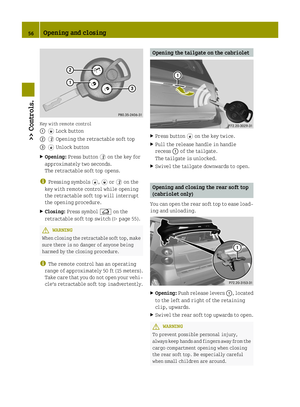 58
58 59
59 60
60 61
61 62
62 63
63 64
64 65
65 66
66 67
67 68
68 69
69 70
70 71
71 72
72 73
73 74
74 75
75 76
76 77
77 78
78 79
79 80
80 81
81 82
82 83
83 84
84 85
85 86
86 87
87 88
88 89
89 90
90 91
91 92
92 93
93 94
94 95
95 96
96 97
97 98
98 99
99 100
100 101
101 102
102 103
103 104
104 105
105 106
106 107
107 108
108 109
109 110
110 111
111 112
112 113
113 114
114 115
115 116
116 117
117 118
118 119
119 120
120 121
121 122
122 123
123 124
124 125
125 126
126 127
127 128
128 129
129 130
130 131
131 132
132 133
133 134
134 135
135 136
136 137
137 138
138 139
139 140
140 141
141 142
142 143
143 144
144 145
145 146
146 147
147 148
148 149
149 150
150 151
151 152
152 153
153 154
154 155
155 156
156 157
157 158
158 159
159 160
160 161
161 162
162 163
163 164
164 165
165 166
166 167
167 168
168 169
169 170
170 171
171 172
172 173
173 174
174 175
175 176
176 177
177 178
178 179
179 180
180 181
181 182
182 183
183 184
184 185
185 186
186 187
187 188
188 189
189 190
190 191
191 192
192 193
193 194
194 195
195 196
196 197
197 198
198 199
199 200
200 201
201 202
202 203
203 204
204 205
205 206
206 207
207 208
208 209
209 210
210 211
211 212
212 213
213 214
214 215
215 216
216 217
217 218
218 219
219 220
220 221
221