Page 89 of 222

READY indicator
READY
READY
appears for two seconds in the mul-
tifunction display, if:
R the key is turned to starter switch posi-
tion 2
R there is no malfunction in the drive sys-
tem
The vehicle is ready to drive. Charging mode display
When you switch off the ignition, you see
the display of the charging mode which is
currently set.
The charging mode is not changed after the
ignition has been switched off.
i If the multifunction display has
already gone out, you must turn the key to
starter switch position 1. Afterwards,
you can change the setting in the Charge
Charge
and Depart
and Depart menu (Ypage 90).
If you do not make a change, the last
selected entry is activated. If you have not
made any departure time settings in the
last 24 hours, the Instant Charge Instant Chargemenu is
activated. Example illustration: Departure time selected
0043 Preset departure time
0044 Instant Charge
Instant Charge menu X
To change the setting: press and hold the
control switch on the control lever up or
down until the desired mode is selected
in the multifunction display (Y page 83).
Additional information:
R Setting the departure time (Y page 90)
R Starting the charging process immedi-
ately (Y page 92) Outside temperature
G
WARNING
The outside temperature display is not
designed as an ice-warning device and is
therefore unsuitable for that purpose.
Indicated temperatures just above the
freezing point do not guarantee that the
road surface is free of ice. The road may
still be icy, especially in wooded areas or
on bridges. Your vehicle could start to skid
if you do not adjust your driving style
accordingly.
Therefore, always adjust your driving style
to the prevailing road and weather condi-
tions. Example illustration (U.S. vehicles)
i
Canada vehicles: The outside tempera-
ture display shows °C °Cinstead of °F
°F.
The outside temperature display 0043
appears in the multifunction display con-
tinuously.
A change of the outside temperature will be
displayed with delay. Control system
87>> Controls. Z
Page 90 of 222
Freeze warning (Canada vehicles only)
When the outside temperature falls below
3¥, the multifunction display makes you
aware of the fact that the road may be icy.
An additional freeze warning, i.e. an ice
crystal symbol 0043, in the multifunction
display flashes. After 60 seconds, the
freeze warning stops flashing but contin-
ues to be displayed. When the outside tem-
perature rises above 3¥, the freeze warn-
ing goes out.
A change of the outside temperature 0044will
be displayed with delay. 88
Control system>> Controls.
Page 91 of 222
Menus and submenus
Function
0043
Odometer
Odometer
menu (Ypage 89) 0044
0096START
START menu (trip statistics since start) (Y page 90)0087
0096RESET
RESET menu (trip statistics since last reset) (Y page 90)0085
Charge and depart
Charge and depart
menu (Ypage 90) 0083
Messages
Messages
menu (Ypage 93) 0084
Settings
Settings
menu (Ypage 93) 006B
Time
Time
menu (Y page 94) Odometer menu
The Odometer
Odometer menu shows you either the
main odometer and the trip odometer or the
trip odometer with the remaining cruise
range. 0043
Main odometer
0044 Trip odometer
0087 Remaining cruise range
X Press the control switch on the control
lever (Y page 83) up or down until the Control system
89>> Controls. Z
Page 92 of 222

Odometer
Odometer
menu appears in the multi-
function display.
X To switch between submenus: Press the OK
button on the control lever briefly.
X To reset the trip odometer: Select the
trip odometer display.
X Press button 0084on the instrument cluster
until the trip odometer is reset to 0
(Y page 23).
If the remaining cruise range of the charge
level of the high-voltage battery has drop-
ped below 10 %, Low Battery
Low Battery is displayed
on position 0087. Start menu
The 0096STARTSTART menu shows you the trip statis-
tics since start. 0043
Average speed since start
0044 Time elapsed since start
0087 Distance driven since start
0085 Average energy consumption
X Press the control switch on the control
lever (Y page 83) up or down until the
0096START START menu appears in the multifunc-
tion display.
X To reset: Press button 0084on the instru-
ment cluster until the 0096STARTSTART menu is
reset to 0(Y page 23).
i The 0096STARTSTART menu is reset to 0 automat-
ically
R when the ignition has been switched
off for more than 4 hours
R after driving more than 9999 miles or
kilometers Reset menu
The 0096RESETRESET menu menu shows you the trip
statistics since the last reset. 0043
Average speed since last reset
0044 Time elapsed since since last reset
0087 Distance driven since last reset
0085 Average energy consumption
X Press the control switch on the control
lever (Y page 83) up or down until the
0096RESET RESET menu appears in the multifunc-
tion display.
X To reset: Press button 0084on the instru-
ment cluster until the 0096RESETRESET menu is
reset to 0(Y page 23). Charge and depart menu
In the Charge and Depart Charge and Depart menu you can
change the following settings:
R set a departure time
R switch on/off the "Air conditioning
before start" function
R instant charge of the high‑voltage bat-
tery
R set the maximum charge current.
X Press the control switch on the control
lever up or down until Charge and Charge and
Depart Depart appears in the multifunction
display.
X Press the OK button on the control lever
briefly.
Setting the departure time With this function, you can preset a depar-
ture time.90
Control system>> Controls.
Page 93 of 222

This is useful:
R
if you wish to cool the interior of the
vehicle before driving
R if you wish to charge the vehicle at a
charging station/wallbox at the most
inexpensive electricity rate
With the "Air conditioning before start"
function, the vehicle interior is cooled
prior to a desired departure time.
Prerequisites:
R The doors and tailgate are closed.
R The charging cable for the high‑voltage
battery is connected to a power source
and inserted into the vehicle's power
socket.
R The high‑voltage battery has a suffi-
cient charge.
The maximum duration of "Air condition-
ing before start" is 30 minutes.
Set the air distribution of your vehicle as
follows so that the "Air conditioning
before start" function has the greatest
effect:
R in summer, to the center and side vents
R in winter, onto the windshield and side
windows
Information on air distribution can be
found on (Y page 102).
The setting of the airflow regulator has no
influence on the "Air conditioning before
start" function.
i If the programmed time is too short, the
high‑voltage battery cannot be com-
pletely charged. After setting the depar-
ture time, the maximum charge level
which can be reached is then shown.
i If the high‑voltage battery is not suf-
ficiently charged and the "Air condi-
tioning before start" function is acti-
vated, the high‑voltage battery is
charged first. When a charge level of at
least 20 % has been reached, the "Air con-
ditioning before start" function is acti-
vated. This function then has priority over the charging of the high‑voltage
battery.
Activating the set departure time X
Press and hold the control switch on the
control lever up or down until the display
of the last set departure time 0043appears
in the multifunction display. X
Briefly press the OK button on the control
lever.
The departure time is activated 0044. The
setting for the "Air conditioning before
start" function 0087is stored.
Changing the set departure time
X Press and hold the control switch on the
control lever up or down until the Over‐ Over‐
write
write menu appears in the multifunction
display.
X Briefly press the OK button on the control
lever.
X If the 12-hour mode is set:
press and hold the control switch on the
control lever up or down until the
desired mode (am amoder pm
pm) is selected.
X Briefly press the OK button on the control
lever.
X Press and hold the control switch on the
control lever up or down until the
desired hour is selected. Control system
91>> Controls. Z
Page 94 of 222

X
Briefly press the OK button on the control
lever.
X Press and hold the control switch on the
control lever up or down until the "Air
conditioning before start" function is
activated or deactivated.
X Briefly press the OK button on the control
lever.
X Press and hold the control switch on the
control lever up or down until the "Air
conditioning before start" function is
activated or deactivated.
X Briefly press the OK button on the control
lever.
The new departure time is stored and
activated.
The "Air conditioning before start"
function is activated or deactivated.
Starting the charging process of the
high‑voltage battery immediately This function allows you to start the charg-
ing process immediately. The charging
process begins as soon as the charging
cable is connected.
i The charging process also begins when
you insert the charging cable into the
vehicle's power socket. However, this is
only the case if you have not made any
departure time settings.
Information on the charging process can
be found on (Y page 115).
X Press and hold the control switch on the
control lever up or down until the
Instant Charge
Instant Charge menu appears in the
multifunction display.
X Briefly press the OK button on the control
lever.
The charging process is started as soon
as the charging cable is connected.
i When you call up the Instant Charge
Instant Charge
menu, the "Air conditioning before
start" function is not available. Setting the maximum charge current G
WARNING
When connected to a power supply socket, a
high electrical load during the charging
process can lead to overheating of the
external power supply. There is a risk of
fire.
Check the maximum permissible charge
current on site before you begin the charg-
ing process. Contact an authorized electric
drive smart center should you require
assistance. If necessary, adjust the set-
tings of your vehicle.
You can limit the charge current of the
high‑voltage battery. This can protect the
power supply from overloading. You can set
the limit either on the control unit of the
charging cable or via the control system.
The preset standard value is "Max". This
corresponds to the maximum available
charge current of the power supply.
Check the maximum permissible charge
current for the respective power supply
socket before charging the high‑voltage
battery.
The following values are available for
selection: 8 A,12 A,Max. The last value set
remains stored until a change is made.
X Press and hold the control switch on the
control lever up or down until the
Charge Current Charge Current menu appears in the
multifunction display.
X Briefly press the OK button on the control
lever.
X Press and hold the control switch on the
control lever up or down until the
desired amperage is selected.
X Briefly press the OK button on the control
lever.
The selected amperage is set.
i If differing values are set on the charg-
ing cable and the control system, the
high‑voltage battery is charged using
the lowest value. 92
Control system>> Controls.
Page 95 of 222

i
If the vehicle needs more time to charge
the high‑voltage battery than usual,
check the settings of the maximum per-
missible charge current. Messages menu
The Messages Messages menu stores messages that
you can call up.
i When no messages have been stored, the
Messages
Messages menu is not displayed. X
Press the control switch on the control
lever (Y page 83) up or down until the
Messages Messages menu appears in the multi-
function display.
The number of stored messages is 0043dis-
played
X Press the OK button on the control lever
briefly.
The first stored message appears.
X To scroll through messages: Press the OK
button on the control lever briefly.
For more information on display messages,
see (Y page 161).
Maintenance service interval display The maintenance service interval display
will notify you when the next maintenance
service is due and what type of maintenance
service is required.
Example:
R 009A Main Service in XXX mi
Main Service in XXX mi
R 009A Main Service in XX Days Main Service in XX Days
X To confirm: Press the OK button on the
control lever briefly.
The mesage is stored. When the due date for the maintenance
service has been has been passed, the num-
ber of miles (kilometers) or days since are
preceeded by a minus sign.
!
Failure to have the maintenance
service performed at the designated
times/mileage, may result in vehicle
damage that is not covered by the smart
Limited Warranty. Settings menu
In the Settings Settings menu, you can select indi-
vidual settings for your vehicle.
The following functions are available:
R Setting the language
R Setting the temperature unit
R Setting the distance and speed unit
X Press the control switch on the control
lever (Y page 83) up or down until the
Settings Settings menu appears in the multi-
function display.
X Press the OK button on the control lever
briefly.
Setting the language The following languages are available:
R
German
R US English
R UK English
R French
R Italian
R Spanish X
Press the control switch on the control
lever (Y page 83) up or down until the Control system
93>> Controls. Z
Page 96 of 222
 up or down until the
d")
Language
Language
submenu appears in the multi-
function display.
X Press the OK button on the control lever
briefly.
X Press the control switch on the control
lever (Y page 83) up or down until the
desired language is selected.
X Press the OK button on the control lever
briefly to confirm.
The selected language is stored.
Setting the temperature unit The following units are available:
R
†
R ‡
X Press the control switch on the control
lever (Y page 83) up or down until the
°F/°C
°F/°C submenu appears in the multifunc-
tion display.
X Press the OK button on the control lever
briefly.
X Press the control switch on the control
lever (Y page 83) up or down until the
desired unit is selected.
X Press the OK button on the control lever
briefly to confirm.
The selected unit is stored.
Setting the distance and speed unit The following units are available:
R
Miles (mi)
R Kilometers (km)
X Press the control switch on the control
lever (Y page 83) up or down until the mi– mi–
km km submenu appears in the multifunction
display.
X Press the OK button on the control lever
briefly. X
Press the control switch on the control
lever (Y page 83) up or down until the
desired unit is selected.
X Press the OK button on the control lever
briefly to confirm.
The selected unit is stored.
i Canada only: The unit for the cruise
control (Y page 97) does not change,
regardless of which unit is set in this
menu. Time menu
The Time Time menu lets you set the time and
offers different display modes.
The following submenus are available:
R Setting time display mode (12-hour or
24-hour mode)
R Setting period of day, am or pm 5
R Setting the hours
R Setting the minutes
X Press the control switch on the control
lever (Y page 83) up or down until the
Time
Time menu appears in the multifunction
display.
X Press the OK button on the control lever
briefly.
Setting the time display mode X
Press the control switch on the control
lever (Y page 83) up or down until the
12h 24h
12h 24h submenu appears in the multi-
function display.
X Press the OK button on the control lever
briefly.
X Press the control switch on the control
lever (Y page 83) up or down until the
desired setting is selected.
X Press the OK button on the control lever
briefly to confirm.
The selected mode is stored.
5 Only available in 12-hour mode. 94
Control system>> Controls.
 1
1 2
2 3
3 4
4 5
5 6
6 7
7 8
8 9
9 10
10 11
11 12
12 13
13 14
14 15
15 16
16 17
17 18
18 19
19 20
20 21
21 22
22 23
23 24
24 25
25 26
26 27
27 28
28 29
29 30
30 31
31 32
32 33
33 34
34 35
35 36
36 37
37 38
38 39
39 40
40 41
41 42
42 43
43 44
44 45
45 46
46 47
47 48
48 49
49 50
50 51
51 52
52 53
53 54
54 55
55 56
56 57
57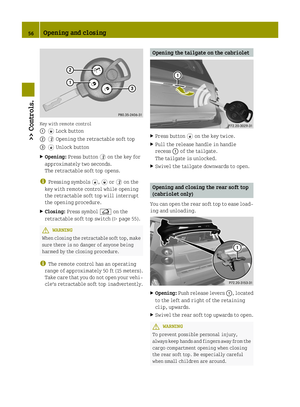 58
58 59
59 60
60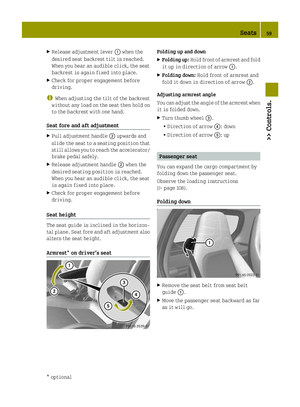 61
61 62
62 63
63 64
64 65
65 66
66 67
67 68
68 69
69 70
70 71
71 72
72 73
73 74
74 75
75 76
76 77
77 78
78 79
79 80
80 81
81 82
82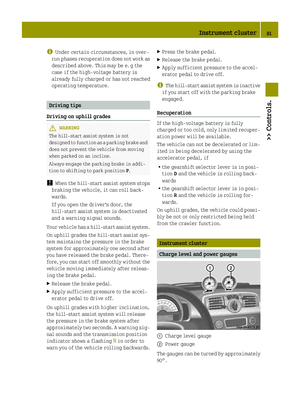 83
83 84
84 85
85 86
86 87
87 88
88 89
89 90
90 91
91 92
92 93
93 94
94 95
95 96
96 97
97 98
98 99
99 100
100 101
101 102
102 103
103 104
104 105
105 106
106 107
107 108
108 109
109 110
110 111
111 112
112 113
113 114
114 115
115 116
116 117
117 118
118 119
119 120
120 121
121 122
122 123
123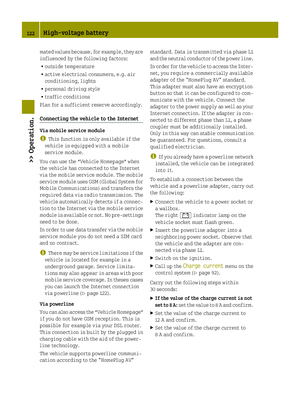 124
124 125
125 126
126 127
127 128
128 129
129 130
130 131
131 132
132 133
133 134
134 135
135 136
136 137
137 138
138 139
139 140
140 141
141 142
142 143
143 144
144 145
145 146
146 147
147 148
148 149
149 150
150 151
151 152
152 153
153 154
154 155
155 156
156 157
157 158
158 159
159 160
160 161
161 162
162 163
163 164
164 165
165 166
166 167
167 168
168 169
169 170
170 171
171 172
172 173
173 174
174 175
175 176
176 177
177 178
178 179
179 180
180 181
181 182
182 183
183 184
184 185
185 186
186 187
187 188
188 189
189 190
190 191
191 192
192 193
193 194
194 195
195 196
196 197
197 198
198 199
199 200
200 201
201 202
202 203
203 204
204 205
205 206
206 207
207 208
208 209
209 210
210 211
211 212
212 213
213 214
214 215
215 216
216 217
217 218
218 219
219 220
220 221
221
When the outside temperature falls below
3¥, the multifunction display makes you
aware of the fact that the road may be icy.
An additional freeze warning, i.e. a")
 0044
0096START
START menu (trip statistics since start) (Y page 90)0087
0096RESET
RESET menu (trip statistics since last reset) (Y pa")