Page 9 of 45
Help display
If you want the help to be displayed on the screen of the unit, you only need to
activate it manually in the SETUP operating mode (deactivate it after-
wards) » page 10 , Setup Voice control .
Voice recording
In the operating modes PHONE, NAV and RADIO , a short voice recording can be
made; after speaking the recorded term, the desired voice command is carried out
(e.g. in the operating mode PHONE, a voice recording can be set up for a tele-
phone contact and after speaking it, the system carries out the dialling).
7Voice control of the device
Page 10 of 45
SETUP mode
Main menu SETUP
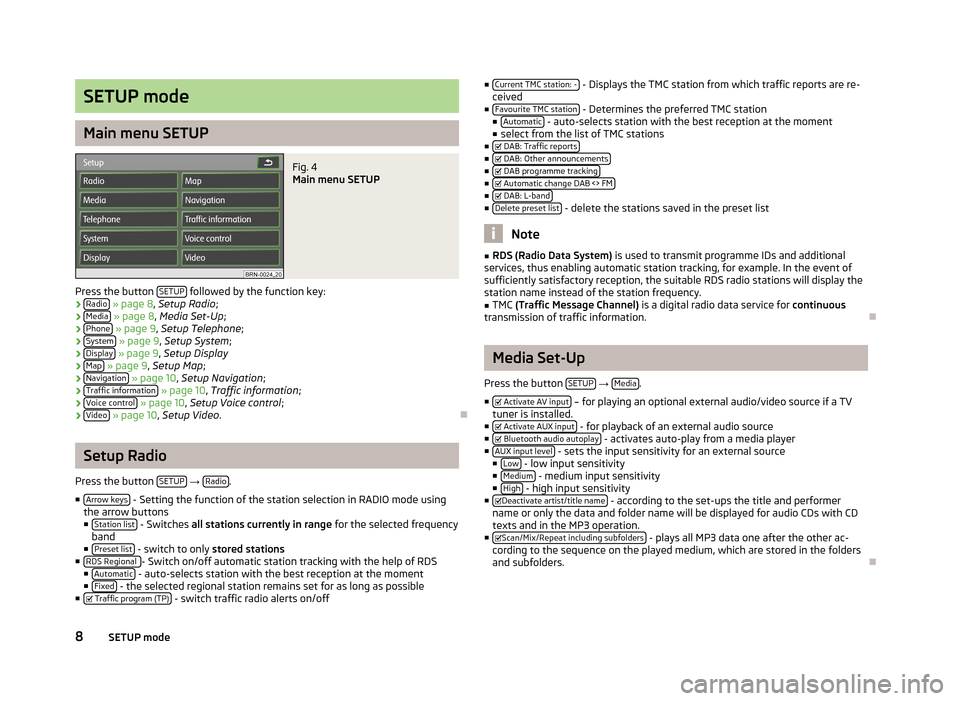
Fig. 4
Main menu SETUP
Press the button SETUP followed by the function key:
› Radio
» page 8 , Setup Radio ;
› Media
» page 8 , Media Set-Up ;
› Phone
» page 9 , Setup Telephone ;
› System
» page 9 , Setup System ;
› Display
» page 9 , Setup Display
› Map
» page 9 , Setup Map ;
› Navigation
» page 10 , Setup Navigation ;
› Traffic information
» page 10 , Traffic information ;
› Voice control
» page 10 , Setup Voice control ;
› Video
» page 10 , Setup Video .
Setup Radio
Press the button SETUP
→ Radio.
■ Arrow keys
- Setting the function of the station selection in RADIO mode using
the arrow buttons
■ Station list
- Switches all stations currently in range for the selected frequency
band
■ Preset list
- switch to only stored stations
■ RDS Regional - Switch on/off automatic station tracking with the help of RDS
■ Automatic - auto-selects station with the best reception at the moment
■ Fixed - the selected regional station remains set for as long as possible
■ Traffic program (TP) - switch traffic radio alerts on/off
■
Current TMC station: - - Displays the TMC station from which traffic reports are re-
ceived
■ Favourite TMC station
- Determines the preferred TMC station
■ Automatic - auto-selects station with the best reception at the moment
■ select from the list of TMC stations
■ DAB: Traffic reports
■
DAB: Other announcements■
DAB programme tracking■
Automatic change DAB <> FM■
DAB: L-band■
Delete preset list - delete the stations saved in the preset list
Note
■RDS (Radio Data System) is used to transmit programme IDs and additional
services, thus enabling automatic station tracking, for example. In the event of
sufficiently satisfactory reception, the suitable RDS radio stations will display the
station name instead of the station frequency.■
TMC (Traffic Message Channel) is a digital radio data service for continuous
transmission of traffic information.
Media Set-Up
Press the button SETUP
→ Media.
■ Activate AV input
– for playing an optional external audio/video source if a TV
tuner is installed.
■ Activate AUX input
- for playback of an external audio source
■ Bluetooth audio autoplay - activates auto-play from a media player
■ AUX input level - sets the input sensitivity for an external source
■ Low - low input sensitivity
■ Medium - medium input sensitivity
■ High - high input sensitivity
■ Deactivate artist/title name - according to the set-ups the title and performer
name or only the data and folder name will be displayed for audio CDs with CD
texts and in the MP3 operation.
■ Scan/Mix/Repeat including subfolders
- plays all MP3 data one after the other ac-
cording to the sequence on the played medium, which are stored in the folders
and subfolders.
8SETUP mode
Page 11 of 45
Setup Telephone
Press the button SETUP
→ Phone.
■ Update telephone book
- loads the phonebook from the mobile phone to the mem-
ory of the radio navigation system. This procedure can take a few minutes.
■ Delete call lists
- deletes saved call lists
■ Delete text message - deletes text messages (SMS)
■ Speed dial - edits speed dial keys
■ Deactivate telephone - deactivates the phone
■ Change order of call lists - changes the order in the call list from the oldest to the
most recent calls
■ Restore factory settings
- resets device to factory settings- deletes user profiles
Setup System
Press the button SETUP
→ System.
■ Language
- Menu language for the displays and the language messages
■ Automatic - auto-detection of menu language, depends on the setting in the
information display
■ or direct selection of the required language from a list
■ Date format
- sets up the date format
■ DD.MM.YYYY - day, month and year
■ MM.DD.YYYY - Month, day and year
■ Time display - Displays the current time on the screen in the operating modes
RADIO, MEDIA and MAP
■ On
- switches on
■ Off - switches off
■ Date - Sets up date
■ Factory settings - restores factory settings
■ Reset - resets device to factory settings- deletes user profiles
■ All - Selects all settings
■ Select setting to be restored
■ Climate displays
- Displays the temperature setting in Climatronic mode
■ Off
■3 s■5 s■10 s
Setup Display
Press the button SETUP
→ Display.
■ Brightness
- adjust the screen brightness
■ Brightest - brightest level
■ Brighter - brighter level
■ Medium - medium level
■ Darker - darker level
■ Darkest - darkest level
■ Day/Night - switches between the day/night and auto map display modes.
■ Automatic - Controlled by the available vehicle lighting sensors (for daytime
running lights)
■ Day
- Setting for daytime running
■ Night - Setting for nightime running
■ Confirmation tone - activates/deactivates confirmation tone when a function key
is pressed ■ On
- switches on
■ Off - switches off
■ Switch off display - it is possible to switch the display to energy saving mode; the
current information about the audio source is shown in the bottom row. The
display can be switched on again by touching the screen or any key other than
the operating knob.
Setup Map
Press the button SETUP
→ Map.
■ Split-screen
- Position of the split-screen in the map view
■ Left - left
■ Right - right
■ Dest. guidan. symbol - displays the navigation instructions and compass in the
split-screen in the 2D and 3D view
■ Destination display
- displays information about the destination » page 26, Func-
tion keys and symbols during route guidance ■ Destination
- destination
■ Next stopover destination - next stopover
■ POI selection - selects points of interest displayed on the map using symbols
9SETUP mode
Page 12 of 45
■ Show VIP destination symbols - displays destinations saved as favourites in the
map with the symbol from the selected favourite category
■ Show speed limitation
- the current speed limitation for the current road section
is displayed in the screen
Setup Navigation
Press the button SETUP
→ Navigation.
■ Suggest 3 alternative routes
- suggests 3 alternative routes for the destina-
tion » page 31 , Function key “Options”
■ Nav. announcements
- sets up navigation announcements
■ Off - switches off
■ Dynamic - spoken driving recommendations are only provided when you have
left the calculated route, for example, on the basis of announced traffic dis-
ruptions.
■ On
- switches on
■ Time display - setup the time display in the lower part of the map
■ Time of arrival - display time of arrival at the destination
■ Remaining time - displays remaining driving time
■ My points of interest (personal POI) Importing your own POIs from the SD memory
card -
■ Define home address
- edit “Home address” » page 32, Function key “
Home
address”
■ Destination entry
- show screen to enter the destination » page 31, Function
key “
Address”
■ Current position
- saves the current position as a home address
■ Delete - Delete numbers
■ Edit - edits home address
■ Set current position - saves the current position as a home address
■ Advanced navigation settings - advanced navigation settings
■ Demo mode - start a virtual route guidance
■ Enter start location - enter start location for the demo mode
■ Av. speed for time calc. - the time of arrival or the journey time is calculated in the
demo mode based on the configured average speed ■ Fast
- high speed
■ Medium - medium speed
■ Low - low speed
Traffic information
Press the button SETUP
→ Traffic information.
■ Favourite TMC station
- set your preferred TMC station
■ Automatic - automatic TMC station finding
■ select favourite TMC station from a list
■ TMC filter
- setup display of the traffic reports
■ All - displays all current traffic reports
■ On Route - only display traffic annoncements which relate to the route being
driven
■ Traffic program (TP)
- switches traffic program on/off » page 13, Traffic Pro-
gramme TP
Setup Voice control
Press the button SETUP
→ Voice control.
■ Dialogue style
- sets up dialogue style
■ Long - the system outputs the complete message without shortening it
■ Short - the system shortens some message or substitutes them with an
acoustic signal (gong); this accelerated the control
■ Visual voice command help
- visual voice command help displays an overview of the
major commands in a pop-up window. The “visual voice command help” can be set separately for each operating mode in the system (this means, if you onlyset the help display for the operating mode MAP, it is only displayed in this op-
erating mode).
■ Delete voice tags
- deletes your voice entries
■ Delete - deletes the selected voice entries
■ All - deletes all stored entries
■ Telephone book - Phonebook
■ Radio memory - radio memory
■ Navigation memory - navigation memory
Setup Video
Press the button SETUP
→ Video.
■ Audio language
- sets up the language of the voice output
■ Menu language - sets the language for the DVD menu
■ Subtitles - subtitles
10SETUP mode
Page 13 of 45
■DVD format - sets DVD format
■ 4:3 - 4:3 aspect ratio for the screen display
■ 16:9 - 16:9 aspect ratio for the screen display
■ 16:9 zoom - 16:9 aspect ratio for the screen display, with full screen display
Setup TV
Press the button SETUP
→ Video.
■ Arrow keys
- searches through TV channels
■ Station list - select TV station from the list of all TV stations which are currently
available
■ Preset list
- displays TV stations saved in the station memory
■ TV Norm - edits TV Norm
■ TV format - adjusts TV image format
■ 4:3 - 4:3 aspect ratio for the screen display
■ 16:9 - 16:9 aspect ratio for the screen display
■ 16:9 (hor. zoom) - 16:9 aspect ratio for the screen display, with full screen display
■ TV audio channel - selects audio channel for bilingual audio “
”
■ Channel A - voice channel A
■ Channel B - voice channel B
■ Automatic DVB-T/Analogue switch - searches for the selected TV station in ana-
logue/digital format
■ Delete TV preset list
- deletes TV preset list
■ AV1 Norm - playback norm, always for a single external audio or video source on-
ly
■ PAL
■NTSC■SECAM■
AV2 Norm - playback norm, always for a single external audio or video source on-
ly
■ PAL
■NTSC■SECAM■ AV1 format - playback norm, only ever for a connected external audio or video
source
■ 4:3
- 4:3 aspect ratio for the screen display
■ 16:9 - 16:9 aspect ratio for the screen display
■ 16:9 (hor. zoom) - 16:9 aspect ratio for the screen display, with full screen display
■AV2 format - playback norm, only ever for a connected external audio or video
source
■ 4:3
- 4:3 aspect ratio for the screen display
■ 16:9 - 16:9 aspect ratio for the screen display
■ 16:9 (hor. zoom) - 16:9 aspect ratio for the screen display, with full screen display
11SETUP mode
Page 14 of 45
RADIO mode
Main menu RADIO
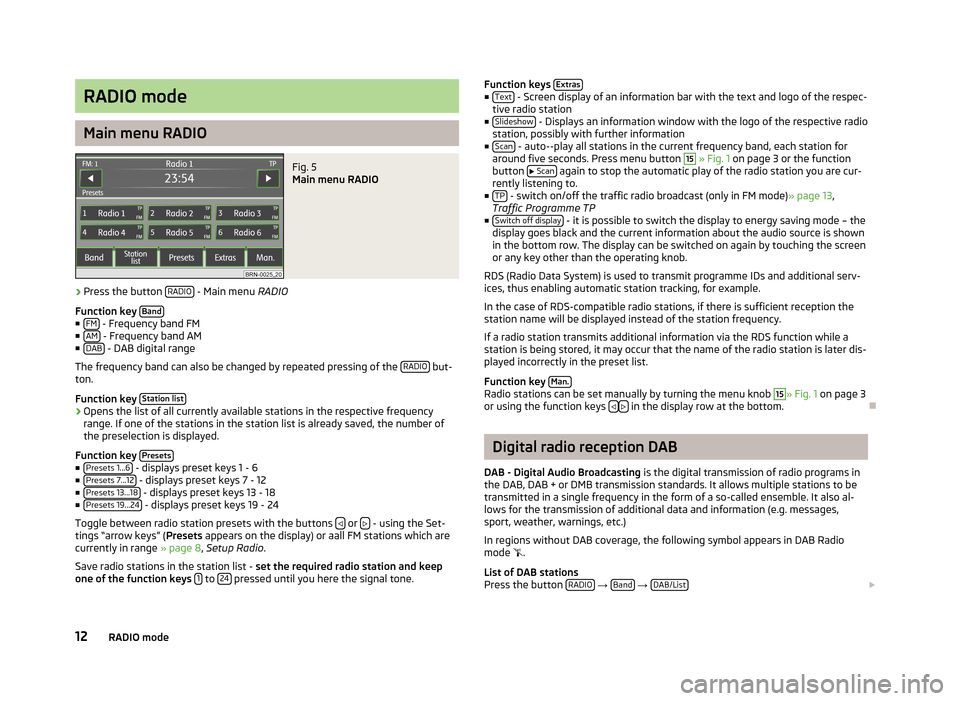
Fig. 5
Main menu RADIO
›
Press the button RADIO - Main menu
RADIO
Function key Band
■
FM - Frequency band FM
■ AM - Frequency band AM
■ DAB - DAB digital range
The frequency band can also be changed by repeated pressing of the RADIO
but-
ton.
Function key Station list
›Opens the list of all currently available stations in the respective frequency
range. If one of the stations in the station list is already saved, the number of
the preselection is displayed.
Function key Presets
■
Presets 1...6 - displays preset keys 1 - 6
■ Presets 7...12 - displays preset keys 7 - 12
■ Presets 13...18 - displays preset keys 13 - 18
■ Presets 19...24 - displays preset keys 19 - 24
Toggle between radio station presets with the buttons
or - using the Set-
tings “arrow keys” ( Presets appears on the display) or aall FM stations which are
currently in range » page 8, Setup Radio .
Save radio stations in the station list - set the required radio station and keep
one of the function keys 1
to 24 pressed until you here the signal tone.
Function keys
Extras■
Text - Screen display of an information bar with the text and logo of the respec-
tive radio station
■ Slideshow
- Displays an information window with the logo of the respective radio
station, possibly with further information
■ Scan
- auto--play all stations in the current frequency band, each station for
around five seconds. Press menu button
15
» Fig. 1 on page 3 or the function
button
Scan again to stop the automatic play of the radio station you are cur-
rently listening to.
■ TP
- switch on/off the traffic radio broadcast (only in FM mode) » page 13,
Traffic Programme TP
■ Switch off display
- it is possible to switch the display to energy saving mode – the
display goes black and the current information about the audio source is shown
in the bottom row. The display can be switched on again by touching the screen
or any key other than the operating knob.
RDS (Radio Data System) is used to transmit programme IDs and additional serv- ices, thus enabling automatic station tracking, for example.
In the case of RDS-compatible radio stations, if there is sufficient reception the
station name will be displayed instead of the station frequency.
If a radio station transmits additional information via the RDS function while a
station is being stored, it may occur that the name of the radio station is later dis-
played incorrectly in the preset list.
Function key Man.
Radio stations can be set manually by turning the menu knob
15
» Fig. 1
on page 3
or using the function keys in the display row at the bottom.
Digital radio reception DAB
DAB - Digital Audio Broadcasting is the digital transmission of radio programs in
the DAB, DAB + or DMB transmission standards. It allows multiple stations to be transmitted in a single frequency in the form of a so-called ensemble. It also al- lows for the transmission of additional data and information (e.g. messages,
sport, weather, warnings, etc.)
In regions without DAB coverage, the following symbol appears in DAB Radio
mode
.
List of DAB stations
Press the button RADIO
→ Band
→ DAB/List
12RADIO mode
Page 15 of 45
XYZ - an ensemble of DAB stations
XYZ
- DAB station with the name XYZ
XYZ
- DAB station with the name XYZ which is currently not in range
XYZ (FM))
- DAB station with the name XYZ which is currently only in range in the
FM frequency band
DAB programme tracking
If a DAB station is a member of several ensembles, when the signal is poor, the same station is searched in a different ensemble.
Auto-change DAB -FM
If the DAB signal is poor, the unit will try to find a corresponding FM station for the DAB station you are currently listening to.
For auto-change to work, the DAB and FM stations must send a sender ID.
While the station is being received via the FM frequency band, (FM) will appear
next to the station name. When the corresponding DAB station is in range again,
the (FM) display disappears.
If a DAB station is also not available in the FM frequency band due to poor recep-
tion, the device will be switched to mute.
If you do not want automatic station change (e.g. when driving through tunnels, when reception may be lost temporarily), you can deactivate this function .
Traffic Programme TP
Press the RADIO
key
→ Extras
→ TP - switches the traffic programme on/off.
The display “ TP” in combination with a station name (e.g. in the station or preset
list), indicates a traffic programme station.
Irrespective of which radio station you are listening to, an additional receiver part
in the unit ensures that a traffic programme station can always be received as
long as the traffic programme function is switched on. During media mode, the
unit always searches for an available traffic program station in the background.
The availability of traffic programme monitoring is identified by the letters “ TP” at
the top right of the screen.
If no traffic programme station can be received because, for example, radio recep- tion is interrupted in general, “ No TP” will be displayed instead of “ TP”.
NoteSome radio stations misleadingly identify themselves as traffic programs. It is
therefore not an error with the unit that there are no traffic news on these sta-
tions.
13RADIO mode
Page 16 of 45
MEDIA mode
Main menu MEDIA
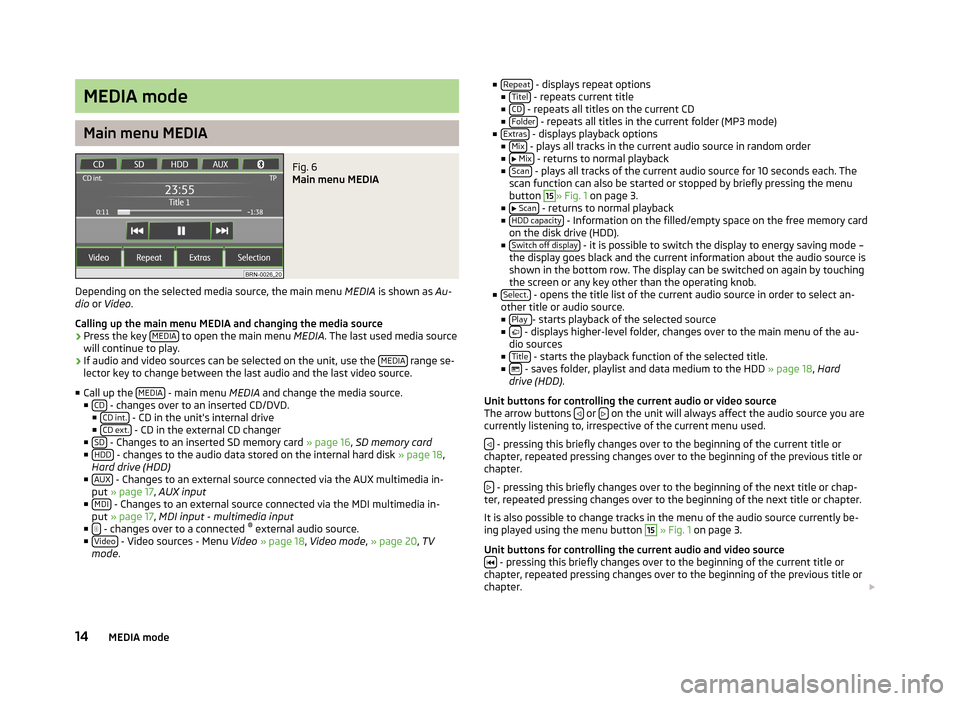
Fig. 6
Main menu MEDIA
Depending on the selected media source, the main menu MEDIA is shown as Au-
dio or Video .
Calling up the main menu MEDIA and changing the media source
›
Press the key MEDIA to open the main menu
MEDIA. The last used media source
will continue to play.
›
If audio and video sources can be selected on the unit, use the MEDIA range se-
lector key to change between the last audio and the last video source.
■ Call up the MEDIA
- main menu
MEDIA and change the media source.
■ CD - changes over to an inserted CD/DVD.
■ CD int. - CD in the unit's internal drive
■ CD ext. - CD in the external CD changer
■ SD - Changes to an inserted SD memory card » page 16, SD memory card
■ HDD - changes to the audio data stored on the internal hard disk » page 18,
Hard drive (HDD)
■ AUX
- Changes to an external source connected via the AUX multimedia in-
put » page 17 , AUX input
■ MDI
- Changes to an external source connected via the MDI multimedia in-
put » page 17 , MDI input - multimedia input
■
- changes over to a connected ®
external audio source.
■ Video - Video sources - Menu Video » page 18 , Video mode , » page 20 , TV
mode .
■
Repeat - displays repeat options
■ Titel - repeats current title
■ CD - repeats all titles on the current CD
■ Folder - repeats all titles in the current folder (MP3 mode)
■ Extras - displays playback options
■ Mix - plays all tracks in the current audio source in random order
■ Mix - returns to normal playback
■ Scan - plays all tracks of the current audio source for 10 seconds each. The
scan function can also be started or stopped by briefly pressing the menu
button
15
» Fig. 1 on page 3.
■ Scan - returns to normal playback
■ HDD capacity - Information on the filled/empty space on the free memory card
on the disk drive (HDD).
■ Switch off display
- it is possible to switch the display to energy saving mode –
the display goes black and the current information about the audio source is
shown in the bottom row. The display can be switched on again by touching
the screen or any key other than the operating knob.
■ Select.
- opens the title list of the current audio source in order to select an-
other title or audio source.
■ Play
- starts playback of the selected source
■ - displays higher-level folder, changes over to the main menu of the au-
dio sources
■ Title
- starts the playback function of the selected title.
■ - saves folder, playlist and data medium to the HDD » page 18, Hard
drive (HDD) .
Unit buttons for controlling the current audio or video source
The arrow buttons
or on the unit will always affect the audio source you are
currently listening to, irrespective of the current menu used.
- pressing this briefly changes over to the beginning of the current title or
chapter, repeated pressing changes over to the beginning of the previous title or
chapter.
- pressing this briefly changes over to the beginning of the next title or chap-
ter, repeated pressing changes over to the beginning of the next title or chapter.
It is also possible to change tracks in the menu of the audio source currently be-
ing played using the menu button
15
» Fig. 1 on page 3.
Unit buttons for controlling the current audio and video source
- pressing this briefly changes over to the beginning of the current title or
chapter, repeated pressing changes over to the beginning of the previous title or chapter.
14MEDIA mode