2014 SKODA YETI buttons
[x] Cancel search: buttonsPage 6 of 45

and - buttons for moving forwards/backwards
› RADIO-Mode
- for the selection of the stations from the preset
list.
› MEDIA-Mode
- for the selection of the previous or following
track.
› TV-Mode
- for the selection of the TV stations.
CD/DVD case14
Display
4
- Eject CD/DVD
15
- Switch on voice control
6
Menu button
› RADIO mode
- Turn for manual tuning; press briefly to start/
stop the automatic play function (scan).
› MEDIA mode
- Turn to change track, press briefly to start/stop
the automatic play function (scan) when in audio mode.
› Turn
map display (MAP) - in order to change the map scale;
press briefly for repeating a navigation announcement during active route guidance.
› Navigation (NAV)
- press briefly to repeat a navigation an-
nouncement during active route guidance.
SD memory card slot
16
Switching the device on/off
›
To switch the device on or off, press the setting knob
1
» Fig. 1 on page 3.
After switching on the unit, the last audio source that was active before switch-
ing off will be played.
If the key is pulled out of the ignition lock while the unit is switched on, the unit
will switch off automatically.
If your vehicle is fitted with the KESSY system, the unit will switch off automati-
cally after the engine is turned off and the door opened. If you open the door be-
fore turning off the engine, the unit will not switch off until the vehicle is locked.
When the ignition is switched off, the system switches off automatically after ap-
prox. half an hour (discharge protection of the vehicle battery).
10111213141516Adjusting the volume›
To increase the volume, turn setting-up button
1
» Fig. 1 on page 3 to the right.
›
To decrease the volume, turn setting-up button
1
counter-clockwise.
The change in volume is displayed on the screen of the unit.
If the volume is reduced to 0, the speakers are muted. The following symbol will appear on the screen .
CAUTION
High volumes can cause hearing damage.
Screen operation
Fig. 2
Setup mode SETUP: Main Menu Setup / Setup Radio
The screen of the unit is known as a “touchscreen”. Fields circled in colour on the screen are presently “active” and are operated by touching the screen.
Some of the device functions can be operated using the multifunction steering wheel; refer to the Owner's Manual for your vehicle.
“Function keys” on the screen
›
Active fields, which call up a function or a menu, are called “function keys”.
›
For example, in the main menu Setup, press the Radio function key
» Fig. 2 to
open the menu Setup radio
C
The title lines
A
and
C
indicate the menu you
are currently in.
›
By using the function keys
B
and
D
, you can change back from each menu
to the previous menu.
4General information
Page 8 of 45

Voice control of the device
Introductory information
The voice control is only possible in the following languages: Czech, English, German, French, Spanish, Portuguese, Dutch, Italian .
You can use the voice control in the operating modes RADIO, MEDIA, PHONE, MAP
and NAV .
Switch on voice control (dialogue)
› Press the button
.
Dialogue
› The long or short dialogue can be selected by pressing the key
on the unit
and by speaking the voice command “ Long dialogue” (the system outputs the
message completely without shortening it) or “ Short dialogue” (the system
shortens some messages or substitute them with an acoustic signal (gong),
which accelerates the control) or in manual mode SETUP » page 10 , Setup
Voice control .
Interrupt messages
› The message just given can be finished by pressing the button
on the unit.
This allows you to speak another voice command earlier.
Switch off voice control (dialogue)
› After executing the voice command, voice control switches off automatically.
› By pressing one of the buttons which are located on the side of the screen of
the unit or by touching the screen (unless the function key Hide help
is not
pressed in the help display).
› By speaking the voice command “
Cancel”.
› If the system does not receive a voice command or does not recognise the voice
command, although dialogue is switched on, it responds with the question “ Par-
don? ” and allows you to speak another voice command. If the system does not
receive a voice command even the second time, you will be offered help. If the
system does not receive a voice command even the third time, you receive the
message “ Cancel” and the voice control switches off.
Optimum understanding of the voice commands depends on several factors:
› Speak with a normal tone of voice without intonation and excessive pauses.
› Avoid a bad pronunciation.
› Do not use abbreviations – always speak the whole voice command.
›
Do not speak when the system makes an announcement. As long as the system
has not finished the announcement, it will not react to an additional voice com-
mand.
› Close the doors, windows and sliding roof, in order to avoid disturbing influen-
ces of the environment on the understanding of the voice commands.
› During the dialogue, limit additional noise in the vehicle, e.g. simultaneously
talking occupants.
› The microphone for voice control is directed to the driver as well as to the front
passenger. Therefore the driver and the front passenger can operate the unit.
Voice commands
The system only recognises 30 000 entries (i.e, it will only recognise 30 000 of the largest cities for the selected country, for example, in the operating mode
NAV . If the desired city is not included in the 30 000 entries, it cannot be spoken
normally, but it must be entered by spelling it out.
Call up the general information for the voice control by briefly pressing the button
on the unit and by speaking the command “ Instructions”. Then you hear a
message that the instructions are divided into seven parts. If you want more de-
tailed information about individual parts of the instructions, then, for example,
speak the voice command “ Tutorial Part 2”.
Call up the general help for individual operating modes by briefly pressing the
button
on the unit and by speaking the command “
Help Quick Commands”.
Voice command “Help”
Help can be called up by speaking the command “ Help”. Depending on the operat-
ing mode in which you are, the help given will offer different possibilities. If the
options offered are not sufficient, speak the voice command “ Further options”.
Changing between the operating modes
If you wish to change between the operating modes after switching on the voice
control, always speak the name of the operating mode to which you wish to
change. This means, if you are in the operating mode RADIO and you wish to
change into the operating mode MEDIA, speak the voice command “ Media”. Al-
ways speak the names of the operating modes PHONE, MAP, NAV as “telephone,
map, navigation ”.
In each operating mode, you can also use the voice commands for other operating modes - the unit automatically switches between the different operating modes.
6Voice control of the device
Page 10 of 45

SETUP mode
Main menu SETUP
Fig. 4
Main menu SETUP
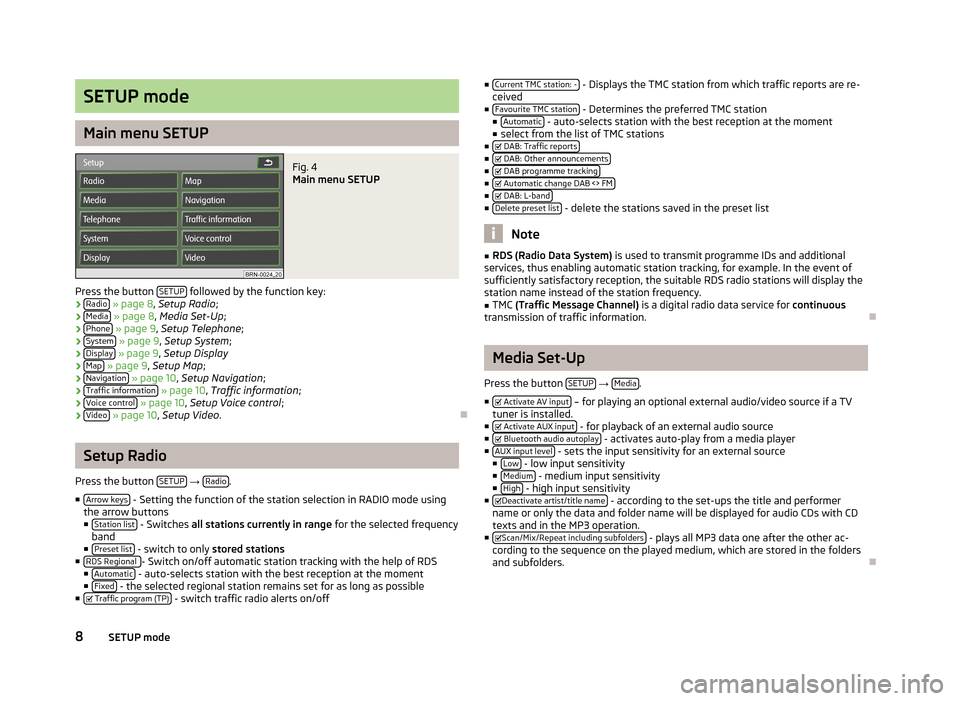
Press the button SETUP followed by the function key:
› Radio
» page 8 , Setup Radio ;
› Media
» page 8 , Media Set-Up ;
› Phone
» page 9 , Setup Telephone ;
› System
» page 9 , Setup System ;
› Display
» page 9 , Setup Display
› Map
» page 9 , Setup Map ;
› Navigation
» page 10 , Setup Navigation ;
› Traffic information
» page 10 , Traffic information ;
› Voice control
» page 10 , Setup Voice control ;
› Video
» page 10 , Setup Video .
Setup Radio
Press the button SETUP
→ Radio.
■ Arrow keys
- Setting the function of the station selection in RADIO mode using
the arrow buttons
■ Station list
- Switches all stations currently in range for the selected frequency
band
■ Preset list
- switch to only stored stations
■ RDS Regional - Switch on/off automatic station tracking with the help of RDS
■ Automatic - auto-selects station with the best reception at the moment
■ Fixed - the selected regional station remains set for as long as possible
■ Traffic program (TP) - switch traffic radio alerts on/off
■
Current TMC station: - - Displays the TMC station from which traffic reports are re-
ceived
■ Favourite TMC station
- Determines the preferred TMC station
■ Automatic - auto-selects station with the best reception at the moment
■ select from the list of TMC stations
■ DAB: Traffic reports
■
DAB: Other announcements■
DAB programme tracking■
Automatic change DAB <> FM■
DAB: L-band■
Delete preset list - delete the stations saved in the preset list
Note
■RDS (Radio Data System) is used to transmit programme IDs and additional
services, thus enabling automatic station tracking, for example. In the event of
sufficiently satisfactory reception, the suitable RDS radio stations will display the
station name instead of the station frequency.■
TMC (Traffic Message Channel) is a digital radio data service for continuous
transmission of traffic information.
Media Set-Up
Press the button SETUP
→ Media.
■ Activate AV input
– for playing an optional external audio/video source if a TV
tuner is installed.
■ Activate AUX input
- for playback of an external audio source
■ Bluetooth audio autoplay - activates auto-play from a media player
■ AUX input level - sets the input sensitivity for an external source
■ Low - low input sensitivity
■ Medium - medium input sensitivity
■ High - high input sensitivity
■ Deactivate artist/title name - according to the set-ups the title and performer
name or only the data and folder name will be displayed for audio CDs with CD
texts and in the MP3 operation.
■ Scan/Mix/Repeat including subfolders
- plays all MP3 data one after the other ac-
cording to the sequence on the played medium, which are stored in the folders
and subfolders.
8SETUP mode
Page 14 of 45

RADIO mode
Main menu RADIO
Fig. 5
Main menu RADIO
›
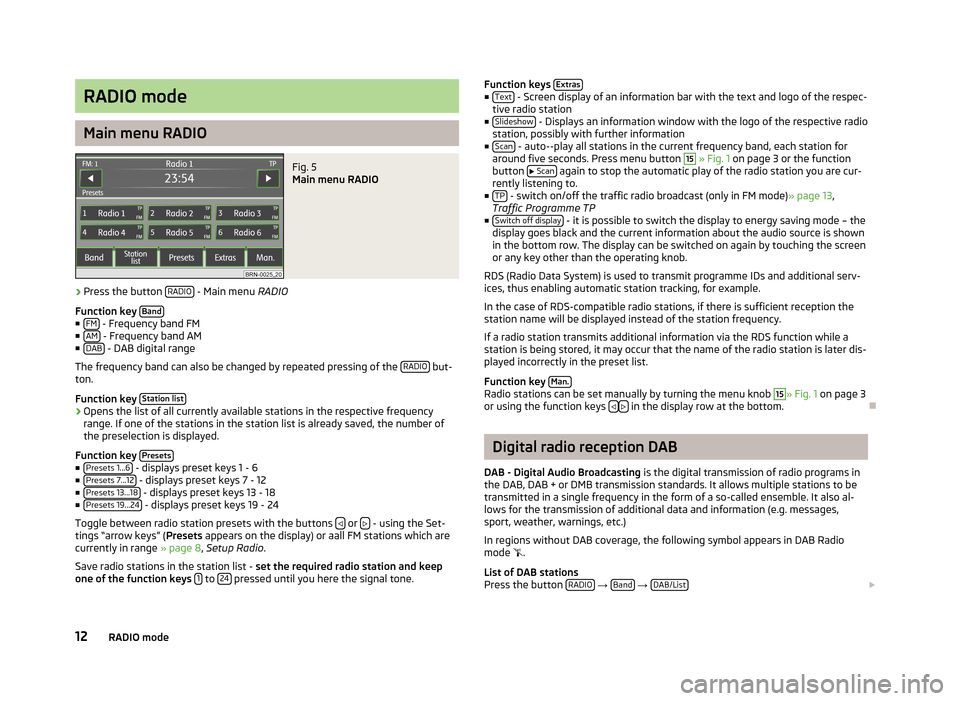
Press the button RADIO - Main menu
RADIO
Function key Band
■
FM - Frequency band FM
■ AM - Frequency band AM
■ DAB - DAB digital range
The frequency band can also be changed by repeated pressing of the RADIO
but-
ton.
Function key Station list
›Opens the list of all currently available stations in the respective frequency
range. If one of the stations in the station list is already saved, the number of
the preselection is displayed.
Function key Presets
■
Presets 1...6 - displays preset keys 1 - 6
■ Presets 7...12 - displays preset keys 7 - 12
■ Presets 13...18 - displays preset keys 13 - 18
■ Presets 19...24 - displays preset keys 19 - 24
Toggle between radio station presets with the buttons
or - using the Set-
tings “arrow keys” ( Presets appears on the display) or aall FM stations which are
currently in range » page 8, Setup Radio .
Save radio stations in the station list - set the required radio station and keep
one of the function keys 1
to 24 pressed until you here the signal tone.
Function keys
Extras■
Text - Screen display of an information bar with the text and logo of the respec-
tive radio station
■ Slideshow
- Displays an information window with the logo of the respective radio
station, possibly with further information
■ Scan
- auto--play all stations in the current frequency band, each station for
around five seconds. Press menu button
15
» Fig. 1 on page 3 or the function
button
Scan again to stop the automatic play of the radio station you are cur-
rently listening to.
■ TP
- switch on/off the traffic radio broadcast (only in FM mode) » page 13,
Traffic Programme TP
■ Switch off display
- it is possible to switch the display to energy saving mode – the
display goes black and the current information about the audio source is shown
in the bottom row. The display can be switched on again by touching the screen
or any key other than the operating knob.
RDS (Radio Data System) is used to transmit programme IDs and additional serv- ices, thus enabling automatic station tracking, for example.
In the case of RDS-compatible radio stations, if there is sufficient reception the
station name will be displayed instead of the station frequency.
If a radio station transmits additional information via the RDS function while a
station is being stored, it may occur that the name of the radio station is later dis-
played incorrectly in the preset list.
Function key Man.
Radio stations can be set manually by turning the menu knob
15
» Fig. 1
on page 3
or using the function keys in the display row at the bottom.
Digital radio reception DAB
DAB - Digital Audio Broadcasting is the digital transmission of radio programs in
the DAB, DAB + or DMB transmission standards. It allows multiple stations to be transmitted in a single frequency in the form of a so-called ensemble. It also al- lows for the transmission of additional data and information (e.g. messages,
sport, weather, warnings, etc.)
In regions without DAB coverage, the following symbol appears in DAB Radio
mode
.
List of DAB stations
Press the button RADIO
→ Band
→ DAB/List
12RADIO mode
Page 16 of 45

MEDIA mode
Main menu MEDIA
Fig. 6
Main menu MEDIA
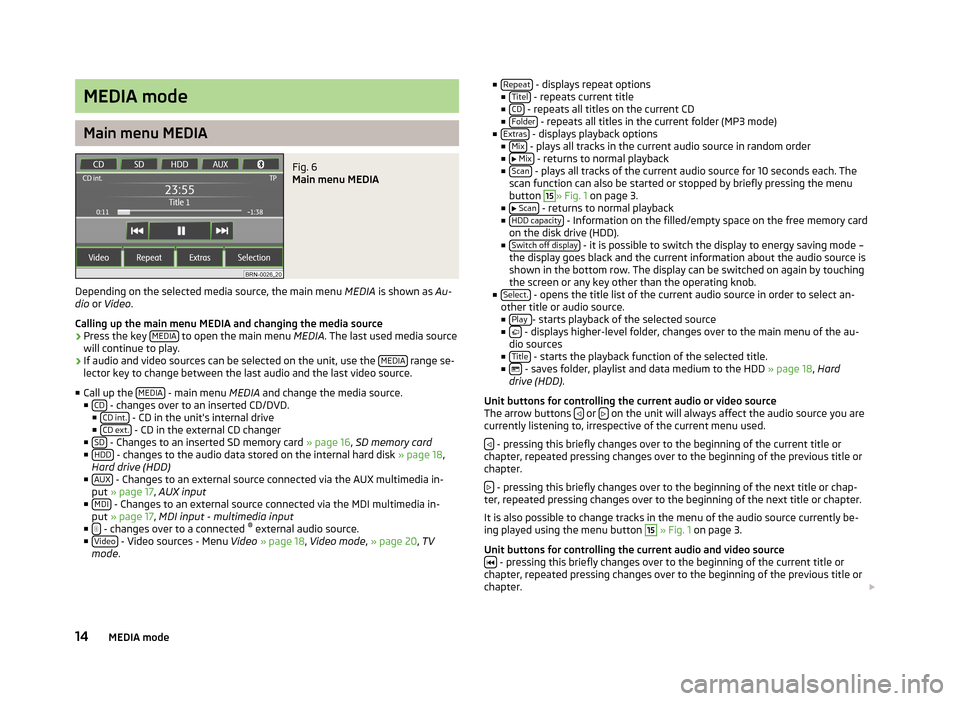
Depending on the selected media source, the main menu MEDIA is shown as Au-
dio or Video .
Calling up the main menu MEDIA and changing the media source
›
Press the key MEDIA to open the main menu
MEDIA. The last used media source
will continue to play.
›
If audio and video sources can be selected on the unit, use the MEDIA range se-
lector key to change between the last audio and the last video source.
■ Call up the MEDIA
- main menu
MEDIA and change the media source.
■ CD - changes over to an inserted CD/DVD.
■ CD int. - CD in the unit's internal drive
■ CD ext. - CD in the external CD changer
■ SD - Changes to an inserted SD memory card » page 16, SD memory card
■ HDD - changes to the audio data stored on the internal hard disk » page 18,
Hard drive (HDD)
■ AUX
- Changes to an external source connected via the AUX multimedia in-
put » page 17 , AUX input
■ MDI
- Changes to an external source connected via the MDI multimedia in-
put » page 17 , MDI input - multimedia input
■
- changes over to a connected ®
external audio source.
■ Video - Video sources - Menu Video » page 18 , Video mode , » page 20 , TV
mode .
■
Repeat - displays repeat options
■ Titel - repeats current title
■ CD - repeats all titles on the current CD
■ Folder - repeats all titles in the current folder (MP3 mode)
■ Extras - displays playback options
■ Mix - plays all tracks in the current audio source in random order
■ Mix - returns to normal playback
■ Scan - plays all tracks of the current audio source for 10 seconds each. The
scan function can also be started or stopped by briefly pressing the menu
button
15
» Fig. 1 on page 3.
■ Scan - returns to normal playback
■ HDD capacity - Information on the filled/empty space on the free memory card
on the disk drive (HDD).
■ Switch off display
- it is possible to switch the display to energy saving mode –
the display goes black and the current information about the audio source is
shown in the bottom row. The display can be switched on again by touching
the screen or any key other than the operating knob.
■ Select.
- opens the title list of the current audio source in order to select an-
other title or audio source.
■ Play
- starts playback of the selected source
■ - displays higher-level folder, changes over to the main menu of the au-
dio sources
■ Title
- starts the playback function of the selected title.
■ - saves folder, playlist and data medium to the HDD » page 18, Hard
drive (HDD) .
Unit buttons for controlling the current audio or video source
The arrow buttons
or on the unit will always affect the audio source you are
currently listening to, irrespective of the current menu used.
- pressing this briefly changes over to the beginning of the current title or
chapter, repeated pressing changes over to the beginning of the previous title or
chapter.
- pressing this briefly changes over to the beginning of the next title or chap-
ter, repeated pressing changes over to the beginning of the next title or chapter.
It is also possible to change tracks in the menu of the audio source currently be-
ing played using the menu button
15
» Fig. 1 on page 3.
Unit buttons for controlling the current audio and video source
- pressing this briefly changes over to the beginning of the current title or
chapter, repeated pressing changes over to the beginning of the previous title or chapter.
14MEDIA mode