Page 17 of 54
 Bolero Car Radio Manual device settings
setup menu
Introduction
This chapter contains information on the following subjects:
Main Menu
15
Sound setup
16
Screen settings
16
time and date settings
17
keyboard settings
17
Ad")
device settings
setup menu
Introduction
This chapter contains information on the following subjects:
Main Menu
15
Sound setup
16
Screen settings
16
time and date settings
17
keyboard settings
17
Additional keypad language settings
17
Unit setup
17
Voice control settings
17
restore factory settings
18
Bluetooth ®
-settings
18
First and foremost, pay attention to the safety instructions » page 4 , Impor-
tant notes .
This chapter covers the basic settings of the device.
Additional settings are described in the individual menus ■ Radio » page 22
■ Media » page 25
■ Phone » page 33
■ Vehicle system settings » page 41
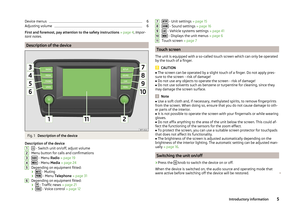
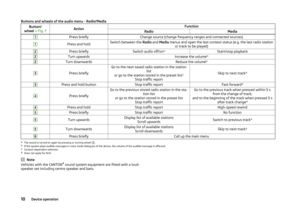
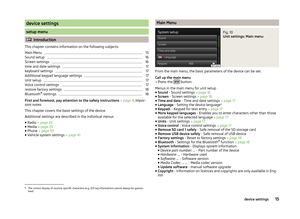
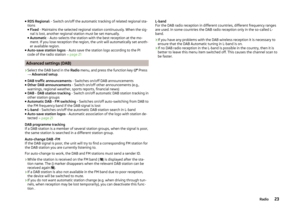
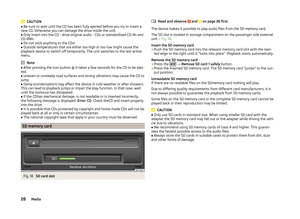
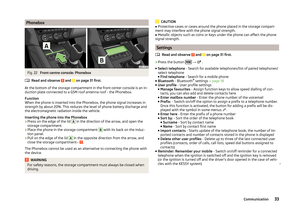
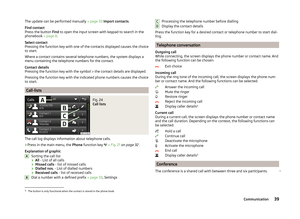
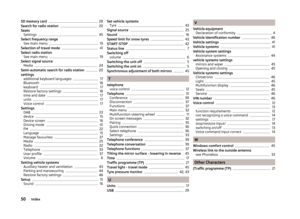
Main MenuFig. 10
Unit settings: Main menu
From the main menu, the basic parameters of the device can be set.
Call up the main menu
›
Press the button.
Menus in the main menu for unit setup
■ Sound - Sound settings » page 16
■ Screen - Screen settings » page 16
■ Time and date - Time and date settings » page 17
■ Language - Setting the device language 1)
■ Keypad: - Keypad for text entry » page 17
■ More keypad languages - Enables you to enter characters other than those
available for the selected language » page 17
■ Units - Unit settings » page 17
■ Voice control - Voice control settings » page 17
■ Remove SD card 1 safely - Safe removal of the SD storage card
■ Remove USB device safely - Safe removal of USB device
■ Factory settings - Reset to factory settings » page 18
■ Bluetooth - Settings for the Bluetooth ®
function » page 18
■ System information - Displays system information
■ Device part number: ... - Part number of the device
■ Hardware: ... - Hardware used
■ Software: ... - Software version
■ Media Codec: … ... - Media codec version
■ Update software - manual software upgrade
■ Copyright - Information on licences and copyrights are only available in Eng-
lish
1)
The correct display of country-specific characters (e.g. ID3 tag information) cannot always be guaran-
teed.
15device settings
Page 18 of 54
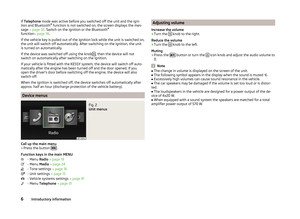
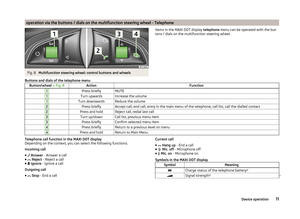
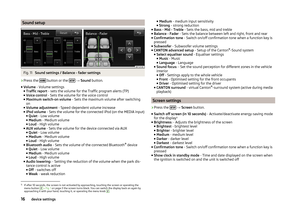
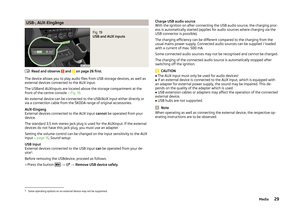
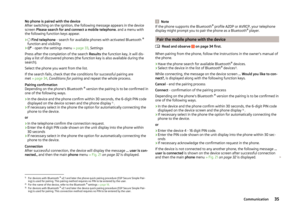
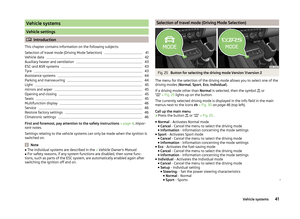
 Bolero Car Radio Manual Sound setupFig. 11
Sound settings / Balance - fader settings
›
Press the button or the
→ Sound button.
■ Volume - Volume settings
■ Traffic report - sets")
Sound setupFig. 11
Sound settings / Balance - fader settings
›
Press the button or the
→ Sound button.
■ Volume - Volume settings
■ Traffic report - sets the volume for the Traffic program alerts (TP)
■ Voice control - Sets the volume for the voice control
■ Maximum switch-on volume - Sets the maximum volume after switching
on
■ Volume adjustment - Speed-dependent volume increase
■ iPod volume - Sets the volume for the connected iPod (on the MEDIA input)
■ Quiet - Low volume
■ Medium - Medium volume
■ Loud - High volume
■ AUX volume - Sets the volume for the device connected via AUX
■ Quiet - Low volume
■ Medium - Medium volume
■ Loud - High volume
■ Bluetooth audio - Sets the volume of the connected Bluetooth ®
device
■ Quiet - Low volume
■ Medium - Medium volume
■ Loud - High volume
■ Audio lowering: - Setting the reduction of the volume when the park dis-
tance control is active ■ Off - switches off
■ Weak - weak reduction
■
Medium - medium input sensitivity
■ Strong - strong reduction
■ Bass - Mid - Treble - Sets the bass, mid and treble
■ Balance - Fader - Sets the balance between left and right, front and rear
■ Confirmation tone - Switch on/off confirmation tone when a function key is
pressed
■ Subwoofer - Subwoofer volume settings
■ CANTON advanced setup - Setup of the Canton®
-Sound system
■ Select equaliser sound - Equaliser settings
■ Music - Music
■ Language - Language
■ Sound focus: - Set the sound perception for different zones in the vehicle
interior
■ Off - Settings apply to the whole vehicle
■ Front - Optimised setting for the front occupants
■ Driver - Optimised setting for the driver
■ CANTON surround - virtual Canton®
-surround system (active during media
playback)
Screen settings
›
Press the
→ Screen button.
■ Switch off screen (in 10 seconds) - Activate/deactivate energy-saving mode
for the display 1)
■ Brightness: - Adjusts the brightness of the screen
■ Brightest - brightest level
■ Brighter - brighter level
■ Medium - medium level
■ Darker - darker level
■ Darkest - darkest level
■ Confirmation tone - Switch on/off confirmation tone when a function key is
pressed
■ Show clock in standby mode - Time and date displayed on the screen when
the ignition is switched on and the unit is switched off
1)
If after 10 seconds, the screen is not activated by approaching, touching the screen or operating the
menu button
2
» Fig. 1 on page 5 the screen turns black. You can switch the display back on again by
approaching it with your hand, touching it, or operating the menu knob
2
.
16device settings
Page 19 of 54
 Bolero Car Radio Manual time and date settings›
Press the
→ Time and date button.
■ Time: - Time settings
■ Summer (DST) - Switches the summer time setting on/off
■ Time zone: - Select the tim")
time and date settings›
Press the
→ Time and date button.
■ Time: - Time settings
■ Summer (DST) - Switches the summer time setting on/off
■ Time zone: - Select the time zone
■ Time format: - Set the time format
■ 12h
■ 24h
■ Date: - Date settings
■ Date format: - Set the date format
■ DD.MM.YYYY - Day - Month - Year
■ YYYY-MM-DD - Year - Month - Day
■ MM-DD-YYYY - Month - Day - Year
keyboard settings
›
Press the
→ Keypad: button.
■ ABC - keys arranged alphabetically
■ QWERTY - Arrangement of the keys as per the QWERTY system (in accord-
ance with computer keyboard arrangement)
Additional keypad language settings
›
Press the
→ More keypad languages button.
In this menu, the keyboard character arrangement for the chosen language
can be selected, and with this the option for fast entry of the characters used
in the selected language.
It is then possible to swap between the languages in the input screen showing
a keyboard by pressing
» page 8 .
Unit setup
›
Press the
→ Units button.
■ Distance: - Distance units
■ km - Kilometres
■ mi - Miles
■
Speed: - Speed units
■ km/h - Kilometres per hour
■ mph - Miles per hour
■ Temperature: - Temperature units
■ °C
- Degrees Celsius
■ °F
- Degrees Fahrenheit
■ Volume: - Volume units
■ l - Litres
■ gal (US) - Gallons (US)
■ gal (UK) - Gallons (UK)
■ Consumption: - Consumption units
■ l/100km - Litres per 100 kilometres
■ km/l - Kilometres per litre
■ mpg (US) - Miles per gallon (US)
■ mpg (UK) - Miles per gallon (UK)
■ Gas consumption: - Gas consumption units
■ kg/100km - Kilograms per 100 km
■ km/kg - Kilometres per kilogram
■ m³/100 km - Cubic metres per 100 kilometres
■ km/m³ - Kilometres per cubic metre
■ Pressure: - Pressure units for tyre pressure
■ kPa - Kilopascal
■ bar - bar
■ psi - Pounds per square inch
Voice control settings
›
Press the
→ voice control system button.
■ Dialogue style: - Setting the dialogue style
■ Long - Long dialogue (the system plays complete acoustic messages)
■ Short - Short dialogue (the system shortens some acoustic messages or
substitutes them with an acoustic signal)
■ Display available commands - Switch on/off the menus containing basic
voice commands when voice control is activated
■ Voice control session start tone - Switch on/off the audible signal that is
output when voice control is activated
■ Voice control session end tone - Switch on/off the audible signal that is out-
put when voice control is ended
■ Input tone in voice dialogue - Switch on/off the audible signal that is output
to signal that voice control is waiting for a command
17device settings
Page 20 of 54
 Bolero Car Radio Manual restore factory settings›
Press the
→ Factory settings button.
■ Restore factory settings - Reset all factory settings
■ Sound - Restore default settings for sound
■ Rad")
restore factory settings›
Press the
→ Factory settings button.
■ Restore factory settings - Reset all factory settings
■ Sound - Restore default settings for sound
■ Radio - Restore default settings for radio
■ Vehicle - Restore default settings for the vehicle systems
■ Telephone - Restore default settings for phone
■ Media - Restore default settings for media
■ Voice control - Restore default settings for voice control
■ Bluetooth - Restore default settings for the Bluetooth ®
function
■ System - Restore the system default settings
Bluetooth ®
-settings
›
Press the
→ Bluetooth button.
■ Bluetooth - Bluetooth ®
function on/off
■ Visibility: - Switch on/off the visibility of the Bluetooth ®
device for other de-
vices
■ Visible - Visibility is always on
■ Hidden - Visibility is off
■ At start-up - Turns on visibility for 5 minutes after switching on the ignition
or until the driving speed has exceeded 5 km/h
■ Name: - Open the input screen with keyboard - Chang the device name
■ Paired devices - Display the list of paired Bluetooth ®
devices; connect or de-
lete a paired device; delete the list of paired devices
■ Delete all - Delete all paired Bluetooth ®
devices
■ - Delete the paired Bluetooth ®
device
■ Find devices - Searches for available external devices with enabled Blue-
tooth ®
functions and activated visibility
■ Bluetooth audio (A2DP/AVRCP) - Switch on/off the connection option for
Bluetooth ®
profiles A2DP and AVRCP 1)
1)
A2DP and AVRCP are Bluetooth
®
profiles that support multimedia functions.
18device settings
Page 21 of 54
 Bolero Car Radio Manual Radio
Operation
Introduction
This chapter contains information on the following subjects:
Main menu
19
List of available stations
20
Search and store radio station
20
Search the available stations")
Radio
Operation
Introduction
This chapter contains information on the following subjects:
Main menu
19
List of available stations
20
Search and store radio station
20
Search the available stations (Scan)
21
Station logos
21
Traffic programme
21
Station information (DAB)
22
First and foremost, pay attention to the safety instructions » page 4 , Impor-
tant notes .
The device allows analogue radio reception of FM and AM frequency ranges as
well as DAB digital radio reception.
The radio reception DAB allows multiple stations to be transmitted in a single
frequency in the form of a so-called ensemble. It also allows for the transmis-
sion of additional data and information (e.g. messages, sport, weather, warn-
ings, etc.).
CAUTION
■ Car parks, tunnels, tall buildings or mountains can disrupt the radio signal
even causing it to fail completely.■
For vehicles with window antennas; if the windows are covered in foil or with
metallic film stickers, reception interference may be experienced.
■
In countries where the RDS function is not supported sufficiently, we recom-
mend turning off the RDS and AF functions. Otherwise, these settings can af-
fect the functionality of the radio.
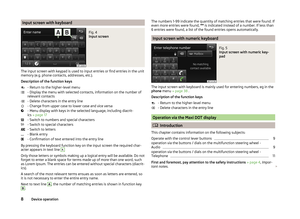
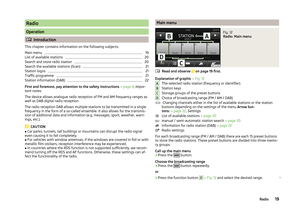
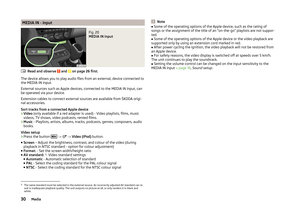
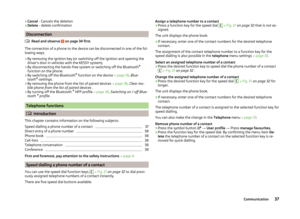
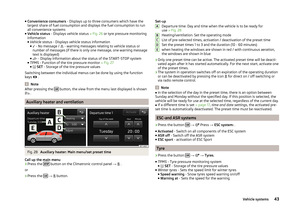
Main menuFig. 12
Radio: Main menu
Read and observe on page 19 first.
Explanation of graphic » Fig. 12
The selected radio station (frequency or identifier)
Station keys
Storage groups of the preset buttons
Choice of broadcasting range (FM / AM / DAB) Changing channels either in the list of available stations or the station
buttons depending on the settings of the menu Arrow but-
tons: » page 22 , Settings
List of available stations » page 20
manual / semi-automatic station search » page 20
Information for radio station (DAB) » page 22
Radio settings
For each broadcasting range (FM / AM / DAB) there are each 15 preset buttons to store the radio stations. These preset buttons are divided into three memo-
ry groups.
Call up the main menu
›
Press the button.
Choose the broadcasting range
›
Press the button repeatedly.
or
›
Press the function button
D
» Fig. 12 and select the desired range.
ABCD
19Radio
Page 22 of 54
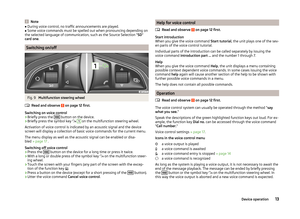
 Bolero Car Radio Manual Information symbols in the displaySymbolMeaningTraffic information station Traffic signals are not available or the selected station is not atraffic information station �")
Information symbols in the displaySymbolMeaningTraffic information station Traffic signals are not available or the selected station is not atraffic information station RDS function is switched off (FM) AF Alternative frequency is off (FM)
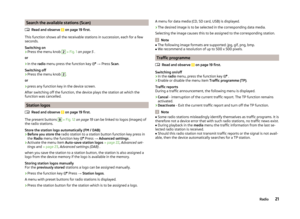
List of available stations
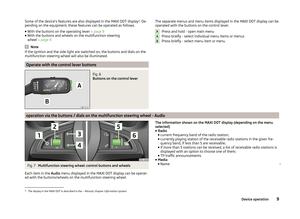
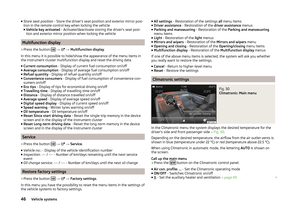
Fig. 13
Example, of the list of available stations: FM / DAB
Read and observe on page 19 first.
The station with sufficient signal strength are shown in the list of availablestations. The unit examines these stations automatically.
Show stations list
›
In the radio menu press the function key .
Information symbols in the display
SymbolMeaningRadio station, which is stored under a preset buttonCurrently selected radio stationTraffic information station (e.g.)Type of program being broadcast (FM) (e.g.)Type the regional broadcast (FM)Signal is not available (DAB)Radio stations with picture representation (slideshow) (DAB)Update Channel ListIn the FM band the station list is continually updated automatically.
In AM and DAB bands update is performed manually by pressing the functionkey .
Sorting the types of radio stations in the station list (FM)›Alphabet - alphabetical order according to station name›Group - Sort by broadcasted type program
Search and store radio station
Read and observe on page 19 first.
A radio station can also be searched for and stored under a preset button.
Automatic station searchAutomatically set stations are in the list of available stations.
Semi-automatic station search
›
In the radio menu press the function key .
›
The function key or .
The device scans the broadcasting range until the first receivable station istuned.
Manual station search
›
In the radio menu press the function key .
›
Select the desired station using the function keys / or adjusted by mov-ing the slider across the screen.
Store radio stations under a preset button
›
Press the desired station in the list of available stations and hold down.
A list of station button
B
will be displayed » Fig. 12 on page 19.
›
Press the preset button
B
as to where you want to save the desired station.
or
›
Set the desired station manually or semi-automatically.
›
Press and hold the desired station key
B
until you hear an acoustic signal.
You can switch between groups of individual preset buttons using the functionkeys
C.20Radio
Page 23 of 54
 Bolero Car Radio Manual Search the available stations (Scan)Read and observe
on page 19 first.
This function shows all the receivable stations in succession, each for a fewseconds.
Switching on
›
Press the menu knob
2")
Search the available stations (Scan)Read and observe
on page 19 first.
This function shows all the receivable stations in succession, each for a fewseconds.
Switching on
›
Press the menu knob
2
» Fig. 1 on page 5 .
or
›
In the radio menu press the function key
→ Press Scan.
Switching off
›
Press the menu knob
2
.
or
›
press any function key in the device screen.
After switching off the function, the device plays the station at which the
function was cancelled.
Station logos
Read and observe
on page 19 first.
The present buttons
B
» Fig. 12 on page 19 can be linked to logos (images) of
the radio stations.
Store the station logo automatically (FM / DAB)
›
Before you store the radio station to a station button function key press in
the Radio menu the function key
Press
→ Advanced settings .
›
Activate the menu item
Auto-save station logos » page 22 , Advanced set-
tings and » page 23 , Advanced settings (DAB) .
when you save the station to a station button, the station is also assigned a
logo from the device memory if the logo is available in the memory.
Storing station logos manually
For the previously stored stations a logo can be assigned manually.
›
Press the function key
Press
→ Station logos .
A menu with preset buttons for radio stations is displayed.
›
Press the station button for the station which is to be assigned a logo.
A menu for data media (CD, SD card, USB) is displayed.›
The desired image is to be selected in the corresponding data media.
Selecting the image causes this to be assigned to the corresponding station.
Note
■ The following image formats are supported: jpg, gif, png, bmp.■We recommend a resolution of up to 500 x 500 pixels.
Traffic programme
Read and observe
on page 19 first.
Switching on/off
›
In the radio menu, press the function key
.
›
Enable or disable the menu item
Traffic programme (TP).
Traffic reports
During a traffic announcement, the following menu is displayed.
›
Cancel - interruption of the current traffic report. The TP function remains
activated.
›
Deactivate - Exit the current traffic report and turn off the TP function.
Note
■
Some radio stations misleadingly identify themselves as traffic programs. It is
therefore not a device error that with such radio stations, no traffic news exist.■
During playback in the media menu the traffic information from the last se-
lected radio station is received.
■
Should this radio station not transmit traffic reports or the signal is not avail-
able, then the device automatically searches for a TP station.
21Radio
Page 24 of 54
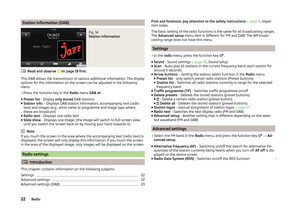
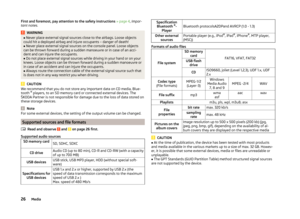
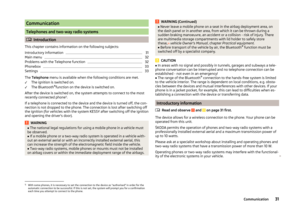
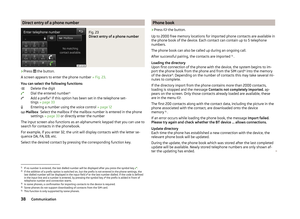
 Bolero Car Radio Manual Station information (DAB)Fig. 14
Station information
Read and observe on page 19 first.
This DAB allows the transmission of various additional information. The displayoptions for this information on")
Station information (DAB)Fig. 14
Station information
Read and observe on page 19 first.
This DAB allows the transmission of various additional information. The displayoptions for this information on the screen can be adjusted in the following
menu.
›
Press the function key in the Radio menu DAB
.
■ Preset list - Display only stored DAB stations
■ Station info. - Displays DAB station information, accompanying text (radio
text) and images (e.g., artist name or programme and image type where
these are broadcast)
■ Radio text - Displays one radio text
■ Slide show - Displays one image; (the image will switch to full-screen view
until you switch the screen back on by moving your hand towards it)
Note
If you touch the screen in the area where the accompanying text (radio text) is
displayed, the screen will only display this information. If you touch the screen
in the area of the displayed image, only images will be displayed on the screen.
Radio settings
Introduction
This chapter contains information on the following subjects:
Settings
22
Advanced settings
22
Advanced settings (DAB)
23First and foremost, pay attention to the safety instructions » page 4 , Impor-
tant notes .
The basic setting of the radio functions is the same for all broadcasting ranges.
The Advanced setup menu item is different for FM and DAB. The AM broad-
casting range does not have this menu.
Settings
›
In the radio menu, press the function key
.
■ Sound - Sound settings » page 16, Sound setup
■ Scan - Auto-play all stations in the current frequency band, each station for
around 5 seconds.
■ Arrow buttons: - Setting the station select function in the Radio menu
■ Preset list - only switch preset radio stations (Preset buttons)
■ Station list - Switches all radio stations currently in range for the selected
frequency band
■ Traffic programme (TP) - Switches traffic programme on/off
■ Delete presets - Deletes the stored stations (preset buttons)
■ - Delete a certain radio station (preset button)
■
Delete all - Deletes the stored stations (preset buttons)
■ Station logos - manual assignment of station logos » page 21
■ Radio text - Switches the text display radio (FM and DAB)
■ Advanced setup - Another setting that is different depending on the selec-
ted waveband (FM and DAB)
Advanced settings
›
Select the FM band in the Radio menu, and press the function key
→ Ad-
vanced setup .
■ Alternative frequency (AF) - Switching on/off the search for alternative fre-
quencies of the station currently being heard, when you turn off AF off is dis-
played on the device screen
■ Radio Data System (RDS) - Switches on/off the RDS function
22Radio