2014 SKODA OCTAVIA turn signal
[x] Cancel search: turn signalPage 13 of 54
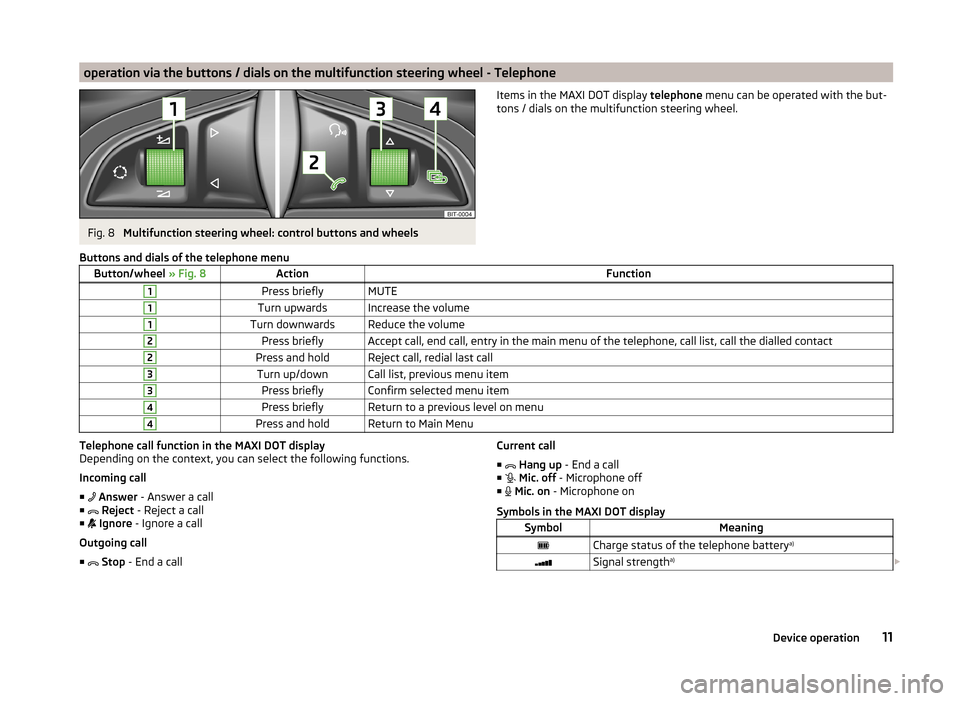
operation via the buttons / dials on the multifunction steering wheel - TelephoneFig. 8
Multifunction steering wheel: control buttons and wheels
Items in the MAXI DOT display telephone menu can be operated with the but-
tons / dials on the multifunction steering wheel.Buttons and dials of the telephone menuButton/wheel » Fig. 8ActionFunction1Press brieflyMUTE1Turn upwardsIncrease the volume1Turn downwardsReduce the volume2Press brieflyAccept call, end call, entry in the main menu of the telephone, call list, call the dialled contact2Press and holdReject call, redial last call3Turn up/downCall list, previous menu item3Press brieflyConfirm selected menu item4Press brieflyReturn to a previous level on menu4Press and holdReturn to Main MenuTelephone call function in the MAXI DOT display
Depending on the context, you can select the following functions.
Incoming call ■ Answer - Answer a call
■ Reject - Reject a call
■ Ignore - Ignore a call
Outgoing call ■ Stop - End a callCurrent call
■ Hang up - End a call
■ Mic. off - Microphone off
■ Mic. on - Microphone on
Symbols in the MAXI DOT displaySymbolMeaningCharge status of the telephone battery a)Signal strengtha)
11Device operation
Page 21 of 54
Radio
Operation
Introduction
This chapter contains information on the following subjects:
Main menu
19
List of available stations
20
Search and store radio station
20
Search the available stations (Scan)
21
Station logos
21
Traffic programme
21
Station information (DAB)
22
First and foremost, pay attention to the safety instructions » page 4 , Impor-
tant notes .
The device allows analogue radio reception of FM and AM frequency ranges as
well as DAB digital radio reception.
The radio reception DAB allows multiple stations to be transmitted in a single
frequency in the form of a so-called ensemble. It also allows for the transmis-
sion of additional data and information (e.g. messages, sport, weather, warn-
ings, etc.).
CAUTION
■ Car parks, tunnels, tall buildings or mountains can disrupt the radio signal
even causing it to fail completely.■
For vehicles with window antennas; if the windows are covered in foil or with
metallic film stickers, reception interference may be experienced.
■
In countries where the RDS function is not supported sufficiently, we recom-
mend turning off the RDS and AF functions. Otherwise, these settings can af-
fect the functionality of the radio.
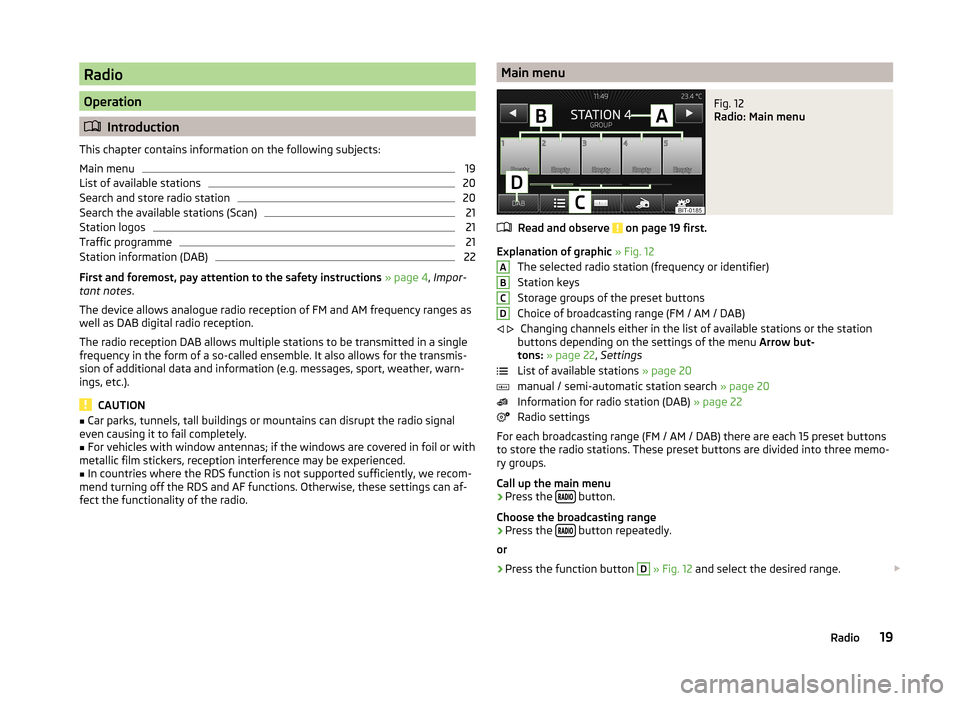
Main menuFig. 12
Radio: Main menu
Read and observe on page 19 first.
Explanation of graphic » Fig. 12
The selected radio station (frequency or identifier)
Station keys
Storage groups of the preset buttons
Choice of broadcasting range (FM / AM / DAB) Changing channels either in the list of available stations or the station
buttons depending on the settings of the menu Arrow but-
tons: » page 22 , Settings
List of available stations » page 20
manual / semi-automatic station search » page 20
Information for radio station (DAB) » page 22
Radio settings
For each broadcasting range (FM / AM / DAB) there are each 15 preset buttons to store the radio stations. These preset buttons are divided into three memo-
ry groups.
Call up the main menu
›
Press the button.
Choose the broadcasting range
›
Press the button repeatedly.
or
›
Press the function button
D
» Fig. 12 and select the desired range.
ABCD
19Radio
Page 23 of 54
Search the available stations (Scan)Read and observe
on page 19 first.
This function shows all the receivable stations in succession, each for a fewseconds.
Switching on
›
Press the menu knob
2
» Fig. 1 on page 5 .
or
›
In the radio menu press the function key
→ Press Scan.
Switching off
›
Press the menu knob
2
.
or
›
press any function key in the device screen.
After switching off the function, the device plays the station at which the
function was cancelled.
Station logos
Read and observe
on page 19 first.
The present buttons
B
» Fig. 12 on page 19 can be linked to logos (images) of
the radio stations.
Store the station logo automatically (FM / DAB)
›
Before you store the radio station to a station button function key press in
the Radio menu the function key
Press
→ Advanced settings .
›
Activate the menu item
Auto-save station logos » page 22 , Advanced set-
tings and » page 23 , Advanced settings (DAB) .
when you save the station to a station button, the station is also assigned a
logo from the device memory if the logo is available in the memory.
Storing station logos manually
For the previously stored stations a logo can be assigned manually.
›
Press the function key
Press
→ Station logos .
A menu with preset buttons for radio stations is displayed.
›
Press the station button for the station which is to be assigned a logo.
A menu for data media (CD, SD card, USB) is displayed.›
The desired image is to be selected in the corresponding data media.
Selecting the image causes this to be assigned to the corresponding station.
Note
■ The following image formats are supported: jpg, gif, png, bmp.■We recommend a resolution of up to 500 x 500 pixels.
Traffic programme
Read and observe
on page 19 first.
Switching on/off
›
In the radio menu, press the function key
.
›
Enable or disable the menu item
Traffic programme (TP).
Traffic reports
During a traffic announcement, the following menu is displayed.
›
Cancel - interruption of the current traffic report. The TP function remains
activated.
›
Deactivate - Exit the current traffic report and turn off the TP function.
Note
■
Some radio stations misleadingly identify themselves as traffic programs. It is
therefore not a device error that with such radio stations, no traffic news exist.■
During playback in the media menu the traffic information from the last se-
lected radio station is received.
■
Should this radio station not transmit traffic reports or the signal is not avail-
able, then the device automatically searches for a TP station.
21Radio
Page 27 of 54
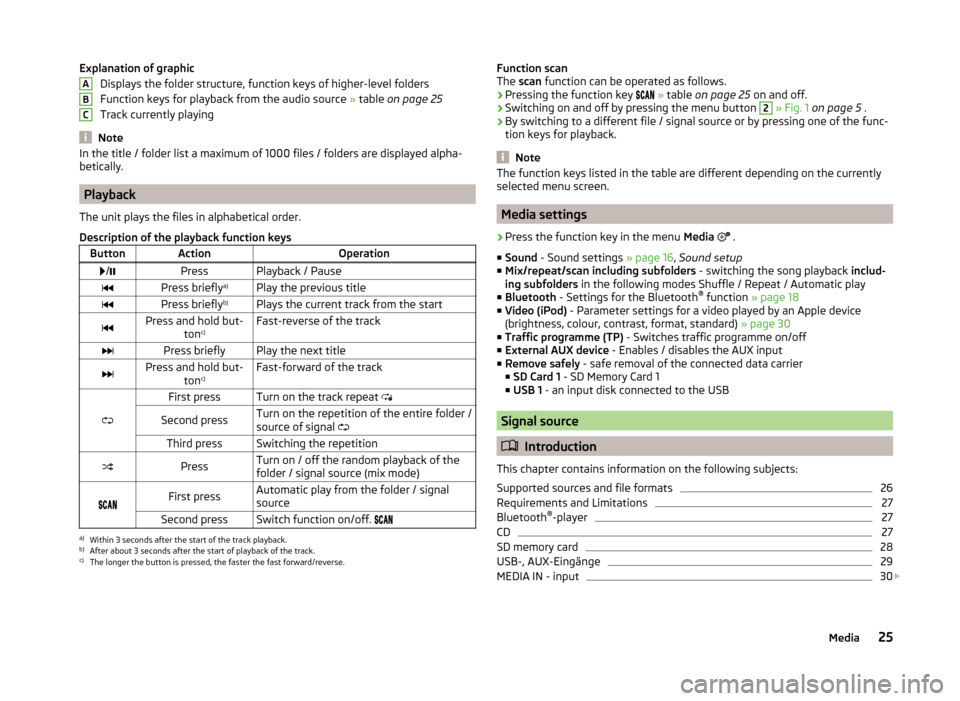
Explanation of graphicDisplays the folder structure, function keys of higher-level folders
Function keys for playback from the audio source » table on page 25
Track currently playing
Note
In the title / folder list a maximum of 1000 files / folders are displayed alpha-
betically.
Playback
The unit plays the files in alphabetical order.
Description of the playback function keys
ButtonActionOperation /PressPlayback / PausePress briefly a)Play the previous titlePress briefly b)Plays the current track from the startPress and hold but-
tonc)Fast-reverse of the trackPress brieflyPlay the next titlePress and hold but-
tonc)Fast-forward of the track
First pressTurn on the track repeat
Second pressTurn on the repetition of the entire folder /
source of signal Third pressSwitching the repetitionPressTurn on / off the random playback of the
folder / signal source (mix mode)
First pressAutomatic play from the folder / signal
sourceSecond pressSwitch function on/off. a)
Within 3 seconds after the start of the track playback.
b)
After about 3 seconds after the start of playback of the track.
c)
The longer the button is pressed, the faster the fast forward/reverse.
ABCFunction scan
The scan function can be operated as follows.
› Pressing the function key
» table on page 25 on and off.
› Switching on and off by pressing the menu button 2
» Fig. 1 on page 5 .
› By switching to a different file / signal source or by pressing one of the func-
tion keys for playback.
Note
The function keys listed in the table are different depending on the currently
selected menu screen.
Media settings
›
Press the function key in the menu Media
.
■ Sound - Sound settings » page 16, Sound setup
■ Mix/repeat/scan including subfolders - switching the song playback includ-
ing subfolders in the following modes Shuffle / Repeat / Automatic play
■ Bluetooth - Settings for the Bluetooth ®
function » page 18
■ Video (iPod) - Parameter settings for a video played by an Apple device
(brightness, colour, contrast, format, standard) » page 30
■ Traffic programme (TP) - Switches traffic programme on/off
■ External AUX device - Enables / disables the AUX input
■ Remove safely - safe removal of the connected data carrier
■ SD Card 1 - SD Memory Card 1
■ USB 1 - an input disk connected to the USB
Signal source
Introduction
This chapter contains information on the following subjects:
Supported sources and file formats
26
Requirements and Limitations
27
Bluetooth ®
-player
27
CD
27
SD memory card
28
USB-, AUX-Eingänge
29
MEDIA IN - input
30
25Media
Page 33 of 54
Communication
Telephones and two-way radio systems
Introduction
This chapter contains information on the following subjects:
Introductory information
31
Main menu
32
Problems with the Telephone function
32
Phonebox
33
Settings
33
The Telephone menu is available when the following conditions are met.
The ignition is switched on.
The Bluetooth ®
function on the device is switched on.
After the device is switched on, the system attempts to connect to the most recently connected phone 1)
.
If a telephone is connected to the device and the device is turned off, the con-
nection is not dropped to the phone. The connection is lost after switching off
the ignition (for vehicles with the system KESSY after switching off the ignition
and opening the driver's door).
WARNING■ The national legal regulations for using a mobile phone in a vehicle must
be observed.■
If a mobile phone or a two-way radio system is operated in a vehicle with-
out an external aerial or with an incorrectly installed external aerial, this
can increase the strength of the electromagnetic field inside the vehicle.
■
Two-way radio systems, mobile phones or mounts must not be installed
on airbag covers or within the immediate deployment range of the airbags.
WARNING (Continued)■ Never leave a mobile phone on a seat in the airbag deployment area, on
the dash panel or in another area, from which it can be thrown during a
sudden braking manoeuvre, an accident or a collision - risk of injury. There
are multimedia storage compartments with lid holder to safely store
these, » vehicle Owner's Manual , chapter Practical equipment.■
Before transport of the vehicle by air, the Bluetooth ®
function must be
switched off by a specialist company.
CAUTION
■ In areas with no signal and possibly in tunnels, garages and subways a tele-
phone conversation can be interrupted and no telephone connection can be
established - not even in an emergency!■
The range of the Bluetooth ®
connection to the hands-free system is limited
to the vehicle interior. The range is dependent on local conditions, e.g. obsta-
cles between the devices and mutual interferences with other devices. If your
phone is in a jacket pocket, for example, this can lead to difficulties when es-
tablishing a connection with the device or transferring data.
Introductory information
Read and observe
and on page 31 first.
The device allows for a wireless connection to the phone. Your phone can be
operated from this unit.
ŠKODA permits the operation of phones and two-way radio systems with a
professionally installed external aerial and a maximum transmission power of
up to 10 watts.
Please ask at a specialist workshop about installing and operating phones and
two-way radio systems that have a transmission power of more than 10 W.
Operating phones or two-way radio systems may interfere with the functional-
ity of the electronic systems in your vehicle.
1)
With some phones, it is necessary to set the connection to the device as "authorised" in order for the
automatic connection to be successful. If this is not set, the system will prompt you for a confirmation
each time you attempt to connect to the phone.
31Communication
Page 35 of 54
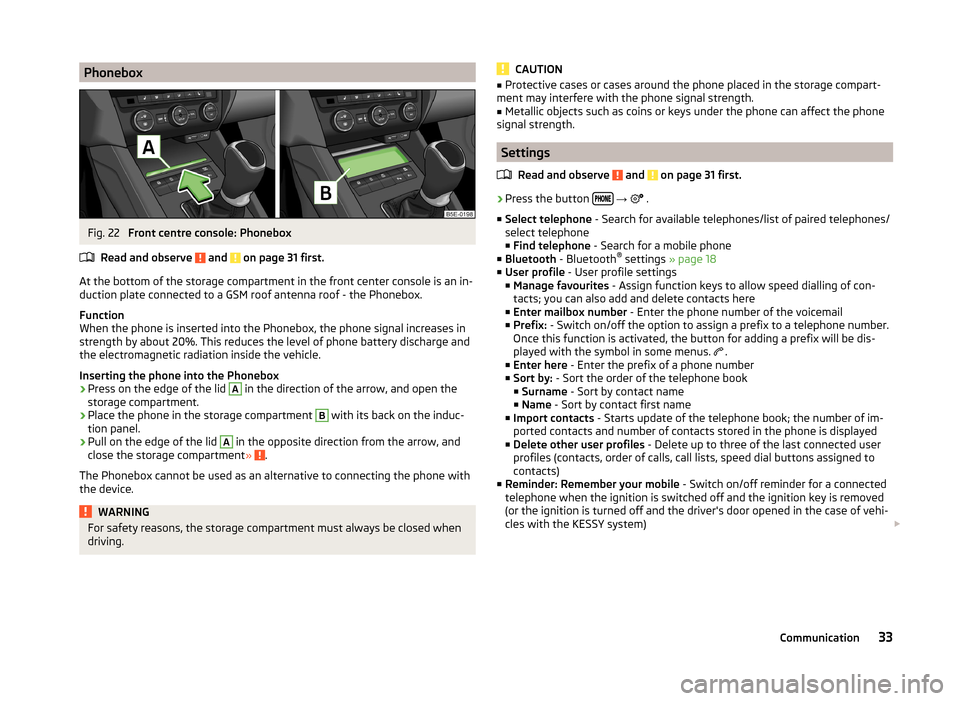
PhoneboxFig. 22
Front centre console: Phonebox
Read and observe
and on page 31 first.
At the bottom of the storage compartment in the front center console is an in-
duction plate connected to a GSM roof antenna roof - the Phonebox.
Function
When the phone is inserted into the Phonebox, the phone signal increases in
strength by about 20%. This reduces the level of phone battery discharge and
the electromagnetic radiation inside the vehicle.
Inserting the phone into the Phonebox
›
Press on the edge of the lid
A
in the direction of the arrow, and open the
storage compartment.
›
Place the phone in the storage compartment
B
with its back on the induc-
tion panel.
›
Pull on the edge of the lid
A
in the opposite direction from the arrow, and
close the storage compartment » .
The Phonebox cannot be used as an alternative to connecting the phone with
the device.
WARNINGFor safety reasons, the storage compartment must always be closed when
driving.CAUTION■ Protective cases or cases around the phone placed in the storage compart-
ment may interfere with the phone signal strength.■
Metallic objects such as coins or keys under the phone can affect the phone
signal strength.
Settings
Read and observe
and on page 31 first.
›
Press the button
→
.
■ Select telephone - Search for available telephones/list of paired telephones/
select telephone ■ Find telephone - Search for a mobile phone
■ Bluetooth - Bluetooth ®
settings » page 18
■ User profile - User profile settings
■ Manage favourites - Assign function keys to allow speed dialling of con-
tacts; you can also add and delete contacts here
■ Enter mailbox number - Enter the phone number of the voicemail
■ Prefix: - Switch on/off the option to assign a prefix to a telephone number.
Once this function is activated, the button for adding a prefix will be dis-
played with the symbol in some menus. .
■ Enter here - Enter the prefix of a phone number
■ Sort by: - Sort the order of the telephone book
■ Surname - Sort by contact name
■ Name - Sort by contact first name
■ Import contacts - Starts update of the telephone book; the number of im-
ported contacts and number of contacts stored in the phone is displayed
■ Delete other user profiles - Delete up to three of the last connected user
profiles (contacts, order of calls, call lists, speed dial buttons assigned to
contacts)
■ Reminder: Remember your mobile - Switch on/off reminder for a connected
telephone when the ignition is switched off and the ignition key is removed
(or the ignition is turned off and the driver's door opened in the case of vehi-
cles with the KESSY system)
33Communication