Page 196 of 252
MANUAL PARK RELEASE — EIGHT SPEED TRANSMISSION
• In order to push or tow the vehicle in cases where the transmission will not shiftout of PARK (such as a dead battery), a Manual Park Release is available.
• Follow these steps to use the Manual Park Release: • Firmly apply the parking brake.
• Using a small screwdriver or similar tool, remove the Manual Park Release
access cover, which is just above the parking brake release handle, below and
to the left of the steering column.
• Using the screwdriver or similar tool, push the Manual Park Release lever locking tab (just below the middle of the lever) to the right.
WHAT TO DO IN EMERGENCIES
194
Page 197 of 252

• While holding the locking tab in the disengaged position, pull the tether strapto rotate the lever rearward, until it locks in place pointing towards the driver's
seat. Release the locking tab and verify that the Manual Park Release lever is
locked in the released position.
• The vehicle is now out of PARK and can be towed. Release the parking
brake only when the vehicle is se-
curely connected to a tow vehicle.
To Reset The Manual Park Release:
• Push the locking tab to the right, to unlock the lever.
• Rotate the Manual Park Release lever forward to its original position, until the locking tab snaps into place to secure the lever.
• Pull gently on the tether strap to confirm that the lever is locked in its stowed position.
• Re-install the access cover.
WARNING!
Always secure your vehicle by fully applying the parking brake, before activating
the Manual Park Release. Activating the Manual Park Release will allow your
vehicle to roll away if it is not secured by the parking brake or by proper connection
to a tow vehicle. Activating the Manual Park Release on an unsecured vehicle
could lead to serious injury or death for those in or around the vehicle.
WHAT TO DO IN EMERGENCIES
195
Page 200 of 252
OPENING THE HOOD
1. Pull the hood release lever locatedbelow the steering wheel at the base
of the instrument panel.
2.
Reach into the opening beneath the
center of the hood and move the safety
latch lever while lifting the hood at the
same time.
WARNING!
Be sure the hood is fully latched before driving your vehicle. If the hood is not fully
latched, it could open when the vehicle is in motion and block your vision. Failure
to follow this warning could result in serious injury or death.
MAINTAINING YOUR VEHICLE
198
Page 232 of 252

FUSES
POWER DISTRIBUTION CENTER (FUSES)
The Power Distribution Center is located in
the engine compartment near the battery.
This center contains cartridge fuses and
mini fuses. A description of each fuse and
component may be stamped on the inside
cover, otherwise the cavity number of each
fuse is stamped on the inside cover that
corresponds to the following chart.
Cavity Cartridge Fuse Micro FuseDescription
F01 80 Amp Red Rad Fan Control Module –
If Equipped
F03 60 Amp Yellow Rad Fan – If Equipped
F05 40 Amp Green Compressor for Air Suspension –
If Equipped
F06 40 Amp Green Antilock Brakes/Electronic
Stability Control Pump
F07 40 Amp Green Starter Solenoid
F08 20 Amp Yellow Emissions Diesel – If Equipped
F09 40 Amp Green (Cummins Diesel)30 Amp Pink
(1500 LD Diesel) Diesel Fuel Heater – If Equipped
F10 40 Amp Green Body Controller/Exterior
Lighting #2
F10 50 Amp Red
Body Controller/Exterior
Lighting #2 – If Equipped with Stop/Start
F11 30 Amp Pink Integrated Trailer Brake
Module – If Equipped
F12 40 Amp Green Body Controller #3/Interior Lights
F13 40 Amp Green Blower Motor
F14 40 Amp Green Body Controller #4/Power Locks
F15 30 Amp Pink Electric Park Brake Right Side –
If Equipped
F19 30 Amp Pink SCR – If Equipped
F20 30 Amp Pink Passenger Door Module
F21 30 Amp Pink Drive Train Control Module
F22 20 Amp Yellow Engine Control Module
MAINTAINING YOUR VEHICLE
230
Page 233 of 252

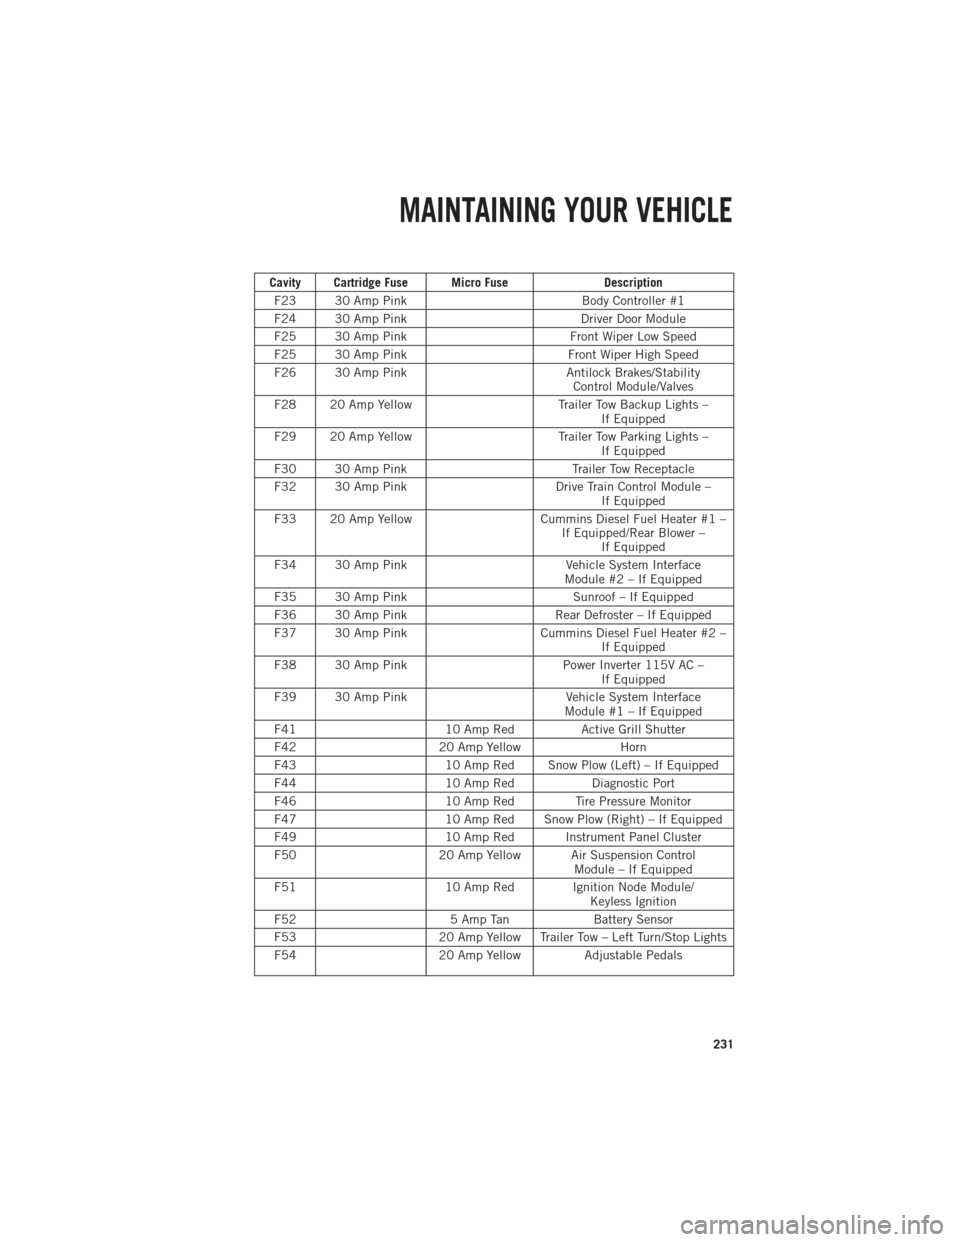
Cavity Cartridge Fuse Micro FuseDescription
F23 30 Amp Pink Body Controller #1
F24 30 Amp Pink Driver Door Module
F25 30 Amp Pink Front Wiper Low Speed
F25 30 Amp Pink Front Wiper High Speed
F26 30 Amp Pink Antilock Brakes/Stability
Control Module/Valves
F28 20 Amp Yellow Trailer Tow Backup Lights –
If Equipped
F29 20 Amp Yellow Trailer Tow Parking Lights –
If Equipped
F30 30 Amp Pink Trailer Tow Receptacle
F32 30 Amp Pink Drive Train Control Module –
If Equipped
F33 20 Amp Yellow Cummins Diesel Fuel Heater #1 –
If Equipped/Rear Blower – If Equipped
F34 30 Amp Pink Vehicle System Interface
Module #2 – If Equipped
F35 30 Amp Pink Sunroof – If Equipped
F36 30 Amp Pink Rear Defroster – If Equipped
F37 30 Amp Pink Cummins Diesel Fuel Heater #2 –
If Equipped
F38 30 Amp Pink Power Inverter 115V AC –
If Equipped
F39 30 Amp Pink Vehicle System Interface
Module #1 – If Equipped
F41 10 Amp RedActive Grill Shutter
F42 20 Amp Yellow Horn
F43 10 Amp Red Snow Plow (Left) – If Equipped
F44 10 Amp RedDiagnostic Port
F46 10 Amp Red Tire Pressure Monitor
F47 10 Amp Red Snow Plow (Right) – If Equipped
F49 10 Amp Red Instrument Panel Cluster
F50 20 Amp Yellow Air Suspension Control
Module – If Equipped
F51 10 Amp Red Ignition Node Module/
Keyless Ignition
F52 5 Amp TanBattery Sensor
F53 20 Amp Yellow Trailer Tow – Left Turn/Stop Lights
F54 20 Amp YellowAdjustable Pedals
MAINTAINING YOUR VEHICLE
231
Page 234 of 252

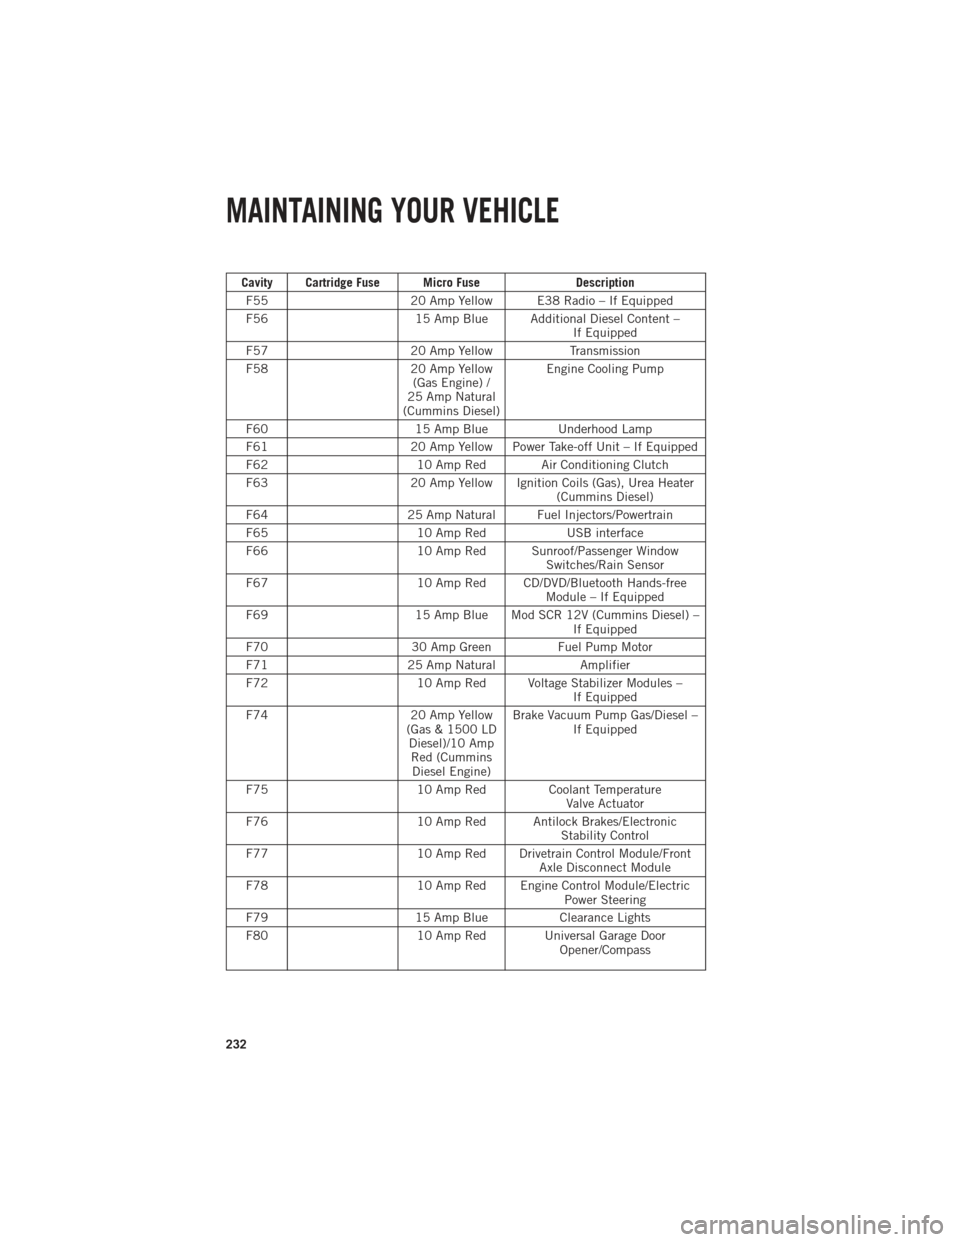
Cavity Cartridge Fuse Micro FuseDescription
F55 20 Amp Yellow E38 Radio – If Equipped
F56 15 Amp Blue Additional Diesel Content –
If Equipped
F57 20 Amp YellowTransmission
F58 20 Amp Yellow
(Gas Engine) /
25 Amp Natural
(Cummins Diesel) Engine Cooling Pump
F60 15 Amp BlueUnderhood Lamp
F61 20 Amp Yellow Power Take-off Unit – If Equipped
F62 10 Amp Red Air Conditioning Clutch
F63 20 Amp Yellow Ignition Coils (Gas), Urea Heater
(Cummins Diesel)
F64 25 Amp Natural Fuel Injectors/Powertrain
F65 10 Amp RedUSB interface
F66 10 Amp Red Sunroof/Passenger Window
Switches/Rain Sensor
F67 10 Amp Red CD/DVD/Bluetooth Hands-free
Module – If Equipped
F69 15 Amp Blue Mod SCR 12V (Cummins Diesel) –
If Equipped
F70 30 Amp GreenFuel Pump Motor
F71 25 Amp Natural Amplifier
F72 10 Amp Red Voltage Stabilizer Modules –
If Equipped
F74 20 Amp Yellow
(Gas & 1500 LD Diesel)/10 AmpRed (CumminsDiesel Engine) Brake Vacuum Pump Gas/Diesel –
If Equipped
F75 10 Amp Red Coolant Temperature
Valve Actuator
F76 10 Amp Red Antilock Brakes/Electronic
Stability Control
F77 10 Amp Red Drivetrain Control Module/Front
Axle Disconnect Module
F78 10 Amp Red Engine Control Module/Electric
Power Steering
F79 15 Amp BlueClearance Lights
F80 10 Amp Red Universal Garage Door
Opener/Compass
MAINTAINING YOUR VEHICLE
232
Page 240 of 252

AUTHENTIC ACCESSORIES BY MOPAR®
The following highlights just some of the many Authentic Ram Truck Accessories by
MOPAR®featuring a fit, finish, and functionality specifically for your Ram Truck. In
choosing Authentic Accessories you gain far more than expressive style, premium
protection, or extreme entertainment, you also benefit from enhancing your vehicle with
accessories that have been thoroughly tested and factory-approved. For the full line of
Authentic Ram Truck Accessories by MOPAR
®, visit your local Ram Truck dealership or
online at mopar.com for U.S residents and mopar.ca for Canadian residents.
CHROME:
• Exhaust Tip • Tubular Side Steps • Fuel Filler Door
• Cast Aluminum Wheels • Front Air Deflector • Grille
• Body Side Molding
EXTERIOR:
• Bedliners • Running Boards • Bed Mat & Bed Rug
•
Composite Tonneau Cover• Bed Extender • Tool Box
• Roll-up Tonneau Cover • Bed Step • Sports Performance Hood
• Folding Tonneau Cover • Hitch Receiver • Body Kit
• Molded Splash Guards • Tailgate Lock
INTERIOR:
• Premium Carpet Mats • Door Sill Guards • Slush Mats
• Ambient Light Kit • Bright Pedal Kit • Heated Seats
ELECTRONICS:
• Kicker
®Sound Systems •Electronic Vehicle Tracking• Remote Start
• MOPAR®Web (Wi-fi)
CARRIERS:
• Bed Mounted Bike Carrier • Bed Mounted Cargo Basket With Cargo Net• Cargo Ramps
• Bed Mounted Ski and Snowboard Carrier • Cargo Bed Divider
Kicker®is a registered trademark of Stillwater Designs and Audio, Inc.
MOPAR® ACCESSORIES
238
Page 241 of 252

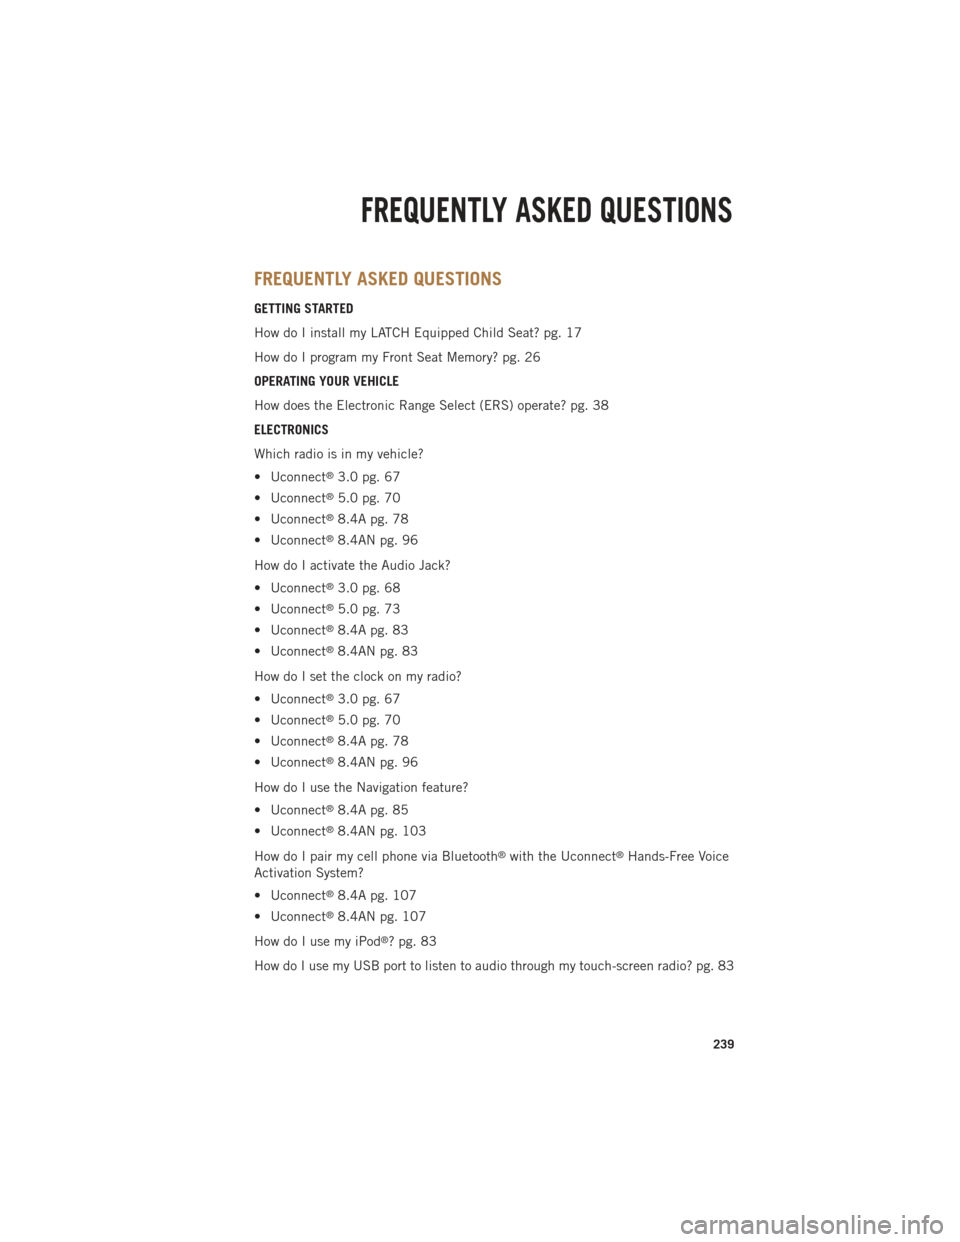
FREQUENTLY ASKED QUESTIONS
GETTING STARTED
How do I install my LATCH Equipped Child Seat? pg. 17
How do I program my Front Seat Memory? pg. 26
OPERATING YOUR VEHICLE
How does the Electronic Range Select (ERS) operate? pg. 38
ELECTRONICS
Which radio is in my vehicle?
• Uconnect
®3.0 pg. 67
• Uconnect
®5.0 pg. 70
• Uconnect
®8.4A pg. 78
• Uconnect
®8.4AN pg. 96
How do I activate the Audio Jack?
• Uconnect
®3.0 pg. 68
• Uconnect
®5.0 pg. 73
• Uconnect
®8.4A pg. 83
• Uconnect
®8.4AN pg. 83
How do I set the clock on my radio?
• Uconnect
®3.0 pg. 67
• Uconnect
®5.0 pg. 70
• Uconnect
®8.4A pg. 78
• Uconnect
®8.4AN pg. 96
How do I use the Navigation feature?
• Uconnect
®8.4A pg. 85
• Uconnect
®8.4AN pg. 103
How do I pair my cell phone via Bluetooth
®with the Uconnect®Hands-Free Voice
Activation System?
• Uconnect
®8.4A pg. 107
• Uconnect
®8.4AN pg. 107
How do I use my iPod
®? pg. 83
How do I use my USB port to listen to audio through my touch-screen radio? pg. 83
FREQUENTLY ASKED QUESTIONS
239