2014 Ram 1500 lock
[x] Cancel search: lockPage 69 of 252
Uconnect® 3.0
Clock Setting
1. Press the Menu button at the bottom of the radio, and push the Enter/Browsebutton for System Settings. Next, select the Time and Format setting and then
select Set Time by pushing the Enter/Browse button.
2. Adjust the hours or minutes by turning the Tune/Scroll knob, then pressing the Enter/Browse button to move to the next entry. You can also select 12hr or 24hr
format by turning the Tune/Scroll knob, then pressing the Enter/Browse button on
the desired selection.
3. Once the time is set press the “Back” button to exit the time screen.
Audio
• Press the AUDIO button on the radio faceplate.
• The Audio Menu shows the following options for you to customize your audio settings.
Treble, Mid, Bass, Fade, Balance, Speed Adjusted Volume, Loudness and Auto
Volume Offset
• Select the desired setting to adjust, then push the ENTER/BROWSE button. Turn the TUNE/SCROLL knob to adjust the setting + or - 9. Press the “Back” button
when done.
ELECTRONICS
67
Page 72 of 252

Uconnect® 5.0
Clock Setting
1. To start the clock setting procedure, perform either of the following:• Press the MORE hard-key on the right side of the display, next press the “Time”soft-key and then press the “Set” soft-key.
• Press the SETTINGS hard-key on the right side of the display, then press the “Clock” soft-key. The Time setting screen is displayed and the clock can be
adjusted as described in the following procedure.
NOTE:
In the Clock Setting Menu you can also select Display Clock. Display Clock turns the
clock display in the status bar on or off.
2. Touch the “Up” or “Down” arrows to adjust the hours or minutes, next select the “AM” or “PM” soft-key. You can also select 12hr or 24hr format by touching the
desired soft-key.
3. Once the time is set press the “Done” soft-key to exit the time screen.
ELECTRONICS
70
Page 80 of 252
Uconnect® 8.4A
Uconnect® 8.4A AT A GLANCE
Displaying The Time
• If the time is not currently displayed on the radio or player main page, touch the“settings” soft-key or the “Apps” soft-key and then the “settings” soft-key. In the
Settings list, touch the “Clock” soft-key then touch the check box next to Show
Time in Status Bar.
Setting The Time
Model 8.4AN synchronizes time automatically via GPS, so it should not require any
time adjustment. If you do need to set the time manually, follow the instructions
below for Model 8.4A.
• For Model 8.4A, turn the unit on, then touch the time display at the top of the screen. Touch “Yes.”
• If the time is not displayed at the top of the screen, touch the “Controls” soft-key, or the “Apps” soft-key, and then the “settings” soft-key. In the Settings screen,
touch the “Clock” soft-key, then check or uncheck this option.
• Touch “+” or “–” next to Set Time Hours and Set Time Minutes to adjust the time.
• If these features are not available, uncheck the Sync with GPS box.
• Touch “X” to save your settings and exit out of the Clock Setting screen.
ELECTRONICS
78
Page 83 of 252

Direct Tune
• Tune directly to a SXM channel by pressing the “Tune” soft-key on the screen, andentering the desired station number.
Jump
• Automatically tells you when Traffic & Weather for a favorite city is available, and gives you the option to switch to that channel. Touch “Jump” to activate the
feature. After listening to Traffic and Weather, touch “Jump” again to return to the
previous channel.
Fav
• Activates the favorites menu. You can add up to 50 favorite artists or songs. Just touch “Add Fav Artist” or “Add Fav Song” while the song is playing. You will then
be alerted any time one of these songs, or works by these artists, is playing on other
SiriusXM channels.
SiriusXM Parental Controls
• You can skip or hide certain channels from view if you do not want access to them. Touch the “More” soft-key, then the “settings” soft-key, next touch the” Sirius
Setup” soft-key, then select Channel Skip. Touch the box check-mark next to the
channel you want skipped. They will not show up in normal usage.
•
SiriusXM also offers the option to permanently block selected channels. Call
(1-888-601-6297 for U.S. customers, 1-877-438-9677 for Canadian customers)
and request the Family-Friendly Package.
Browse
Lets you browse the SiriusXM channel listing or Genre listing. Favorites, Game Zone,
Weather and Jump settings also provide a way to browse the SiriusXM channel list.
Browse
Sub-Menu Sub-Menu Description
All Shows the channel listing.
Genre Provides a list of all genres, and lets you jump to a channel within the selected genre.
Presets Lets you scroll the list of Preset satellite channels. Touch the channel, or press Enter on the Tune knob, to go to that channel. Touch the trash can
icon to delete a preset. Your presets are also shown at the top of the main
Satellite Radio screen.
Favorites Lets you manage artists and songs in the Favorites list and configure Alert Settings to let you know when favorite songs or artists are playing on other
channels. Also, view a list of channels airing any of your Favorites.
Game Zone
Provides alerts when your favorite sports teams are starting a game which is
being aired on other SiriusXM channels, or when their game score is
announced. You can select and manage your Teams list here, and configure
alerts.
Jump Lets you select your favorite cities for Traffic & Weather information, which is used by the Jump feature on the main satellite radio screen.
ELECTRONICS
81
Page 98 of 252
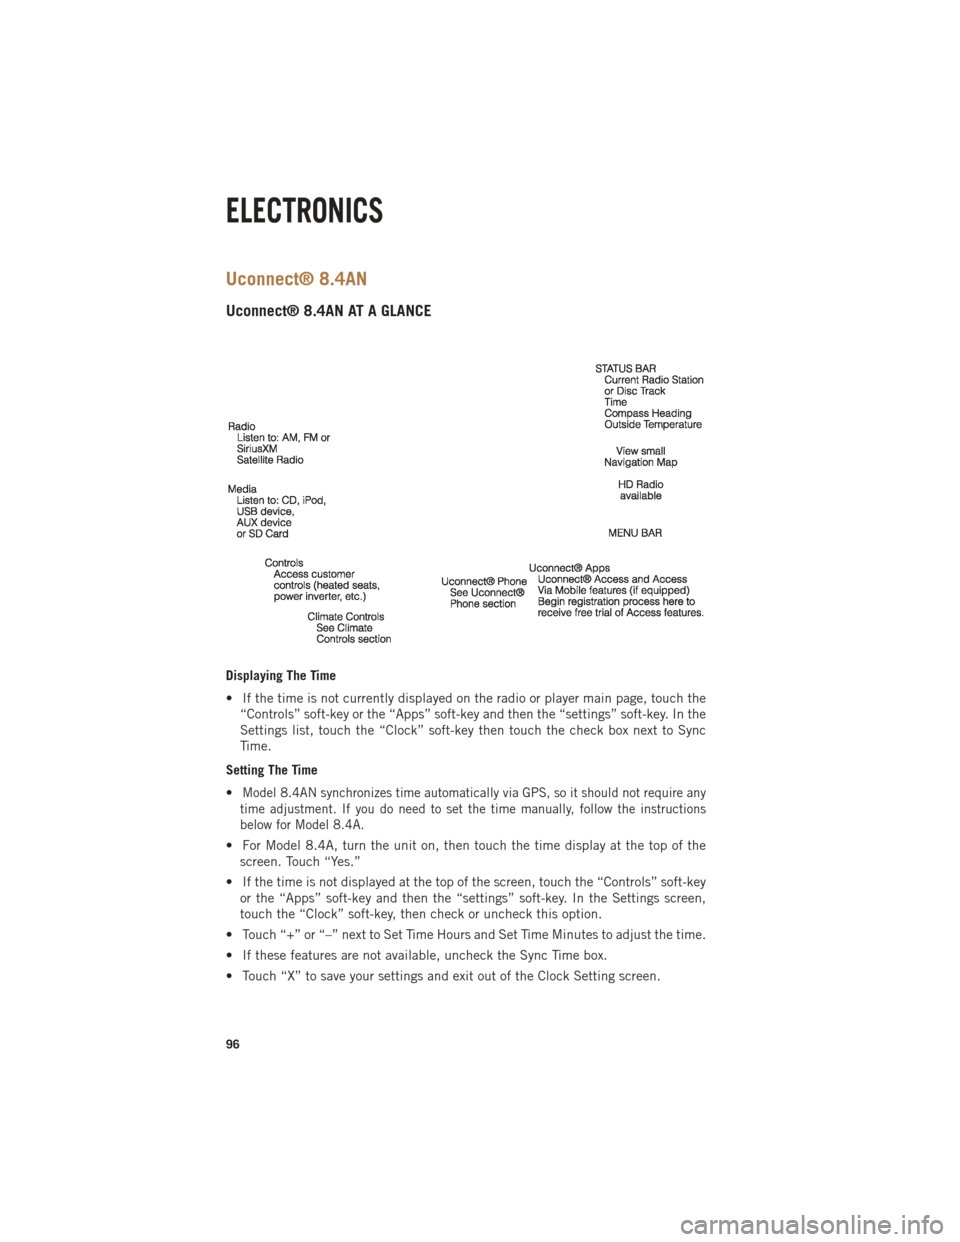
Uconnect® 8.4AN
Uconnect® 8.4AN AT A GLANCE
Displaying The Time
• If the time is not currently displayed on the radio or player main page, touch the“Controls” soft-key or the “Apps” soft-key and then the “settings” soft-key. In the
Settings list, touch the “Clock” soft-key then touch the check box next to Sync
Time.
Setting The Time
•
Model 8.4AN synchronizes time automatically via GPS, so it should not require any
time adjustment. If you do need to set the time manually, follow the instructions
below for Model 8.4A.
• For Model 8.4A, turn the unit on, then touch the time display at the top of the screen. Touch “Yes.”
• If the time is not displayed at the top of the screen, touch the “Controls” soft-key or the “Apps” soft-key and then the “settings” soft-key. In the Settings screen,
touch the “Clock” soft-key, then check or uncheck this option.
• Touch “+” or “–” next to Set Time Hours and Set Time Minutes to adjust the time.
• If these features are not available, uncheck the Sync Time box.
• Touch “X” to save your settings and exit out of the Clock Setting screen.
ELECTRONICS
96
Page 101 of 252
Direct Tune
• Tune directly to a SXM channel by pressing the “Tune” soft-key on the screen, andentering the desired station number.
Jump
• Automatically tells you when Traffic & Weather for a favorite city is available, and gives you the option to switch to that channel. Touch “Jump” to activate the
feature. After listening to Traffic and Weather, touch “Jump” again to return to the
previous channel.
Fav
• Activates the favorites menu. You can add up to 50 favorite artists or songs. Just touch “Add Fav Artist” or “Add Fav Song” while the song is playing. You will then
be alerted any time one of these songs, or works by these artists, is playing on other
SiriusXM channels.
SiriusXM Parental Controls
• You can skip or hide certain channels from view if you do not want access to them. Touch the “More” soft-key, then the “settings” soft-key, next touch the” Sirius
Setup” soft-key, then select Channel Skip. Touch the box check-mark next to the
channel you want skipped. They will not show up in normal usage.
• SiriusXM also offers the option to permanently block selected channels. Call
(1-888-601-6297 for U.S. customers, 1-877-438-9677 for Canadian customers)
and request the Family-Friendly Package.
Browse
Lets you browse the SiriusXM channel listing or Genre listing. Favorites, Game Zone,
Weather and Jump settings also provide a way to browse the SiriusXM channel list.
Browse
Sub-Menu Sub-Menu Description
All Shows the channel listing.
Genre Provides a list of all genres, and lets you jump to a channel within the selected genre.
Presets Lets you scroll the list of Preset satellite channels. Touch the channel, or press Enter on the Tune knob, to go to that channel. Touch the trash can
icon to delete a preset. Your presets are also shown at the top of the main
Satellite Radio screen.
Favorites Lets you manage artists and songs in the Favorites list and configure Alert Settings to let you know when favorite songs or artists are playing on other
channels. Also, view a list of channels airing any of your Favorites.
Game Zone
Provides alerts when your favorite sports teams are starting a game which is
being aired on other SiriusXM channels, or when their game score is
announced. You can select and manage your Teams list here, and configure
alerts.
Jump Lets you select your favorite cities for Traffic & Weather information, which is used by the Jump feature on the main satellite radio screen.
ELECTRONICS
99
Page 119 of 252
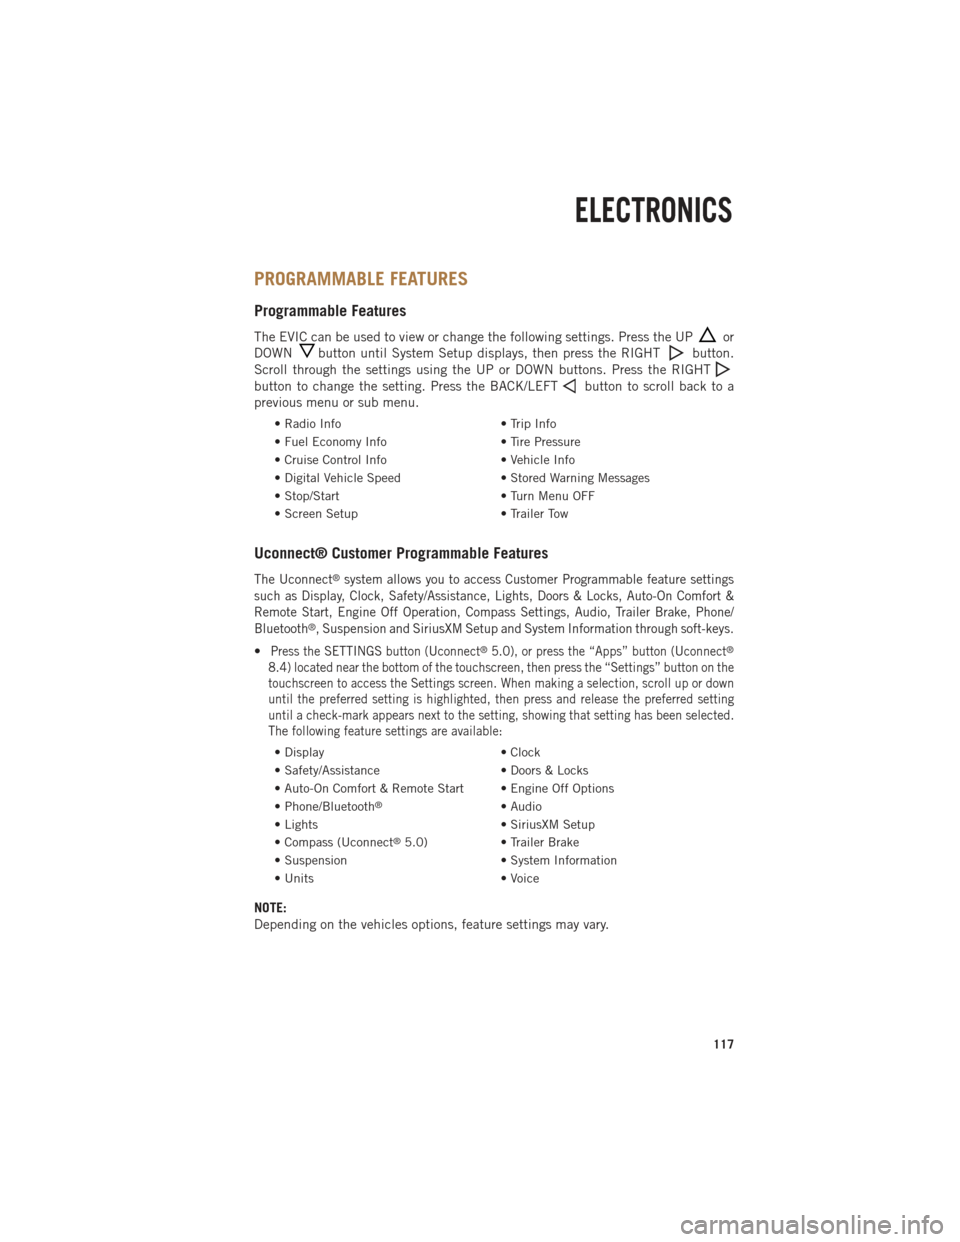
PROGRAMMABLE FEATURES
Programmable Features
The EVIC can be used to view or change the following settings. Press the UPor
DOWN
button until System Setup displays, then press the RIGHTbutton.
Scroll through the settings using the UP or DOWN buttons. Press the RIGHT
button to change the setting. Press the BACK/LEFTbutton to scroll back to a
previous menu or sub menu.
• Radio Info • Trip Info
• Fuel Economy Info • Tire Pressure
• Cruise Control Info • Vehicle Info
• Digital Vehicle Speed • Stored Warning Messages
• Stop/Start • Turn Menu OFF
• Screen Setup • Trailer Tow
Uconnect® Customer Programmable Features
The Uconnect®system allows you to access Customer Programmable feature settings
such as Display, Clock, Safety/Assistance, Lights, Doors & Locks, Auto-On Comfort &
Remote Start, Engine Off Operation, Compass Settings, Audio, Trailer Brake, Phone/
Bluetooth
®, Suspension and SiriusXM Setup and System Information through soft-keys.
•Press the SETTINGS button (Uconnect®5.0), or press the “Apps” button (Uconnect®
8.4) located near the bottom of the touchscreen, then press the “Settings” button on the
touchscreen to access the Settings screen. When making a selection, scroll up or down
until the preferred setting is highlighted, then press and release the preferred setting
until a check-mark appears next to the setting, showing that setting has been selected.
The following feature settings are available:
• Display • Clock
• Safety/Assistance • Doors & Locks
• Auto-On Comfort & Remote Start • Engine Off Options
• Phone/Bluetooth
®• Audio
• Lights • SiriusXM Setup
• Compass (Uconnect
®5.0) • Trailer Brake
• Suspension • System Information
• Units • Voice
NOTE:
Depending on the vehicles options, feature settings may vary.
ELECTRONICS
117
Page 124 of 252

Programming A Non-Rolling Code
NOTE:
For programming Garage Door Openers manufactured before 1995.
1. Turn the ignition switch to the ON/RUN position.
2. Place the hand-held transmitter 1 to 3 in (3 to 8 cm) away from the HomeLink
®
button you wish to program while keeping the HomeLink®indicator light in view.
3. Simultaneously press and hold both the HomeLink
®button you want to program
and the hand-held transmitter button.
4.
Continue to hold buttons until the EVIC display changes from “CHANNEL #
TRAINING” to “CHANNEL # TRAINED”, then release both buttons.
5. Press and hold the programmed HomeLink®button and observe the indicator
light.
NOTE:
If the EVIC displays “DID NOT TRAIN” repeat from Step 2.
• To program the two remaining HomeLink
®buttons, repeat each step for each
remaining button. DO NOT erase the channels.
Using HomeLink®
To operate, press and release the programmed HomeLink®button. Activation will
now occur for the programmed device (i.e., garage door opener, gate operator,
security system, entry door lock, home/office lighting, etc.,). The hand-held trans-
mitter of the device may also be used at any time.
WARNING!
• Your motorized door or gate will open and close while you are programming the universal transceiver. Do not program the transceiver if people or pets are in the
path of the door or gate.
• Do not run your vehicle in a closed garage or confined area while programming
the transceiver. Exhaust gas from your vehicle contains Carbon Monoxide (CO)
which is odorless and colorless. Carbon Monoxide is poisonous when inhaled
and can cause you and others to be severely injured or killed.
ELECTRONICS
122