2014 PORSCHE 911 TURBO flat tire
[x] Cancel search: flat tirePage 252 of 300

250 Minor Repairs
Wheel alignment, wheel balancing
As a precaution, have wheels with summer tires balanced in the spring, and those with mud and snow tires before winter. Unbalanced wheels may affect car handling and tire life.Only the specified weights may be used for wheel balancing.
Self-adhesive weights must not come into contact with cleaning agents, since they could drop off.Uneven tread wear indicates wheel imbalance. In this event, the vehicle should be checked at an authorized Porsche dealer.
If, during a trip, uneven running or vibrations occur that could be caused by damage to tires or the car, the speed must be reduced immediately, but without braking sharply. If you continue your trip without having the cause of the fault remedied, you might lose control of your vehicle.fStop the vehicle and check the tires.fIf no cause for the fault can be found, drive carefully to the nearest authorized Porsche dealer.
The summer tires of your Sports Car have been specially developed and adapted for high performance. At low outside temperatures (<15°C (60°F)), the tire characteristics change. This can result in noises occurring when parking or maneuvering at low outside temperatures.
Wheels with Tire Pressure Monitoring System (TPMS) sensors
Before changing wheels, make sure that the wheels are compatible with your vehicle’s TPMS.fCheck this with your authorized Porsche dealer.
Removing and storing tires
fAfter changing, adjust tire pressure and torque wheel bolts diagonally. Please see the chapter “CHANGING WHEELS” on page 254.fStore tires in a cool and dry place. Rotate periodically to avoid flat spots.fDo not store summer tires or park vehicles fitted with summer tires at ambient temperatures below 5 °F (-15 °C).fAvoid contact with fuel, oil and grease.
Tires must always remain on the same side of the vehicle.When wheels are removed, the direction of rotation and position of each wheel should be marked.
Example
FR (front right), FL, RR and RL.
Wheels must always be fitted in accordance with their marking.
The perception that tire durability and performance are not affected by storage and age is unfounded. Chemical additives, which make the rubber elastic, lose their effectiveness over the course of time and the rubber becomes brittle and cracks.
Therefore, the tires should be inspected from time to time.
Information
Under no circumstances should tires older than 6 years be used on your Porsche.
The age of the tire can be obtained from the “DOT” code number. If, for example, the last four numbers read 1213, then the tire was produced in the 12th week of 2013.
Snow tires
The installation of Porsche approved snow tires is recommended.
Use Porsche approved snow tires for grip on snow and ice. Summer performance tires are not suitable for usage in cold, snowy, or icy conditions.Check with your local Motor Vehicle Bureau for possible restrictions.
High-Speed tire Vibration
DANGERh
14_991_Turbo_21.book Seite 250 Mittwoch, 9. April 2014 2:19 14
Page 255 of 300

Minor Repairs 253
– third four-digit code means tire type code. – fourth four-digit code means date of manufacture.If, for example, the last four numbers read 0211, the tire was produced in the 2nd week of 2011.
C – Tire ply composition and material
The number of layers in the tread and sidewalls and their material composition.
D – Maximum permissible inflation pressure
The maximum permissible cold inflation pressure to which a tire can be inflated.fDo not exceed the permissible inflation pressure.
E – Maximum Load rating
The maximum load in kilograms and pounds can be carried by the tire. If you replace tires always use a tire that has the same maximum load rating as the factory installed tire.
F – Radial
The identification indicates if the tire has radial structure.
G – Term of tubeless or tube tire
Identification for tubeless tires.
Speed code letters
The speed code letter Y indicates the maximum permitted speed for the tire.This code letter is shown on the tire sidewall.
Information
Tires with a maximum speed rating that is lower than the specified maximum vehicle speed may be mounted only if they bear an M+S identification on the tire sidewall.fPlease note that in addition to snow tires, all-season tires are also subject to speed limits and bear this identification.fNever drive faster than the speed rating of the tires, and obey all speed and traffic laws.
G - Rim width in inches H - Rim-flange contour code letter I - Symbol for drop-center rim J - Rim diameter in inches K - Double hump L - Rim offset in mm
Inscription on alloy wheels
The information is provided on the rear of the spokes. The rim width in inches A and the rim offset F are visible from the outside. This information can be found near the tire valve.
T up to 118 mph (190 km/h)
H up to 131 mph (210 km/h)
V up to 150 mph (240 km/h)
W up to 167 mph (270 km/h)
Y up to 186 mph (300 km/h)
(Y) up to 186 mph (300 km/h) as for Y tires. Speeds of more than 185 mph(300 km/h) are also possible at a maximum tire load capacity of 85 % (confirmation from tire manufacturer required for speeds of more than 185 mph (300 km/h)).
14_991_Turbo_21.book Seite 253 Mittwoch, 9. April 2014 2:19 14
Page 256 of 300

254 Minor Repairs
Jacking point for lifting platform and jack at the front
Raising the vehicle with a lifting platform, trolley jack or standard jack
fBefore driving the vehicle onto a lifting platform, make sure that there is sufficient space between the lifting platform and the vehicle.
Jacking point for lifting platform and jack at the rear
Risk of serious damage to the engine or vehicle if you lift the vehicle improperly.fLift only at the jacking points provided.fBefore driving the vehicle onto a lifting platform, make sure that there is sufficient space between the lifting platform and the vehicle.fTo avoid serious damage, never jack up the vehicle at the engine, transmission or at the axles.fUse only level anti-slip rubber pads on a lifting platform.fDo not damage any sensitive components in the vicinity of the jacking points.
Changing Wheels
Other vehicles could collide with your vehicle if you are parked in a dangerous position.fIf you have a flat tire, move a safe distance off the road. Turn the emergency flasher on and use other warning devices to alert other motorists.fDo not remain in the car. Someone approaching from the rear may not realize your vehicle is stopped and cause a collision.
Exhaust fumes and the exhaust system are very hot when the engine is running. The exhaust system remains hot for some time after the vehicle is turned off.fDo not park your vehicle in areas where the hot exhaust system may come in contact with dry grass, brush, fuel spill or other flammable material.
If the vehicle is not secured, or incorrectly secured, during a wheel change, it could move unexpectedly or fall from the car jack.fPassengers must not be in the vehicle when it is jacked up.
NOTICE
Unsafe Stopping
Stopping Over Nearby Flammable Matter
Jacking Risks
DANGERh
WARNINGh
WARNINGh
14_991_Turbo_21.book Seite 254 Mittwoch, 9. April 2014 2:19 14
Page 257 of 300

Minor Repairs 255
fBefore you change a wheel, be sure the ground is level and firm. If necessary, use a board under the jack to ensure that the jack does not sink into the ground.fSet the electric parking brake and block the wheels opposite the flat tire on the other side of the vehicle.fThe jack is only to be used for changing a wheel. Do not use it as a support to work under the car.fThe car must be jacked up only at the illustrated jacking points. Lifting at any other place may result in personal injury.
Risk of damage to the engine or vehicle if you lift the vehicle improperly.fThe car must be jacked up only at the illustrated jacking points. Lifting at any other place may result in damage to the vehicle.fNever jack up the car by the body, bumpers, engine, transmission or at the axles.fDo not damage any sensitive components in the vicinity of the jacking points.fFor safety reasons do not use tire inflating bot-tles. Do not use commercially available sealant bottles. Use only the tire inflating bottle located in the luggage compartment.
Information
The tools required for changing a wheel (e.g. jack, wheel bolt wrench, assembly aids) are not supplied as standard with the vehicle. Your authorized Porsche dealer will be pleased to advise you.
Information
The tire and wheel sizes on both axles are different.fDo not fit the wrong wheels on the wrong axle.fOnly use wheels/tires with approved dimensions for the relevant axle.
Sequence of operation
The jack must be used only to raise the car for wheel changing. The jack must never be used as a support to work underneath the vehicle. If the jack is accidentally dislodged, you or bystanders could suffer severe personal injury.fNever jack up other vehicles or other loads with the jack.fAlways place the car on stable supports if you have to work under it. When working under the vehicle, always use safety stands specifically designed for this purpose.
fPlease use a suitable knee rest to protect your clothing against soiling.1. Activate the electric parking brake and move the PDK selector lever to position P. Remove the ignition key or control unit on vehicles with Porsche Entry & Drive.2. Switch on the emergency flasher if necessary.
3. Secure the vehicle to prevent it from rolling away, e.g. by means of wedges under the wheels on the opposite side.This is particularly important on slopes.4. Slightly loosen the wheel bolts on the wheel to be changed.5. Lift the vehicle only at the specified jacking points.6. Raise the vehicle until the wheel lifts off the ground. fPlease see the chapter “RAISING THE VEHICLE WITH A LIFTING PLATFORM, TROLLEY JACK OR STANDARD JACK” on page 254.7. Remove 1 or 2 wheel bolts (see corresponding figure).NOTICE
Working Under VehicleWARNINGh
14_991_Turbo_21.book Seite 255 Mittwoch, 9. April 2014 2:19 14
Page 258 of 300
256 Minor Repairs
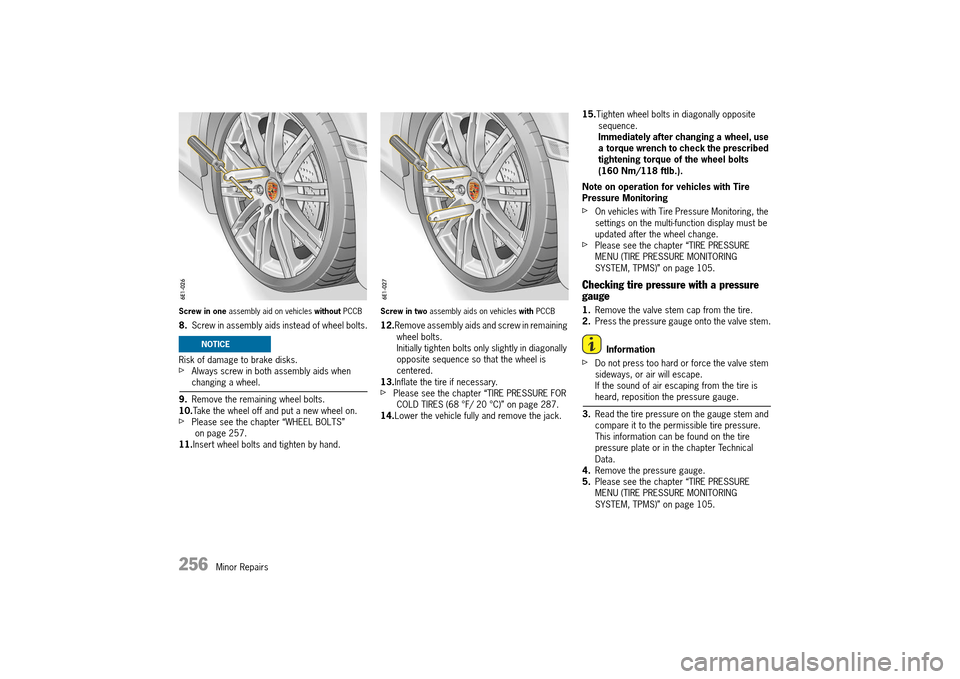
Screw in one assembly aid on vehicles without PCCB
8.Screw in assembly aids instead of wheel bolts.
Risk of damage to brake disks.fAlways screw in both assembly aids when changing a wheel.
9. Remove the remaining wheel bolts. 10. Take the wheel off and put a new wheel on.fPlease see the chapter “WHEEL BOLTS” on page 257.11. Insert wheel bolts and tighten by hand.
Screw in two assembly aids on vehicles with PCCB
12.Remove assembly aids and screw in remaining wheel bolts.Initially tighten bolts only slightly in diagonally opposite sequence so that the wheel is centered.13. Inflate the tire if necessary.fPlease see the chapter “TIRE PRESSURE FOR COLD TIRES (68 °F/ 20 °C)” on page 287.14. Lower the vehicle fully and remove the jack.
15. Tighten wheel bolts in diagonally opposite sequence.Immediately after changing a wheel, use a torque wrench to check the prescribed tightening torque of the wheel bolts (160 Nm/118 ftlb.).
Note on operation for vehicles with Tire Pressure Monitoring
fOn vehicles with Tire Pressure Monitoring, the settings on the multi-function display must be updated after the wheel change.fPlease see the chapter “TIRE PRESSURE MENU (TIRE PRESSURE MONITORING SYSTEM, TPMS)” on page 105.
Checking tire pressure with a pressure gauge
1. Remove the valve stem cap from the tire. 2. Press the pressure gauge onto the valve stem.
Information
fDo not press too hard or force the valve stem sideways, or air will escape.If the sound of air escaping from the tire is heard, reposition the pressure gauge.
3. Read the tire pressure on the gauge stem and compare it to the permissible tire pressure.This information can be found on the tire pressure plate or in the chapter Technical Data.4. Remove the pressure gauge. 5. Please see the chapter “TIRE PRESSURE MENU (TIRE PRESSURE MONITORING SYSTEM, TPMS)” on page 105.
NOTICE
14_991_Turbo_21.book Seite 256 Mittwoch, 9. April 2014 2:19 14
Page 267 of 300

Minor Repairs 265
Flat Tire
1.Stop the vehicle as far away from the driving lane as possible.The vehicle must be parked on a firm and flat surface offering adequate grip.2. Switch emergency flasher on. 3. Apply the parking brake. 4. Move the PDK selector lever to position P. 5. Straighten the front wheels. 6. Remove the ignition key, or the control unit on vehicles with Porsche Entry & Drive, in order to lock the steering and prevent the engine from being started.7. Get all passengers to leave the vehicle. 8. Set up the warning triangle at a suitable distance.
Filling in tire sealant
The tire sealant can be found in the right-hand box in the luggage compartment. The compressor is located under the cover in the luggage compartment.
The tire sealant can be used to seal small cuts, especially in the tire tread.
Sealing the tire with the tire sealant is only an emergency solution so you can drive to the nearest workshop. Even if the tire is air-tight, it may only be used for short journeys in an emergency.
The tire sealant set comprises: – a filler bottle– a filler hose– a valve turner– a spare valve insert– a sticker with the maximum permitted speed– a compressor– operating instructions
Always observe the following points:fUse the tire sealant only in the case of cuts or punctures no larger than 0.15 in. (4 mm).fNever use the tire sealant if the rim is damaged.
The sealant is highly flammable and harmful to health.fFire, naked flame and smoking are prohibited when handling tire sealant.fAvoid contact with skin, eyes or clothing due to caustic chemical properties of the tire sealant.fKeep tire sealant away from children.fDo not inhale vapors, due to the consequent harm to personal health resulting in serious personal injury or death.
In the event of contact with sealant:
fIf sealant gets on your skin or into your eyes, thoroughly rinse the affected part of your body immediately with plenty of water.fChange soiled clothing immediately.fSee a doctor immediately in the event of an allergic reaction.fIf sealant is swallowed, thoroughly rinse out the mouth without delay and drink plenty of water. Do not induce vomiting.See a doctor immediately.
Limits on Tire Sealant Use
Tire Sealant Flammability
WARNINGh
WARNINGh
14_991_Turbo_21.book Seite 265 Mittwoch, 9. April 2014 2:19 14
Page 268 of 300

266 Minor Repairs
A- Filler bottle B - Filler hose C - Filler hose plug D - Valve turner E - Valve insert F - Tire valve
Filling in sealant
1. Leave the object that caused the puncture in the tire.2. Remove sealant and the enclosed sticker from the luggage compartment.3. Stick the sticker in the driver’s field of vision. 4. Shake filler bottle A.
5. Screw filler hose B onto the filler bottle. The filler bottle is now open.6. Unscrew valve cap from the tire valve F. 7. Remove valve insert E from the tire valve with valve turner D. Keep the valve insert in a clean, dry place.8. Remove plug C from the filler hose B. 9. Push filler hose onto the tire valve. 10. Hold the filler bottle higher than the level of the tire valve and squeeze it forcefully until the bottle is completely emptied into the tire.11. Pull filler hose off the tire valve. 12. Screw valve insert E securely into the tire valve with the valve turner D. 13. Connect the compressor to a socket in the vehicle and inflate the tire to at least 37 psi/2.5 bar/25 kPa.If this tire pressure cannot be reached, the tire is too severely damaged.Do not continue driving with this tire.14. Screw valve cap onto the tire valve F. 15. Check the tire pressure after driving for around 10 minutes.If the tire pressure is less than 22 psi/1.5 bar/15 kPa, do not continue driving.If a value of more than 22 psi/1.5 bar/15 kPa is indicated, correct the pressure to the prescribed value.fPlease see the chapter “TIRE PRESSURE FOR COLD TIRES (68 °F/ 20 °C)” on page 287.
16. Please contact an authorized Porsche dealer.fAlso follow the separate operating instructions for the tire sealing compound.
A tire pressure sensor that is soiled with sealant cannot determine the tire pressure correctly.fWhen the defective tire is replaced, the tire pressure sensor must be replaced.
Damaged tires could burst causing loss of control of the vehicle.fHave the tire replaced by a specialist workshop as soon as possible.fAvoid hard acceleration and high cornering speeds.fObserve maximum speed of 50 mph (80 km/h).fAlways observe the safety and operating instructions, which can be found in the separate operating instructions for the sealant and on the compressor.
Pressure Loss
Damaged Tires
WARNINGh
DANGERh
14_991_Turbo_21.book Seite 266 Mittwoch, 9. April 2014 2:19 14
Page 275 of 300
Minor Repairs 273
fAfter you install a new battery, it must be initialized in the control unit.Please contact your authorized Porsche dealer.fPlease observe the disposal instructions for batteries.
Putting vehicle into operation
After the battery is connected or after a fully discharged battery is charged, the PSM warning light lights up on the instrument panel and a message appears on the multi-function display in the instrument panel to indicate a fault.
This fault can be corrected with a few simple steps: 1. Start the engine. To do this, turn the ignition key or the control unit (on vehicles with Porsche Entry & Drive) to ignition lock position 2 twice. 2. With the vehicle stationary, perform a few steering movements to the left and right and then drive a short distance in a straight line until the PSM warning light goes out and the message is erased from the multi-function display in the instrument panel.3. If the warnings do not disappear, then: Drive carefully to the nearest authorized Porsche dealer.Have the fault corrected.4. After the warnings go out: Stop the vehicle in a suitable place.5. Store the end position for the power windows.
For information on storing the end positions for the power windows: fPlease see the chapter “STORING END POSITION OF THE WINDOWS AFTER CONNECTING THE VEHICLE BATTERY” on page 63.6. Teach tires on vehicles with Tire Pressure Monitoring.
For information on teaching the Tire Pressure Monitoring System (TPMS): fPlease see the chapter “TIRE PRESSURE MENU (TIRE PRESSURE MONITORING SYSTEM, TPMS)” on page 105.7. Store end position on vehicles with a sunroof.
For information on storing the end position for the sunroof: fPlease see the chapter “STORING END POSITION OF THE SUNROOF” on page 66.fPlease see the chapter “STORING END POSITION OF THE ROLL-UP SUNBLIND” on page 67.
External Power Supply, Emergency
starting with jumper cables
If the battery is flat, the battery of another vehicle can be used for starting or as an external power supply with the help of jump leads.
Both batteries must be 12 V batteries. The capacity (Ah) of the donor battery must not be substantially less than that of the flat battery.
The flat battery must be connected correctly to the vehicle’s electrical system.
A short circuit may be caused if unsuitable jumper cables are used or if jumper cable starting is not performed properly. Such short circuits can cause a fire.fUse only standard jumper cables with sufficient cross section and completely insulated alligator clips. Follow the instructions provided by the jumper cable manufacturer.fRoute the jumper cables so that they cannot be caught by moving parts in the engine compartment.The jumper cables must be long enough so that neither vehicles nor cables touch another.fThe vehicles must not touch, otherwise current might flow as soon as the positive terminals are connected.fEnsure that tools or conductive jewelry (rings, chains, watch straps) do not come into contact with the positive jumper cable, the positive battery post or live parts of the vehicle.fImproper hook-up of jumper cables can ruin the alternator.
Jumper Cable HazardsWARNINGh
14_991_Turbo_21.book Seite 273 Mittwoch, 9. April 2014 2:19 14