Page 5 of 352
.
.
Contents
Child seats 153
ISOFIX child seats 160
Child lock 164
Child safety
Direction indicators 165
Emergency or assistance call 166
Horn 166
Tyre under-infl ation detection 167
ESC system 169
Seat belts 172
Airbags 175
Safety
Temporary puncture repair kit 179
Changing a wheel 185
Changing a bulb 192
Changing a fuse 201
12 V battery 205
Energy economy mode 208
Changing a wiper blade 209
Towing the vehicle 210
Towing a trailer 212
Fitting roof bars 214
Accessories 215
Practical information
Opening the bonnet 218
Running out of fuel (Diesel) 219
Petrol engines 221
Diesel engines 222
Blue HDi Diesel engines 224
Checking levels 225
Checks 228
AdBlue® additive for ® additive for ®
HDi Blue Diesel engines 230
Checks
Petrol engines 235
Petrol weights 236
Diesel engines 238
Diesel weights 242
Dimensions 246
Identifi cation markings 247
Technical data
Emergency or assistance 249
JBL equipment 251
PEUGEOT Connect Navigation (RT6) 253
Audio system 307
Audio equipment and telematics
Alphabetical indexVisual search
Page 9 of 352
.
7
Familiarisation
Interior
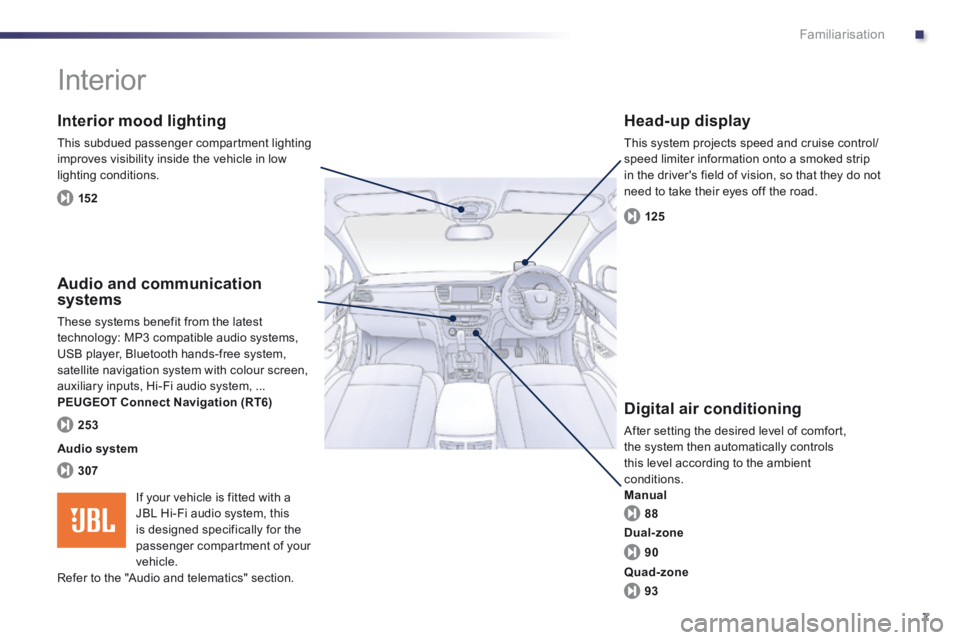
Interior mood lighting
This subdued passenger compartment lighting improves visibility inside the vehicle in low lighting conditions.
Head-up display
This system projects speed and cruise control/speed limiter information onto a smoked strip in the driver's field of vision, so that they do not need to take their eyes off the road.
Digital air conditioning
After setting the desired level of comfort, the system then automatically controls this level according to the ambient conditions. Manual
Audio and communication systems
These systems benefit from the latest technology: MP3 compatible audio systems, USB player, Bluetooth hands-free system, satellite navigation system with colour screen, auxiliary inputs, Hi-Fi audio system, ... PEUGEOT Connect Navigation (RT6)
152
125
88
307
253
Audio system
90
93
Dual-zone
Quad-zone
If your vehicle is fitted with a JBL Hi-Fi audio system, this is designed specifically for the
passenger compartment of your vehicle. Refer to the "Audio and telematics" section.
Page 43 of 352
1
41
Monitoring
Setting the date and time
Audio system / Bluetooth
Press MENU .
Using the arrows, select " Personalisation-configuration " and confirm.
Using the arrows, select " Display configuration " and confirm.
Using the arrows, select " Date and time adjustment " and confirm.
Select the setting to be modified. Confirm by pressing OK , then make the change and confirm again to save the modification.
Adjust the settings one by one, confirming by pressing the OK button. Next select the " OK " tab on the screen then confirm to exit from the " Date and time adjustment " menu.
Page 92 of 352
90
Comfort
Dual-zone digital air conditioning
Automatic operation
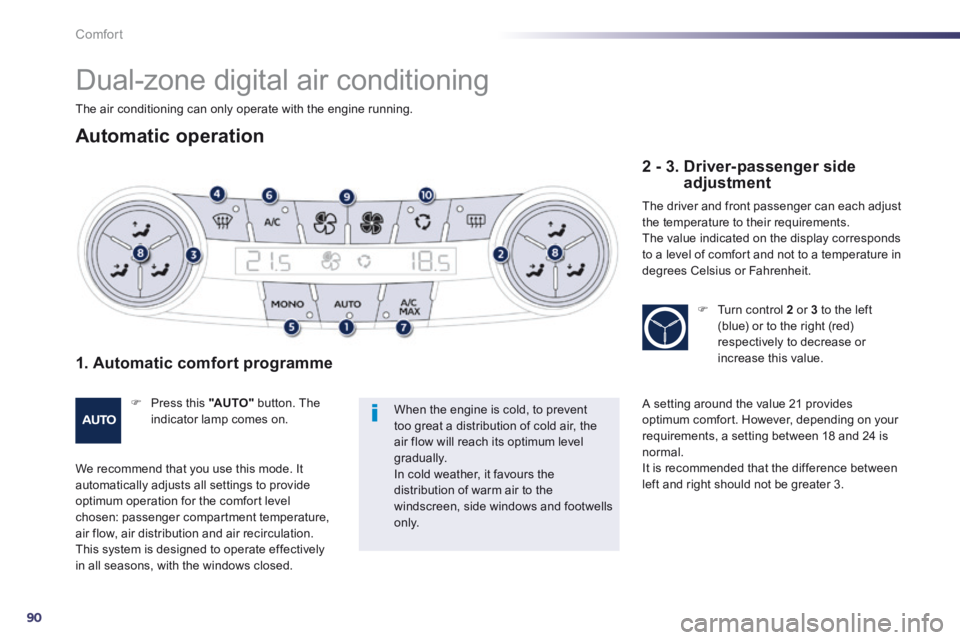
1. Automatic comfort programme
Press this "AUTO" button. The indicator lamp comes on.
We recommend that you use this mode. It automatically adjusts all settings to provide optimum operation for the comfort level chosen: passenger compartment temperature, air flow, air distribution and air recirculation. This system is designed to operate effectively in all seasons, with the windows closed.
When the engine is cold, to prevent too great a distribution of cold air, the air flow will reach its optimum level gradually. In cold weather, it favours the distribution of warm air to the windscreen, side windows and footwells o n l y.
2 - 3. Driver-passenger side adjustment
The driver and front passenger can each adjust the temperature to their requirements. The value indicated on the display corresponds to a level of comfort and not to a temperature in degrees Celsius or Fahrenheit.
Turn control 2 or 3 to the left (blue) or to the right (red) respectively to decrease or increase this value.
A setting around the value 21 provides optimum comfort. However, depending on your requirements, a setting between 18 and 24 is normal. It is recommended that the difference between left and right should not be greater 3.
The air conditioning can only operate with the engine running.
Page 95 of 352
3
93
Comfort
Quad-zone digital air conditioning
Automatic operation
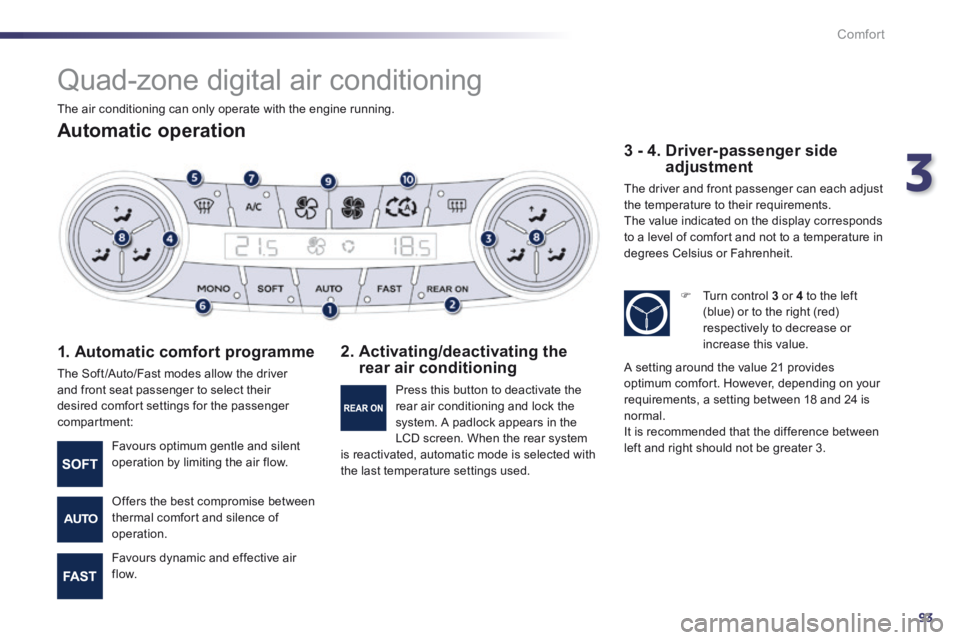
1. Automatic comfort programme
The Soft /Auto/Fast modes allow the driver and front seat passenger to select their desired comfort settings for the passenger compartment:
2. Activating/deactivating the rear air conditioning
3 - 4. Driver-passenger side adjustment
The driver and front passenger can each adjust the temperature to their requirements. The value indicated on the display corresponds to a level of comfort and not to a temperature in degrees Celsius or Fahrenheit.
Favours optimum gentle and silent operation by limiting the air flow.
Offers the best compromise between thermal comfort and silence of operation.
Favours dynamic and effective air f low.
Press this button to deactivate the rear air conditioning and lock the system. A padlock appears in the LCD screen. When the rear system is reactivated, automatic mode is selected with the last temperature settings used.
Turn control 3 or 4 to the left (blue) or to the right (red) respectively to decrease or increase this value.
A setting around the value 21 provides optimum comfort. However, depending on your requirements, a setting between 18 and 24 is normal. It is recommended that the difference between left and right should not be greater 3.
The air conditioning can only operate with the engine running.
Page 210 of 352
208Practical information
System which manages the duration of use of certain functions to conserve a sufficient level of charge in the battery. After the engine has stopped, you can still use functions such as the audio and telematics system, windscreen wipers, dipped beam headlamps, courtesy lamps, etc. for a maximum combined duration of about forty minutes.
Energy economy mode
Switching to economy mode
A message then appears in the instrument panel screen indicating that the vehicle has switched to economy mode and the active functions are put on standby. If a telephone call is being made at this time, it
will be maintained for around 10 minutes with the Bluetooth hands-free system of your audio system.
Exiting economy mode
These functions are reactivated automatically next time the vehicle is driven. In order to resume the use of these functions immediately, start the engine and let it run: - for less than ten minutes, to use the equipment for approximately five minutes, - for more than ten minutes, to use the equipment for up to approximately thirty minutes. Let the engine run for the duration specified to ensure that the battery charge is sufficient. Do not repeatedly and continuously restart the engine in order to charge the battery. A flat battery prevents the engine from starting (refer to the "Battery" section).
Page 218 of 352
216
Practical information
The fitting of electrical equipment or accessories which are not recommended by PEUGEOT may result in a failure of your vehicle's electronic system and excessive electrical consumption. Please note this precaution. You are advised to contact a PEUGEOT representative to be shown the range of recommended equipment and accessories.
Installation of radio communication transmitters
Before installing any after-market radio communication transmitter, you can contact a PEUGEOT dealer for the specification of transmitters which can be fitted (frequency, maximum power, aerial position, specific installation requirements), in line with the Vehicle Electromagnetic Compatibility Directive (2004/104/EC).
Depending on the legislation in force in the country, it may be compulsory to have a high visibility safety vest, warning triangle and spare bulbs and fuses available in the vehicle.
You can also obtain products for cleaning and maintenance (exterior and interior) and topping up fluids (screenwash, ...), as well as refills (cartridge for temporary tyre repair kit...) from PEUGEOT dealers.
"Multimedia":
audio systems, portable navigation system, Takara/Sony portable video screen, Bluetooth system, speakers, DVD player, Wi-Fi, driving aids, video support, microwave unit...
Page 222 of 352
220Checks
Blue HDi engines
Fill the fuel tank with at least five litres of Diesel. Switch on the ignition (without starting the engine). Wait around 6 seconds and switch off the ignition. Repeat the operation 10 times. Operate the starter to run the engine.