2014 Peugeot 508 ignition
[x] Cancel search: ignitionPage 66 of 352
64
Access
Fuel tank Capacity of the tank: approximately 72 litres (or 55 litres according to version).
Additions of fuel must be of at least 5 litres to be registered by the fuel gauge. Opening the filler cap may result in an inrush of air. This vacuum is entirely normal and results from the sealing of the fuel system. Take care to select the pump that delivers
the correct fuel type for your vehicle's engine (reminder on a label on the inside of the filler flap). Open the filler cap by turning it a 1/4 turn to the left. Remove the filler cap and hang it on its carrier (on the filler flap).
Opening
If you have put in the wrong fuel for your vehicle, you must have have the tank drained and refilled with the correct fuel before you star t the engine.
With Stop & Start, never refuel with the system in STOP mode; you must switch off the ignition with the key.
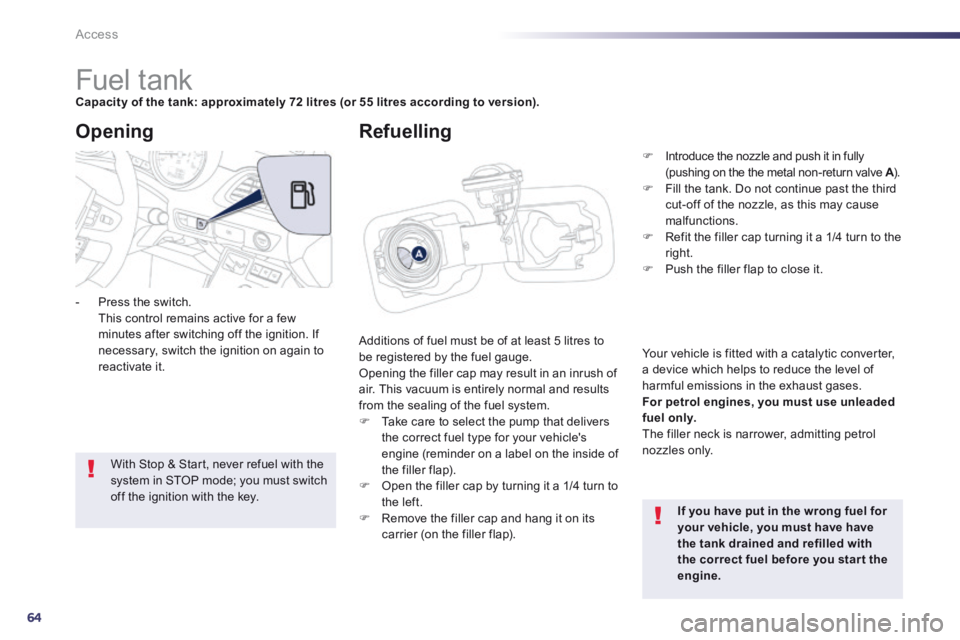
- Press the switch. This control remains active for a few minutes after switching off the ignition. If necessary, switch the ignition on again to reactivate it.
Refuelling
Introduce the nozzle and push it in fully (pushing on the the metal non-return valve A ). A ). A Fill the tank. Do not continue past the third cut-off of the nozzle, as this may cause malfunctions.
Refit the filler cap turning it a 1/4 turn to the right. Push the filler flap to close it.
Your vehicle is fitted with a catalytic converter, a device which helps to reduce the level of harmful emissions in the exhaust gases. For petrol engines, you must use unleaded fuel only. The filler neck is narrower, admitting petrol nozzles only.
Page 70 of 352
68
Comfort
Electric adjustments
Switch on the ignition or start the engine if the vehicle has gone into economy mode.
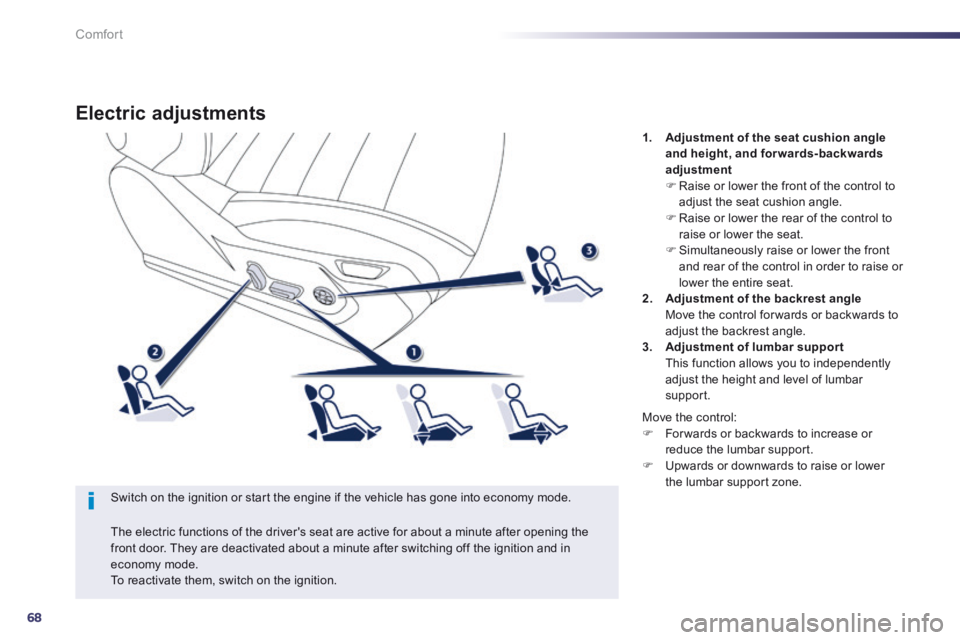
1. Adjustment of the seat cushion angle and height, and forwards-backwards adjustment Raise or lower the front of the control to adjust the seat cushion angle. Raise or lower the rear of the control to
raise or lower the seat. Simultaneously raise or lower the front and rear of the control in order to raise or lower the entire seat. 2. Adjustment of the backrest angle Move the control for wards or backwards to adjust the backrest angle. 3. Adjustment of lumbar support This function allows you to independently adjust the height and level of lumbar support.
The electric functions of the driver's seat are active for about a minute after opening the front door. They are deactivated about a minute after switching off the ignition and in economy mode. To reactivate them, switch on the ignition.
Move the control: For wards or backwards to increase or reduce the lumbar support. Upwards or downwards to raise or lower the lumbar support zone.
Page 71 of 352
3
69
Comfort
Storing driving positions
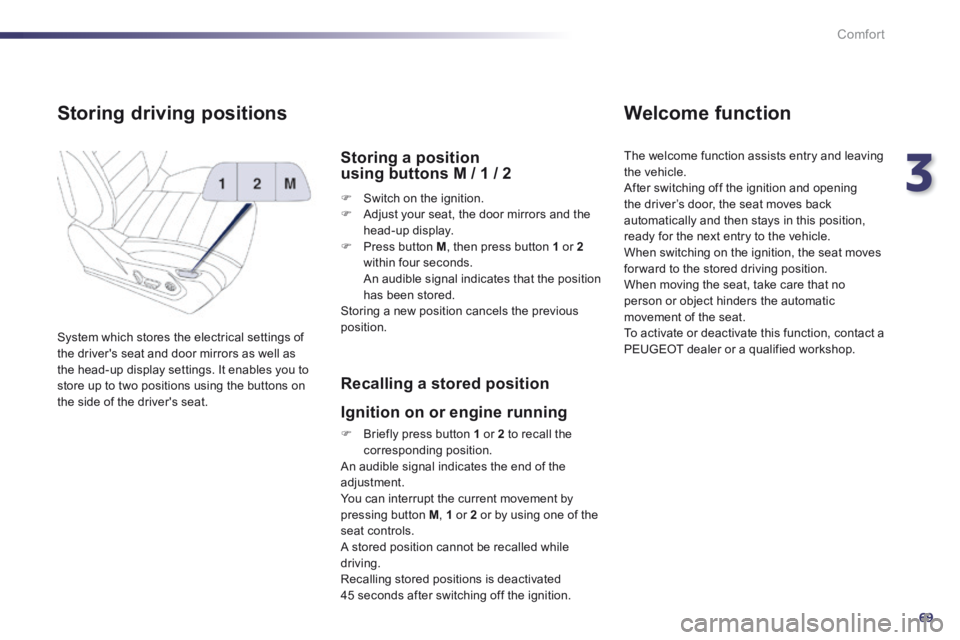
System which stores the electrical settings of the driver's seat and door mirrors as well as the head-up display settings. It enables you to store up to two positions using the buttons on the side of the driver's seat.
Storing a position using buttons M / 1 / 2
Switch on the ignition. Adjust your seat, the door mirrors and the head-up display. Press button M , then press button 1 or 2within four seconds. An audible signal indicates that the position has been stored. Storing a new position cancels the previous position.
Recalling a stored position
Ignition on or engine running
Briefly press button 1 or 2 to recall the corresponding position. An audible signal indicates the end of the adjustment. You can interrupt the current movement by pressing button M , 1 or 2 or by using one of the seat controls.
A stored position cannot be recalled while driving. Recalling stored positions is deactivated 45 seconds after switching off the ignition.
Welcome function
The welcome function assists entry and leaving the vehicle. After switching off the ignition and opening the driver’s door, the seat moves back automatically and then stays in this position, ready for the next entry to the vehicle. When switching on the ignition, the seat moves for ward to the stored driving position. When moving the seat, take care that no person or object hinders the automatic movement of the seat. To activate or deactivate this function, contact a PEUGEOT dealer or a qualified workshop.
Page 76 of 352
74
Comfort
Mirrors
Each fitted with an adjustable mirror glass providing the lateral rear ward vision necessary for overtaking or parking. They can also be folded for parking in confined spaces.
Door mirrors
If the mirrors are folded using control A , they will not unfold when the vehicle is unlocked. Pull again on control A .
The folding and unfolding of the door mirrors using the remote control can be deactivated by a PEUGEOT dealer or a qualified workshop. Fold the mirrors when putting your vehicle through an automatic car wash.
The objects observed are, in reality, closer than they appear. Take this into account in order to correctly judge the distance of vehicles approaching from behind.
Demisting - Defrosting
Demisting-defrosting of the door mirrors operates with the engine running, by switching on the heated rear screen (refer to the "Rear screen demist-defrost" page).
Adjustment
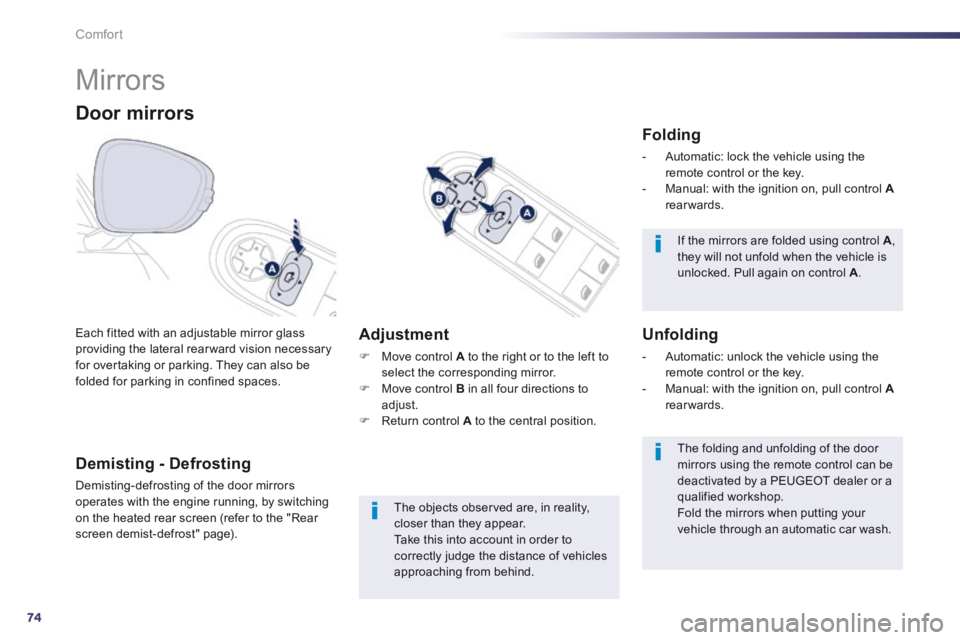
Move control A to the right or to the left to select the corresponding mirror. Move control B in all four directions to adjust. Return control A to the central position.
Folding
- Automatic: lock the vehicle using the remote control or the key. - Manual: with the ignition on, pull control Arearwards.
Unfolding
- Automatic: unlock the vehicle using the remote control or the key. - Manual: with the ignition on, pull control Arearwards.
Page 101 of 352
3
99
Comfort
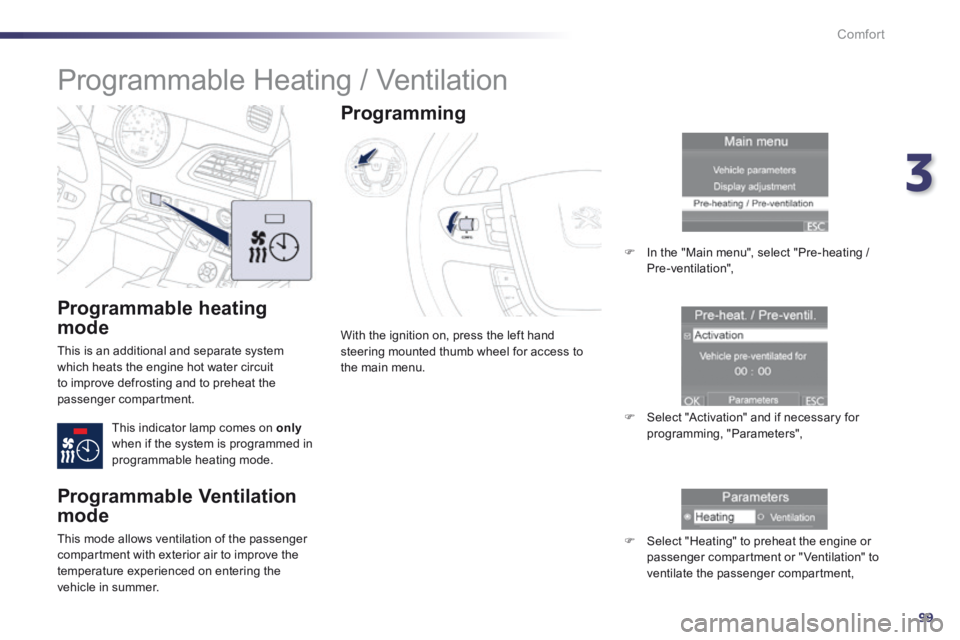
Programmable heating
mode
This is an additional and separate system which heats the engine hot water circuit to improve defrosting and to preheat the passenger compartment.
This indicator lamp comes on onlywhen if the system is programmed in programmable heating mode.
With the ignition on, press the left hand steering mounted thumb wheel for access to the main menu.
Programming
In the "Main menu", select "Pre-heating / Pre-ventilation",
Select "Activation" and if necessary for programming, "Parameters",
Select "Heating" to preheat the engine or passenger compartment or "Ventilation" to ventilate the passenger compartment,
Programmable Heating / Ventilation
Programmable Ventilation
mode
This mode allows ventilation of the passenger compartment with exterior air to improve the temperature experienced on entering the
vehicle in summer.
Page 103 of 352
4
101
Driving
Starting-switching off the engine With a manual gearbox , put the gear lever in neutral. With an electronic gear control gearbox , put the gear lever in N . With an automatic gearbox , put the gear lever in P or N .
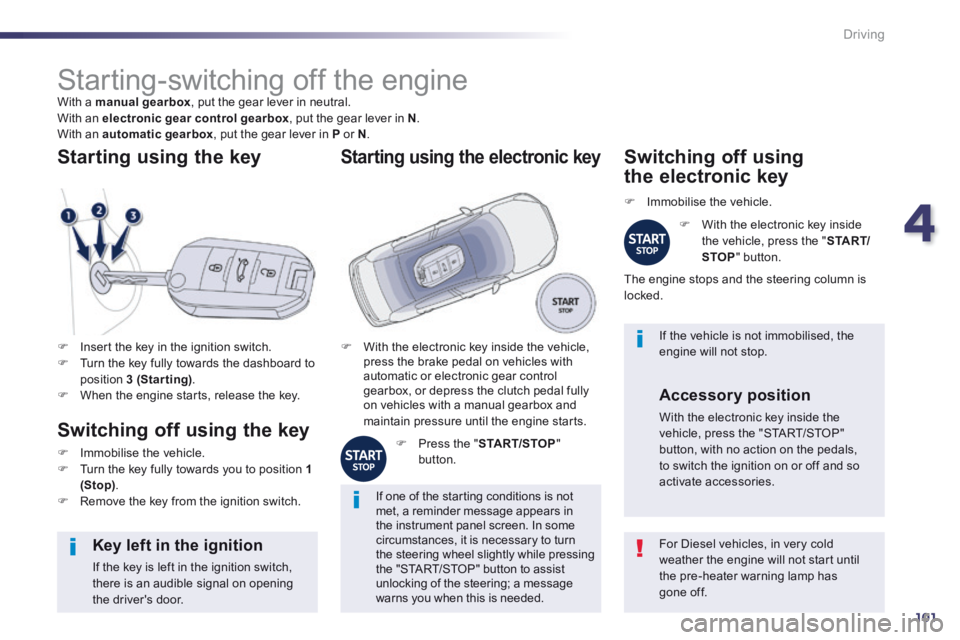
Insert the key in the ignition switch. Turn the key fully towards the dashboard to position 3 (Starting) . When the engine starts, release the key.
Starting using the key
Switching off using the key
Immobilise the vehicle. Turn the key fully towards you to position 1 (Stop) . Remove the key from the ignition switch.
For Diesel vehicles, in very cold weather the engine will not start until the pre-heater warning lamp has gone off.
Key left in the ignition
If the key is left in the ignition switch, there is an audible signal on opening the driver's door.
If one of the starting conditions is not met, a reminder message appears in the instrument panel screen. In some circumstances, it is necessary to turn the steering wheel slightly while pressing the "START/STOP" button to assist unlocking of the steering; a message warns you when this is needed.
If the vehicle is not immobilised, the engine will not stop. With the electronic key inside the vehicle, press the brake pedal on vehicles with automatic or electronic gear control gearbox, or depress the clutch pedal fully on vehicles with a manual gearbox and maintain pressure until the engine starts.
Starting using the electronic key
Press the " START/STOP " button.
Switching off using
the electronic key
Immobilise the vehicle.
With the electronic key inside the vehicle, press the " S TA R T/STOP " button.
The engine stops and the steering column is locked.
Accessory position
With the electronic key inside the vehicle, press the "START/STOP" button, with no action on the pedals, to switch the ignition on or off and so activate accessories.
Page 104 of 352
102
Driving
Anti-theft protection
Electronic engine immobiliser
The keys contain an electronic chip which has a secret code. When the ignition is switched on, this code must be recognised in order for starting to be possible. This electronic engine immobiliser locks the engine management system a few minutes after the ignition is switched off and prevents starting of the engine by anyone who does not have the key.
In the event of a malfunction, you are informed by a message in the instrument panel screen. In this case, your vehicle does not start; contact a PEUGEOT dealer as soon as possible.
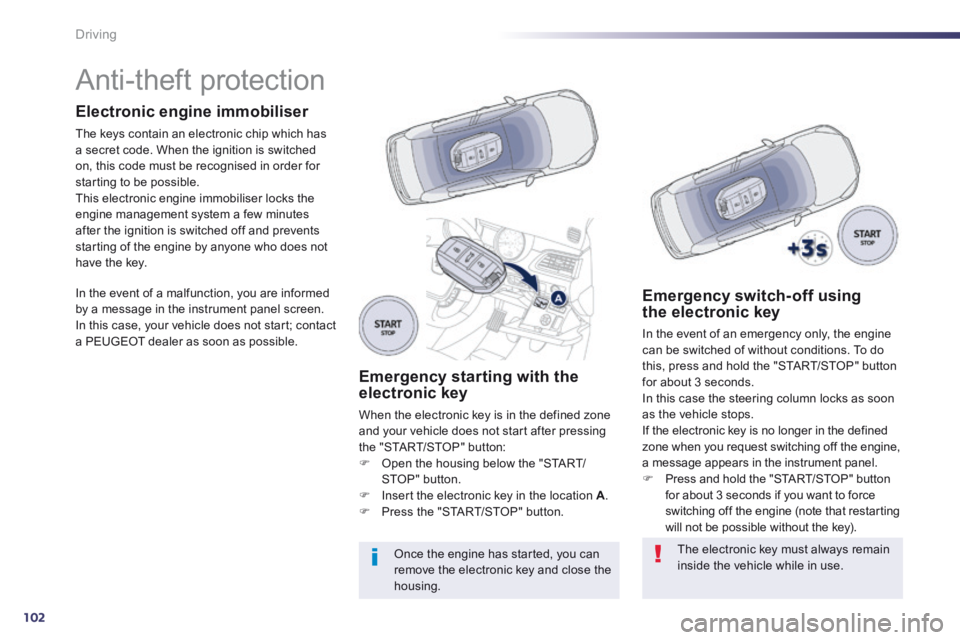
Emergency starting with the electronic key
When the electronic key is in the defined zone and your vehicle does not start after pressing the "START/STOP" button: Open the housing below the "START/STOP" button. Insert the electronic key in the location A . Press the "START/STOP" button.
Once the engine has started, you can remove the electronic key and close the housing.
Emergency switch-off using the electronic key
In the event of an emergency only, the engine can be switched of without conditions. To do this, press and hold the "START/STOP" button for about 3 seconds. In this case the steering column locks as soon as the vehicle stops. If the electronic key is no longer in the defined zone when you request switching off the engine, a message appears in the instrument panel. Press and hold the "START/STOP" button for about 3 seconds if you want to force switching off the engine (note that restarting will not be possible without the key).
The electronic key must always remain inside the vehicle while in use.
Page 106 of 352
104
Driving
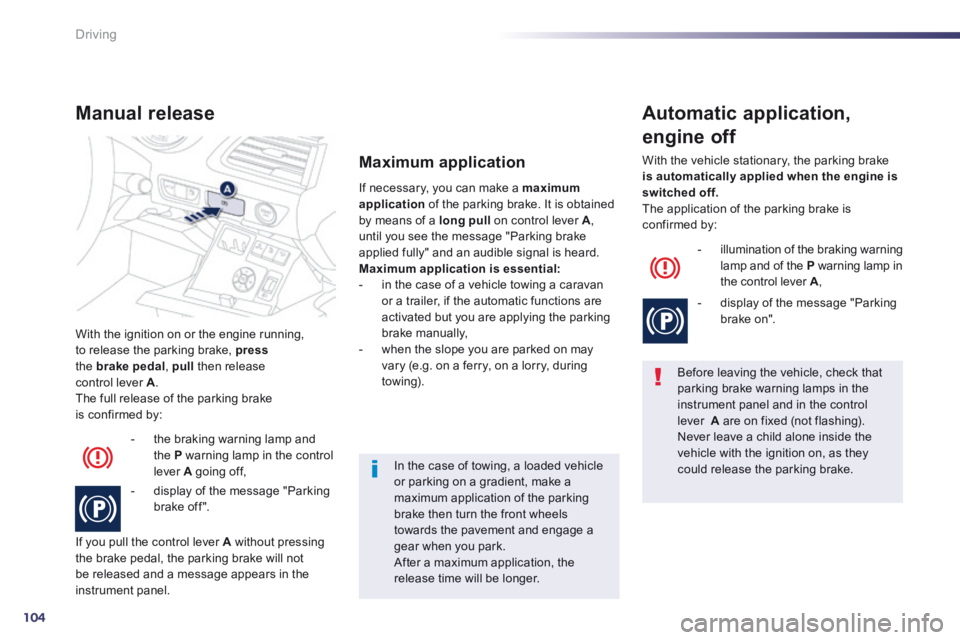
With the ignition on or the engine running, to release the parking brake, pressthe brake pedal , pull then release control lever A . The full release of the parking brake is confirmed by:
Manual release
- the braking warning lamp and the P warning lamp in the control lever A going off,
- display of the message "Parking brake off ".
If you pull the control lever A without pressing the brake pedal, the parking brake will not be released and a message appears in the instrument panel.
If necessary, you can make a maximum application of the parking brake. It is obtained by means of a long pull on control lever A , until you see the message "Parking brake applied fully" and an audible signal is heard. Maximum application is essential: - in the case of a vehicle towing a caravan or a trailer, if the automatic functions are activated but you are applying the parking brake manually, - when the slope you are parked on may vary (e.g. on a ferry, on a lorry, during towing).
Maximum application
Before leaving the vehicle, check that parking brake warning lamps in the instrument panel and in the control lever A are on fixed (not flashing). Never leave a child alone inside the vehicle with the ignition on, as they could release the parking brake.
Automatic application,
engine off
- illumination of the braking warning lamp and of the P warning lamp in the control lever A ,
- display of the message "Parking brake on".
With the vehicle stationary, the parking brake is automatically applied when the engine is switched off. The application of the parking brake is confirmed by:
In the case of towing, a loaded vehicle or parking on a gradient, make a maximum application of the parking brake then turn the front wheels towards the pavement and engage a gear when you park. After a maximum application, the release time will be longer.