Page 11 of 352
.
9
Familiarisation
Sitting comfortably
Front seats
67
Manual adjustments
1. Height adjustment. 2. Backrest angle adjustment. 3. Seat cushion height adjustment. 4. Lumbar support adjustment. 5. Seat forwards-backwards adjustment.
Electrical adjustment
1. Angle, seat height and seat forwards-backwards adjustment. 2. Backrest angle adjustment. 3. Lumbar support adjustment.
68
Page 12 of 352
10Familiarisation
9. Fusebox. 10. Front door window demisting/defrosting vent. 11. Windscreen demisting/defrosting vent. 12 . Steering lock and starting with the key. 13. Starting using the electronic key. 14 . Audio equipment steering wheel controls. 15. Wiper / screenwash / trip computer stalk. 16. Central locking and hazard warning buttons. 17. Multifunction screen.
Instruments and controls
1. Cruise control / speed limiter controls. 2. Headlamp height adjustment. 3. Lighting and direction indicator stalk 4. Instrument panel. 5. Driver's airbag. Horn. 6. Gear lever. 7. 12 V accessory socket USB port / auxiliary socket. 8. Bonnet release lever.
18. Central adjustable air vents. 19. Passenger's airbag. 20. Side adjustable air vents. 21. Glove box / Passenger's airbag deactivation. 22. Electric parking brake. 23. Central armrest with storage. 24. Storage (according to version). 25. Audio system. 26. Heating / air conditioning controls.
Page 14 of 352
12
Familiarisation
Sitting comfortably
Head restraint adjustment
70
1. Release the adjustment mechanism. 2. Adjust for height and reach. 3. Lock the adjustment mechanism.
Steering wheel adjustment
76
For reasons of safety, these operations must only be carried out with the vehicle stationary.
Heated seats control
0 : off. 1 : low. 2 : medium. 3 : high.
To lower it, press button A . To raise it, guide the head restraint upwards to the desired position.
70
Page 61 of 352

2
59
Access
Closing
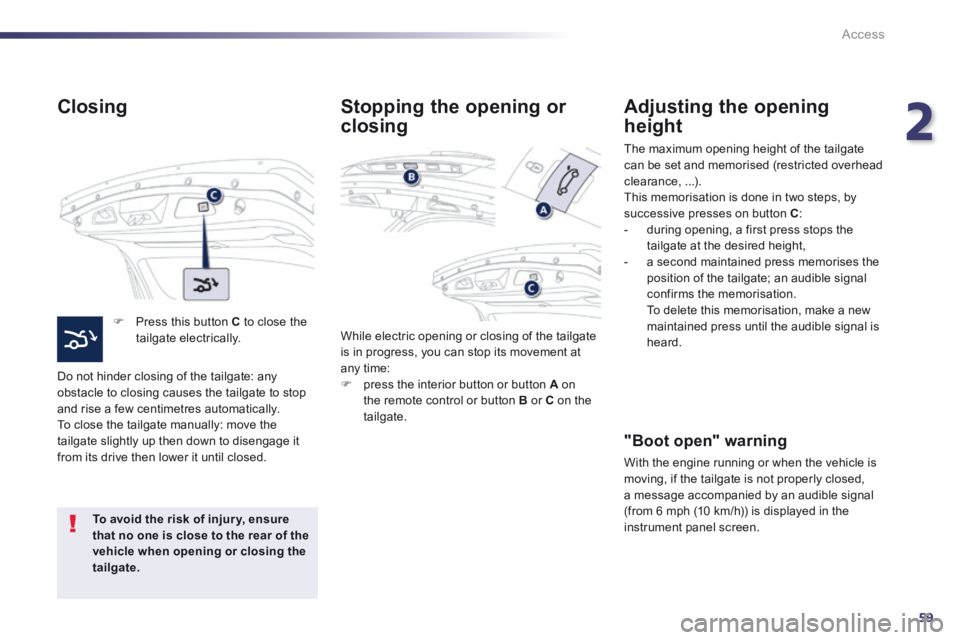
Press this button C to close the tailgate electrically.
Do not hinder closing of the tailgate: any obstacle to closing causes the tailgate to stop and rise a few centimetres automatically. To close the tailgate manually: move the tailgate slightly up then down to disengage it from its drive then lower it until closed.
To avoid the risk of injur y, ensure that no one is close to the rear of the vehicle when opening or closing the tailgate.
While electric opening or closing of the tailgate is in progress, you can stop its movement at any time: press the interior button or button A on the remote control or button B or C on the tailgate.
Stopping the opening or
closing
Adjusting the opening
height
The maximum opening height of the tailgate can be set and memorised (restricted overhead clearance, ...). This memorisation is done in two steps, by successive presses on button C :
- during opening, a first press stops the tailgate at the desired height, - a second maintained press memorises the position of the tailgate; an audible signal confirms the memorisation. To delete this memorisation, make a new maintained press until the audible signal is heard.
"Boot open" warning
With the engine running or when the vehicle is moving, if the tailgate is not properly closed, a message accompanied by an audible signal (from 6 mph (10 km/h)) is displayed in the instrument panel screen.
Page 69 of 352
3
67
Comfort
Front seats
Manual adjustments
1. Adjustments to the height and angle of the head restraint To raise it, pull upwards. To lower it, hold the button in and press on the head restraint (pushing to go past the stiff point of the button). 2. Adjustment of the backrest angle Operate the control lever and adjust the position of the backrest to the front or to the rear. 3. Adjustment of the seat height Raise or lower the control lever the number of times required to obtain the desired position. 4. Adjustment of the lumbar suppor t This system allows the height and depth of the lumbar support to be adjusted separately. For wards or backwards to increase or
decrease the lumbar support. Upwards or downwards to raise or lower the lumbar contact zone. 5. Forwards-backwards adjustment of the seat position Lift the control bar and slide the seat for wards or backwards.
Page 70 of 352

68
Comfort
Electric adjustments
Switch on the ignition or start the engine if the vehicle has gone into economy mode.
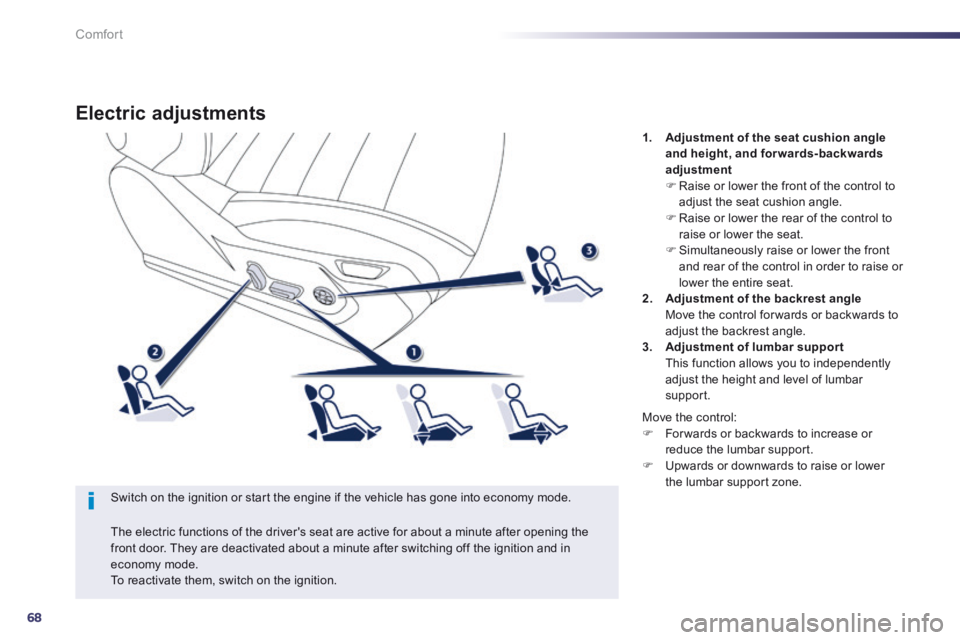
1. Adjustment of the seat cushion angle and height, and forwards-backwards adjustment Raise or lower the front of the control to adjust the seat cushion angle. Raise or lower the rear of the control to
raise or lower the seat. Simultaneously raise or lower the front and rear of the control in order to raise or lower the entire seat. 2. Adjustment of the backrest angle Move the control for wards or backwards to adjust the backrest angle. 3. Adjustment of lumbar support This function allows you to independently adjust the height and level of lumbar support.
The electric functions of the driver's seat are active for about a minute after opening the front door. They are deactivated about a minute after switching off the ignition and in economy mode. To reactivate them, switch on the ignition.
Move the control: For wards or backwards to increase or reduce the lumbar support. Upwards or downwards to raise or lower the lumbar support zone.
Page 72 of 352

70
Comfort
Head restraint height and angle adjustment
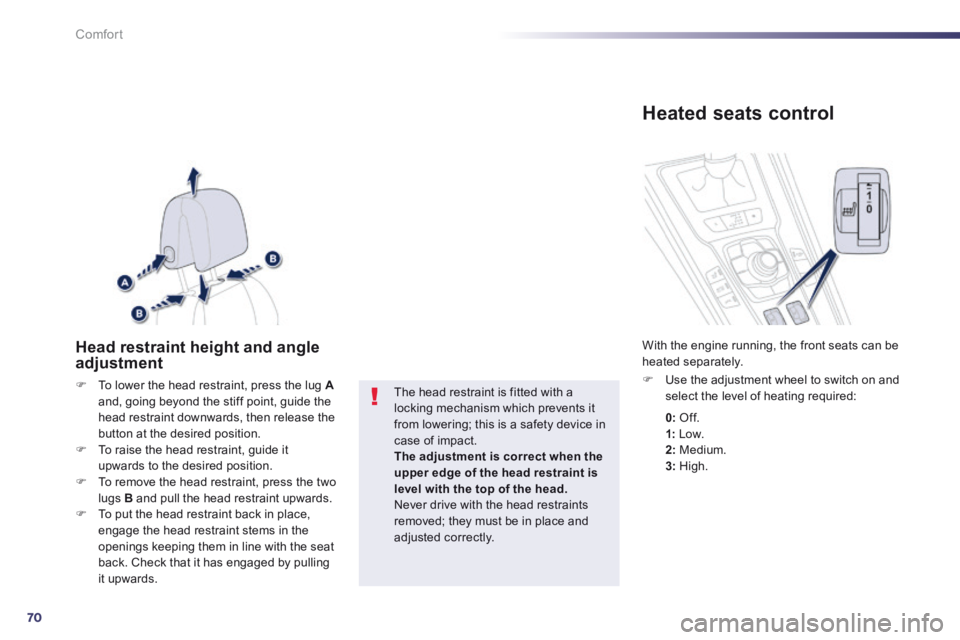
To lower the head restraint, press the lug Aand, going beyond the stiff point, guide the head restraint downwards, then release the button at the desired position. To raise the head restraint, guide it upwards to the desired position. To remove the head restraint, press the two lugs B and pull the head restraint upwards. To put the head restraint back in place, engage the head restraint stems in the openings keeping them in line with the seat back. Check that it has engaged by pulling it upwards.
The head restraint is fitted with a locking mechanism which prevents it from lowering; this is a safety device in
case of impact. The adjustment is correct when the upper edge of the head restraint is level with the top of the head. Never drive with the head restraints removed; they must be in place and adjusted correctly.
Heated seats control
Use the adjustment wheel to switch on and select the level of heating required:
With the engine running, the front seats can be heated separately.
0: Of f.
1: Low. 2: Medium. 3: High.
Page 78 of 352

76
Comfort
Automatic day/night model
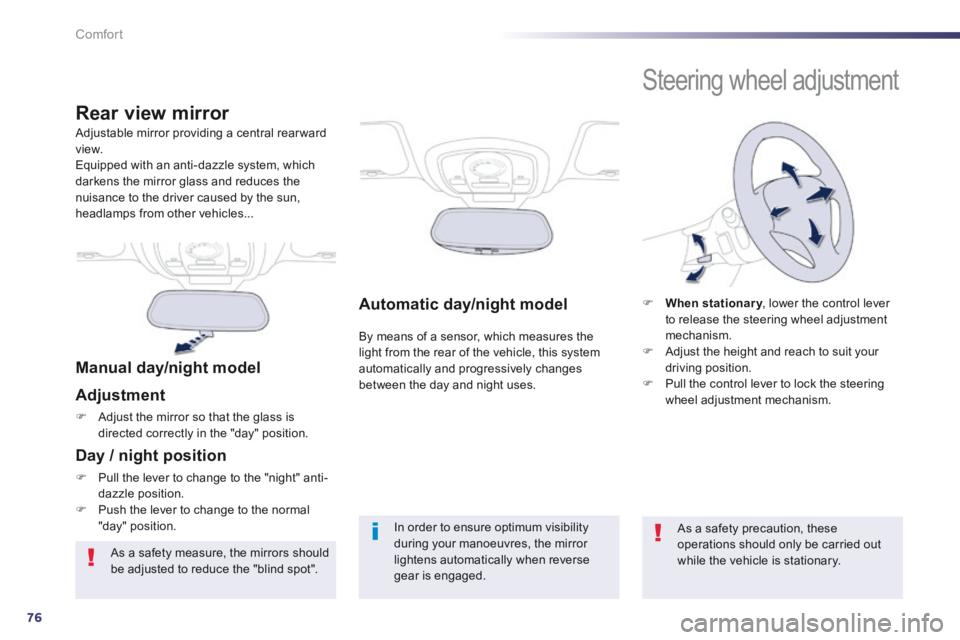
By means of a sensor, which measures the light from the rear of the vehicle, this system automatically and progressively changes between the day and night uses.
Adjustable mirror providing a central rearward view. Equipped with an anti-dazzle system, which darkens the mirror glass and reduces the nuisance to the driver caused by the sun, headlamps from other vehicles...
Rear view mirror
Manual day/night model
Adjustment
Adjust the mirror so that the glass is directed correctly in the "day" position.
Day / night position
Pull the lever to change to the "night" anti-dazzle position. Push the lever to change to the normal "day" position. In order to ensure optimum visibility during your manoeuvres, the mirror lightens automatically when reverse gear is engaged.
Steering wheel adjustment
When stationary , lower the control lever When stationary , lower the control lever When stationaryto release the steering wheel adjustment mechanism. Adjust the height and reach to suit your driving position. Pull the control lever to lock the steering wheel adjustment mechanism.
As a safety precaution, these operations should only be carried out while the vehicle is stationary. As a safety measure, the mirrors should be adjusted to reduce the "blind spot".