2014 NISSAN TEANA radiator cap
[x] Cancel search: radiator capPage 3207 of 4801

ENGINE MAINTENANCE (VQ35DE)MA-23
< PERIODIC MAINTENANCE >
C
D E
F
G H
I
J
K L
M B
MA
N
O A
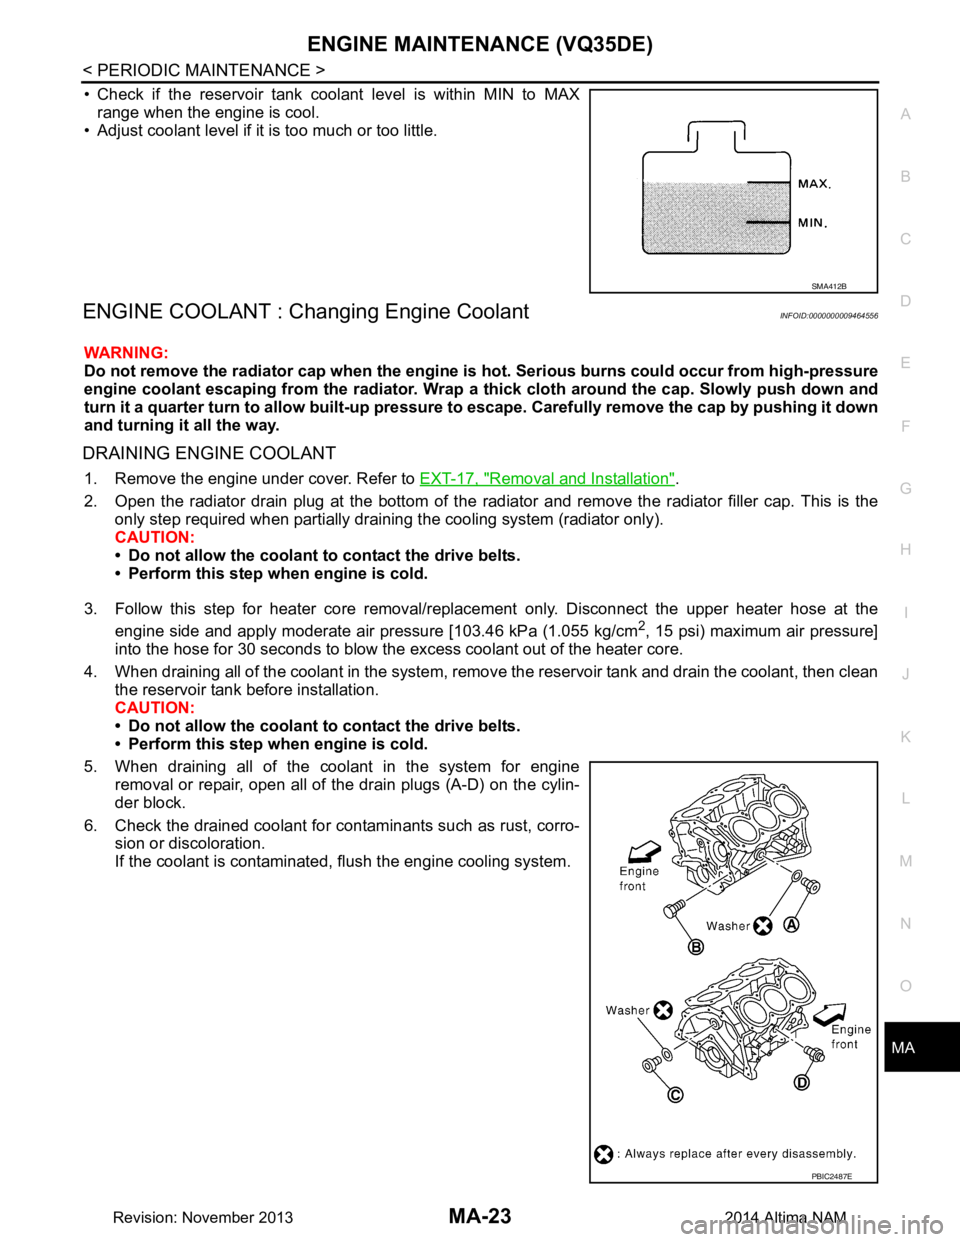
• Check if the reservoir tank coolant level is within MIN to MAX
range when the engine is cool.
• Adjust coolant level if it is too much or too little.
ENGINE COOLANT : Chang ing Engine CoolantINFOID:0000000009464556
WARNING:
Do not remove the radiator cap when the engine is hot. Serious burns could occur from high-pressure
engine coolant escaping from the radiator. Wrap a thick cloth around the cap. Slowly push down and
turn it a quarter turn to allow built-up pressure to escape. Carefully remove the cap by pushing it down
and turning it all the way.
DRAINING ENGINE COOLANT
1. Remove the engine under cover. Refer to EXT-17, "Removal and Installation".
2. Open the radiator drain plug at the bottom of the radiat or and remove the radiator filler cap. This is the
only step required when partially draining the cooling system (radiator only).
CAUTION:
• Do not allow the coolant to contact the drive belts.
• Perform this step when engine is cold.
3. Follow this step for heater core removal/repl acement only. Disconnect the upper heater hose at the
engine side and apply moderate air pressure [103.46 kPa (1.055 kg/cm
2, 15 psi) maximum air pressure]
into the hose for 30 seconds to blow the excess coolant out of the heater core.
4. When draining all of the coolant in the system, remo ve the reservoir tank and drain the coolant, then clean
the reservoir tank before installation.
CAUTION:
• Do not allow the coolant to contact the drive belts.
• Perform this step when engine is cold.
5. When draining all of the coolant in the system for engine removal or repair, open all of the drain plugs (A-D) on the cylin-
der block.
6. Check the drained coolant for contaminants such as rust, corro- sion or discoloration.
If the coolant is contaminated, flush the engine cooling system.
SMA412B
PBIC2487E
Revision: November 20132014 Altima NAM
Page 3208 of 4801

MA-24
< PERIODIC MAINTENANCE >
ENGINE MAINTENANCE (VQ35DE)
REFILLING ENGINE COOLANT
1. Install the radiator drain plug. If the cooling system was drained completely, install the reservoir tank and
the cylinder block drain plugs.
• The radiator must be complete ly empty of coolant and water.
• Apply sealant to the threads of the cylinder block drain plug. Use Genuine High Performance
Thread Sealant or equivalent. Refer to GI-21, "Recommended Chemical Products and Sealants"
.
CAUTION:
Do not reuse copp er sealing washers.
2. If disconnected, reattach the upper radiator hose at the engine side.
3. Set the vehicle heater controls to the full HOT and heat er ON position. Turn the vehicle ignition ON with
the engine OFF as necessary to activate the heater mode.
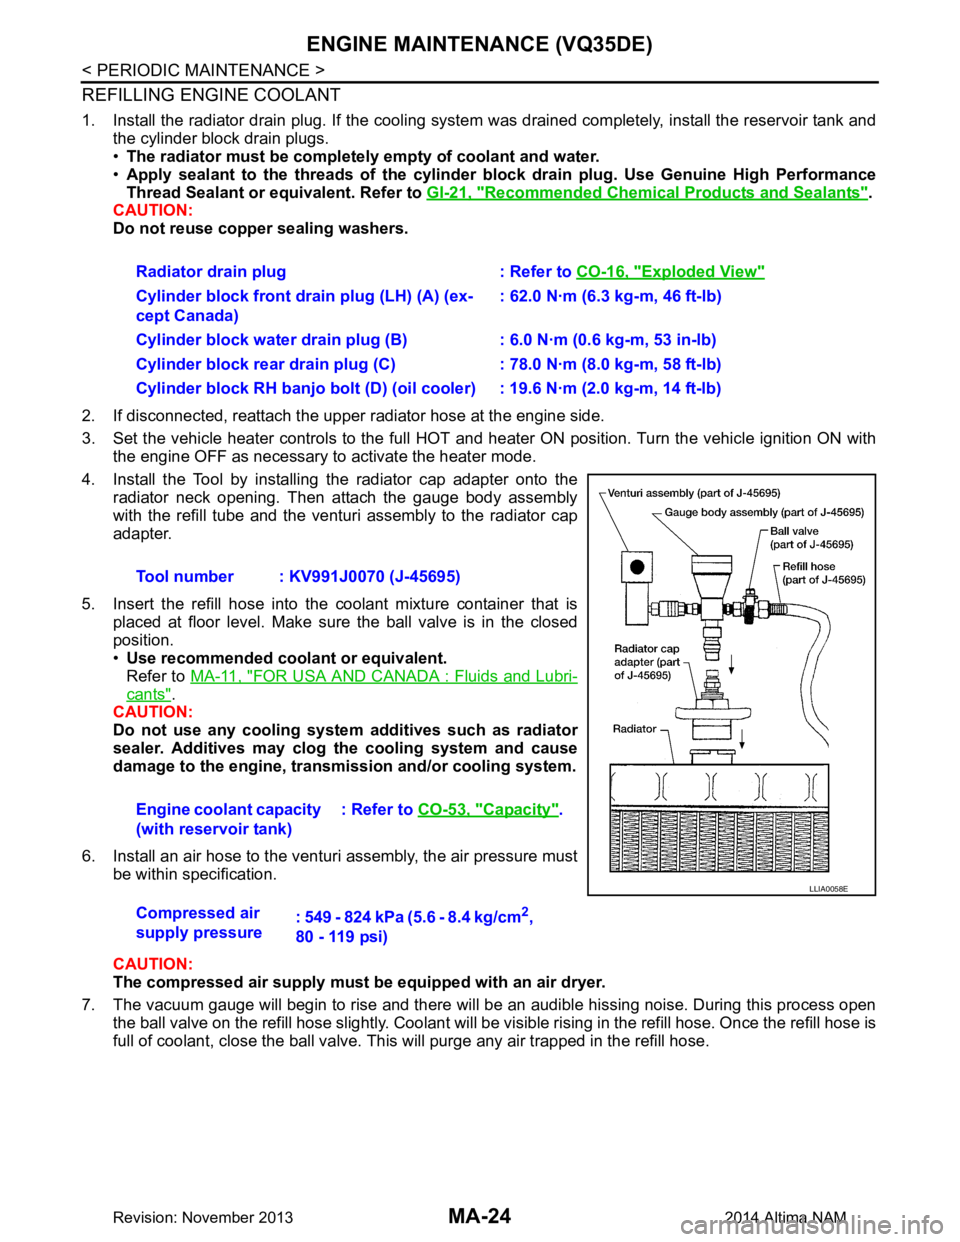
4. Install the Tool by installing the radiator cap adapter onto the radiator neck opening. Then attach the gauge body assembly
with the refill tube and the venturi assembly to the radiator cap
adapter.
5. Insert the refill hose into the coolant mixture container that is placed at floor level. Make sure the ball valve is in the closed
position.
• Use recommended coolant or equivalent.
Refer to MA-11, "FOR USA AND CANADA : Fluids and Lubri-
cants".
CAUTION:
Do not use any cooling system additives such as radiator
sealer. Additives may clog th e cooling system and cause
damage to the engine, transm ission and/or cooling system.
6. Install an air hose to the venturi assembly, the air pressure must be within specification.
CAUTION:
The compressed air supply must be equipped with an air dryer.
7. The vacuum gauge will begin to rise and there will be an audible hissing noise. During this process open the ball valve on the refill hose slightly. Coolant will be vi sible rising in the refill hose. Once the refill hose is
full of coolant, close the ball valve. This will purge any air trapped in the refill hose. Radiator drain plug : Refer to
CO-16, "Exploded View"
Cylinder block front drain plug (LH) (A) (ex-
cept Canada) : 62.0 N·m (6.3 kg-m, 46 ft-lb)
Cylinder block water drain plug (B) : 6.0 N·m (0.6 kg-m, 53 in-lb)
Cylinder block rear drain plug (C) : 78.0 N·m (8.0 kg-m, 58 ft-lb)
Cylinder block RH banjo bolt (D) (oil cooler) : 19.6 N·m (2.0 kg-m, 14 ft-lb)
Tool number : KV991J0070 (J-45695)
Engine coolant capacity
(with reservoir tank) : Refer to
CO-53, "Capacity"
.
Compressed air
supply pressure : 549 - 824 kPa (5.6 - 8.4 kg/cm
2,
80 - 119 psi)
LLIA0058E
Revision: November 20132014 Altima NAM
Page 3209 of 4801

ENGINE MAINTENANCE (VQ35DE)MA-25
< PERIODIC MAINTENANCE >
C
D E
F
G H
I
J
K L
M B
MA
N
O A
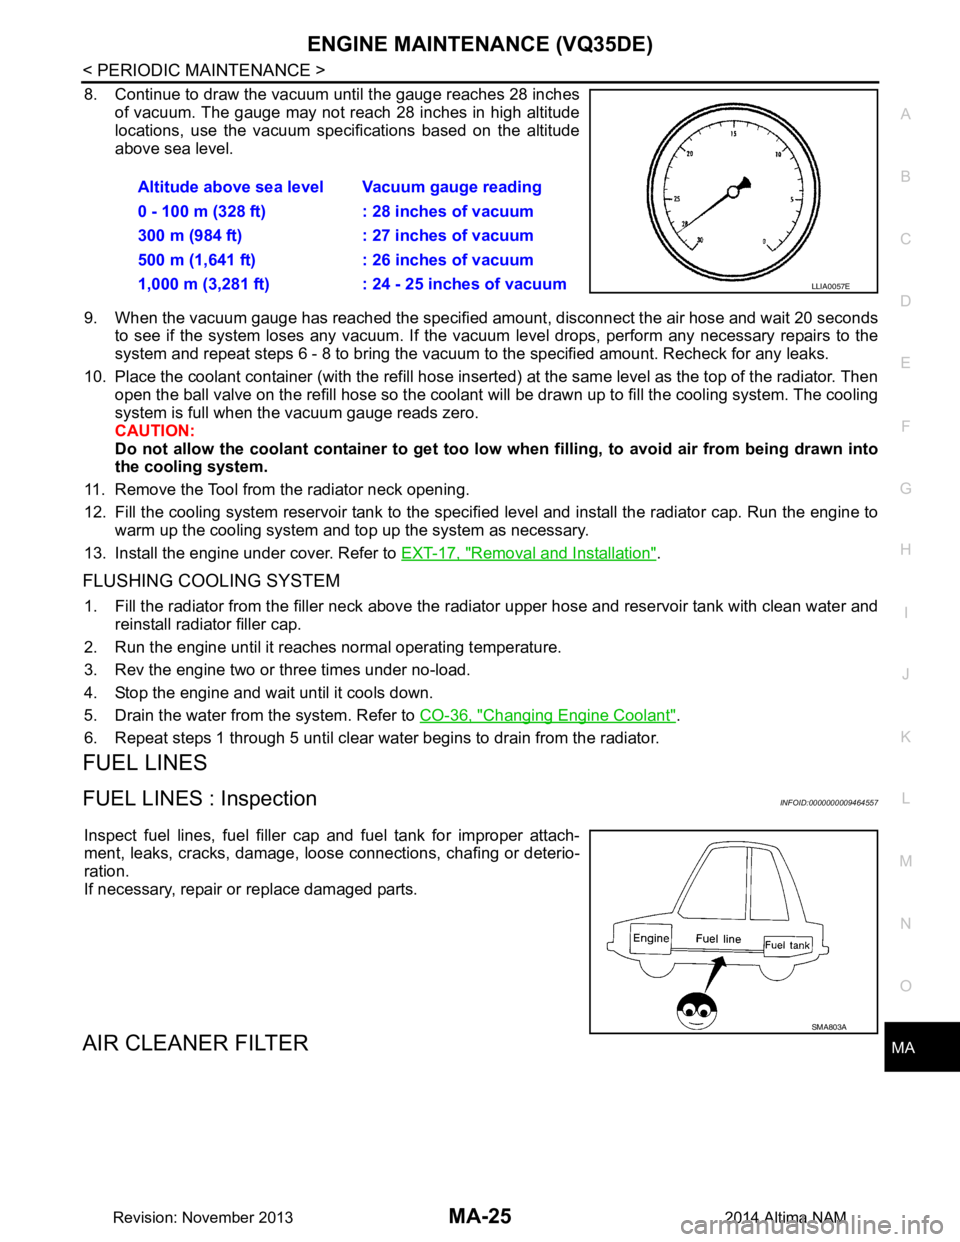
8. Continue to draw the vacuum until the gauge reaches 28 inches
of vacuum. The gauge may not reach 28 inches in high altitude
locations, use the vacuum specifications based on the altitude
above sea level.
9. When the vacuum gauge has reached the specified amount, disconnect the air hose and wait 20 seconds
to see if the system loses any vacuum. If the vacuum level drops, perform any necessary repairs to the
system and repeat steps 6 - 8 to br ing the vacuum to the specified amount. Recheck for any leaks.
10. Place the coolant container (with the refill hose inserted) at the same level as the top of the radiator. Then
open the ball valve on the refill hose so the coolant will be drawn up to fill the cooling system. The cooling
system is full when the vacuum gauge reads zero.
CAUTION:
Do not allow the coolant container to get too low when filling, to avoid air from being drawn into
the cooling system.
11. Remove the Tool from the radiator neck opening.
12. Fill the cooling system reservoir tank to the specif ied level and install the radiator cap. Run the engine to
warm up the cooling system and top up the system as necessary.
13. Install the engine under cover. Refer to EXT-17, "Removal and Installation"
.
FLUSHING COOLING SYSTEM
1. Fill the radiator from the filler neck above the r adiator upper hose and reservoir tank with clean water and
reinstall radiator filler cap.
2. Run the engine until it reaches normal operating temperature.
3. Rev the engine two or three times under no-load.
4. Stop the engine and wait until it cools down.
5. Drain the water from the system. Refer to CO-36, "Changing Engine Coolant"
.
6. Repeat steps 1 through 5 until clear water begins to drain from the radiator.
FUEL LINES
FUEL LINES : InspectionINFOID:0000000009464557
Inspect fuel lines, fuel filler cap and fuel tank for improper attach-
ment, leaks, cracks, damage, loos e connections, chafing or deterio-
ration.
If necessary, repair or replace damaged parts.
AIR CLEANER FILTER
Altitude above sea level Vacuum gauge reading
0 - 100 m (328 ft) : 28 inches of vacuum
300 m (984 ft) : 27 inches of vacuum
500 m (1,641 ft) : 26 inches of vacuum
1,000 m (3,281 ft) : 24 - 25 inches of vacuum
LLIA0057E
SMA803A
Revision: November 20132014 Altima NAM
Page 4001 of 4801

SRC-8
< SYSTEM DESCRIPTION >
COMPONENT PARTS
Front Seat Belt Pre-tensioner
INFOID:0000000009460710
The seat belt pre-tensioner system wi th load limiter is installed for
both the driver's seat and the front passenger's seat. It operates
simultaneously with the SRS air bag system in the event of a frontal
collision with an impact exceeding a specified level.
When the frontal collision with an im pact exceeding a specified level
occurs, seat belt slack resulting from clothing or other factors is
immediately taken up by the shoulder belt pre-tensioner (1) as well
as the lap belt pre-tensioner (2). Vehicle passengers are securely
restrained.
When passengers in a vehicle are thrown forward in a collision and
the restraining force of the seat belt exceeds a specified level, the
load limiter permits the specified extension of the seat belt by the
twisting of the ELR shaft, and a relaxation of the ches t-area seat belt web tension while maintaining force.
Air Bag Diagnosis Sensor UnitINFOID:0000000009460711
The air bag diagnosis sensor unit is located under the center con-
sole assembly. The air bag diagnosis sensor unit receives signals
from multiple SRS sensors and cont rols the deployment of the air
bags. The deployment of the air bags depends on the type and
severity of the collision. The air bag diagnosis sensor unit has self-
diagnosis capability through the use of the CONSULT as well as
flash codes displayed by the air bag warning lamp.
Crash Zone SensorINFOID:0000000009460712
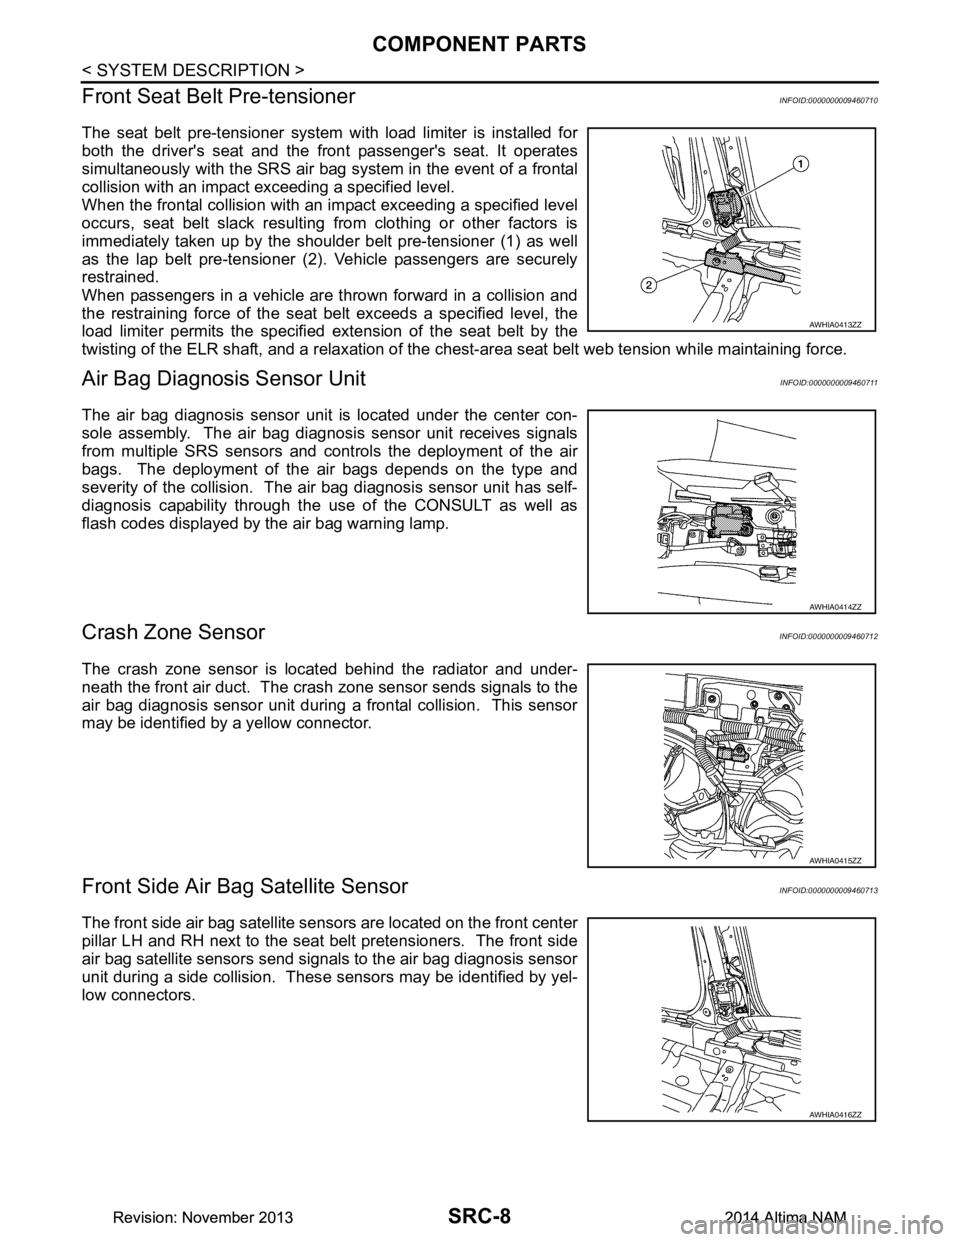
The crash zone sensor is located behind the radiator and under-
neath the front air duct. The crash zone sensor sends signals to the
air bag diagnosis sensor unit during a frontal collision. This sensor
may be identified by a yellow connector.
Front Side Air B ag Satellite SensorINFOID:0000000009460713
The front side air bag satellite sensors are located on the front center
pillar LH and RH next to the seat belt pretensioners. The front side
air bag satellite sensors send signals to the air bag diagnosis sensor
unit during a side collision. Thes e sensors may be identified by yel-
low connectors.
AWHIA0413ZZ
AWHIA0414ZZ
AWHIA0415ZZ
AWHIA0416ZZ
Revision: November 20132014 Altima NAMRevision: November 20132014 Altima NAM
Page 4414 of 4801
![NISSAN TEANA 2014 Service Manual
CVT OIL WARMER SYSTEMTM-199
< REMOVAL AND INSTALLATION > [CVT: RE0F10D]
C
EF
G H
I
J
K L
M A
B
TM
N
O P
CVT OIL WARMER SYSTEM
WATER HOSE
WATER HOSE : Exploded ViewINFOID:0000000009464145
WATER HOSE NISSAN TEANA 2014 Service Manual
CVT OIL WARMER SYSTEMTM-199
< REMOVAL AND INSTALLATION > [CVT: RE0F10D]
C
EF
G H
I
J
K L
M A
B
TM
N
O P
CVT OIL WARMER SYSTEM
WATER HOSE
WATER HOSE : Exploded ViewINFOID:0000000009464145
WATER HOSE](/manual-img/5/57390/w960_57390-4413.png)
CVT OIL WARMER SYSTEMTM-199
< REMOVAL AND INSTALLATION > [CVT: RE0F10D]
C
EF
G H
I
J
K L
M A
B
TM
N
O P
CVT OIL WARMER SYSTEM
WATER HOSE
WATER HOSE : Exploded ViewINFOID:0000000009464145
WATER HOSE : Removal and InstallationINFOID:0000000009464146
REMOVAL
WARNING:
Do not remove the radiator cap when the engine is hot. Serious burns could occur from high pressure
coolant escaping from the radiator. Wrap a thick cloth around the cap. Slowly turn it a quarter turn to
allow built-up pressure to escap e. Carefully remove the cap by turning it all the way.
CAUTION:
Perform when the engine is cold.
NOTE:
When removing components such as hoses, tubes/lines, etc. , cap or plug openings to prevent fluid from spill-
ing.
1. Remove front under cover. Refer to EXT-28, "Removal and Installation"
.
Hose clamp CVT water hose A CVT oil warmer
CVT water hose B Heater thermostat CVT water hose C
Transaxle assembly
Water outlet
: Always replace after every disassembly.
: N·m (kg-m, ft-lb)
JSDIA3627GB
Revision: November 20132014 Altima NAMRevision: November 20132014 Altima NAM
Page 4417 of 4801
![NISSAN TEANA 2014 Service Manual
TM-202
< REMOVAL AND INSTALLATION >[CVT: RE0F10D]
CVT OIL WARMER SYSTEM
CVT FLUID COOLER HOSE : Removal and Installation
INFOID:0000000009464149
REMOVAL
NOTE:
When removing components such as hoses, NISSAN TEANA 2014 Service Manual
TM-202
< REMOVAL AND INSTALLATION >[CVT: RE0F10D]
CVT OIL WARMER SYSTEM
CVT FLUID COOLER HOSE : Removal and Installation
INFOID:0000000009464149
REMOVAL
NOTE:
When removing components such as hoses,](/manual-img/5/57390/w960_57390-4416.png)
TM-202
< REMOVAL AND INSTALLATION >[CVT: RE0F10D]
CVT OIL WARMER SYSTEM
CVT FLUID COOLER HOSE : Removal and Installation
INFOID:0000000009464149
REMOVAL
NOTE:
When removing components such as hoses, tubes/lines, etc. , cap or plug openings to prevent fluid from spill-
ing.
1. Remove front under cover. Refer to EXT-28, "Removal and Installation"
.
2. Remove engine room cover. Refer to EM-28, "Removal and Installation"
.
3. Remove front air duct and air cleaner case assembly. Refer to EM-29, "Removal and Installation"
.
4. Release hose clamp, then remove CVT fluid cooler hoses A and B from CVT oil warmer and radiator. CAUTION:
Do not reuse hose clamps.
INSTALLATION
Installation is in the reverse order of removal.
CAUTION:
Do not reuse hose clamps.
• Insert CVT fluid cooler hoses according to dimension (A).
• Install hose clamps (1) at both ends of CVT fluid cooler hoses (2)
with dimension (A) from the hose end.
• Hose clamp should not interfere with the bulge.
*: Refer to the illustrations for the specific position of each hose clamp tab. CVT oil warmer Hose clamp CVT fluid cooler hose A
CVT fluid cooler hose B Transaxle assembly
: To radiator
: Always replace after every disassembly.
CVT fluid cooler hose (1) Insert side tube (2) Dimension (A)
CVT fluid cooler hose A Radiator (United States and Canada)
End reaches the
2-stage bulge (B)
CVT oil warmer
CVT fluid cooler hose B CVT oil warmer
Radiator (United States and Canada)
JSDIA1289ZZ
Dimension (A) : 5 – 7 mm (0.20 – 0.28 in)
SCIA8123E
CVT fluid cooler hose Hose end Paint mark Position of hose clamp*
CVT fluid cooler hose A Radiator tube side (United States and Canada) N/A
CVT oil warmer side Facing to the front of the vehicle B
CVT fluid cooler hose B CVT oil warmer side
Facing downward A
Radiator tube side (United States and Canada) N/A
Revision: November 20132014 Altima NAMRevision: November 20132014 Altima NAM
Page 4418 of 4801
![NISSAN TEANA 2014 Service Manual
CVT OIL WARMER SYSTEMTM-203
< REMOVAL AND INSTALLATION > [CVT: RE0F10D]
C
EF
G H
I
J
K L
M A
B
TM
N
O P
• The illustrations indicate the view from the hose ends.
• When installing hose clamps, NISSAN TEANA 2014 Service Manual
CVT OIL WARMER SYSTEMTM-203
< REMOVAL AND INSTALLATION > [CVT: RE0F10D]
C
EF
G H
I
J
K L
M A
B
TM
N
O P
• The illustrations indicate the view from the hose ends.
• When installing hose clamps,](/manual-img/5/57390/w960_57390-4417.png)
CVT OIL WARMER SYSTEMTM-203
< REMOVAL AND INSTALLATION > [CVT: RE0F10D]
C
EF
G H
I
J
K L
M A
B
TM
N
O P
• The illustrations indicate the view from the hose ends.
• When installing hose clamps, the center line of each clamp tab should be positioned as shown.
CVT FLUID COOLER HOSE : InspectionINFOID:0000000009464150
INSPECTION AFTER INSTALLATION
Check for CVT fluid leakage and check CVT fluid level. Refer to TM-178, "Inspection".
CVT OIL WARMER
CVT OIL WARMER : Exploded ViewINFOID:0000000009464151
CVT OIL WARMER : Removal and InstallationINFOID:0000000009464152
REMOVAL
WARNING:
Do not remove the radiator cap when the engine is hot. Serious burns could occur from high pressure
coolant escaping from the radiator. Wrap a thick cloth around the cap. Slowly turn it a quarter turn to
allow built-up pressure to escap e. Carefully remove the cap by turning it all the way.
CAUTION:
Perform when the engine is cold.
1. Remove front under cover. Refer to EXT-28, "Removal and Installation"
.
2. Remove CVT water hose inlet and CVT water hose outlet from CVT oil warmer. Refer to TM-199,
"WATER HOSE : Exploded View".
3. Remove CVT fluid cooler hose inlet and CVT fluid cooler hose outlet from CVT oil warmer. Refer to TM-
201, "CVT FLUID COOLER HOSE : Exploded View".
(C): Front
ALDIA0366ZZ
Transaxle assembly CVT oil warmer
: N·m (kg-m, ft-lb)
JSDIA5031GB
Revision: November 20132014 Altima NAMRevision: November 20132014 Altima NAM
Page 4421 of 4801
![NISSAN TEANA 2014 Service Manual
TM-206
< UNIT REMOVAL AND INSTALLATION >[CVT: RE0F10D]
TRANSAXLE ASSEMBLY
UNIT REMOVAL AND INSTALLATION
TRANSAXLE ASSEMBLY
Exploded ViewINFOID:0000000009464160
Removal and InstallationINFOID:00000000 NISSAN TEANA 2014 Service Manual
TM-206
< UNIT REMOVAL AND INSTALLATION >[CVT: RE0F10D]
TRANSAXLE ASSEMBLY
UNIT REMOVAL AND INSTALLATION
TRANSAXLE ASSEMBLY
Exploded ViewINFOID:0000000009464160
Removal and InstallationINFOID:00000000](/manual-img/5/57390/w960_57390-4420.png)
TM-206
< UNIT REMOVAL AND INSTALLATION >[CVT: RE0F10D]
TRANSAXLE ASSEMBLY
UNIT REMOVAL AND INSTALLATION
TRANSAXLE ASSEMBLY
Exploded ViewINFOID:0000000009464160
Removal and InstallationINFOID:0000000009464161
REMOVAL
WARNING:
Do not remove the radiator cap when the engine is hot. Serious burns could occur from high pressure
coolant escaping from the radiator. Wrap a thick cl oth around the cap. Slowly turn a quarter turn to
allow built-up pressure to escape. Carefully remove the cap by turning it all the way.
CAUTION:
• Perform when the engine is cold.
• When replacing the TCM and transaxle assembly as a set, replace the transaxle assembly first and
then replace the TCM. Refer to TM-80, "Description"
.
NOTE:
When removing components such as hoses, tubes/lines, etc. , cap or plug openings to prevent fluid from spill-
ing.
1. Remove engine and transaxle assembly. Refer to EM-84, "Removal and Installation"
.
Transaxle assembly O-ring CVT fluid charging pipe
CVT fluid charging pipe cap
: For the tightening torque, refer to TM-206, "Removal and Installation"
.
: Always replace after every disassembly.
: N·m (kg-m, ft-lb)
: N·m (kg-m, in-lb)
: Apply petroleum jelly
JSDIA3632GB
Revision: November 20132014 Altima NAMRevision: November 20132014 Altima NAM