2014 NISSAN TEANA radiator cap
[x] Cancel search: radiator capPage 2556 of 4801
GI-28
< PRECAUTION >
PRECAUTIONS
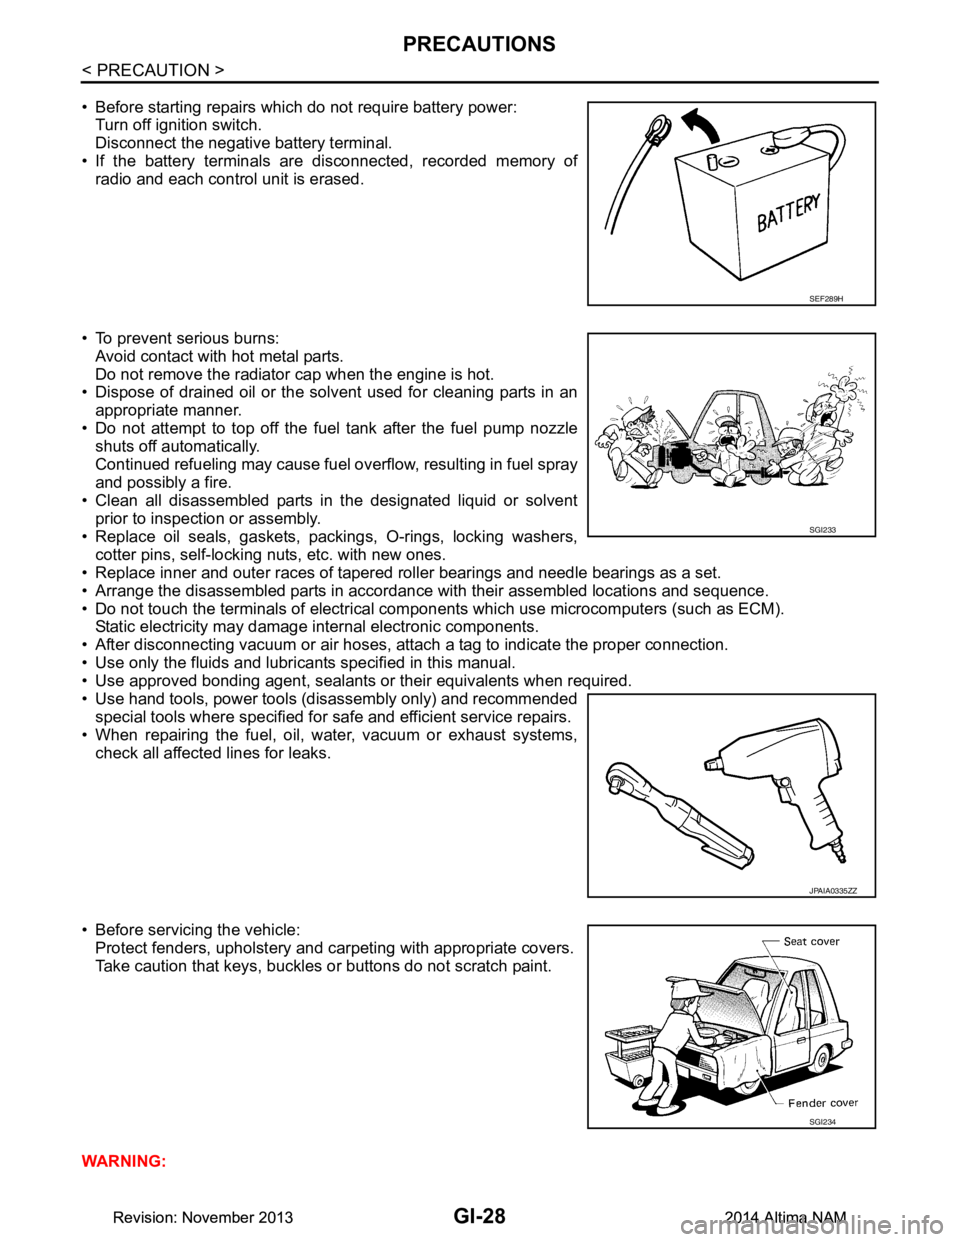
• Before starting repairs which do not require battery power:Turn off ignition switch.
Disconnect the negative battery terminal.
• If the battery terminals are disconnected, recorded memory of
radio and each control unit is erased.
• To prevent serious burns: Avoid contact with hot metal parts.
Do not remove the radiator cap when the engine is hot.
• Dispose of drained oil or the solvent used for cleaning parts in an
appropriate manner.
• Do not attempt to top off the fuel tank after the fuel pump nozzle
shuts off automatically.
Continued refueling may cause fuel overflow, resulting in fuel spray
and possibly a fire.
• Clean all disassembled parts in the designated liquid or solvent
prior to inspection or assembly.
• Replace oil seals, gaskets, packings, O-rings, locking washers, cotter pins, self-locking nuts, etc. with new ones.
• Replace inner and outer races of tapered roller bearings and needle bearings as a set.
• Arrange the disassembled parts in accordance with their assembled locations and sequence.
• Do not touch the terminals of electrical com ponents which use microcomputers (such as ECM).
Static electricity may damage internal electronic components.
• After disconnecting vacuum or air hoses, atta ch a tag to indicate the proper connection.
• Use only the fluids and lubricants specified in this manual.
• Use approved bonding agent, sealants or their equivalents when required.
• Use hand tools, power tools (disassembly only) and recommended special tools where specified for safe and efficient service repairs.
• When repairing the fuel, oil, water, vacuum or exhaust systems,
check all affected lines for leaks.
• Before servicing the vehicle: Protect fenders, upholstery and carpeting with appropriate covers.
Take caution that keys, buckles or buttons do not scratch paint.
WARNING:
SEF289H
SGI233
JPAIA0335ZZ
SGI234
Revision: November 20132014 Altima NAMRevision: November 20132014 Altima NAM
Page 2806 of 4801
![NISSAN TEANA 2014 Service Manual
INSUFFICIENT HEATINGHAC-157
< SYMPTOM DIAGNOSIS > [MANUAL AIR CONDITIONER]
C
D E
F
G H
J
K L
M A
B
HAC
N
O P
INSUFFICIENT HEATING
Component Function CheckINFOID:0000000009463224
SYMPTOM: Insufficie NISSAN TEANA 2014 Service Manual
INSUFFICIENT HEATINGHAC-157
< SYMPTOM DIAGNOSIS > [MANUAL AIR CONDITIONER]
C
D E
F
G H
J
K L
M A
B
HAC
N
O P
INSUFFICIENT HEATING
Component Function CheckINFOID:0000000009463224
SYMPTOM: Insufficie](/manual-img/5/57390/w960_57390-2805.png)
INSUFFICIENT HEATINGHAC-157
< SYMPTOM DIAGNOSIS > [MANUAL AIR CONDITIONER]
C
D E
F
G H
J
K L
M A
B
HAC
N
O P
INSUFFICIENT HEATING
Component Function CheckINFOID:0000000009463224
SYMPTOM: Insufficient heating
INSPECTION FLOW
1. CONFIRM SYMPTOM BY PERFORMING OP ERATION CHECK - TEMPERATURE INCREASE
1. Turn temperature control dial clockwise to maximum heat.
2. Check for hot air at discharge air outlets.
Can a symptom be duplicated?
YES >> GO TO 3
NO >> GO TO 2
2. CHECK FOR ANY SYMPTOMS
Perform a complete operational check and check for any symptoms. Refer to HAC-140, "Work Procedure"
.
Does another symptom exist?
YES >> Refer to HAC-154, "Symptom Table".
NO >> System OK.
3. CHECK FOR SERVICE BULLETINS
Check for any service bulletins.
>> GO TO 4
4. CHECK ENGINE COOLING SYSTEM
1. Check for proper engine coolant level. Refer to CO-11, "System Inspection"
(QR25DE) or CO-35, "System
Inspection" (VQ35DE).
2. Check hoses for leaks or kinks.
3. Check radiator cap. Refer to CO-11, "System Inspection"
(QR25DE) or CO-35, "System Inspection"
(VQ35DE).
4. Check for air in cooling system.
>> GO TO 5
5. CHECK AIR MIX DOOR MOTOR OPERATION
Check and verify air mix door mechanism for smooth operation.
Does air mix door operate correctly?
YES >> GO TO 6
NO >> Check the air mix door motor circuit. Refer to HAC-144, "Diagnosis Procedure"
.
6. CHECK AIR DUCTS
Check for disconnected or leaking air ducts.
Is the inspection result normal?
YES >> GO TO 7
NO >> Repair all disconnected or leaking air ducts.
7. CHECK HEATER HOSE TEMPERATURES
1. Start engine and warm it up to normal operating temperature.
2. Touch both the inlet and outlet heater hoses. The inlet hose should be hot and the outlet hose should be
warm.
Is the inspection result normal?
YES >> GO TO 8
NO >> Both hoses warm: GO TO 9
8. CHECK ENGINE COOLANT SYSTEM
Revision: November 20132014 Altima NAMRevision: November 20132014 Altima NAM
Page 3166 of 4801
![NISSAN TEANA 2014 Service Manual
LU-16
< REMOVAL AND INSTALLATION >[QR25DE]
OIL COOLER
OIL COOLER
Exploded ViewINFOID:0000000009461035
Removal and InstallationINFOID:0000000009461036
WARNING:
Be careful not to burn yourself, as eng NISSAN TEANA 2014 Service Manual
LU-16
< REMOVAL AND INSTALLATION >[QR25DE]
OIL COOLER
OIL COOLER
Exploded ViewINFOID:0000000009461035
Removal and InstallationINFOID:0000000009461036
WARNING:
Be careful not to burn yourself, as eng](/manual-img/5/57390/w960_57390-3165.png)
LU-16
< REMOVAL AND INSTALLATION >[QR25DE]
OIL COOLER
OIL COOLER
Exploded ViewINFOID:0000000009461035
Removal and InstallationINFOID:0000000009461036
WARNING:
Be careful not to burn yourself, as engi ne oil and engine coolant may be hot.
NOTE:
When removing components such as hoses, tubes/lines, etc. , cap or plug openings to prevent fluid from spill-
ing.
REMOVAL
1. Remove RH front road wheel and tire. Refer to WT-55, "Adjustment".
2. Remove RH fender protector. Refer to EXT-26, "FENDER PROTECTOR : Removal and Installation"
.
3. Drain engine coolant by removing water drain plug on cylinder block and radiator drain plug. Refer to CO-
12, "Changing Engine Coolant".
4. Disconnect hoses from the oil cooler.
5. Remove oil cooler bolts in reverse numerical order.
6. Remove oil cooler.
7. Remove relief valve and O-rings.
INSTALLATION
Installation is in the reverse order of removal.
CAUTION:
1-5. Tightening sequence 6. O-ring 7. Relief Valve
8. Oil cooler A. To water hose
AWBIA1295GB
Revision: November 20132014 Altima NAM
Page 3196 of 4801
MA-12
< PERIODIC MAINTENANCE >
RECOMMENDED FLUIDS AND LUBRICANTS
FOR USA AND CANADA : Engi ne Coolant Mixture Ratio
INFOID:0000000009464538
The engine cooling system is filled at the factory with a pre-diluted mixture of 50% Genuine NISSAN Long Life
Antifreeze/Coolant (blue) and 50% water to provide year-round anti-freeze and coolant protection. The anti-
freeze solution contains rust and corrosion inhibitors. Additional engine cooling system additives are not nec-
essary.
WARNING:
• Do not remove the radiator or coolant reservoir cap wh en the engine is hot. Wait until the engine and
radiator cool down. Serious burns could be caused by high pressure fluid escaping from the radia-
tor.
• The radiator is equipped with a pressure type radiator cap. To prevent engine damage, use only a
genuine NISSAN radiator cap.
CAUTION:
• When adding or replacing coolant, be sure to use only Genuine NISSAN Long Life Antifreeze/Cool-
ant (blue) or equivalent. Genuine NISSAN Long Life Antifreeze/Coolant (blue) is pre-diluted to pro-
vide antifreeze protection to -34°F (-37°C). If additional freeze protection is needed due to weather
where you operate your vehicle, add Genuine NISS AN Long Life Antifreeze/Coolant (blue) concen-
trate following the directions on the container. If an equivalent coolant other than Genuine NISSAN
Long Life Antifreeze/Coolant (blue) is used, follow the coolant manufacturer’s instructions to main-
tain minimum antifreeze protection to -34°F (-37°C). The use of other types of coolant solutions other
than Genuine NISSAN Long Life Antifreeze/Coolant (blue) or equivalent may damage the engine
cooling system.
• Mixing any other type of coolant other than Genu ine NISSAN Long Life Antifreeze/Coolant (blue),
including Genuine NISSAN Long Life Antifreeze/Coolant (green), or the use of non-distilled water will
reduce the life expectancy of the factory-fill coolant.
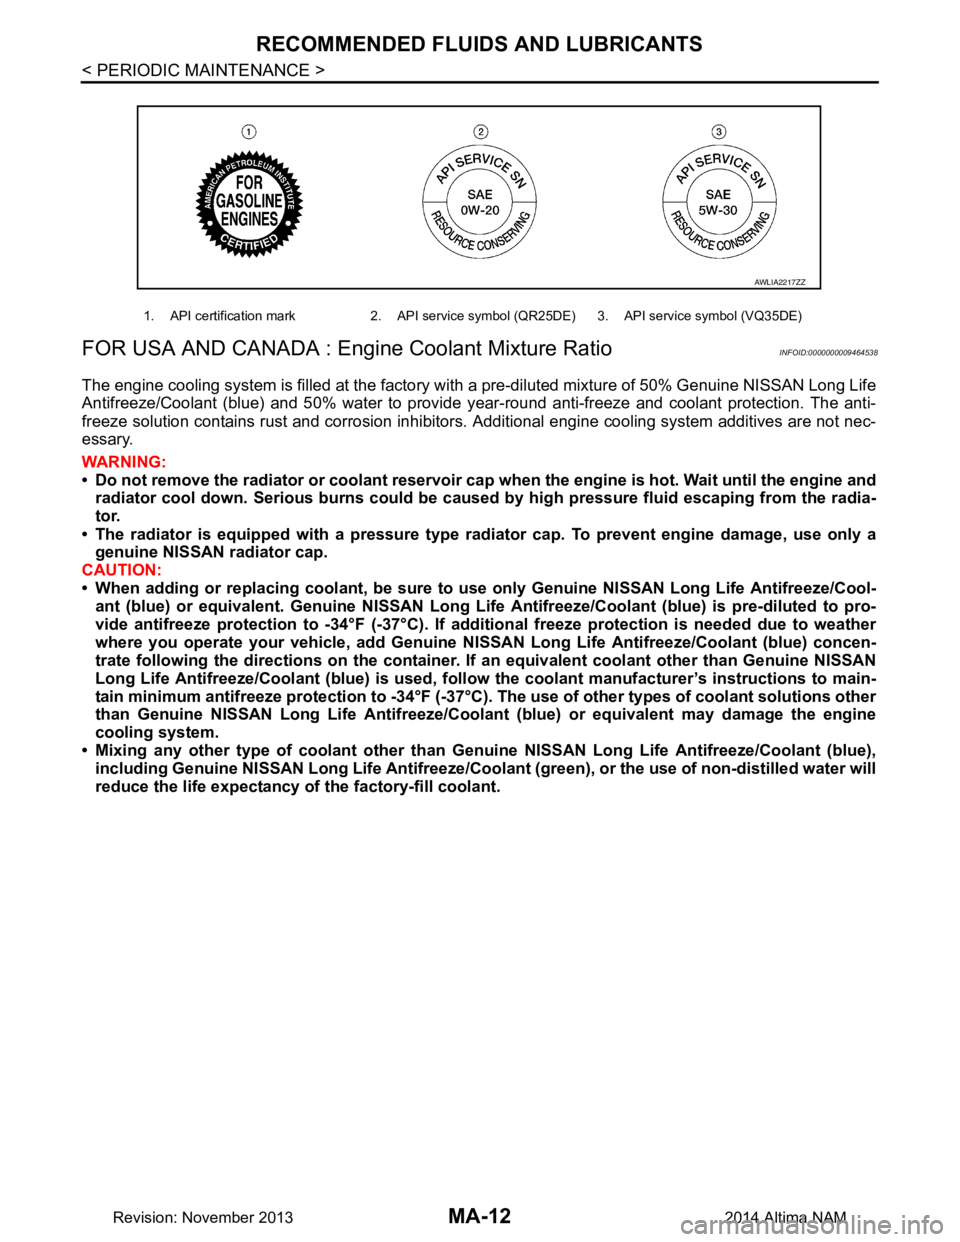
1. API certification mark 2. API service symbol (QR25DE) 3. API service symbol (VQ35DE)
AWLIA2217ZZ
Revision: November 20132014 Altima NAM
Page 3197 of 4801
ENGINE MAINTENANCE (QR25DE)MA-13
< PERIODIC MAINTENANCE >
C
D E
F
G H
I
J
K L
M B
MA
N
O A
ENGINE MAINTENANCE (QR25DE)
DRIVE BELTS
DRIVE BELTS : Checking Drive BeltsINFOID:0000000009464542
WARNING:
Inspect the drive belt only when the engine is stopped.
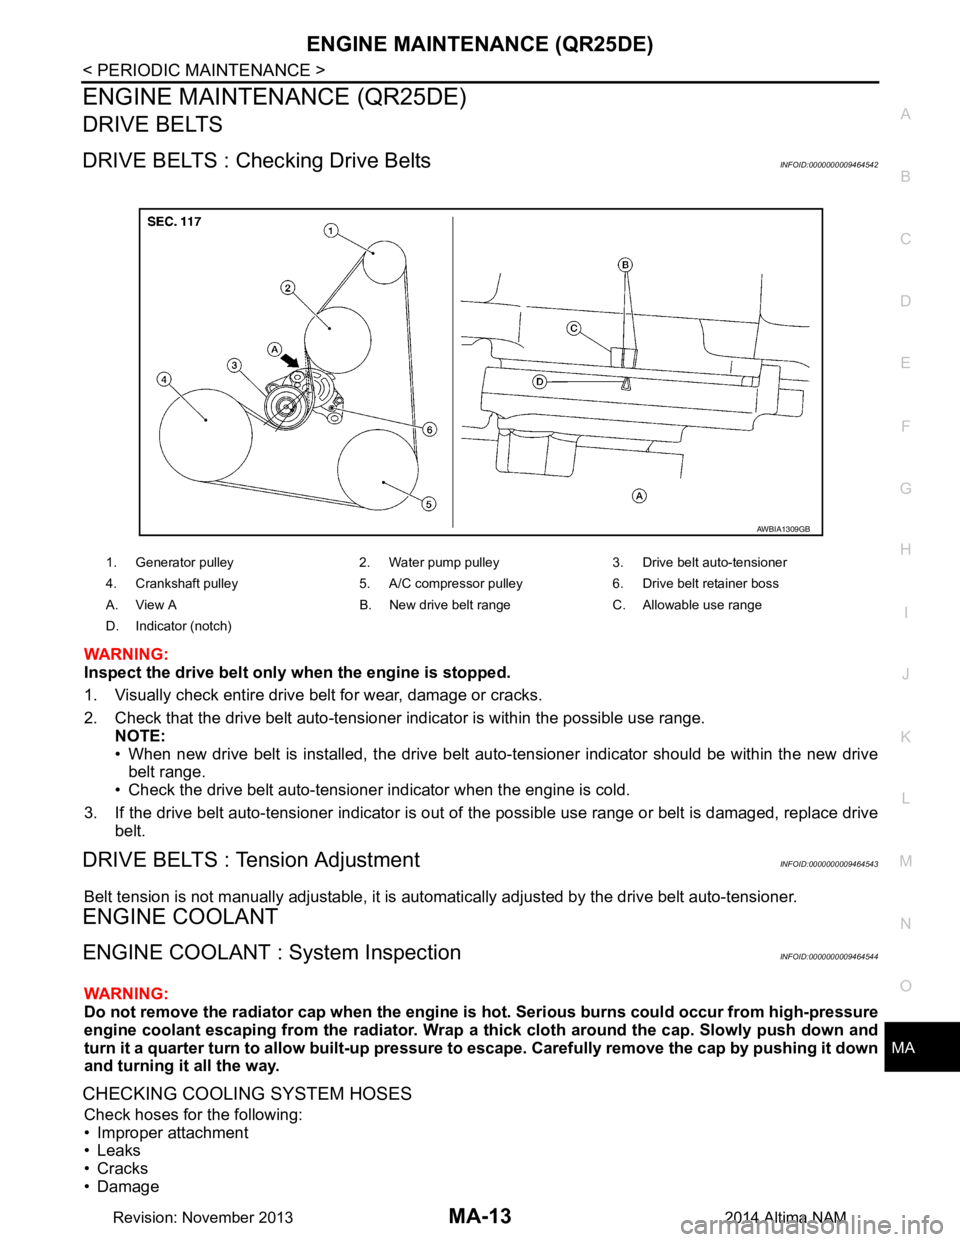
1. Visually check entire drive belt for wear, damage or cracks.
2. Check that the drive belt auto-tensioner indicator is within the possible use range.
NOTE:
• When new drive belt is installed, the drive belt aut o-tensioner indicator should be within the new drive
belt range.
• Check the drive belt auto-tensioner indicator when the engine is cold.
3. If the drive belt auto-tensioner indicator is out of the possible use range or belt is damaged, replace drive
belt.
DRIVE BELTS : Tension AdjustmentINFOID:0000000009464543
Belt tension is not manually adjustable, it is aut omatically adjusted by the drive belt auto-tensioner.
ENGINE COOLANT
ENGINE COOLANT : System InspectionINFOID:0000000009464544
WARNING:
Do not remove the radiator cap when the engine is hot. Serious burns could occur from high-pressure
engine coolant escaping from the radiator. Wrap a thick cloth around the cap. Slowly push down and
turn it a quarter turn to allow built-up pressure to escape. Carefully remove the cap by pushing it down
and turning it all the way.
CHECKING COOLING SYSTEM HOSES
Check hoses for the following:
• Improper attachment
• Leaks
•Cracks
• Damage
1. Generator pulley 2. Water pump pulley 3. Drive belt auto-tensioner
4. Crankshaft pulley 5. A/C compressor pulley 6. Drive belt retainer boss
A. View A B. New drive belt range C. Allowable use range
D. Indicator (notch)
AWBIA1309GB
Revision: November 20132014 Altima NAM
Page 3198 of 4801
MA-14
< PERIODIC MAINTENANCE >
ENGINE MAINTENANCE (QR25DE)
• Loose connections
• Chafing
• Deterioration
CHECKING RESERVOIR LEVEL
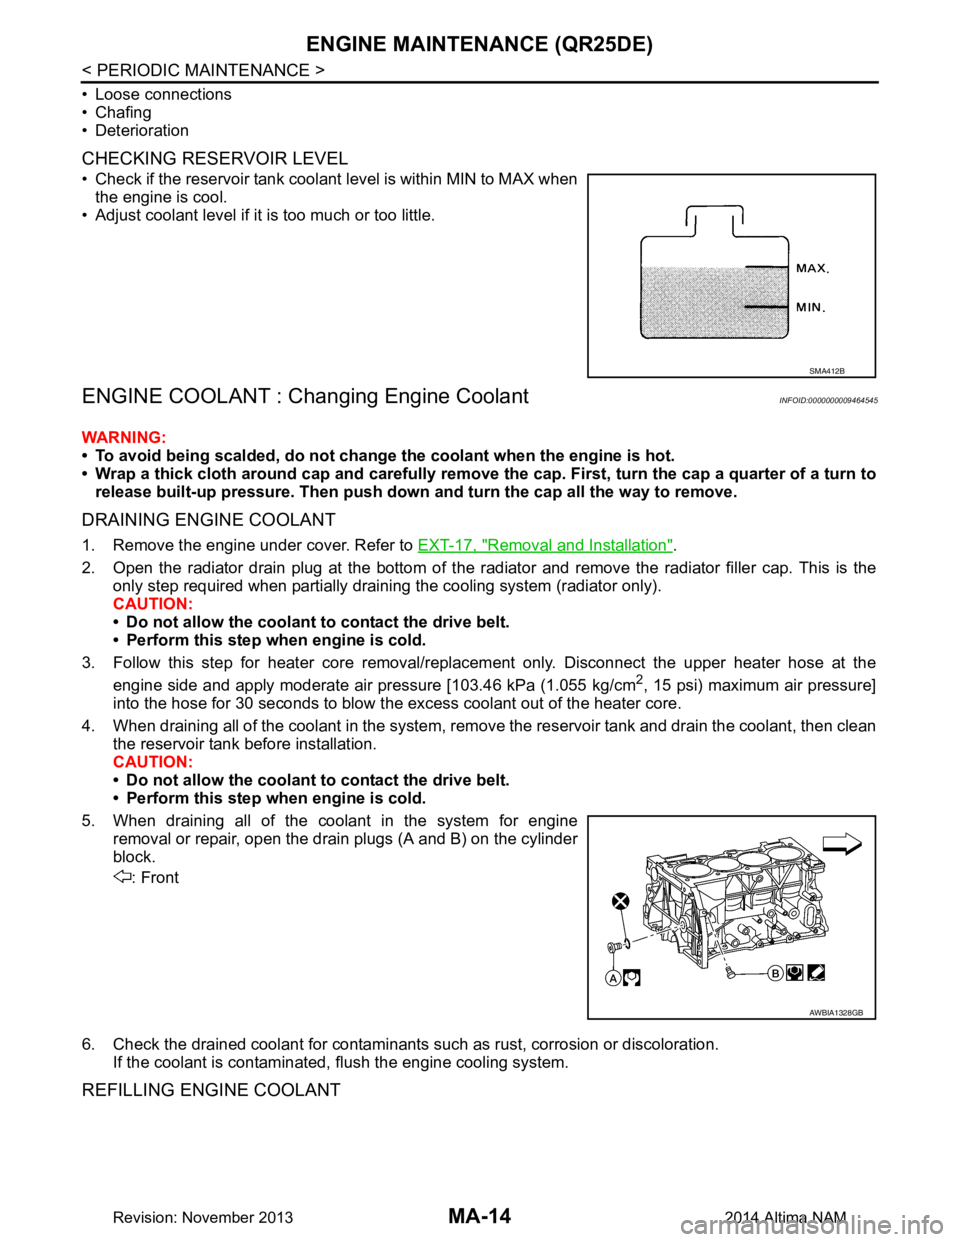
• Check if the reservoir tank coolant level is within MIN to MAX when the engine is cool.
• Adjust coolant level if it is too much or too little.
ENGINE COOLANT : Changing Engine CoolantINFOID:0000000009464545
WARNING:
• To avoid being scalded, do not change the coolant when the engine is hot.
• Wrap a thick cloth around cap and carefully remove the cap. First, turn the cap a quarter of a turn to
release built-up pressure. Then push down and turn the cap all the way to remove.
DRAINING ENGINE COOLANT
1. Remove the engine under cover. Refer to EXT-17, "Removal and Installation".
2. Open the radiator drain plug at the bottom of the radi ator and remove the radiator filler cap. This is the
only step required when partially draining the cooling system (radiator only).
CAUTION:
• Do not allow the coolant to contact the drive belt.
• Perform this step when engine is cold.
3. Follow this step for heater core removal/replac ement only. Disconnect the upper heater hose at the
engine side and apply moderate air pressure [103.46 kPa (1.055 kg/cm
2, 15 psi) maximum air pressure]
into the hose for 30 seconds to blow t he excess coolant out of the heater core.
4. When draining all of the coolant in the system, re move the reservoir tank and drain the coolant, then clean
the reservoir tank before installation.
CAUTION:
• Do not allow the coolant to contact the drive belt.
• Perform this step when engine is cold.
5. When draining all of the coolant in the system for engine removal or repair, open the drain plugs (A and B) on the cylinder
block.
: Front
6. Check the drained coolant for contaminants such as rust, corrosion or discoloration.
If the coolant is contaminated, flush the engine cooling system.
REFILLING ENGINE COOLANT
SMA412B
AWBIA1328GB
Revision: November 20132014 Altima NAM
Page 3199 of 4801
ENGINE MAINTENANCE (QR25DE)MA-15
< PERIODIC MAINTENANCE >
C
D E
F
G H
I
J
K L
M B
MA
N
O A
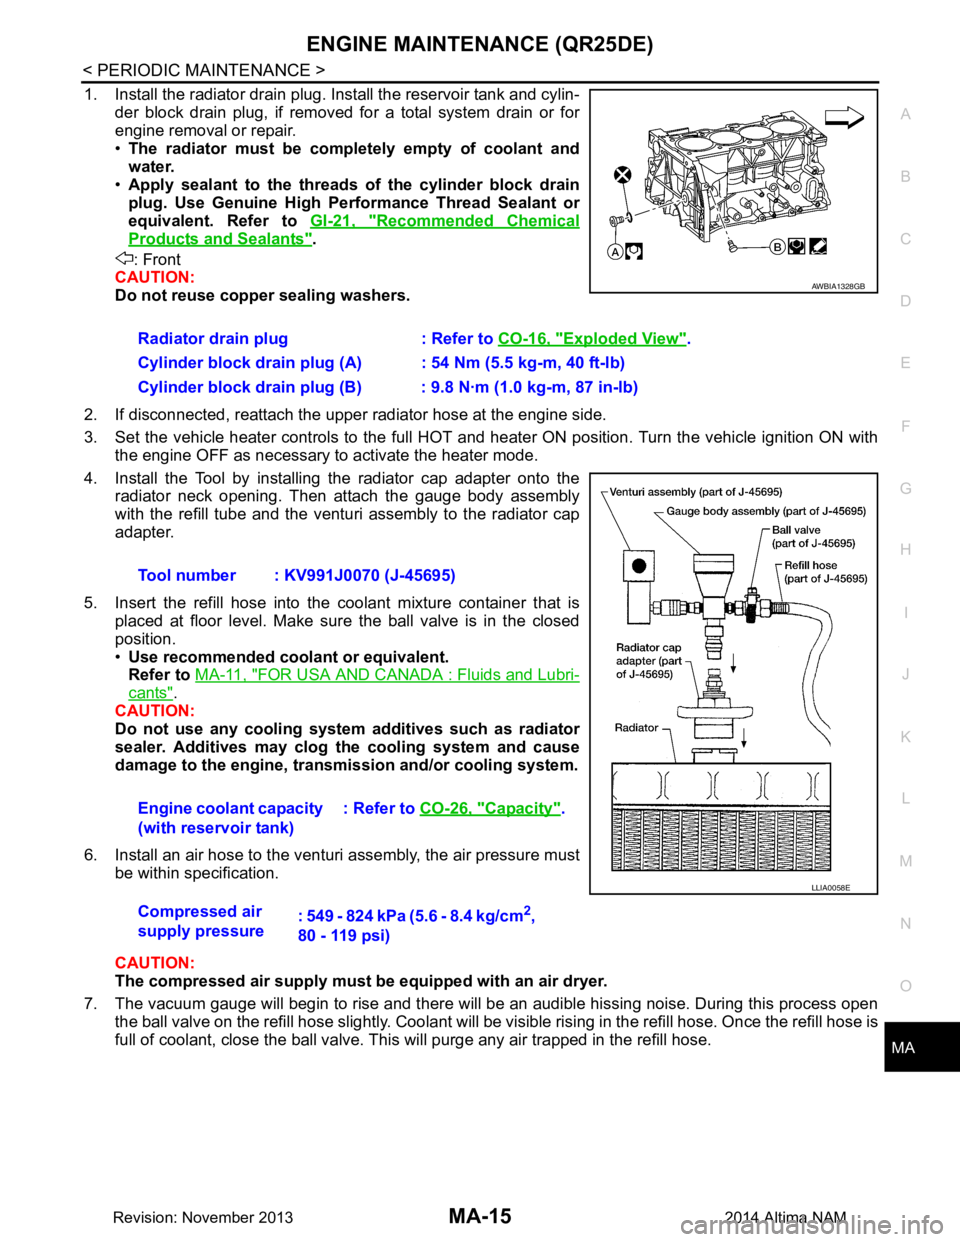
1. Install the radiator drain plug. Install the reservoir tank and cylin-
der block drain plug, if removed for a total system drain or for
engine removal or repair.
• The radiator must be completely empty of coolant and
water.
• Apply sealant to the threads of the cylinder block drain
plug. Use Genuine High Pe rformance Thread Sealant or
equivalent. Refer to GI-21, "Recommended Chemical
Products and Sealants".
: Front
CAUTION:
Do not reuse copper sealing washers.
2. If disconnected, reattach the upper radiator hose at the engine side.
3. Set the vehicle heater controls to the full HOT and heat er ON position. Turn the vehicle ignition ON with
the engine OFF as necessary to activate the heater mode.
4. Install the Tool by installing the radiator cap adapter onto the radiator neck opening. Then attach the gauge body assembly
with the refill tube and the venturi assembly to the radiator cap
adapter.
5. Insert the refill hose into the coolant mixture container that is
placed at floor level. Make sure the ball valve is in the closed
position.
• Use recommended coolant or equivalent.
Refer to MA-11, "FOR USA AND CANADA : Fluids and Lubri-
cants".
CAUTION:
Do not use any cooling system additives such as radiator
sealer. Additives may clog th e cooling system and cause
damage to the engine, transmission and/or cooling system.
6. Install an air hose to the venturi assembly, the air pressure must be within specification.
CAUTION:
The compressed air supply must be equipped with an air dryer.
7. The vacuum gauge will begin to rise and there will be an audible hissing noise. During this process open the ball valve on the refill hose slightly. Coolant will be vi sible rising in the refill hose. Once the refill hose is
full of coolant, close the ball valve. Th is will purge any air trapped in the refill hose.
Radiator drain plug : Refer to
CO-16, "Exploded View"
.
Cylinder block drain plug (A) : 54 Nm (5.5 kg-m, 40 ft-lb)
Cylinder block drain plug (B) : 9.8 N·m (1.0 kg-m, 87 in-lb)
Tool number : KV991J0070 (J-45695)
Engine coolant capacity
(with reservoir tank) : Refer to
CO-26, "Capacity"
.
Compressed air
supply pressure : 549 - 824 kPa (5.6 - 8.4 kg/cm
2,
80 - 119 psi)
AWBIA1328GB
LLIA0058E
Revision: November 20132014 Altima NAM
Page 3200 of 4801
MA-16
< PERIODIC MAINTENANCE >
ENGINE MAINTENANCE (QR25DE)
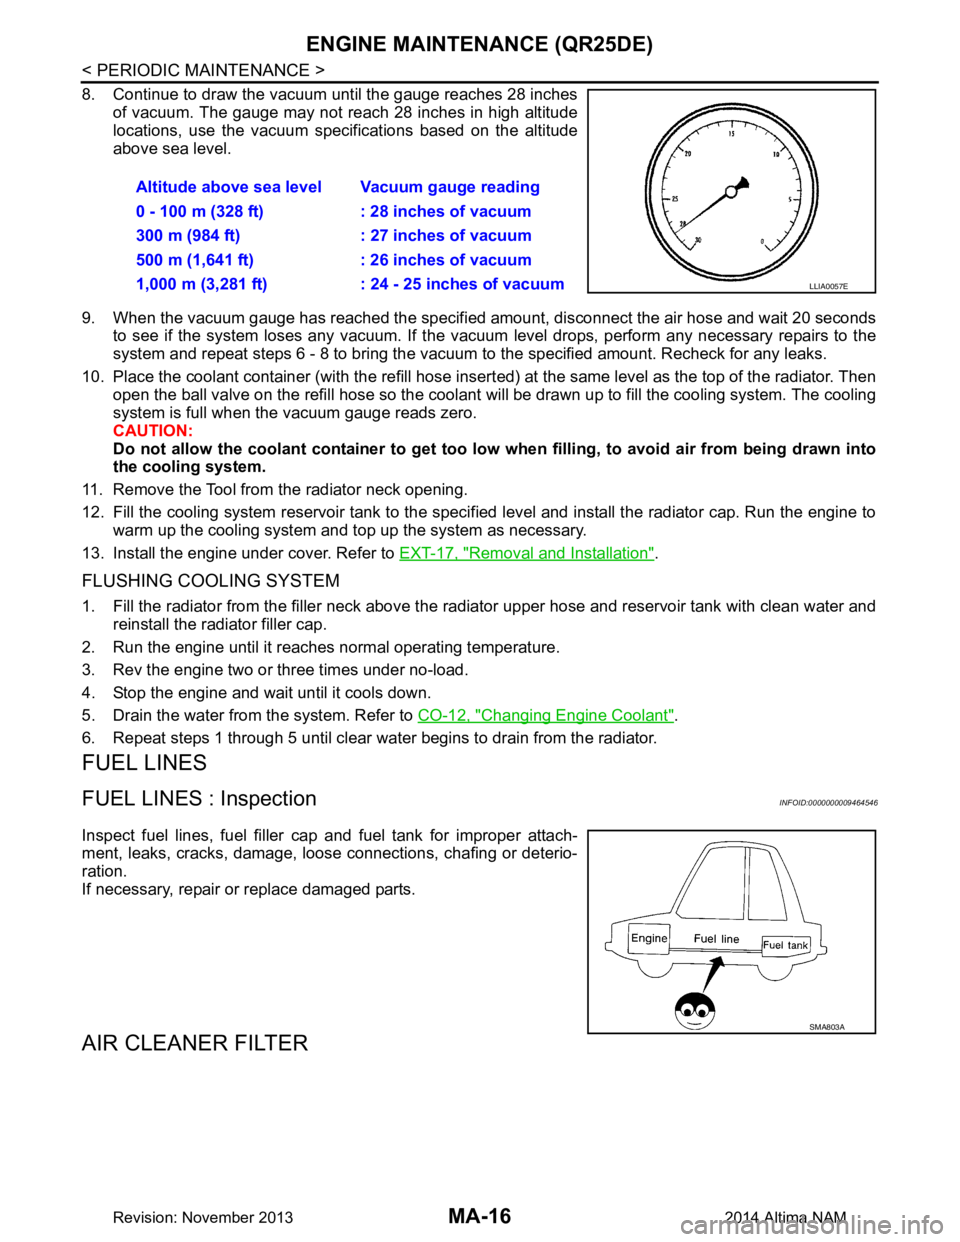
8. Continue to draw the vacuum until the gauge reaches 28 inchesof vacuum. The gauge may not reach 28 inches in high altitude
locations, use the vacuum specifications based on the altitude
above sea level.
9. When the vacuum gauge has reached the specifi ed amount, disconnect the air hose and wait 20 seconds
to see if the system loses any vacuum. If the vacuum level drops, perform any necessary repairs to the
system and repeat steps 6 - 8 to bring the vacuum to the specified amount. Recheck for any leaks.
10. Place the coolant container (with the refill hose insert ed) at the same level as the top of the radiator. Then
open the ball valve on the refill hose so the coolant will be drawn up to fill the cooling system. The cooling
system is full when the vacuum gauge reads zero.
CAUTION:
Do not allow the coolant container to get too low when filling, to avoid air from being drawn into
the cooling system.
11. Remove the Tool from the radiator neck opening.
12. Fill the cooling system reservoir tank to the specif ied level and install the radiator cap. Run the engine to
warm up the cooling system and t op up the system as necessary.
13. Install the engine under cover. Refer to EXT-17, "Removal and Installation"
.
FLUSHING COOLING SYSTEM
1. Fill the radiator from the filler neck above the radiator upper hose and reservoir tank with clean water and
reinstall the radiator filler cap.
2. Run the engine until it reaches normal operating temperature.
3. Rev the engine two or three times under no-load.
4. Stop the engine and wait until it cools down.
5. Drain the water from the system. Refer to CO-12, "Changing Engine Coolant"
.
6. Repeat steps 1 through 5 until clear water begins to drain from the radiator.
FUEL LINES
FUEL LINES : InspectionINFOID:0000000009464546
Inspect fuel lines, fuel filler cap and fuel tank for improper attach-
ment, leaks, cracks, damage, loose connections, chafing or deterio-
ration.
If necessary, repair or replace damaged parts.
AIR CLEANER FILTER
Altitude above sea level Vacuum gauge reading
0 - 100 m (328 ft) : 28 inches of vacuum
300 m (984 ft) : 27 inches of vacuum
500 m (1,641 ft) : 26 inches of vacuum
1,000 m (3,281 ft) : 24 - 25 inches of vacuum
LLIA0057E
SMA803A
Revision: November 20132014 Altima NAM