2014 NISSAN TEANA fuel tank removal
[x] Cancel search: fuel tank removalPage 1977 of 4801
![NISSAN TEANA 2014 Service Manual
ON BOARD REFUELING VAPOR RECOVERY (ORVR)EC-977
< DTC/CIRCUIT DIAGNOSIS > [VQ35DE]
C
D E
F
G H
I
J
K L
M A
EC
NP
O
Is the inspection result normal?
YES >> INSPECTION END
NO >> Replace refueling EVAP NISSAN TEANA 2014 Service Manual
ON BOARD REFUELING VAPOR RECOVERY (ORVR)EC-977
< DTC/CIRCUIT DIAGNOSIS > [VQ35DE]
C
D E
F
G H
I
J
K L
M A
EC
NP
O
Is the inspection result normal?
YES >> INSPECTION END
NO >> Replace refueling EVAP](/manual-img/5/57390/w960_57390-1976.png)
ON BOARD REFUELING VAPOR RECOVERY (ORVR)EC-977
< DTC/CIRCUIT DIAGNOSIS > [VQ35DE]
C
D E
F
G H
I
J
K L
M A
EC
NP
O
Is the inspection result normal?
YES >> INSPECTION END
NO >> Replace refueling EVAP vapor cut valve with fuel tank. Refer to FL-10, "Removal and Installation"
.
3.CHECK REFUELING EVAP VAPOR CUT VALVE
Without CONSULT
1. Turn ignition switch OFF.
2. Remove fuel tank. Refer to FL-10, "Removal and Installation"
.
3. Drain fuel from the tank as per the following:
- Remove fuel gauge retainer.
- Drain fuel from the tank using a handy pump into a fuel container.
4. Check refueling EVAP vapor cut valve for being stuck to close as per the following. Blow air into the refueling EVAP vapor cut valv e (from the end of EVAP/ORVR line hose), and check that
the air flows freely into the tank.
5. Check refueling EVAP vapor cut valve for being stuck to open as per the following.
- Connect vacuum pump to hose end.
- Remove fuel gauge retainer with fuel gauge unit. Always replace O-ring with new one.
- Turn fuel tank upside down.
- Apply vacuum pressure to hose end [ −13.3 kPa ( −0.136 kg/cm
2, −1.93 psi)] with fuel gauge retainer
remaining open and check that the pressure is applicable.
1. Filler tube 2. Recirculation line 3. EVAP/ORVR line
4. Vacuum/pressure handy pump 5. Fuel tank
JPBIA5852ZZ
Revision: November 20132014 Altima NAMRevision: November 20132014 Altima NAM
Page 1978 of 4801
![NISSAN TEANA 2014 Service Manual
EC-978
< DTC/CIRCUIT DIAGNOSIS >[VQ35DE]
ON BOARD REFUELING VAPOR RECOVERY (ORVR)
Is the inspection result normal?
YES >> INSPECTION END
NO >> Replace refueling EVAP vapor cut valve with fuel tank. NISSAN TEANA 2014 Service Manual
EC-978
< DTC/CIRCUIT DIAGNOSIS >[VQ35DE]
ON BOARD REFUELING VAPOR RECOVERY (ORVR)
Is the inspection result normal?
YES >> INSPECTION END
NO >> Replace refueling EVAP vapor cut valve with fuel tank.](/manual-img/5/57390/w960_57390-1977.png)
EC-978
< DTC/CIRCUIT DIAGNOSIS >[VQ35DE]
ON BOARD REFUELING VAPOR RECOVERY (ORVR)
Is the inspection result normal?
YES >> INSPECTION END
NO >> Replace refueling EVAP vapor cut valve with fuel tank. Refer to FL-10, "Removal and Installation"
.
1. Filler tube 2. Recirculation line 3. EVAP/ORVR line
4. Vacuum/pressure handy pump 5. Fuel tank
JPBIA5852ZZ
Revision: November 20132014 Altima NAMRevision: November 20132014 Altima NAM
Page 2481 of 4801
FL-1
ENGINE
C
D E
F
G H
I
J
K L
M
SECTION FL
A
FL
N
O P
CONTENTS
FUEL SYSTEM
PRECAUTION ................ ...............................2
PRECAUTIONS .............................................. .....2
Precaution for Supplemental Restraint System
(SRS) "AIR BAG" and "SEAT BELT PRE-TEN-
SIONER" ............................................................. ......
2
General Precaution ...................................................2
PREPARATION ............................................4
PREPARATION .............................................. .....4
Special Service Tool ........................................... ......4
Commercial Service Tool ..........................................4
PERIODIC MAINTENANCE ..........................5
FUEL SYSTEM ............................................... .....5
Inspection ............................................................ ......5
Quick Connector .......................................................5
REMOVAL AND INSTALLATION ................6
FUEL LEVEL SENSOR UNIT, FUEL FILTER
AND FUEL PUMP ASSEMBLY ..................... .....
6
Exploded View .................................................... ......6
Removal and Installation ...........................................6
Inspection ............................................................ ......9
FUEL TANK ........................................................10
Exploded View .................................................... ....10
Removal and Installation .........................................10
Inspection ............................................................ ....13
EVAP CANISTER ..............................................14
Exploded View .........................................................14
Removal and Installation .........................................14
Inspection ................................................................15
EVAP CANISTER FILTER ................................16
Exploded View .........................................................16
Removal and Installation .........................................16
EVAP CANISTER VENT CONTROL VALVE ...17
Exploded View .........................................................17
Removal and Installation .........................................17
EVAP CONTROL SYSTEM PRESSURE SEN-
SOR ...................................................................
18
Exploded View ..................................................... ....18
Removal and Installation .........................................18
UNIT DISASSEMBLY AND ASSEMBLY ....19
FUEL LEVEL SENSOR UNIT ...........................19
Disassembly and Assembly ................................. ....19
SERVICE DATA AND SPECIFICATIONS
(SDS) ............... .............................................
21
SERVICE DATA AND SPECIFICATIONS
(SDS) .................................................................
21
Fuel Tank ............................................................. ....21
Revision: November 20132014 Altima NAM
Page 2486 of 4801
FL-6
< REMOVAL AND INSTALLATION >
FUEL LEVEL SENSOR UNIT, FUEL FILTER AND FUEL PUMP ASSEMBLY
REMOVAL AND INSTALLATION
FUEL LEVEL SENSOR UNIT, FUEL FILTER AND FUEL PUMP ASSEMBLY
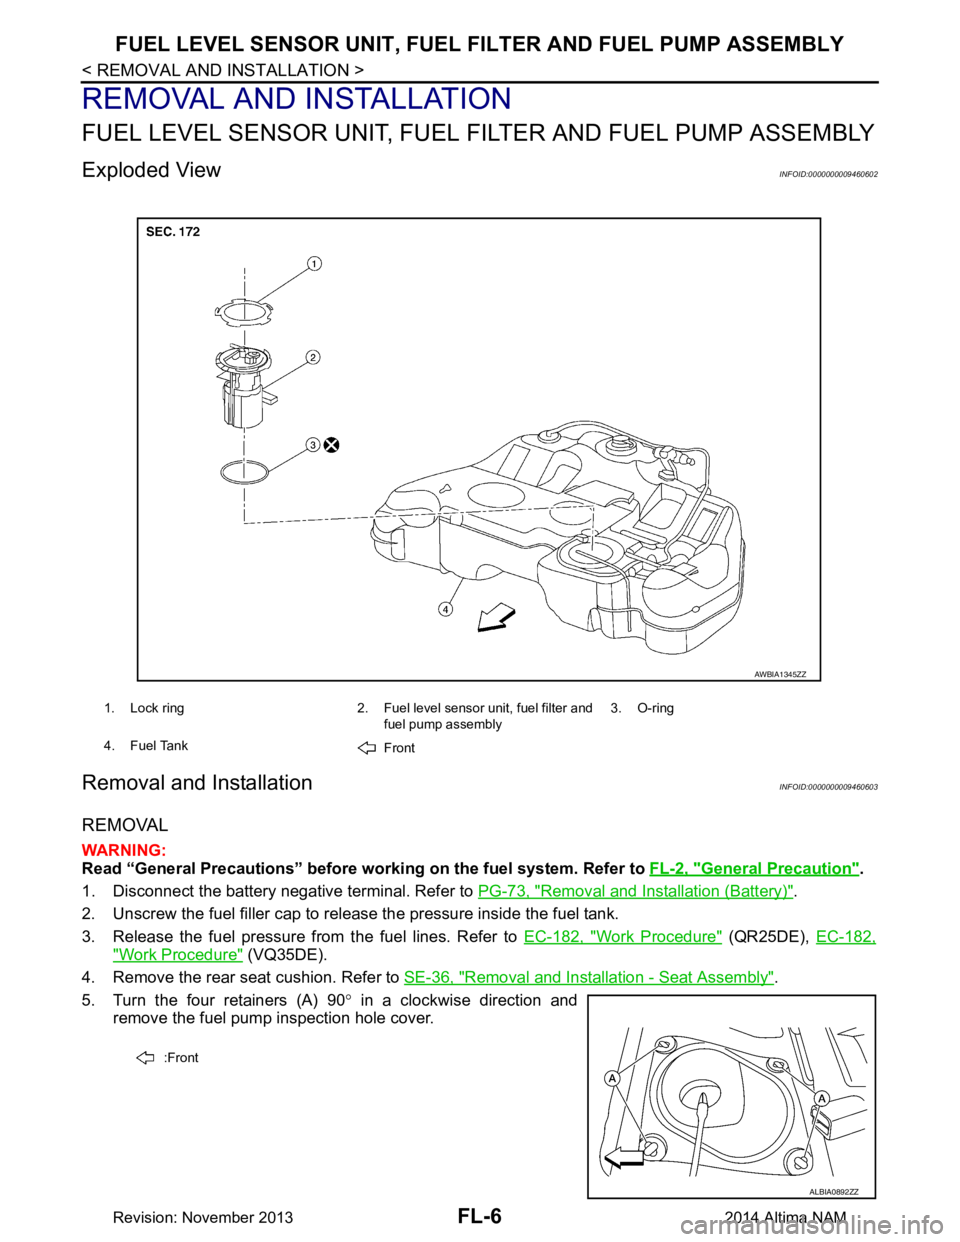
Exploded ViewINFOID:0000000009460602
Removal and InstallationINFOID:0000000009460603
REMOVAL
WARNING:
Read “General Precautions” before wo rking on the fuel system. Refer to FL-2, "General Precaution"
.
1. Disconnect the battery negative terminal. Refer to PG-73, "Removal and Installation (Battery)"
.
2. Unscrew the fuel filler cap to release the pressure inside the fuel tank.
3. Release the fuel pressure from the fuel lines. Refer to EC-182, "Work Procedure"
(QR25DE), EC-182,
"Work Procedure" (VQ35DE).
4. Remove the rear seat cushion. Refer to SE-36, "Removal and Installation - Seat Assembly"
.
5. Turn the four retainers (A) 90 ° in a clockwise direction and
remove the fuel pump inspection hole cover.
1. Lock ring 2. Fuel level sensor unit, fuel filter and
fuel pump assembly3. O-ring
4. Fuel Tank Front
AWBIA1345ZZ
:Front
ALBIA0892ZZ
Revision: November 20132014 Altima NAM
Page 2490 of 4801
FL-10
< REMOVAL AND INSTALLATION >
FUEL TANK
FUEL TANK
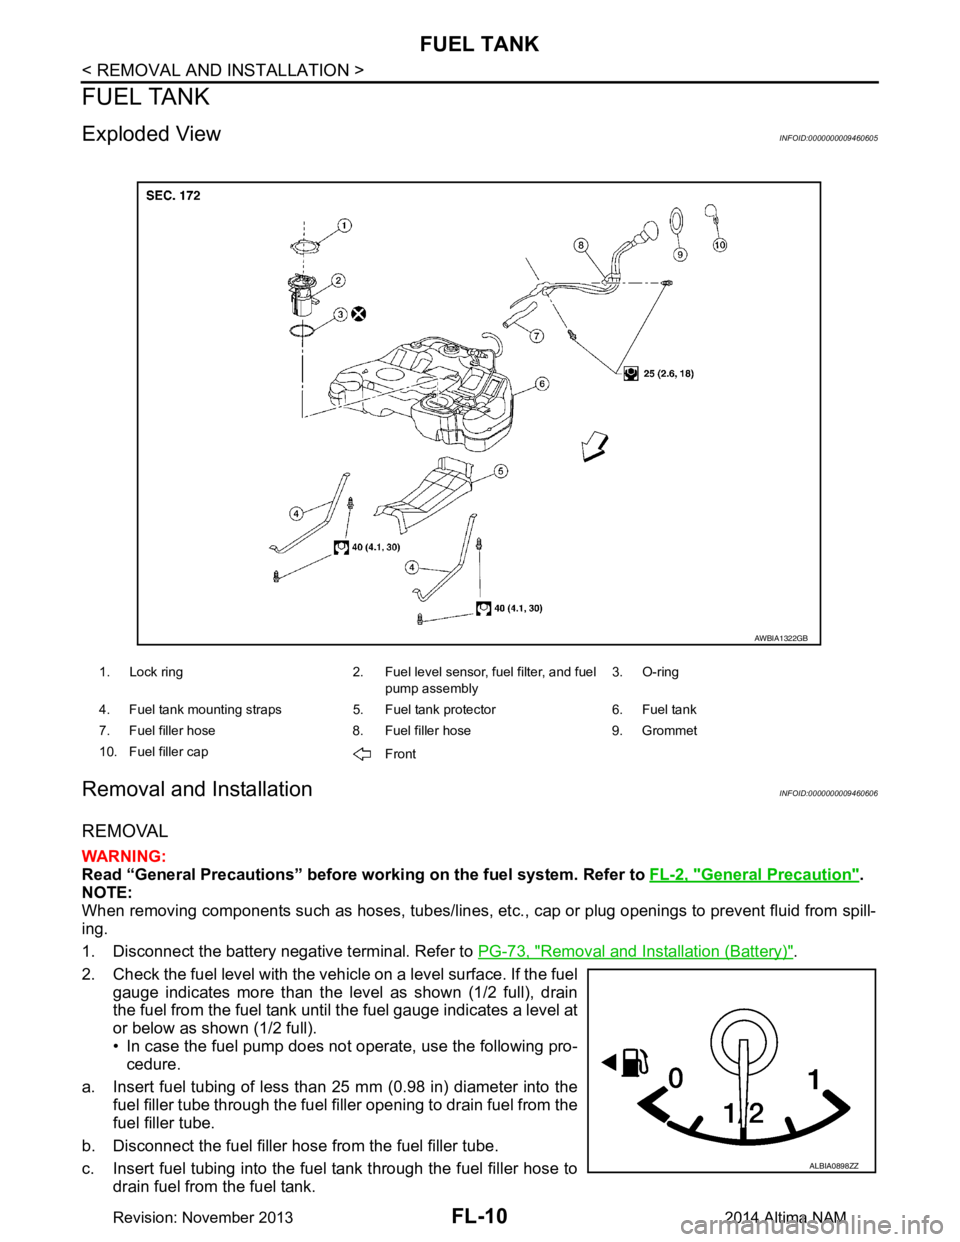
Exploded ViewINFOID:0000000009460605
Removal and InstallationINFOID:0000000009460606
REMOVAL
WARNING:
Read “General Precautions” before wo rking on the fuel system. Refer to FL-2, "General Precaution"
.
NOTE:
When removing components such as hoses, tubes/lines, etc. , cap or plug openings to prevent fluid from spill-
ing.
1. Disconnect the battery negative terminal. Refer to PG-73, "Removal and Installation (Battery)"
.
2. Check the fuel level with the vehicle on a level surface. If the fuel gauge indicates more than the level as shown (1/2 full), drain
the fuel from the fuel tank until the fuel gauge indicates a level at
or below as shown (1/2 full).
• In case the fuel pump does not operate, use the following pro- cedure.
a. Insert fuel tubing of less than 25 mm (0.98 in) diameter into the fuel filler tube through the fuel f iller opening to drain fuel from the
fuel filler tube.
b. Disconnect the fuel filler hose from the fuel filler tube.
c. Insert fuel tubing into the fuel tank through the fuel filler hose to drain fuel from the fuel tank.
1. Lock ring 2. Fuel level sensor, fuel filter, and fuel
pump assembly3. O-ring
4. Fuel tank mounting straps 5. Fuel tank protector 6. Fuel tank
7. Fuel filler hose 8. Fuel filler hose 9. Grommet
10. Fuel filler cap Front
AWBIA1322GB
ALBIA0898ZZ
Revision: November 20132014 Altima NAM
Page 2491 of 4801
FUEL TANKFL-11
< REMOVAL AND INSTALLATION >
C
D E
F
G H
I
J
K L
M A
FL
NP
O
• As a guide, if the fuel tank is full the fuel leve
l reaches or is less than the level on the fuel gauge as
shown, when approximately 34 (9 US gal, 7 1/2 Imp gal) of fuel is drained from a full fuel tank.
3. Open the fuel filler cap to release the pressure inside the fuel tank.
4. Release fuel pressure from fuel line. Refer to EC-182, "Work Procedure"
(QR25DE), EC-687, "Work Pro-
cedure" (VQ35DE).
5. Remove rear seat cushion. Refer to SE-36, "Removal and Installation - Seat Assembly"
.
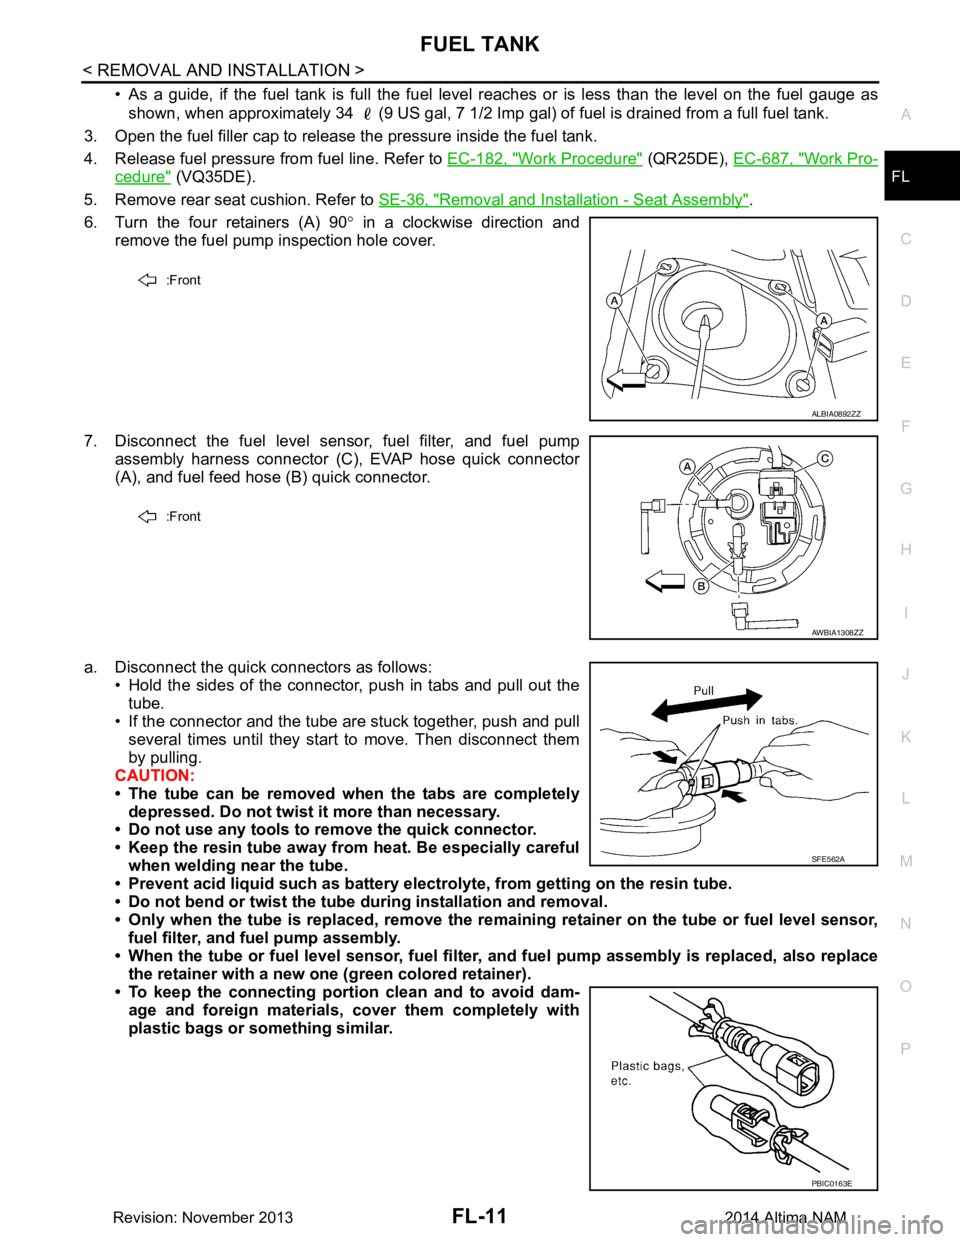
6. Turn the four retainers (A) 90 ° in a clockwise direction and
remove the fuel pump inspection hole cover.
7. Disconnect the fuel level sensor, fuel filter, and fuel pump assembly harness connector (C), EVAP hose quick connector
(A), and fuel feed hose (B) quick connector.
a. Disconnect the quick connectors as follows: • Hold the sides of the connector, push in tabs and pull out the
tube.
• If the connector and the tube are stuck together, push and pull
several times until they start to move. Then disconnect them
by pulling.
CAUTION:
• The tube can be removed when the tabs are completely depressed. Do not twist it more than necessary.
• Do not use any tools to remove the quick connector.
• Keep the resin tube away from heat. Be especially careful
when welding near the tube.
• Prevent acid liquid such as battery elect rolyte, from getting on the resin tube.
• Do not bend or twist the tube during installation and removal.
• Only when the tube is replaced, remove the remaining retainer on the tube or fuel level sensor,
fuel filter, and fuel pump assembly.
• When the tube or fuel level sen sor, fuel filter, and fuel pump assembly is replaced, also replace
the retainer with a new one (green colored retainer).
• To keep the connecting portio n clean and to avoid dam-
age and foreign materials, cover them completely with
plastic bags or something similar.
:Front
ALBIA0892ZZ
:Front
AWBIA1308ZZ
SFE562A
PBIC0163E
Revision: November 20132014 Altima NAM
Page 2492 of 4801
FL-12
< REMOVAL AND INSTALLATION >
FUEL TANK
8. Remove rear wheel and tire using power tool. Refer to WT-55, "Adjustment".
9. Remove rear brake pads. Refer to BR-38, "BRAKE PAD : Removal and Installation"
.
10. Remove rear torque members and rear disc brake rotor.
11. Disconnect rear parking brake shoe, and remove rear cables from toggle lever. Refer to PB-9, "Removal
and Installation".
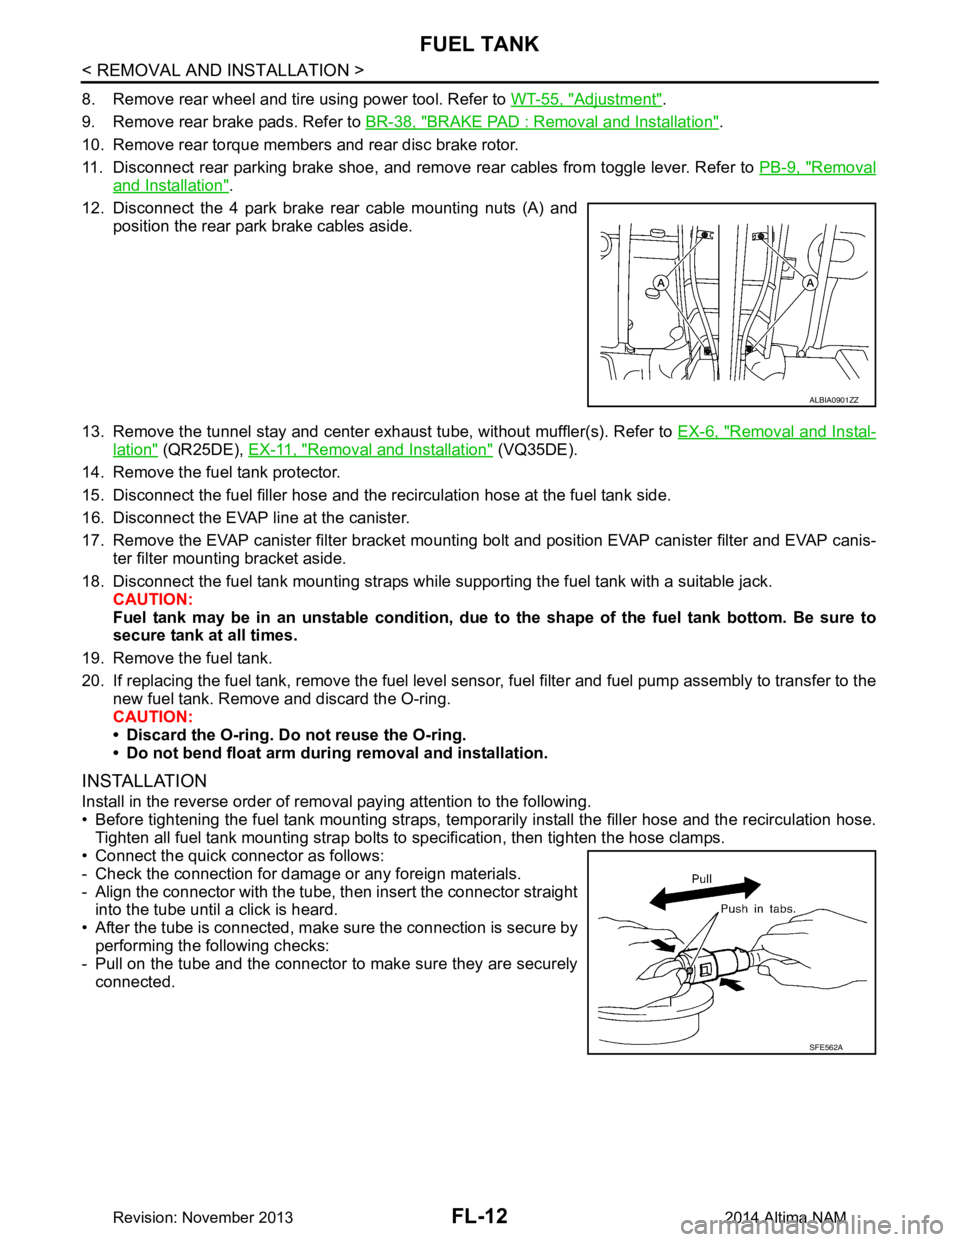
12. Disconnect the 4 park brake rear cable mounting nuts (A) and position the rear park brake cables aside.
13. Remove the tunnel stay and center exhaust tube, without muffler(s). Refer to EX-6, "Removal and Instal-
lation" (QR25DE), EX-11, "Removal and Installation" (VQ35DE).
14. Remove the fuel tank protector.
15. Disconnect the fuel filler hose and the recirculation hose at the fuel tank side.
16. Disconnect the EVAP line at the canister.
17. Remove the EVAP canister filter bracket mounti ng bolt and position EVAP canister filter and EVAP canis-
ter filter mounting bracket aside.
18. Disconnect the fuel tank mounting straps while supporting the fuel tank with a suitable jack. CAUTION:
Fuel tank may be in an unstable condition, due to the shape of the fuel tank bottom. Be sure to
secure tank at all times.
19. Remove the fuel tank.
20. If replacing the fuel tank, remove the fuel level sens or, fuel filter and fuel pump assembly to transfer to the
new fuel tank. Remove and discard the O-ring.
CAUTION:
• Discard the O-ring. Do not reuse the O-ring.
• Do not bend float arm during removal and installation.
INSTALLATION
Install in the reverse order of removal paying attention to the following.
• Before tightening the fuel tank mounting straps, tempor arily install the filler hose and the recirculation hose.
Tighten all fuel tank mounting strap bolts to specification, then tighten the hose clamps.
• Connect the quick connector as follows:
- Check the connection for damage or any foreign materials.
- Align the connector with the tube, then insert the connector straight into the tube until a click is heard.
• After the tube is connected, make sure the connection is secure by performing the following checks:
- Pull on the tube and the connector to make sure they are securely
connected.
ALBIA0901ZZ
SFE562A
Revision: November 20132014 Altima NAM
Page 2493 of 4801
FUEL TANKFL-13
< REMOVAL AND INSTALLATION >
C
D E
F
G H
I
J
K L
M A
FL
NP
O
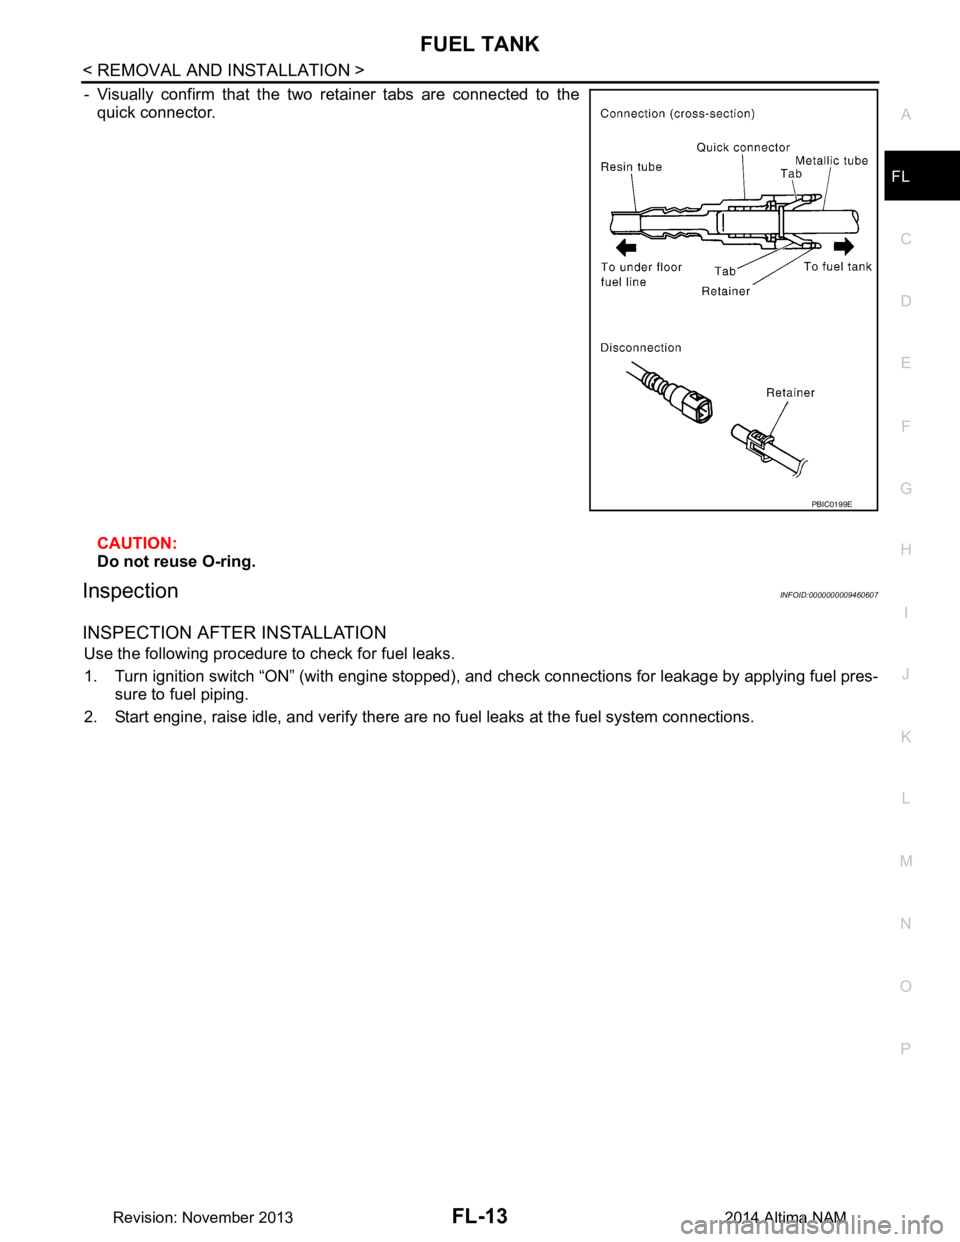
- Visually confirm that the two retainer tabs are connected to the
quick connector.
CAUTION:
Do not reuse O-ring.
InspectionINFOID:0000000009460607
INSPECTION AFTER INSTALLATION
Use the following procedure to check for fuel leaks.
1. Turn ignition switch “ON” (with engine stopped), and check connections for leakage by applying fuel pres-
sure to fuel piping.
2. Start engine, raise idle, and verify there are no fuel leaks at the fuel system connections.
PBIC0199E
Revision: November 20132014 Altima NAM