2014 NISSAN TEANA center console
[x] Cancel search: center consolePage 3245 of 4801

SQUEAK AND RATTLE TROUBLE DIAGNOSESMIR-15
< SYMPTOM DIAGNOSIS >
C
D E
F
G H
I
J
K
M A
B
MIR
N
O P
INSTRUMENT PANEL
Most incidents are caused by contact and movement between:
1. Cluster lid A and the instrument panel
2. Acrylic lens and combination meter housing
3. Instrument panel to front pillar finisher
4. Instrument panel to windshield
5. Instrument panel pins
6. Wiring harnesses behind the combination meter
7. A/C defroster duct and duct joint
These incidents can usually be located by tapping or moving the components to duplicate the noise or by
pressing on the components while driving to stop the noi se. Most of these incidents can be repaired by apply-
ing felt cloth tape or silicone spray (in hard to reach areas). Urethane pads can be used to insulate wiring har-
ness.
CAUTION:
Do not use silicone spray to isolate a squeak or ra ttle. If you saturate the area with silicone, you will
not be able to recheck the repair.
CENTER CONSOLE
Components to pay attention to include:
1. Shift selector assembly cover to finisher
2. A/C control unit and cluster lid C
3. Wiring harnesses behind audio and A/C control unit
The instrument panel repair and isolation pr ocedures also apply to the center console.
DOORS
Pay attention to the:
1. Finisher and inner panel making a slapping noise
2. Inside handle escutcheon to door finisher
3. Wiring harnesses tapping
4. Door striker out of alignment causing a popping noise on starts and stops
Tapping or moving the components or pressing on them wh ile driving to duplicate the conditions can isolate
many of these incidents. You can usually insulate the ar eas with felt cloth tape or insulator foam blocks from
the NISSAN Squeak and Rattle Kit (J-50397) to repair the noise.
TRUNK
Trunk noises are often caused by a loose jack or loose items put into the trunk by the owner.
In addition look for:
1. Trunk lid bumpers out of adjustment
2. Trunk lid striker out of adjustment
3. The trunk lid torsion bars knocking together
4. A loose license plate or bracket
Most of these incidents can be repaired by adjusting, se curing or insulating the item(s) or component(s) caus-
ing the noise.
SUNROOF/HEADLINING
Noises in the sunroof/headlining area can often be traced to one of the following:
1. Sunroof lid, rail, linkage or seals making a rattle or light knocking noise
2. Sun visor shaft shaking in the holder
3. Front or rear windshield touching headlining and squeaking
Again, pressing on the components to stop the noise while duplicating the conditions can isolate most of these
incidents. Repairs usually consist of insulating with felt cloth tape.
OVERHEAD CONSOLE (FRONT AND REAR)
Overhead console noises are often caused by the cons ole panel clips not being engaged correctly. Most of
these incidents are repaired by pushing up on the c onsole at the clip locations until the clips engage.
In addition look for:
Revision: November 20132014 Altima NAMRevision: November 20132014 Altima NAM
Page 3262 of 4801
MWI
COMPONENT PARTSMWI-7
< SYSTEM DESCRIPTION >
C
D E
F
G H
I
J
K L
M B
A
O P
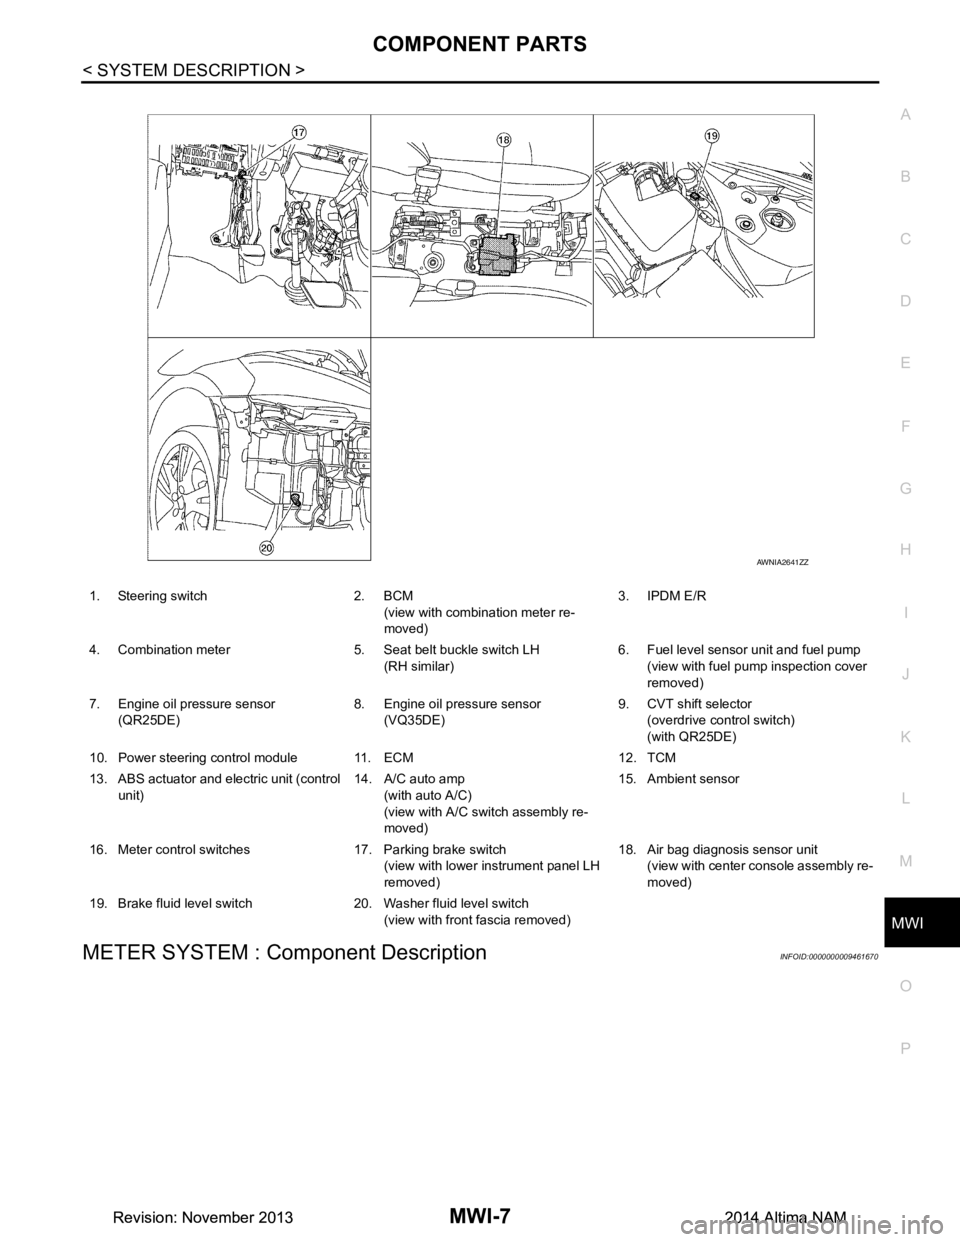
METER SYSTEM : Component DescriptionINFOID:0000000009461670
1. Steering switch 2. BCM (view with combination meter re-
moved) 3. IPDM E/R
4. Combination meter 5. Seat belt buckle switch LH (RH similar) 6. Fuel level sensor unit and fuel pump
(view with fuel pump inspection cover
removed)
7. Engine oil pressure sensor (QR25DE) 8. Engine oil pressure sensor
(VQ35DE) 9. CVT shift selector
(overdrive control switch)
(with QR25DE)
10. Power steering control module 11. ECM 12. TCM
13. ABS actuator and electric unit (control unit) 14. A/C auto amp
(with auto A/C)
(view with A/C swit ch assembly re-
moved) 15. Ambient sensor
16. Meter control switches 17. Parking brake switch (view with lower instrument panel LH
removed) 18. Air bag diagnosis sensor unit
(view with center console assembly re-
moved)
19. Brake fluid level switch 20. Washer fluid level switch (view with front fascia removed)
AWNIA2641ZZ
Revision: November 20132014 Altima NAMRevision: November 20132014 Altima NAM
Page 3474 of 4801

PG-42
< DTC/CIRCUIT DIAGNOSIS >
HARNESS
B3 M51 L/8 : Heated steering wheel switch D2 M153 W / 2 4: AV control unit (With navigation system
with BOSE audio system)
C3 M52 W/2 : Combination switch (Spiral cable) A3 M155 W/4 : Joint connector-M06
C3 M53 W/8 : Steering angle sensor C3 M156 W/4 : Joint connector-M07
D2 M54 W/4 : Hazard switch D3 M157 W/4 : Joint connector-M08
A1 M55 BR/2 : Front speaker LH B3 M158 W/8 : Meter control switch
B1 M56 B/2 : Sunload sensor D1 M159 W/4 : Dongle unit
B2 M57 — : Body ground Console sub-harness
E3 M58 W/40 : ITS control unit D4 M201 W/6 : Front heated seat switch LH
E3 M59 W/32 : ITS control unit E4 M202 BR/6 : Front heated seat switch RH
F2 M60 O/2 : Front passenger air bag module D4 M204 BR/2 : CVT shift selector
F1 M61 — : Body ground E3 M205 W / 1 6 : T o M 1 6
B3 M62 GR/8 : Warning system switch D5 M209 GR/3 : Front console power socket
F1 M63 BR/2 : Front speaker RH Speaker sub-harness
A3 M64 W/4 : Joint connector-M01 D1 M300 W / 2 : T o M 5 0
F1 M66 W/3 : Optical sensor D1 M301 BR/2 : Center speaker
Revision: November 20132014 Altima NAM
Page 3702 of 4801

SQUEAK AND RATTLE TROUBLE DIAGNOSESRF-37
< SYMPTOM DIAGNOSIS >
C
D E
F
G H
I
J
L
M A
B
RF
N
O P
Used instead of UHMW tape that will be visible or not fit.
Note: Will only last a few months.
SILICONE SPRAY
Use when grease cannot be applied.
DUCT TAPE
Use to eliminate movement.
CONFIRM THE REPAIR
Confirm that the cause of a noise is repaired by test driving the vehicle. Operate the vehicle under the same
conditions as when the noise originally occurred. Refer to the notes on the Diagnostic Worksheet.
Generic Squeak and Rattle TroubleshootingINFOID:0000000009461322
Refer to Table of Contents for specific component removal and installation information.
INSTRUMENT PANEL
Most incidents are caused by contact and movement between:
1. Cluster lid A and the instrument panel
2. Acrylic lens and combination meter housing
3. Instrument panel to front pillar finisher
4. Instrument panel to windshield
5. Instrument panel pins
6. Wiring harnesses behind the combination meter
7. A/C defroster duct and duct joint
These incidents can usually be located by tapping or moving the components to duplicate the noise or by
pressing on the components while driving to stop the noi se. Most of these incidents can be repaired by apply-
ing felt cloth tape or silicone spray (in hard to reach areas). Urethane pads can be used to insulate wiring har-
ness.
CAUTION:
Do not use silicone spray to isolate a squeak or ra ttle. If you saturate the area with silicone, you will
not be able to recheck the repair.
CENTER CONSOLE
Components to pay attention to include:
1. Shift selector assembly cover to finisher
2. A/C control unit and cluster lid C
3. Wiring harnesses behind audio and A/C control unit
The instrument panel repair and isolation pr ocedures also apply to the center console.
DOORS
Pay attention to the:
1. Finisher and inner panel making a slapping noise
2. Inside handle escutcheon to door finisher
3. Wiring harnesses tapping
4. Door striker out of alignment causing a popping noise on starts and stops
Tapping or moving the components or pressing on them wh ile driving to duplicate the conditions can isolate
many of these incidents. You can usually insulate the ar eas with felt cloth tape or insulator foam blocks from
the NISSAN Squeak and Rattle Kit (J-43980) to repair the noise.
TRUNK
Trunk noises are often caused by a loose jack or loose items put into the trunk by the owner.
In addition look for:
1. Trunk lid bumpers out of adjustment
2. Trunk lid striker out of adjustment
3. The trunk lid torsion bars knocking together
4. A loose license plate or bracket
Revision: November 20132014 Altima NAMRevision: November 20132014 Altima NAM
Page 3768 of 4801

SQUEAK AND RATTLE TROUBLE DIAGNOSESSE-19
< SYMPTOM DIAGNOSIS >
C
D E
F
G H
I
K L
M A
B
SE
N
O P
INSTRUMENT PANEL
Most incidents are caused by contact and movement between:
1. Cluster lid A and the instrument panel
2. Acrylic lens and combination meter housing
3. Instrument panel to front pillar finisher
4. Instrument panel to windshield
5. Instrument panel pins
6. Wiring harnesses behind the combination meter
7. A/C defroster duct and duct joint
These incidents can usually be located by tapping or moving the components to duplicate the noise or by
pressing on the components while driving to stop the noi se. Most of these incidents can be repaired by apply-
ing felt cloth tape or silicone spray (in hard to reach areas). Urethane pads can be used to insulate wiring har-
ness.
CAUTION:
Do not use silicone spray to isolate a squeak or ra ttle. If you saturate the area with silicone, you will
not be able to recheck the repair.
CENTER CONSOLE
Components to pay attention to include:
1. Shift selector assembly cover to finisher
2. A/C control unit and cluster lid C
3. Wiring harnesses behind audio and A/C control unit
The instrument panel repair and isolation pr ocedures also apply to the center console.
DOORS
Pay attention to the:
1. Finisher and inner panel making a slapping noise
2. Inside handle escutcheon to door finisher
3. Wiring harnesses tapping
4. Door striker out of alignment causing a popping noise on starts and stops
Tapping or moving the components or pressing on them wh ile driving to duplicate the conditions can isolate
many of these incidents. You can usually insulate the ar eas with felt cloth tape or insulator foam blocks from
the NISSAN Squeak and Rattle Kit (J-50397) to repair the noise.
TRUNK
Trunk noises are often caused by a loose jack or loose items put into the trunk by the owner.
In addition look for:
1. Trunk lid bumpers out of adjustment
2. Trunk lid striker out of adjustment
3. The trunk lid torsion bars knocking together
4. A loose license plate or bracket
Most of these incidents can be repaired by adjusting, se curing or insulating the item(s) or component(s) caus-
ing the noise.
SUNROOF/HEADLINING
Noises in the sunroof/headlining area can often be traced to one of the following:
1. Sunroof lid, rail, linkage or seals making a rattle or light knocking noise
2. Sun visor shaft shaking in the holder
3. Front or rear windshield touching headlining and squeaking
Again, pressing on the components to stop the noise while duplicating the conditions can isolate most of these
incidents. Repairs usually consist of insulating with felt cloth tape.
OVERHEAD CONSOLE (FRONT AND REAR)
Overhead console noises are often caused by the cons ole panel clips not being engaged correctly. Most of
these incidents are repaired by pushing up on the c onsole at the clip locations until the clips engage.
In addition look for:
Revision: November 20132014 Altima NAMRevision: November 20132014 Altima NAM
Page 3781 of 4801
SE-32
< REMOVAL AND INSTALLATION >
FRONT SEAT
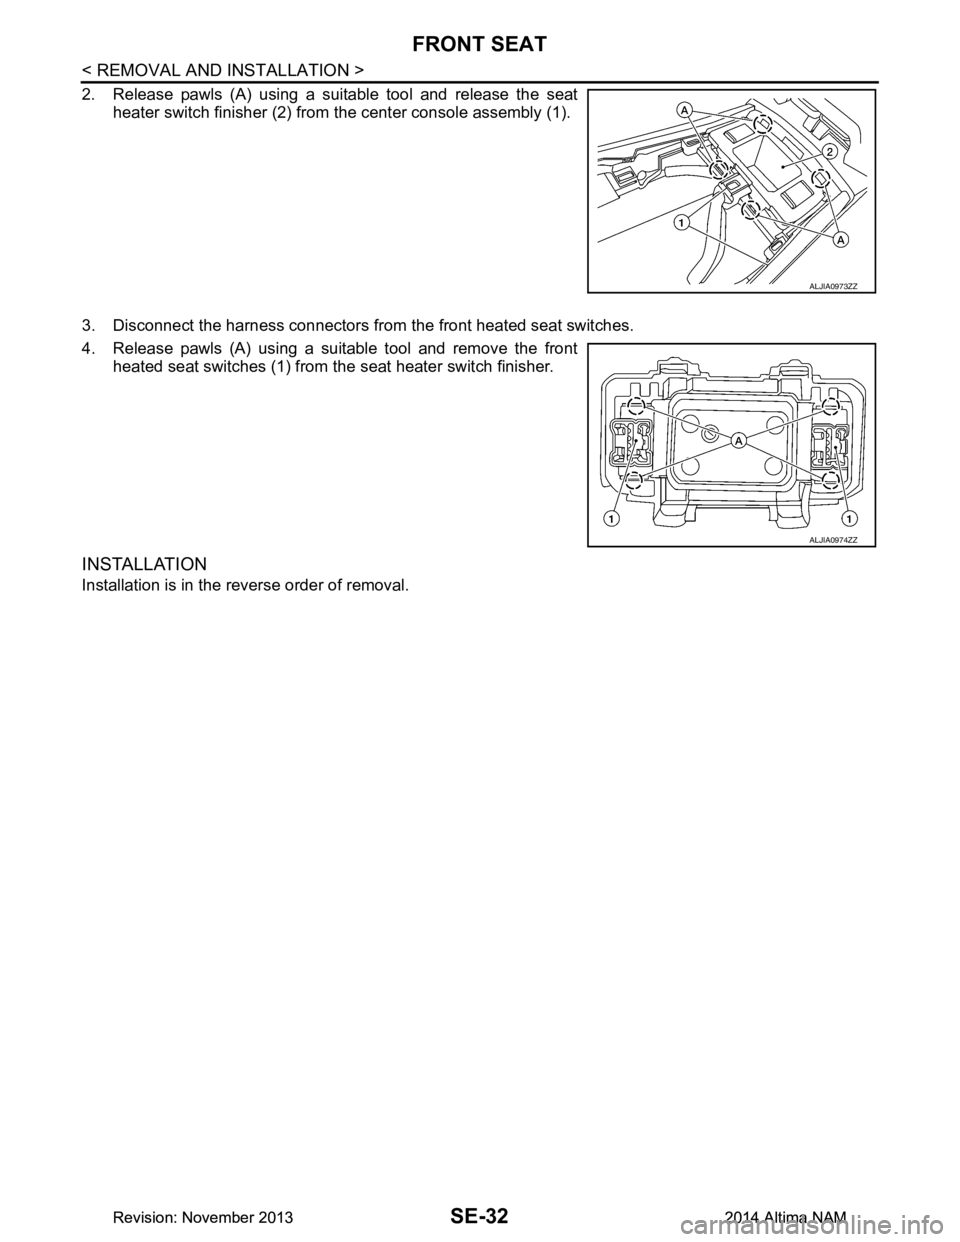
2. Release pawls (A) using a suitable tool and release the seatheater switch finisher (2) from the center console assembly (1).
3. Disconnect the harness connectors from the front heated seat switches.
4. Release pawls (A) using a suitable tool and remove the front heated seat switches (1) from t he seat heater switch finisher.
INSTALLATION
Installation is in the reverse order of removal.
ALJIA0973ZZ
ALJIA0974ZZ
Revision: November 20132014 Altima NAMRevision: November 20132014 Altima NAM
Page 3988 of 4801
SR-26
< REMOVAL AND INSTALLATION >
DIAGNOSIS SENSOR UNIT
DIAGNOSIS SENSOR UNIT
Removal and InstallationINFOID:0000000009463080
REMOVAL
WARNING:
• Before servicing the SRS, turn ig nition switch OFF, disconnect both battery terminals and wait at
least three minutes.
• Before disconnecting the air bag diagnosis sensor unit harness conn ectors, be sure to disconnect
each harness connector of the front shoulder belt pre-tensioners to prevent accidental air bag
deployment by static electricity and seat belt pre-tensioner operation.
• Do not use the air tools or electric tools for servicing.
• When replacing the air bag diagno sis sensor unit, always check with th e parts department for the lat-
est parts information. Installing an incorrect air bag diagnosis sen sor unit may or may not cause the
air bag warning lamp to illuminate and may cause in correct deployment of the supplemental air bags
and seat belt pre-tensioners in a collision r esulting in serious personal injury or death.
1. Always check the air bag diagnosis sensor unit ECU discriminated number (identification number) or part
number using CONSULT.
2. Disconnect both the negative and positive battery terminal s, then wait at least three minutes. Refer to PG-
73, "Removal and Installation (Battery)".
3. Disconnect the harness connector fo r the following SRS components: SB-8, "Removal and Installation"
(Front shoulder belt pre-tensioner LH/RH).
4. Remove the center console. Refer to IP-18, "Removal and Installation"
.
5. Disconnect the harness connector from air bag diagnosis sensor unit.
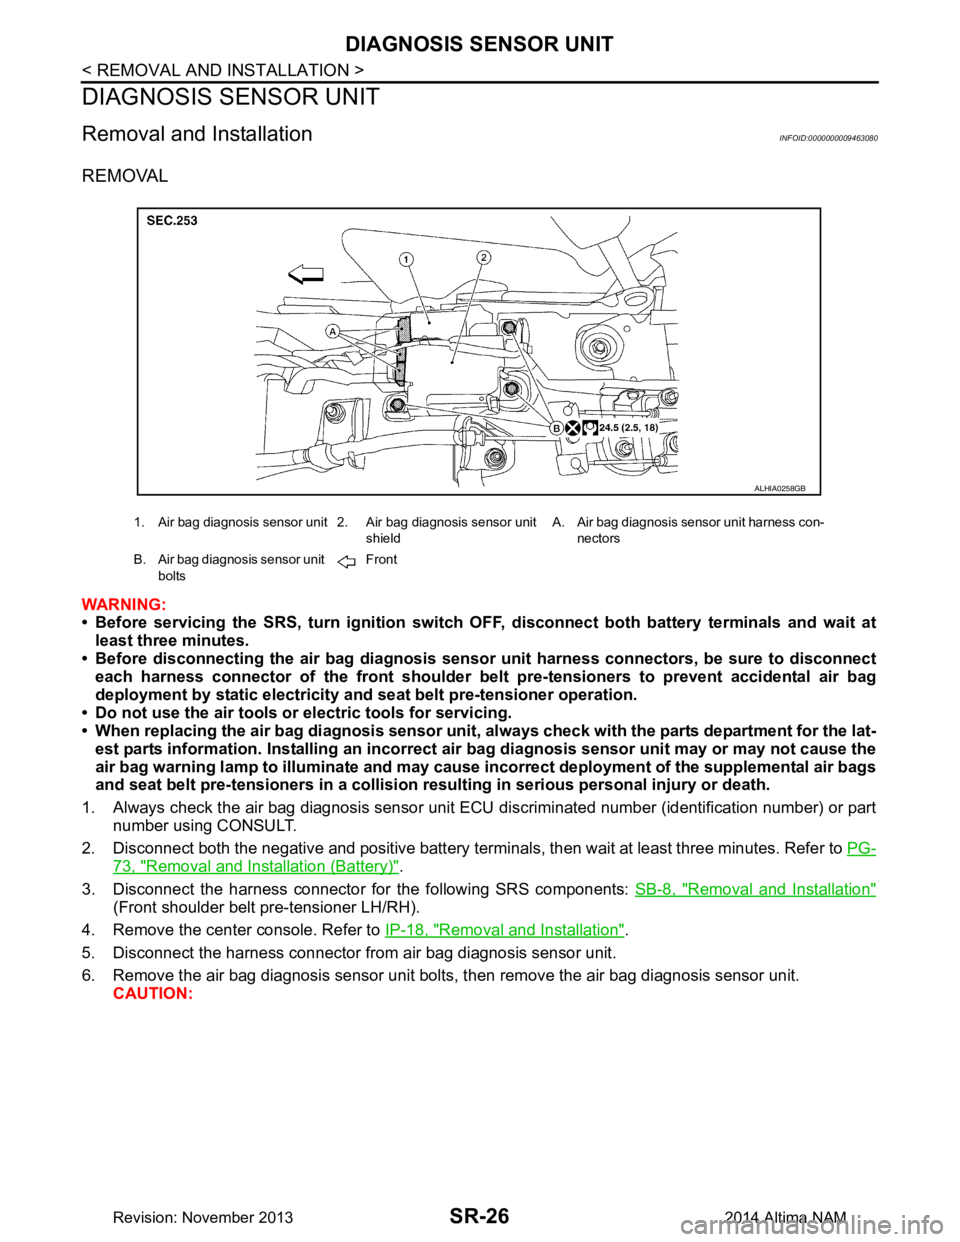
6. Remove the air bag diagnosis sensor unit bolts , then remove the air bag diagnosis sensor unit.
CAUTION:
1. Air bag diagnosis sensor unit 2. Air bag diagnosis sensor unit
shieldA. Air bag diagnosis sensor unit harness con-
nectors
B. Air bag diagnosis sensor unit bolts Front
ALHIA0258GB
Revision: November 20132014 Altima NAM
Page 3999 of 4801
SRC-6
< SYSTEM DESCRIPTION >
COMPONENT PARTS
Component Description
INFOID:0000000009460705
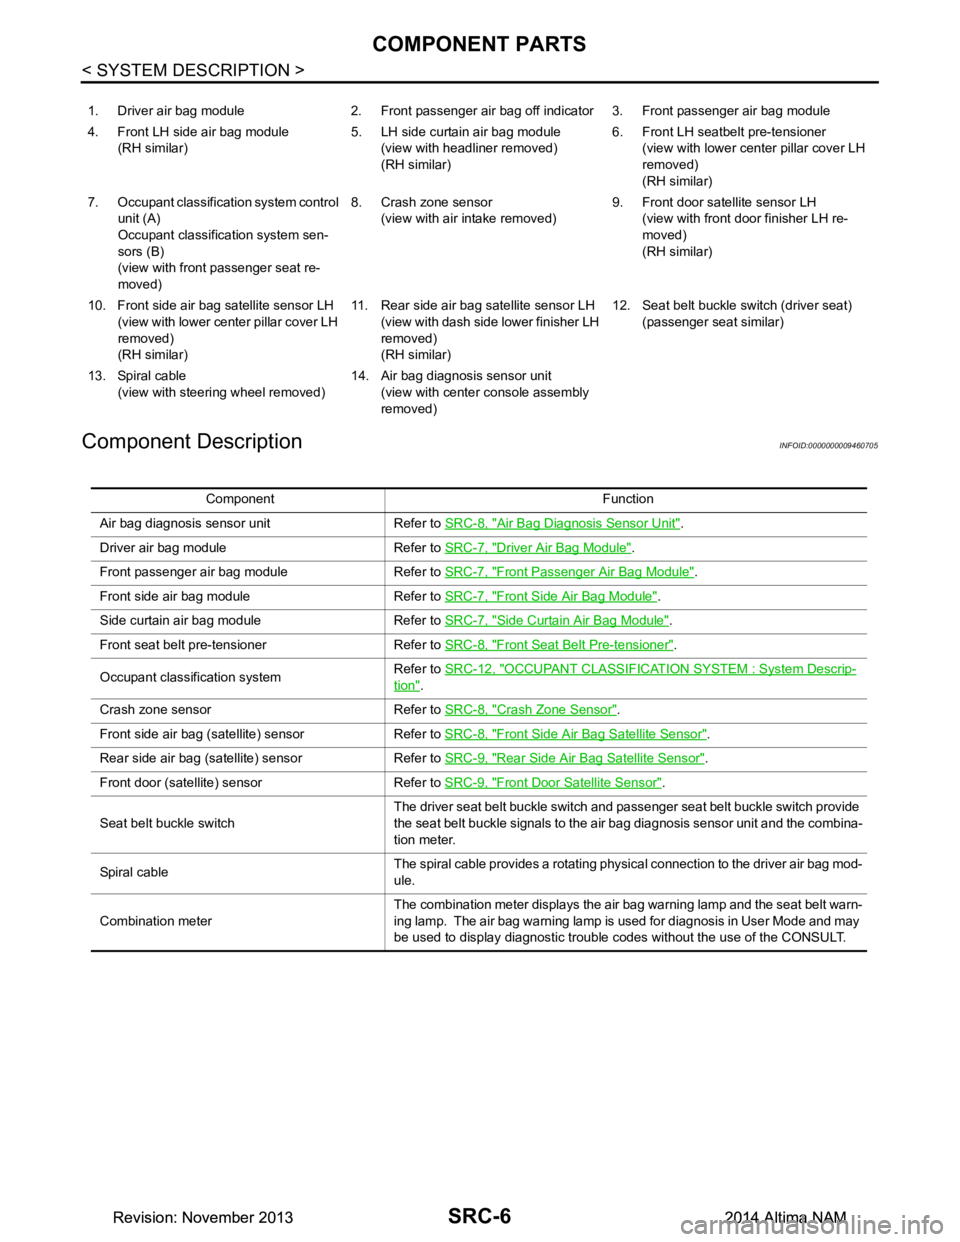
1. Driver air bag module 2. Front passenger air bag off indicator 3. Front passenger air bag module
4. Front LH side air bag module (RH similar) 5. LH side curtain air bag module
(view with headliner removed)
(RH similar) 6. Front LH seatbelt pre-tensioner
(view with lower cent er pillar cover LH
removed)
(RH similar)
7. Occupant classification system control unit (A)
Occupant classification system sen-
sors (B)
(view with front passenger seat re-
moved) 8. Crash zone sensor
(view with air intake removed) 9. Front door satellite sensor LH
(view with front door finisher LH re-
moved)
(RH similar)
10. Front side air bag satellite sensor LH (view with lower cent er pillar cover LH
removed)
(RH similar) 11. Rear side air bag satellite sensor LH
(view with dash side lower finisher LH
removed)
(RH similar) 12. Seat belt buckle switch (driver seat)
(passenger seat similar)
13. Spiral cable (view with steeri ng wheel removed) 14. Air bag diagnosis sensor unit
(view with center console assembly
removed)
Component Function
Air bag diagnosis sensor unit Refer to SRC-8, "Air Bag Diagnosis Sensor Unit"
.
Driver air bag module Refer to SRC-7, "Driver Air Bag Module"
.
Front passenger air bag module Refer to SRC-7, "Front Passenger Air Bag Module"
.
Front side air bag module Refer to SRC-7, "Front Side Air Bag Module"
.
Side curtain air bag module Refer to SRC-7, "Side Curtain Air Bag Module"
.
Front seat belt pre-tensioner Refer to SRC-8, "Front Seat Belt Pre-tensioner"
.
Occupant classification system Refer to
SRC-12, "OCCUPANT CLASSIFICATION SYSTEM : System Descrip-
tion".
Crash zone sensor Refer to SRC-8, "Crash Zone Sensor"
.
Front side air bag (satellite) sensor Refer to SRC-8, "Front Side Air Bag Satellite Sensor"
.
Rear side air bag (satellite) sensor Refer to SRC-9, "Rear Side Air Bag Satellite Sensor"
.
Front door (satellite) sensor Refer to SRC-9, "Front Door Satellite Sensor"
.
Seat belt buckle switch The driver seat belt buckle switch and passenger seat belt buckle switch provide
the seat belt buckle signals to the air bag diagnosis sensor unit and the combina-
tion meter.
Sp iral c ab le The spiral cable provides a rotating physical connection to the driver air bag mod-
ule.
Combination meter The combination meter displays the air bag warning lamp and the seat belt warn-
ing lamp. The air bag warning lamp is used for diagnosis in User Mode and may
be used to display diagnostic trouble codes without the use of the CONSULT.
Revision: November 20132014 Altima NAMRevision: November 20132014 Altima NAM