2014 MITSUBISHI LANCER SPORTBACK wheel size
[x] Cancel search: wheel sizePage 262 of 422
Vehicle preparation before driving
Driving safety 6-3
6
N00629000685
For a safer and more enjoyable trip, always observe the following: Before starting the vehicle, make certain that you and all passengers are seated and wearing their seat belts properly (with children in the rear seat, in appropriaterestraints), and that all the doors and the rear hatch are locked.
Move the driver’s seat as far backward as possible, while still keeping good visibil- ity, and good control of the steering wheel, brakes, accelerator, and controls.Check the instrument panel indicators and multi-information display for any possible problem. Move the front passenger seat as far back as possible. Make sure that infants and small children are properly restrained in accordance withall laws and regulations.
Check these by selecting the defroster mode, and set the blower switch on high. You should be able to feel the air blowing against the windshield.(Refer to “Defrosting or defogging (wind- shield, door windows)” on page 7-9, 7-14, 7-19, 7-24.) Check all the tires for heavy tread wear or uneven wear patterns. Look for stones, nails,glass, or other objects stuck in the tread. Look for any tread cuts or sidewall cracks. Check the wheel nuts for tightness, and the tires(including spare tire) for proper pressures.
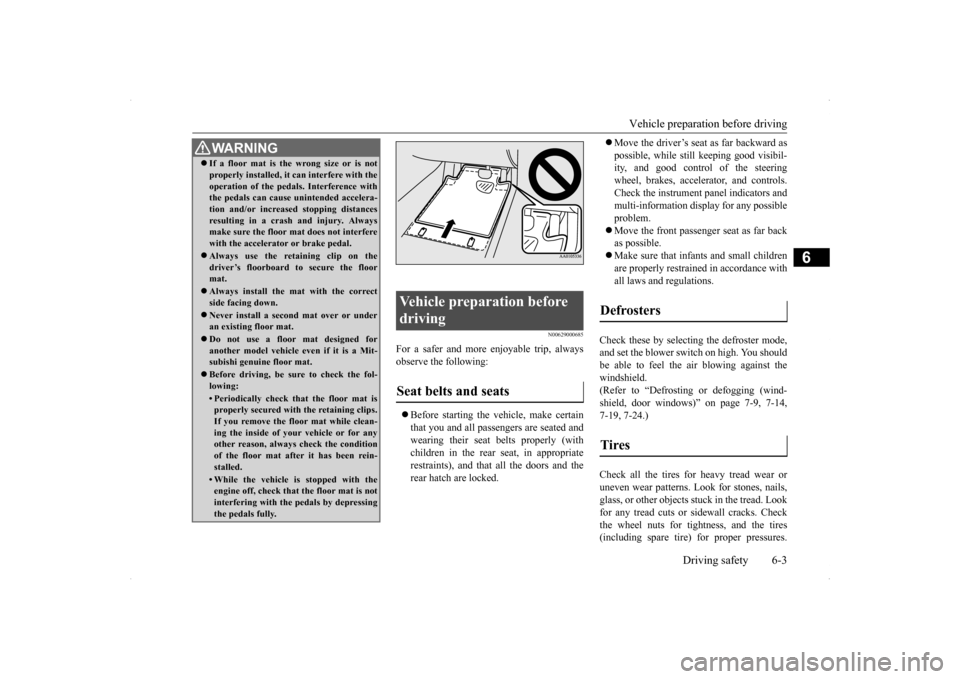
WA R N I N G If a floor mat is the wrong size or is not properly installed, it can interfere with the operation of the pedals. Interference with the pedals can cause unintended accelera- tion and/or increased stopping distancesresulting in a crash and injury. Always make sure the floor mat does not interfere with the accelerator or brake pedal. Always use the retaining clip on the driver’s floorboard to secure the floormat. Always install the mat with the correct side facing down. Never install a second mat over or under an existing floor mat. Do not use a floor mat designed for another model vehicle ev
en if it is a Mit-
subishi genuine floor mat. Before driving, be sure to check the fol- lowing:• Periodically check that the floor mat isproperly secured with the retaining clips. If you remove the floor mat while clean-ing the inside of your vehicle or for any other reason, always check the condition of the floor mat after it has been rein-stalled.• While the vehicle is stopped with the engine off, check that the floor mat is not interfering with the pedals by depressingthe pedals fully.
Vehicle preparation before driving Seat belts and seats
Defrosters Tires
BK0200700US.bo
ok 3 ページ 2013年2月15日 金曜日 午後12時17分
Page 341 of 422

How to change a tire 8-8 For emergencies
8
2. To remove the spare tire, remove the installation clamp (A) by turning it coun- terclockwise.
N00849800434
1. On vehicles equipped with wheel covers,first remove the covers (refer to “Wheel covers” on page 8-12). Then loosen thewheel nuts with the wheel nut wrench. Do not remove the wheel nuts yet.
2. Place the jack under
one of the jacking
points (A) shown in the illustration. Use the jacking point closest to the tire you wish to change.
NOTE
The clamp cannot be used for a normal size tire. Store a normal size tire under the board. Put the spare tire under the vehicle body near the jack. This makes it safer if the jack slips out of position.
To change a tire
WA R N I N G Set the jack only at the positions shown here. If the jack is set at a wrong position, it could dent your vehicle or the jack might fall over and cause personal injury. Do not use the jack on a tilted or soft sur- face.Otherwise, the jack might slip and cause personal injury. Always use the jack on a flat, hard surface. Before setting the jack,make sure there are no sand or pebbles under the jack base.
BK0200700US.bo
ok 8 ページ 2013年2月15日 金曜日 午後12時17分
Page 345 of 422
How to change a tire 8-12 For emergencies
8
N00850000159
Reverse the removing procedure when stor- ing the flat tire or spare tire, jack, bar and wheel nut wrench. Refer to “To remove the compact spare tire”on page 8-7 and “Tools and jack” on page 8-5.
N00849400209
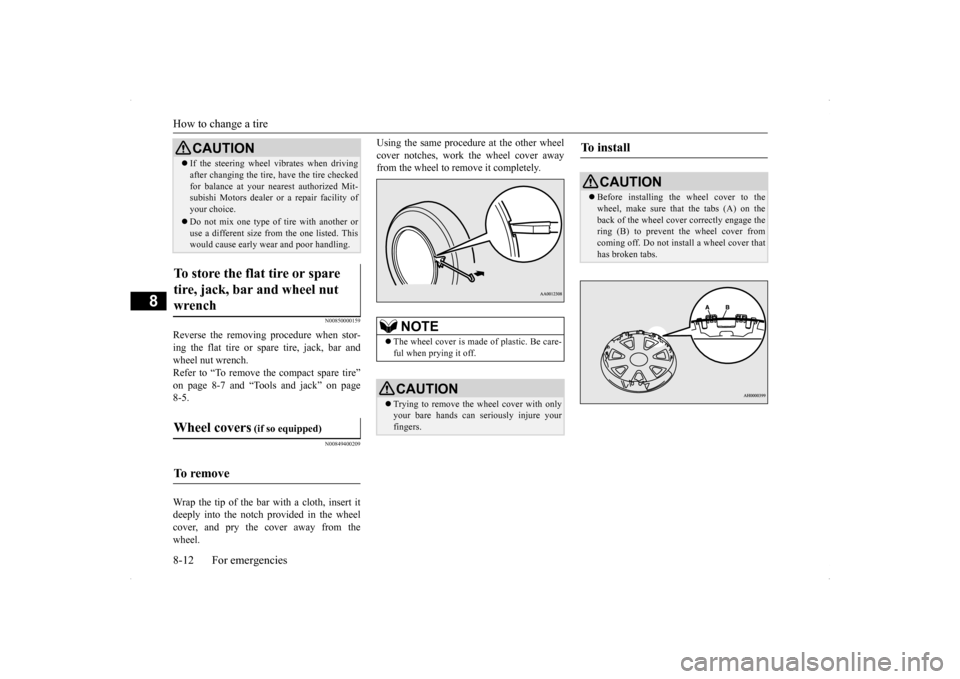
Wrap the tip of the bar with a cloth, insert it deeply into the notch provided in the wheelcover, and pry the cover away from the wheel.
Using the same procedure at the other wheel cover notches, work the wheel cover away from the wheel to remove it completely.
If the steering wheel vibrates when driving after changing the tire, have the tire checked for balance at your nearest authorized Mit- subishi Motors dealer or a repair facility of your choice. Do not mix one type of tire with another or use a different size from the one listed. Thiswould cause early wear
and poor handling.
To store the flat tire or spare tire, jack, bar and wheel nut wrench Wheel covers
(if so equipped)
To remove
CAUTION
NOTE
The wheel cover is made of plastic. Be care- ful when prying it off. CAUTION Trying to remove the wheel cover with only your bare hands can seriously injure your fingers.
To i n s t a l l
CAUTION Before installing the wheel cover to the wheel, make sure that the tabs (A) on the back of the wheel cover correctly engage the ring (B) to prevent the wheel cover fromcoming off. Do not install a wheel cover that has broken tabs.
BK0200700US.bo
ok 12 ページ 2013年2月15日 金曜日 午後12時17分
Page 369 of 422

Tires 9-20 Vehicle care and maintenance
9
EXAMPLE: DOT MA L9 ABCD 1504
The treadwear grade is a comparative rating based on the wear rate of the tire when tested under controlledconditions on a specified government test course. For example, a tire graded 150 would wear one and one- half (1
1/2) times as well on the gov-
ernment course as a tire graded 100. The relative performance of tiresdepends upon the actual conditions of their use, however, and may depart significantly from the norm due tovariations in driving habits, service practices and differences in road characteristics and climate. The traction grades, from highest to lowest, are AA, A, B and C. Thosegrades represent the tire’s ability to stop on wet pavement as measured
under controlled conditions on speci- fied government test surfaces of asphalt and concrete. A tire marked C may have poor traction perfor- mance. The temperature grades are A (the highest), B and C, representing the tire’s resistance to the generation ofheat and its ability to dissipate heat when tested under controlled condi- tions on a specified indoor laboratorytest wheel. Sustained high tempera- ture can cause the material of the tire to degenerate and reduce tire life, andexcessive temperature can lead to sudden tire failure. The grade C cor- responds to a level of performancewhich all passenger car tires must meet under the Federal Motor Vehi- cle Safety Standard No. 109. Grades B and A represent higher levels of performance on the laboratory testwheel than the minimum required by law.
DOT
Department of Transporta- tion This symbol certifies thatthe tire is in compliance with the U.S. Department of Transportation tire safetystandards, and is approved for highway use.
MA
Code representing the tire manufacturing location. (2 digits)
L9 ABCD
Code representing the tire size. (2 digits)Code used by tire manufac- turer. (1 to 4 digits)
15
Number representing the week in which the tire wasmanufactured. (2 digits)
04
Number representing the year in which the tire was manufactured. (2 digits)
Treadwear, Traction and Temper- ature Grades Treadwear Tr a c t i o n
Temperature
BK0200700US.bo
ok 20 ページ 2013年2月15日 金曜日 午後12時17分
Page 371 of 422
Tires 9-22 Vehicle care and maintenance
9
N00939600371 N00939700154
The following maintenance steps are recom- mended: Check tire pressures regularly. Have regular maintenance done on the wheel balance and front and rear suspen- sion alignment. Rotate your tires regularly as described in the “Tire rotation” section on page 9-22.
N00939800227
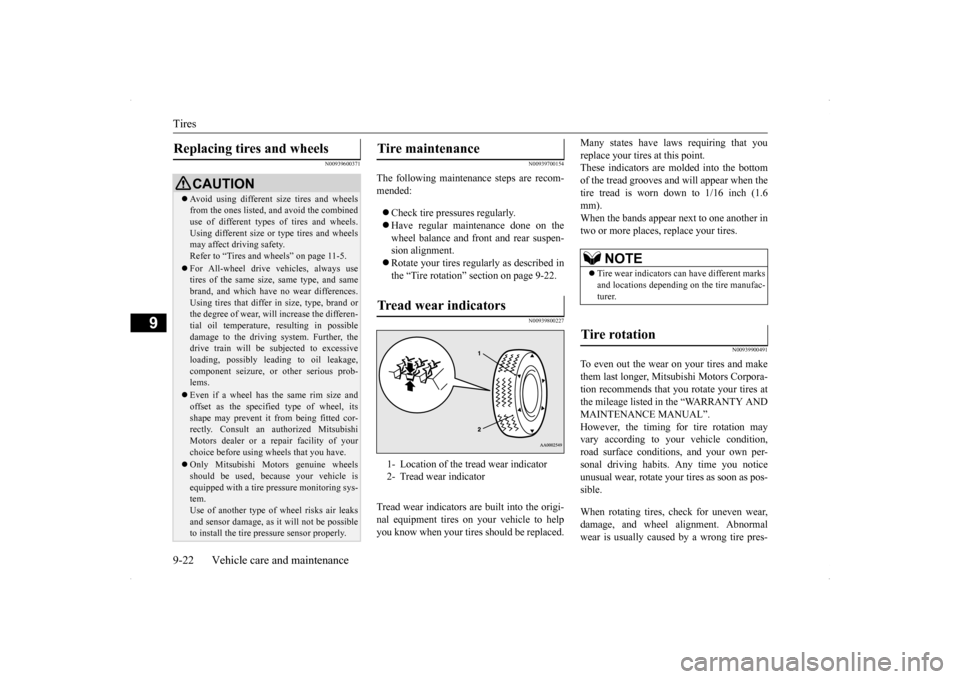
Tread wear indicators are built into the origi-nal equipment tires on your vehicle to helpyou know when your tires should be replaced.
Many states have laws requiring that you replace your tires at this point. These indicators are molded into the bottom of the tread grooves and will appear when thetire tread is worn down to 1/16 inch (1.6 mm). When the bands appear next to one another intwo or more places, replace your tires.
N00939900491
To even out the wear on your tires and makethem last longer, Mitsubishi Motors Corpora- tion recommends that you rotate your tires at the mileage listed in the “WARRANTY ANDMAINTENANCE MANUAL”. However, the timing for tire rotation may vary according to your vehicle condition,road surface conditions, and your own per- sonal driving habits. Any time you notice unusual wear, rotate your tires as soon as pos-sible. When rotating tires, check for uneven wear, damage, and wheel alignment. Abnormal wear is usually caused by a wrong tire pres-
Replacing tires and wheels
CAUTION Avoid using different size tires and wheels from the ones listed, and avoid the combined use of different types of tires and wheels. Using different size or type tires and wheelsmay affect driving safety. Refer to “Tires and wheels” on page 11-5. For All-wheel drive vehicles, always use tires of the same size, same type, and same brand, and which have no wear differences.Using tires that differ in size, type, brand or the degree of wear, will increase the differen- tial oil temperature, resulting in possibledamage to the driving system. Further, the drive train will be subjected to excessive loading, possibly leading to oil leakage,component seizure, or other serious prob- lems. Even if a wheel has the same rim size and offset as the specified type of wheel, its shape may prevent it from being fitted cor-rectly. Consult an authorized Mitsubishi Motors dealer or a repair facility of your choice before using wheels that you have. Only Mitsubishi Motors genuine wheels should be used, because your vehicle is equipped with a tire pressure monitoring sys- tem.Use of another type of wheel risks air leaks and sensor damage, as it will not be possible to install the tire pressure sensor properly.
Tire maintenance Tread wear indicators 1- Location of the tread wear indicator 2- Tread wear indicator
NOTE
Tire wear indicators can have different marks and locations depending on the tire manufac- turer.
Tire rotation
BK0200700US.bo
ok 22 ページ 2013年2月15日 金曜日 午後12時17分
Page 372 of 422
Tires
Vehicle care and maintenance 9-23
9
sure, wheels that are not aligned properly, wheels that are out-of-balance, or severe braking. Check with an authorized Mitsubishi Motorsdealer or a repair facility of your choice to find out the reason for uneven tread wear. The first tire rotation is the most important one. It will allow all your tires to wear evenly.
N00940000359
In some areas of the country, snow tires arerequired for winter driving. If snow tires arerequired in your area, you must choose snow tires of the same size and type as the original tires provided with your vehicle. Snow tiresshould also be installed on all four wheels. Otherwise your safety and vehicle handling can be reduced.Even where laws may permit it, snow tiresshould not be operated at sustained speeds over 75 mph (120 km/h).
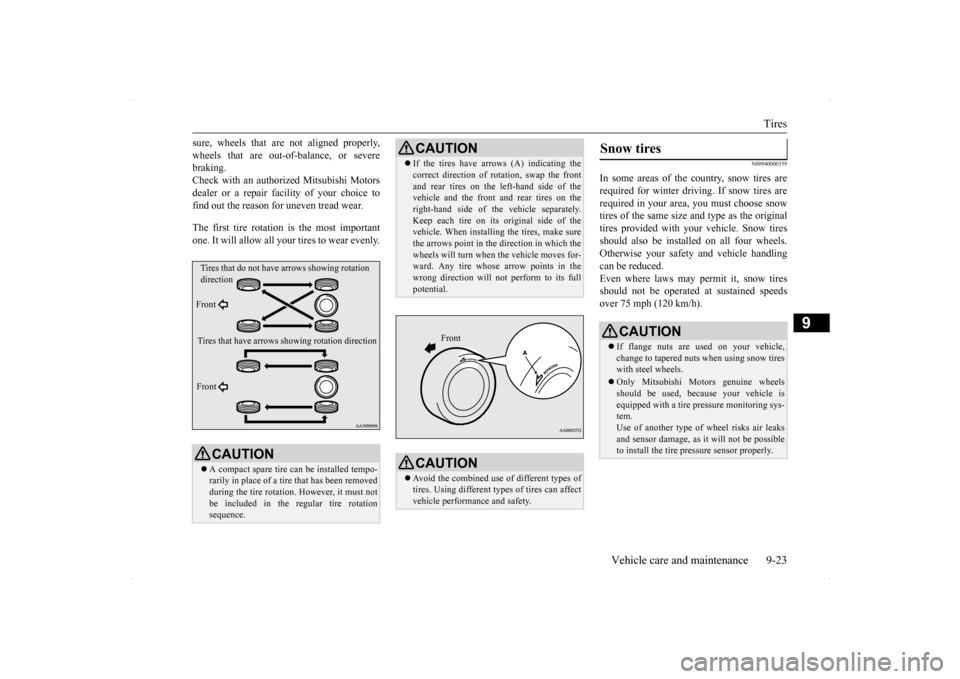
CAUTION A compact spare tire can be installed tempo- rarily in place of a tire that has been removed during the tire rotation. However, it must notbe included in the regular tire rotation sequence.Tires that do not have
arrows showing rotation
direction Front Tires that have arrows
showing rotation direction
Front
CAUTION If the tires have arrows (A) indicating the correct direction of rotation, swap the front and rear tires on the left-hand side of the vehicle and the front and rear tires on the right-hand side of the vehicle separately.Keep each tire on its original side of the vehicle. When installing the tires, make sure the arrows point in the
direction in which the
wheels will turn when the vehicle moves for- ward. Any tire whose
arrow points in the
wrong direction will not perform to its fullpotential.CAUTION Avoid the combined use of different types of tires. Using different types of tires can affectvehicle performance and safety.
Front
Snow tires
CAUTION If flange nuts are used on your vehicle, change to tapered nuts when using snow tireswith steel wheels. Only Mitsubishi Motors genuine wheels should be used, because your vehicle is equipped with a tire pressure monitoring sys- tem.Use of another type of wheel risks air leaks and sensor damage, as it will not be possible to install the tire pressure sensor properly.
BK0200700US.bo
ok 23 ページ 2013年2月15日 金曜日 午後12時17分
Page 412 of 422
Engine specifications Specifications 11-5
11
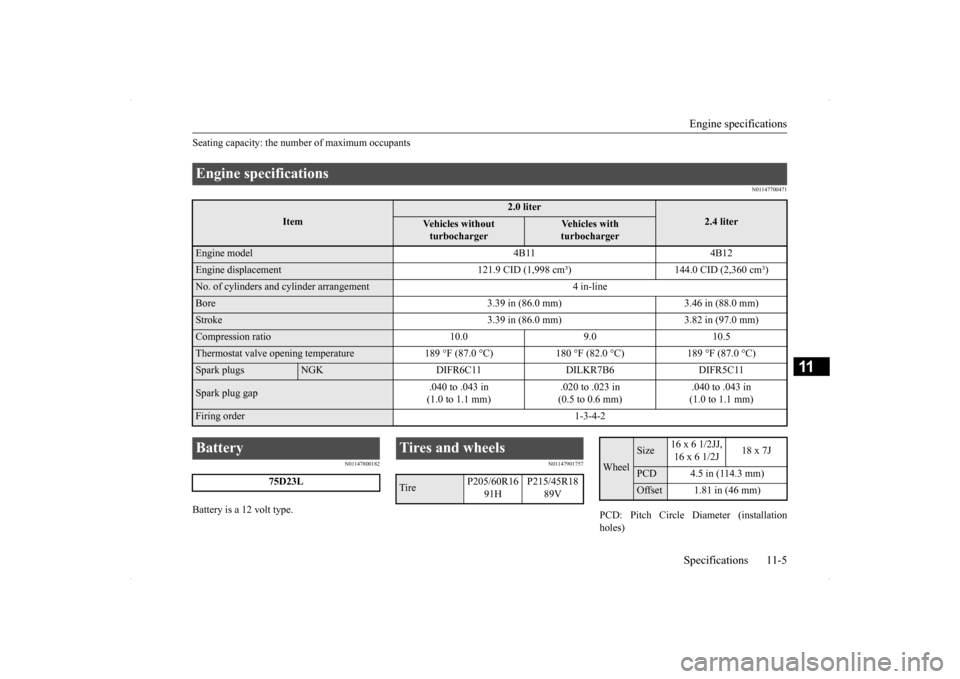
Seating capacity: the number of maximum occupants
N01147700471
N01147800182
Battery is a 12 volt type.
N01147901757
PCD: Pitch Circle Diameter (installation holes)
Engine specifications
Item
2.0 liter
2.4 liter
Vehicles without turbocharger
Vehicles with turbocharger
Engine model 4B11 4B12Engine displacement 121.9 CID
(1,998 cm³) 144.0 CID (2,360 cm³)
No. of cylinders and cylinder arrangement 4 in-lineBore 3.39 in (86.0 mm) 3.46 in (88.0 mm)Stroke 3.39 in (86.0 mm) 3.82 in (97.0 mm)Compression ratio 10.0 9.0 10.5Thermostat valve opening temperature 189 °F
(87.0 °C) 180 °F (82.0 °C) 189 °F (87.0 °C)
Spark plugs
NGK DIFR6C11 DILKR7B6 DIFR5C11
Spark plug gap
.040 to .043 in (1.0 to 1.1 mm)
.020 to .023 in (0.5 to 0.6 mm)
.040 to .043 in (1.0 to 1.1 mm)
Firing order
1-3-4-2
Battery
75D23L
Tires and wheels Tire
P205/60R16
91H
P215/45R18
89V
Wheel
Size
16 x 6 1/2JJ, 16 x 6 1/2J
18 x 7J
PCD 4.5 in (114.3 mm)Offset 1.81 in (46 mm)
BK0200700US.bo
ok 5 ページ 2013年2月15日 金曜日 午後12時17分
Page 420 of 422
Alphabetical index
12-5
12
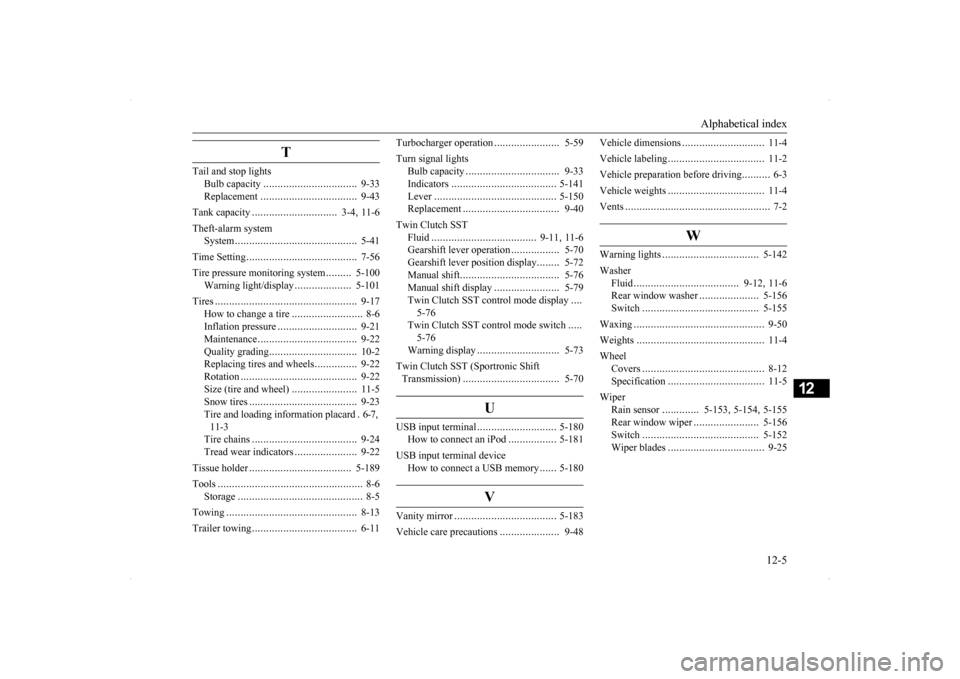
T
Tail and stop lights
Bulb capacity
................
.................
9-33
Replacement
.................
.................
9-43
Tank capacity
..............................
3-4
, 11-6
Theft-alarm system
System
......................
.....................
5-41
Time Setting
..................
.....................
7-56
Tire pressure monitoring system
.........
5-100
Warning light/display
....................
5-101
Tires
..........................
........................
9-17
How to change a tire
.........................
8-6
Inflation pressure
............................
9-21
Maintenance
..................
.................
9-22
Quality grading
...............................
10-2
Replacing tires and wheels
...............
9-22
Rotation
....................
.....................
9-22
Size (tire and wheel)
.......................
11-5
Snow tires
.....................
.................
9-23
Tire and loading information placard
.6-7
,
11-3 Tire chains
....................
.................
9-24
Tread wear indicators
......................
9-22
Tissue holder
.....................
...............
5-189
Tools
.........................
..........................
8-6
Storage
.........................
...................
8-5
Towing
......................
........................
8-13
Trailer towing
....................
.................
6-11
Turbocharger operation
.......................
5-59
Turn signal lights
Bulb capacity
..................
...............
9-33
Indicators
....................
.................
5-141
Lever
......................
.....................
5-150
Replacement
...................
...............
9-40
Twin Clutch SST
Fluid
....................
.................
9-11
, 11-6
Gearshift lever operation
.................
5-70
Gearshift lever position display
........
5-72
Manual shift
....................
...............
5-76
Manual shift display
.......................
5-79
Twin Clutch SST control mode display
....
5-76Twin Clutch SST control mode switch
.....
5-76 Warning display
.............................
5-73
Twin Clutch SST (Sportronic Shift Transmission)
...................
...............
5-70
U
USB input terminal
............................
5-180
How to connect an iPod
.................
5-181
USB input terminal device
How to connect a USB memory
......
5-180
V
Vanity mirror
...................
.................
5-183
Vehicle care precautions
.....................
9-48
Vehicle dimensions
.............................
11-4
Vehicle labeling
.................
.................
11-2
Vehicle preparation before driving
..........
6-3
Vehicle weights
.................
.................
11-4
Vents
............................
.......................
7-2
W
Warning lights
...................
...............
5-142
Washer
Fluid
..................
...................
9-12
, 11-6
Rear window washer
.....................
5-156
Switch
......................
...................
5-155
Waxing
......................
........................
9-50
Weights
........................
.....................
11-4
Wheel
Covers
......................
.....................
8-12
Specification
.................
.................
11-5
Wiper
Rain sensor
.............
5-153
, 5-154
, 5-155
Rear window wiper
.......................
5-156
Switch
......................
...................
5-152
Wiper blades
.................
.................
9-25
BK0200700US.bo
ok 5 ページ 2013年2月15日 金曜日 午後12時17分