Page 265 of 362

2.Operate the hand pump (B) slowly 6 or 7
times in order to force the water out through
the drain plug (A).
3. Tighten the drain plug (A) when water no lon-
ger comes out.
4. Bleed the air in the fuel system. (Refer to “Bleeding the fuel system” on page
6-05.)
5. Check to be sure that the fuel filter indication lamp illuminates when the ignition switch is
turned to “ON”, and that it goes off when the
engine is started. If in doubt, we recommend
you to consult a specialist for necessary infor-
mation.
CAUTIONl Do not smoke or have any other open
flame near the vehicle while bleeding the
fuel system.
l Be sure to carefully clean away any water
drained out because any fuel mixed with
the water could ignite and cause a fire.Type 3
Take your vehicle to a MITSUBISHI MOTORS Au-
thorized Service Point to remove the water from
the fuel filter.
Tools, jack and jack handle E00800900819
Storage
The storage location of the tools, jack and jack han-
dle should be remembered in case of an emergency.
Single cab
Type 1
A- Tool (wheel nut wrench) B- Jack handle
C- Jack
For emergencies
6-07
OKTE14E2
6
Page 266 of 362
Type 2
A- ToolsB- Jack handle
C- Jack
Club cab
A- Tools B- Jack
C- Jack handle
Double cab
Except for vehicles with rear retractable power
windowType 1
A- Tool (wheel nut wrench) B- Jack handle
C- Jack
Type 2
A- Tools B- Jack handle
C- Jack
Vehicles with rear retractable power windowType 1
A- Tool (wheel nut wrench) B- Jack
C- Jack handle
Type 2
A- Tools B- Jack
C- Wheel nut wrench
D- Jack handle
For emergencies
6-08 OKTE14E2
6
Page 267 of 362
ToolsE00801900382
Type 1Single cab, Double cabClub cab
Single cab, Double cab 1- Wheel nut wrench
Club cab 1- Tool bag
2- Wheel nut wrench
Type 2
Single cab, Club cab, Double cab 1- Tool bag
2- Wheel nut wrench
3- Plier
4- Driver
5- SpannerRemoving and storing the tools, jack
and jack handle E00802300240
Single cab
The tools, jack, and jack handle are located behind
the seat. 1. Tip forward the seatback.(Refer to “Folding the seatback forward” on
page 2-06.)
2. Remove the wheel nut wrench (A) from the
holder (B), and take out the wrench.
Remove the securing band (C), and then take
out the tools (D).
3. Remove the securing nut (E), and then take
out the jack (F).
4. Remove the jack handle (G) from the holder
(H), and take out the handle.
5. Reverse the removing procedure when stor-
ing the tool, jack and jack handle.
For emergencies
6-09
OKTE14E2
6
Page 268 of 362

NOTEl When stowing the jack handle, align the black-
marked part (I) of the jack handle with the
holder (J).
Club cab
The tools, jack, and jack handle are stored under
the floor on the left-hand side of the cargo space. 1.Raise the left side seat cushion. Refer to
“ Folding up the seat cushion (Club cab)” on
page 2-07.
Tip forward the seatback of the driver seat.
Slide the driver seat forward.
2. Open the lid.
3. Remove the securing band (A), and then take
out the tools (B).
4. Remove the securing nut (C), and then take
out the jack (D).
5. Remove the jack handle (E) from the holder
(F), and then take out the jack handle.
6. Reverse the removing procedure when stor-
ing the tools, jack and jack handle.
NOTE l When stowing the jack handle, align the col-
oured marking on the jack handle with that
on the holder, and fit the jack in the holder.
Double cab
Except for vehicles with rear retractable power
window
The tool (wheel nut wrench only), jack, and jack
handle are located behind the rear seat. 1. Tip forward the seatback of the rear seat.(Refer to “Folding the seatback forward” on
page 2-07.)
2. Remove the wheel nut wrench (A) from the
holder (B), and take out the wrench.
For emergencies
6-10 OKTE14E2
6
Page 269 of 362
Remove the securing band (C), and then take
out the tools (D).
3. Remove the securing nut (E), and then take
out the jack (F).
4. Remove the jack handle (G) from the holder
(H), and take out the handle.
5. Reverse the removing procedure when stor-
ing the tool, jack and jack handle.
NOTE l When stowing the jack handle, align the black-
marked part (I) of the jack handle with the
holder (H).
Vehicles with rear retractable power window
The tools, jack, and jack handle are located behind
the rear seat.
1. Tip forward the seatback of the rear seat. (Refer to “Folding the seatback forward” on
page 2-07.)
2. Remove the wheel nut wrench (A) from the
holder of the back panel (B), and take out the
wrench.
Take out the tools (C) from the rear back
trim (D).
3. Remove the securing nut (E), and then take
out the jack (F).
For emergencies
6-11
OKTE14E2
6
Page 270 of 362
4.Remove the jack handle (G) from the holder
of the back panel (H), and take out the handle.
5. Reverse the removing procedure when stor-
ing the tool, jack and jack handle.
NOTE l When stowing the wheel nut wrench, insert it
into the holder on the back panel as illustrated.
To use the jack handle (Club cab, Dou-
ble cab with rear retractable power
window only) E00802400124
1. While pressing the snap pin (A) on the han-
dle that has a black marking, withdraw and re-
move the inner handle (B).
2. Reverse the inner handle (B) then, while press-
ing the snap pin (C), insert it into the outer
handle (D) until it is locked by snap pin as il-
lustrated.
3. While pressing the snap pin (F) on the assem-
bled handle (E), insert the white-marked han-
dle (G) until it is locked by snap pin as illus-
trated.
For emergencies
6-12 OKTE14E2
6
Page 271 of 362

Jacking up the vehicleE00801001436
1. Park the vehicle on level and stable ground.
2. Set the parking brake firmly.
3. On vehicles with manual transmission, turn
the ignition key to the “LOCK” position,
move the gearshift lever to the “R” (Reverse)
position.
On vehicles with automatic transmission,
move the selector lever to the “P” (PARK) po-
sition, turn the ignition key to the “LOCK”
position.
4. Turn on the hazard warning flashers and set
up a warning triangle, flashing signal lamp,
etc., at an adequate distance from the vehi-
cle, and have all your passengers leave the ve-
hicle.
5. To prevent the vehicle from rolling when it
is raised on the jack, place chocks or blocks
(A) at the tyre that is diagonally opposite
from the tyre (B) you are changing.WARNINGl Be sure to apply chocks or blocks to the
correct tyre when jacking up the vehicle.
If the vehicle moves while jacked up, the
jack could slip out of position, leading to
an accident.
NOTE
l The chocks shown in the illustration do not
come with your vehicle. It is recommended
that you keep one in the vehicle for use if nee-
ded.
l If chocks are not available, use stones or any
other objects that are large enough to hold
the wheel in position.
6. Get the spare wheel, jack and jack handle
ready.
7. Place the jack under one of the jacking
points shown in the illustration. Use the jack-
ing point closest to the tyre you wish to
change.
2WD vehicles with 15 inch wheelsC-Front jacking point (2WD vehicles with 15
inch wheels)
2WD vehicles with 16 inch wheels and 4WD ve-
hicles
D-Front jacking point (2WD vehicles 16 inch
wheels and 4WD vehicles)
For emergencies
6-13
OKTE14E2
6
Page 272 of 362

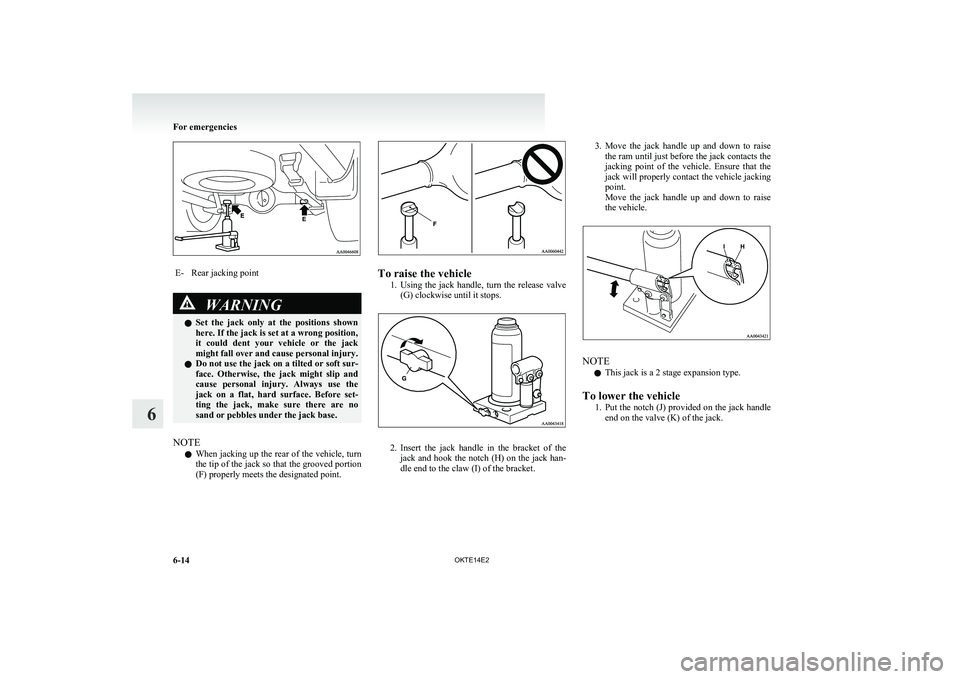
E-Rear jacking pointWARNINGlSet the jack only at the positions shown
here. If the jack is set at a wrong position,
it could dent your vehicle or the jack
might fall over and cause personal injury.
l Do not use the jack on a tilted or soft sur-
face. Otherwise, the jack might slip and
cause personal injury. Always use the
jack on a flat, hard surface. Before set-
ting the jack, make sure there are no
sand or pebbles under the jack base.
NOTE
l When jacking up the rear of the vehicle, turn
the tip of the jack so that the grooved portion
(F) properly meets the designated point.
To raise the vehicle
1.Using the jack handle, turn the release valve
(G) clockwise until it stops.
2. Insert the jack handle in the bracket of the
jack and hook the notch (H) on the jack han-
dle end to the claw (I) of the bracket.
3. Move the jack handle up and down to raise
the ram until just before the jack contacts the
jacking point of the vehicle. Ensure that the
jack will properly contact the vehicle jacking
point.
Move the jack handle up and down to raise
the vehicle.
NOTE
l This jack is a 2 stage expansion type.
To lower the vehicle 1.Put the notch (J) provided on the jack handle
end on the valve (K) of the jack.
For emergencies
6-14 OKTE14E2
6