2014 MERCEDES-BENZ S-Class Turn signal
[x] Cancel search: Turn signalPage 244 of 434
Due to the nature of the system:
R
warnings may be issued in error when
driving close to crash barriers or similar
solid lane borders.
R warnings may be interrupted when driving
alongside particularly long vehicles, e.g.
trucks, for a prolonged time.
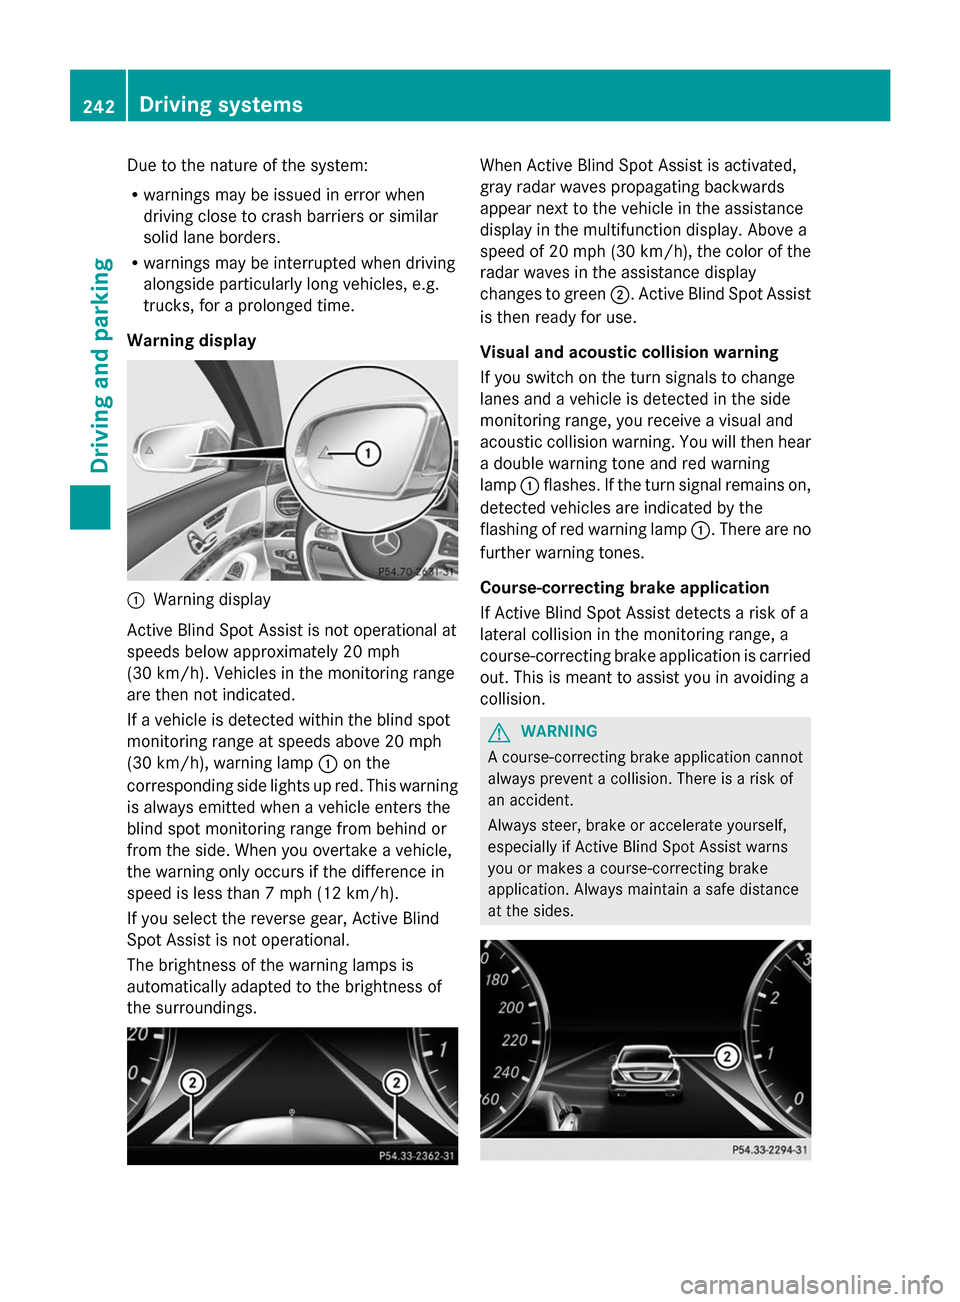
Warning display 0043
Warning display
Active Blind Spot Assist is not operational at
speeds below approximately 20 mph
(30 km/h). Vehicles in the monitoring range
are then not indicated.
If a vehicle is detected within the blind spot
monitoring range at speeds above 20 mph
(30 km/h), warning lamp 0043on the
corresponding side lights up red. This warning
is always emitted when a vehicle enters the
blind spot monitoring range from behind or
from the side. When you overtake a vehicle,
the warning only occurs if the difference in
speed is less than 7 mph (12 km/h).
If you select the reverse gear, Active Blind
Spot Assist is not operational.
The brightness of the warning lamps is
automatically adapted to the brightness of
the surroundings. When Active Blind Spot Assist is activated,
gray radar waves propagating backwards
appear next to the vehicle in the assistance
display in the multifunction display. Above a
speed of 20 mph (30 km/h), the color of the
radar waves in the assistance display
changes to green 0044. Active Blind Spot Assist
is then ready for use.
Visual and acoustic collision warning
If you switch on the turn signals to change
lanes and a vehicle is detected in the side
monitoring range, you receive a visual and
acoustic collision warning. You will then hear
a double warning tone and red warning
lamp 0043flashes. If the turn signal remains on,
detected vehicles are indicated by the
flashing of red warning lamp 0043. There are no
further warning tones.
Course-correcting brake application
If Active Blind Spot Assist detects a risk of a
lateral collision in the monitoring range, a
course-correcting brake application is carried
out. This is meant to assist you in avoiding a
collision. G
WARNING
A course-correcting brake application cannot
always prevent a collision. There is a risk of
an accident.
Always steer, brake or accelerate yourself,
especially if Active Blind Spot Assist warns
you or makes a course-correcting brake
application. Always maintain a safe distance
at the sides. 242
Driving systemsDriving an
d parking
Page 247 of 434
In addition, a lane with lane markings on both
sides must be recognized.
In the case of a broken lane marking being
detected, a lane-correcting brake application
can only be made if a vehicle has been
detected in the adjacent lane. Oncoming
vehicles, overtaking vehicles and vehicles in
adjacent lanes can be detected.
i A further lane-correcting brake
application can only occur after your
vehicle has returned to the original lane.
No lane-correcting brake application occurs
if:
R you clearly and actively steer, brake or
accelerate.
R you cut the corner on a sharp bend.
R you have switched on the turn signal.
R a driving safety system intervenes, e.g.
ESP ®
, PRE-SAFE ®
Brake or Active Blind
Spot Assist.
R you have adopted a sporty driving style with
high cornering speeds or high rates of
acceleration.
R ESP ®
is switched off.
R the transmission is not in position D.
R a loss of tire pressure or a defective tire has
been detected and displayed.
R an obstacle in the lane in which you are
driving has been detected.
Active Lane Keeping Assist may not detect
other road users or traffic situations. An
inappropriate brake application may be
interrupted at any time if you:
R steer slightly in the opposite direction
R switch on the turn signal
R clearly brake or accelerate
A lane-correcting brake application is
interrupted automatically if:
R a driving safety system intervenes, e.g.
ESP ®
, PRE-SAFE ®
Brake or Active Blind
Spot Assist.
R lane markings can no longer be recognized. Switching on Active Lane Keeping Assist
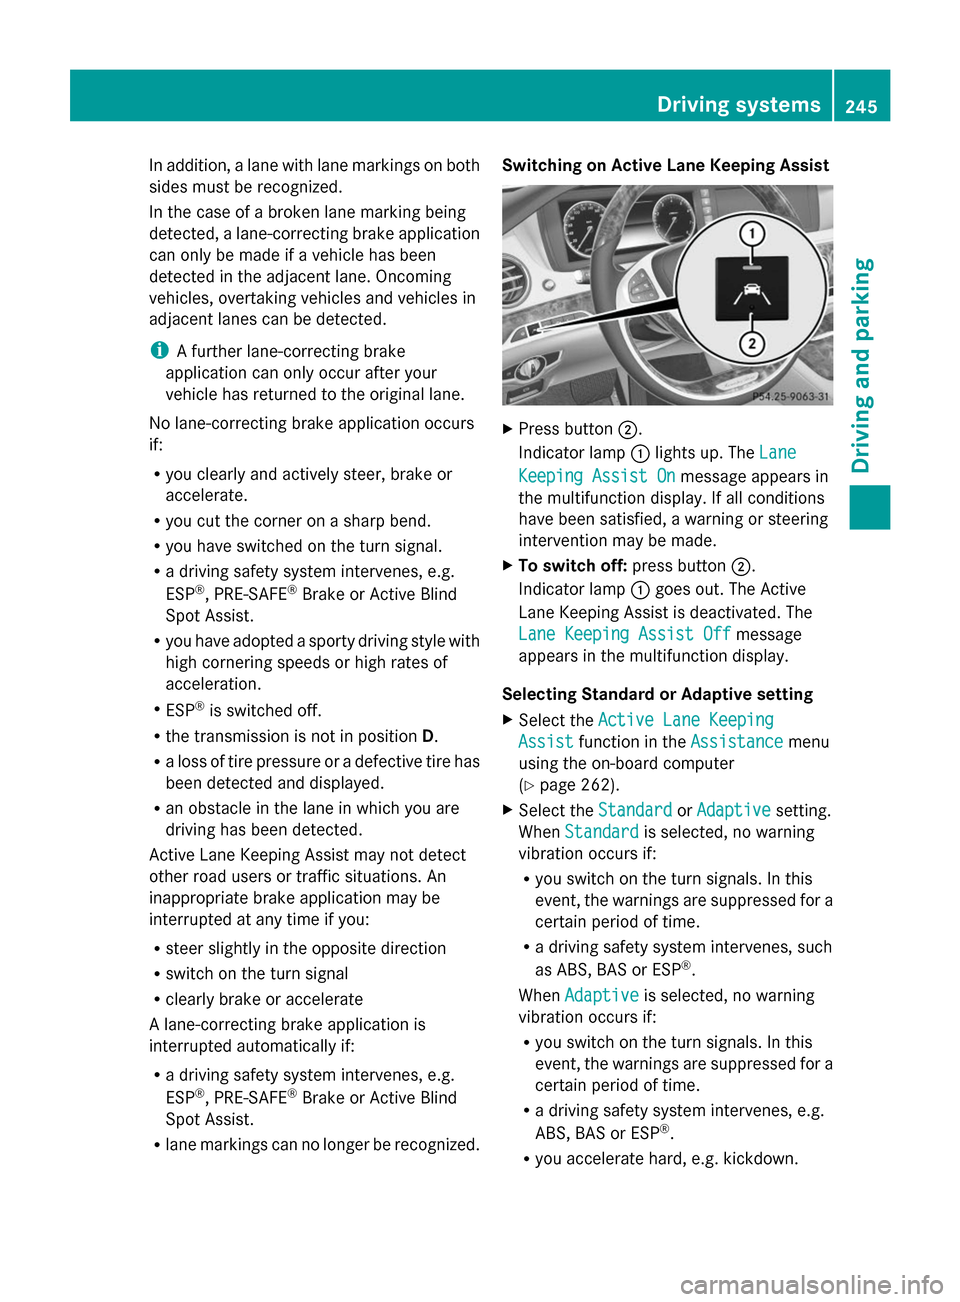
X
Press button 0044.
Indicator lamp 0043lights up. The Lane Lane
Keeping Assist On
Keeping Assist On message appears in
the multifunction display. If all conditions
have been satisfied, a warning or steering
intervention may be made.
X To switch off: press button0044.
Indicator lamp 0043goes out. The Active
Lane Keeping Assist is deactivated. The
Lane Keeping Assist Off Lane Keeping Assist Off message
appears in the multifunction display.
Selecting Standard or Adaptive setting
X Select the Active Lane Keeping Active Lane Keeping
Assist
Assist function in the Assistance
Assistancemenu
using the on-board computer
(Y page 262).
X Select the Standard StandardorAdaptive
Adaptive setting.
When Standard
Standard is selected, no warning
vibration occurs if:
R you switch on the turn signals. In this
event, the warnings are suppressed for a
certain period of time.
R a driving safety system intervenes, such
as ABS, BAS or ESP ®
.
When Adaptive Adaptive is selected, no warning
vibration occurs if:
R you switch on the turn signals. In this
event, the warnings are suppressed for a
certain period of time.
R a driving safety system intervenes, e.g.
ABS, BAS or ESP ®
.
R you accelerate hard, e.g. kickdown. Driving systems
245Driving and parking Z
Page 252 of 434

0063 R
Mute 00E3
Switches on the Voice Control
System; see the separate
operating instructions
Multifunction display
0043
Upper status bar with the following
possible displays and indicator lamps:
outside temperature (Y page 248)
003E Turn signal, left (Y page 140)
0058 Low-beam headlamps (Y page 139)
0057 High-beam headlamps (Y page 140)
0060 Parking lamps and license plate lamp
(Ypage 139)
003D Turn signal, right (Y page 140)
0044 Display
0087 Lower status bar with the following
possible displays:
Digital speed
00A7 ECO start/stop function (Y page 175)
00D9 HOLD function (Y page 212)
005D Active Parking Assist (Y page 221)
00CE Adaptive Highbeam Assist
(Ypage 142)
00CE Adaptive Highbeam Assist Plus
(Ypage 143)
004F DISTRONIC PLUS Steering Assist
(Ypage 210)
Additional speedometer (Y page 263)X
To call up the menu list in display
panel 0044:press the 00E2button on the
steering wheel.
Display panel 0044shows the selected menu
or submenu and display messages. Menus and submenus
Menu overview
Press the 00E2button on the steering wheel
to call up the list of menus and select a menu.
Operating the on-board computer
(Y page 249).
Depending on the equipment installed in the
vehicle, you can call up the following menus:
R Trip
Trip menu (Y page 250)
R Navi Navi menu (navigation instructions)
(Y page 252)
R Radio
Radio menu (Y page 254)
R Media
Media menu (Y page 255)
R Telephone
Telephone menu (Ypage 257)
R Assistance Info Display
Assistance Info Display menu
(Y page 258)
R Service
Service menu (Ypage 259)
R Settings
Settings menu (Ypage 259)
R AMG
AMG menu in AMG vehicles (Y page 264) Trip menu
Standard display 250
Menus and submenusOn-board computer and displays
Page 282 of 434

Display messages Possible causes/consequences and
0050
0050Solutions X
Wait for a period of at least 60 seconds until the necessary
system checks have been completed.
X Make sure that the display messages do not appear in the
multifunction display.
If these conditions are fulfilled, the front-passenger seat can be
occupied again. Whether the PASSENGER AIR BAG OFF indicator
lamp remains lit or goes out depends on how OCS classifies the
occupant.
If the conditions are not fulfilled, the system is not operating
correctly.
X Visit a qualified specialist workshop immediately.
For further information about the Occupant Classification System,
see (Y page 51). Lights
i Display messages about LEDs:
This display message will only appear if all LEDs have failed. Display messages Possible causes/consequences and
0050 0050Solutions 0049
Check Left Check Left
Cornering Light Cornering Light
or
Check Right
Check Right
Cornering Light Cornering Light The left or right-hand cornering light is defective.
X
Visit a qualified specialist workshop. 0049
Check Left Low Check Left Low
Beam Beam
orCheck
Check
Right Low Beam
Right Low Beam The left or right-hand low-beam headlamp is defective.
X
Visit a qualified specialist workshop. 0049
Check Rear Left Check Rear Left
Turn Signal Turn Signal
or
Check Rear Right
Check Rear Right
Turn Signal Turn Signal The rear left-hand or rear right-hand turn signal is defective.
X
Visit a qualified specialist workshop. 280
Display
messagesOn-board computer and displays
Page 283 of 434
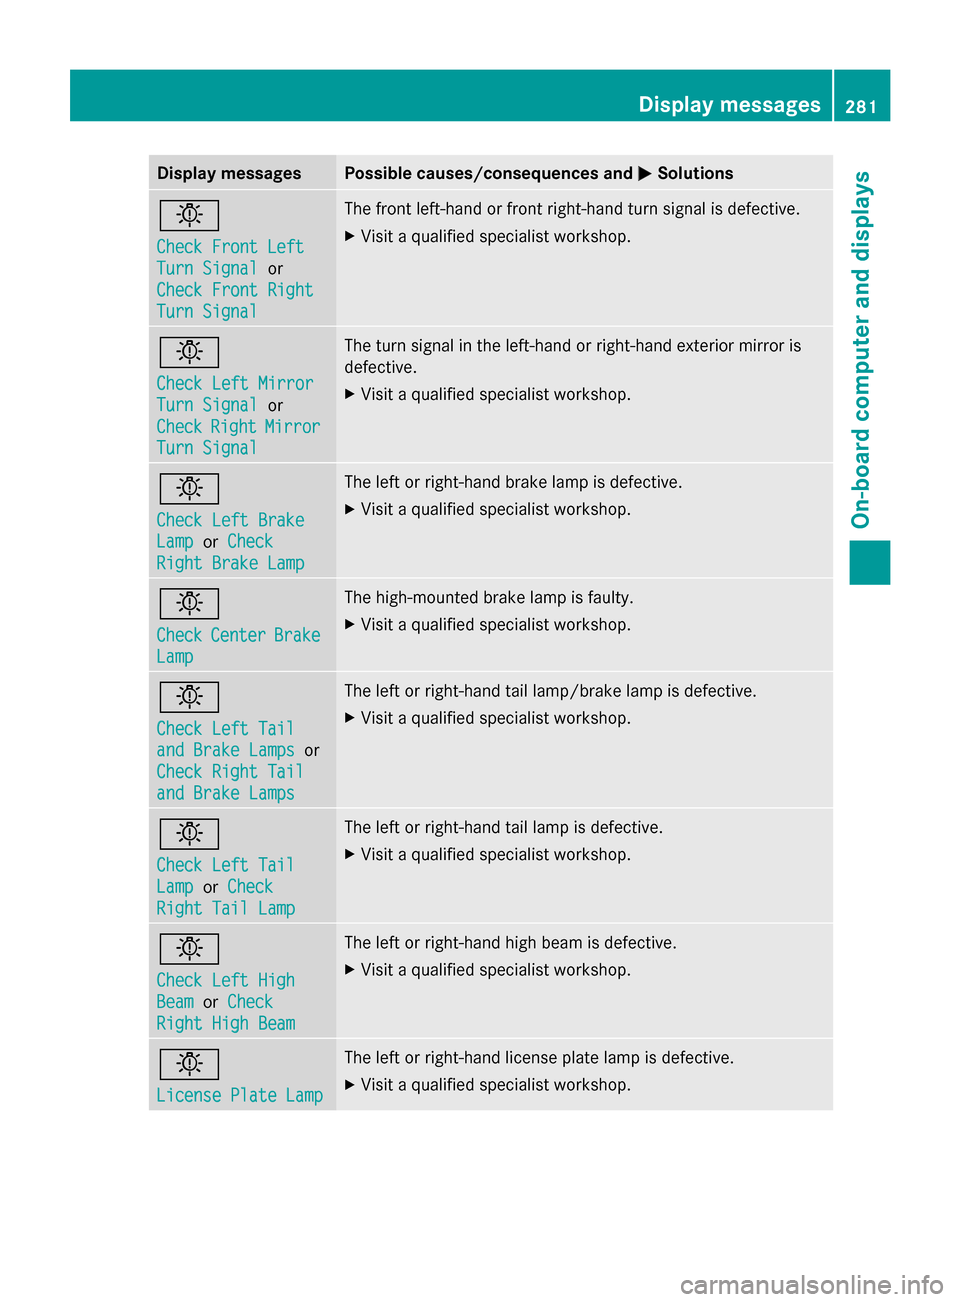
Display messages Possible causes/consequences and
0050
0050Solutions 0049
Check Front Left Check Front Left
Turn Signal Turn Signal
or
Check Front Right
Check Front Right
Turn Signal Turn Signal The front left-hand or front right-hand turn signal is defective.
X
Visit a qualified specialist workshop. 0049
Check Left Mirror Check Left Mirror
Turn Signal Turn Signal
or
Check
Check Right
Right Mirror
Mirror
Turn Signal
Turn Signal The turn signal in the left-hand or right-hand exterior mirror is
defective.
X
Visit a qualified specialist workshop. 0049
Check Left Brake Check Left Brake
Lamp Lamp
orCheck
Check
Right Brake Lamp
Right Brake Lamp The left or right-hand brake lamp is defective.
X
Visit a qualified specialist workshop. 0049
Check Check
Center
Center Brake
Brake
Lamp
Lamp The high-mounted brake lamp is faulty.
X
Visit a qualified specialist workshop. 0049
Check Left Tail Check Left Tail
and Brake Lamps and Brake Lamps
or
Check Right Tail
Check Right Tail
and Brake Lamps and Brake Lamps The left or right-hand tail lamp/brake lamp is defective.
X
Visit a qualified specialist workshop. 0049
Check Left Tail Check Left Tail
Lamp Lamp
orCheck
Check
Right Tail Lamp
Right Tail Lamp The left or right-hand tail lamp is defective.
X
Visit a qualified specialist workshop. 0049
Check Left High Check Left High
Beam Beam
orCheck
Check
Right High Beam
Right High Beam The left or right-hand high beam is defective.
X
Visit a qualified specialist workshop. 0049
License Plate Lamp License Plate Lamp The left or right-hand license plate lamp is defective.
X
Visit a qualified specialist workshop. Display
messages
281On-board computer and displays Z
Page 345 of 434
X
Turn the SmartKey to position 2in the
ignition lock (Y page 171).
X Get out of the vehicle.
X Press the programing button on the door
drive unit.
i Usually, you now have 30 seconds to
initiate the next step.
X Get into the vehicle.
X Press previously programed button 0044,0087
or 0085 of the integrated garage door opener
until the door closes.
The rolling code synchronization is then
complete.
Notes on programing the remote control
Canadian radio frequency laws require a
"break" (or interruption) of the transmission
signals after broadcasting for a few seconds.
Therefore, these signals may not last long
enough for the integrated garage door
opener. The signal is not recognized during
programing. Comparable with Canadian law,
some U.S. garage door openers also feature
a "break".
Proceed as follows:
R if you live in Canada
R if you have difficulties programing the
garage door opener (regardless of where
you live) when using the programing steps
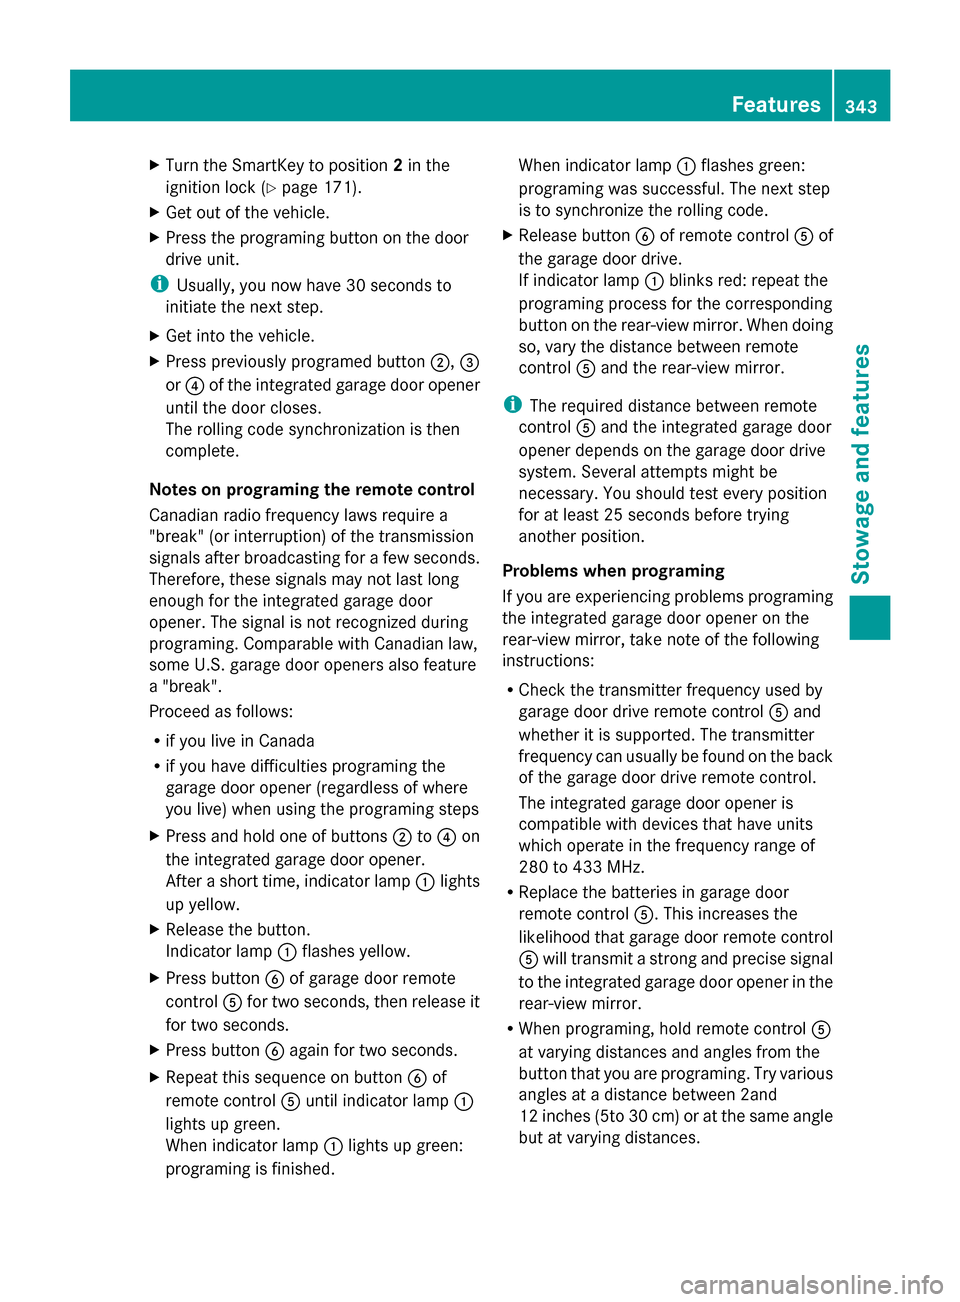
X Press and hold one of buttons 0044to0085 on
the integrated garage door opener.
After a short time, indicator lamp 0043lights
up yellow.
X Release the button.
Indicator lamp 0043flashes yellow.
X Press button 0084of garage door remote
control 0083for two seconds, then release it
for two seconds.
X Press button 0084again for two seconds.
X Repeat this sequence on button 0084of
remote control 0083until indicator lamp 0043
lights up green.
When indicator lamp 0043lights up green:
programing is finished. When indicator lamp
0043flashes green:
programing was successful. The next step
is to synchronize the rolling code.
X Release button 0084of remote control 0083of
the garage door drive.
If indicator lamp 0043blinks red: repeat the
programing process for the corresponding
button on the rear-view mirror. When doing
so, vary the distance between remote
control 0083and the rear-view mirror.
i The required distance between remote
control 0083and the integrated garage door
opener depends on the garage door drive
system. Several attempts might be
necessary. You should test every position
for at least 25 seconds before trying
another position.
Problems when programing
If you are experiencing problems programing
the integrated garage door opener on the
rear-view mirror, take note of the following
instructions:
R Check the transmitter frequency used by
garage door drive remote control 0083and
whether it is supported. The transmitter
frequency can usually be found on the back
of the garage door drive remote control.
The integrated garage door opener is
compatible with devices that have units
which operate in the frequency range of
280 to 433 MHz.
R Replace the batteries in garage door
remote control 0083. This increases the
likelihood that garage door remote control
0083 will transmit a strong and precise signal
to the integrated garage door opener in the
rear-view mirror.
R When programing, hold remote control 0083
at varying distances and angles from the
button that you are programing. Try various
angles at a distance between 2and
12 inches (5to 30 cm) or at the same angle
but at varying distances. Features
343Stowage and features Z
Page 346 of 434
R
If another remote control for the same
garage door drive is available, repeat the
same programing steps with this remote
control. Before performing these steps,
make sure that new batteries have been
installed in garage door drive remote
control 0083.
R Note that some remote controls only
transmit for a limited amount of time (the
indicator lamp on the remote control goes
out). Press button 0084on remote control
0083 again before transmission ends.
R Align the antenna cable of the garage door
opener unit. This can improve signal
reception/transmission.
Opening/closing the garage door After it has been programed, the integrated
garage door opener performs the function of
the garage door system remote control.
Please also read the operating instructions
for the garage door system.
X Turn the SmartKey to position 2in the
ignition lock (Y page 171).
X Press button 0044,0087or0085 which you have
programed to operate the garage door.
Garage door system with a fixed code:
indicator lamp 0043lights up green.
Garage door system with a rolling code:
indicator lamp 0043flashes green.
i The transmitter will transmit a signal as
long as the button is pressed. The
transmission is halted after a maximum of
ten seconds and indicator lamp 0043lights
up yellow. Press button 0044,0087or0085 again
if necessary.
Clearing the memory Make sure that you clear the memory of the
integrated garage door opener before selling
the vehicle. X
Turn the SmartKey to position 2in the
ignition lock (Y page 171).
X Press and hold buttons 0044and 0085.
The indicator lamp initially lights up yellow
and then green.
X Release buttons 0044and 0085.
The memory of the integrated garage door
opener in the rear-view mirror is cleared. Floormats
G
WARNING
Objects in the driver's footwell can restrict the
pedal travel or obstruct a depressed pedal.
The operating and road safety of the vehicle
is jeopardized. There is a risk of an accident.
Make sure that all objects in the vehicle are
stowed correctly, and that they cannot enter
the driver's footwell. Install the floormats
securely and as specified in order to ensure
sufficient clearance for the pedals. Do not use
loose floormats and do not place floormats on
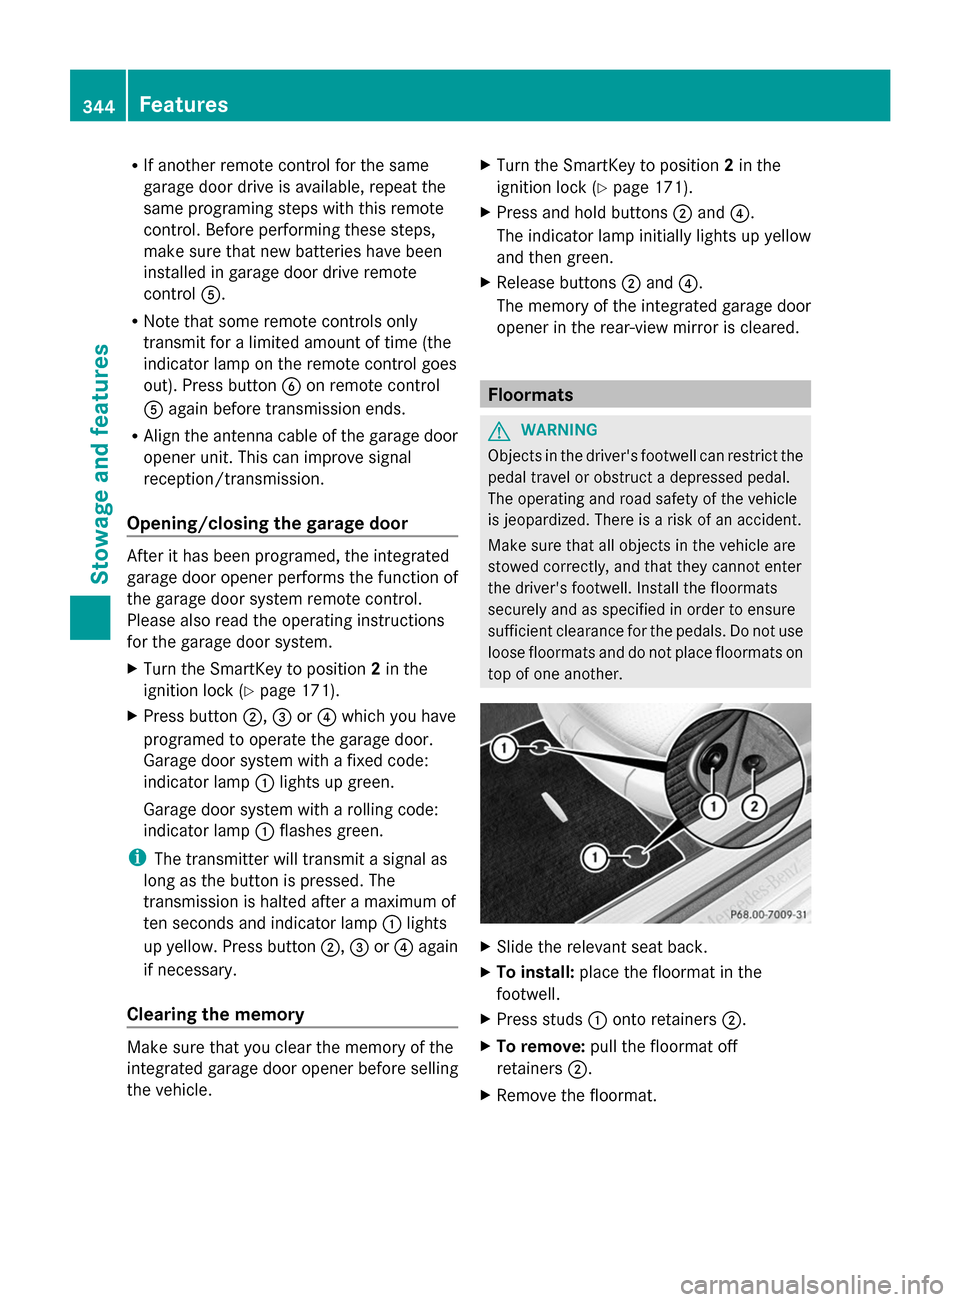
top of one another. X
Slide the relevant seat back.
X To install: place the floormat in the
footwell.
X Press studs 0043onto retainers 0044.
X To remove: pull the floormat off
retainers 0044.
X Remove the floormat. 344
FeaturesStowage and features
Page 359 of 434

after having cleaned the wheels with wheel
cleaner. Wheel cleaners could cause
increased corrosion of the brake discs and
brake pads/linings. For this reason, you
should drive for a few minutes after
cleaning. Braking heats the brake discs and
the brake pads/linings, thus drying them.
The vehicle can then be parked.
Cleaning the windows G
WARNING
You could become trapped by the windshield
wipers if they start moving while cleaning the
windshield or wiper blades. There is a risk of
injury.
Always switch off the windshield wipers and
the ignition before cleaning the windshield or
wiper blades.
! Do not use dry cloths, abrasive products,
solvents or cleaning agents containing
solvents to clean the inside of the windows.
Do not touch the insides of the windows
with hard objects, e.g. an ice scraper or
ring. There is otherwise a risk of damaging
the windows.
! Clean the water drainage channels of the
windshield and the rear window at regular
intervals. Deposits such as leaves, petals
and pollen may under certain
circumstances prevent water from draining
away. This can lead to corrosion damage
and damage to electronic components.
X Clean the inside and outside of the
windows with a damp cloth and a cleaning
product that is recommended and
approved by Mercedes-Benz.
Cleaning wiper blades G
WARNING
You could become trapped by the windshield
wipers if they start moving while cleaning the
windshield or wiper blades. There is a risk of
injury. Always switch off the windshield wipers and
the ignition before cleaning the windshield or
wiper blades.
! Do not pull the wiper blade. Otherwise,
the wiper blade could be damaged.
! Do not clean wiper blades too often and
do not rub them too hard. Otherwise, the
graphite coating could be damaged. This
could cause wiper noise.
! Hold the wiper arm securely when folding
back. The windshield could be damaged if
the wiper arm smacks against it suddenly.
X Fold the windshield wiper arms away from
the windshield.
X Carefully clean the wiper blades with a
damp cloth.
X Fold the windshield wiper arms back again
before switching on the ignition.
Cleaning the exterior lighting !
Only use cleaning agents or cleaning
cloths which are suitable for plastic light
lenses. Unsuitable cleaning agents or
cleaning cloths could scratch or damage
the plastic light lenses.
X Clean the plastic lenses of the exterior
lights with a wet sponge and a mild cleaning
agent, e.g. Mercedes-Benz car shampoo or
cleaning cloths.
Mirror turn signals !
Only use cleaning agents or cleaning
cloths that are suitable for plastic lenses.
Unsuitable cleaning agents or cleaning
cloths could scratch or damage the plastic
lenses of the mirror turn signals.
X Clean the plastic lenses of the mirror turn
signals in the exterior mirror housing using
a wet sponge and mild cleaning agent, e.g.
Mercedes-Benz car shampoo or cleaning
cloths. Care
357Maintenance and care Z