2014 MERCEDES-BENZ S-Class lock
[x] Cancel search: lockPage 190 of 434
If you or others come into contact with fuel,
observe the following:
R Wash away fuel from skin immediately
using soap and water.
R If fuel comes into contact with your eyes,
immediately rinse them thoroughly with
clean water. Seek medical assistance
without delay.
R If fuel is swallowed, seek medical
assistance without delay. Do not induce
vomiting.
R Immediately change out of clothing which
has come into contact with fuel. G
WARNING
Electrostatic buildup can create sparks and
ignite fuel vapors. There is a risk of fire and
explosion.
Always touch the vehicle body before opening
the fuel filler flap or touching the fuel pump
nozzle. Any existing electrostatic buildup is
thereby discharged.
Do not get into the vehicle again during the
refueling process. Otherwise, electrostatic
charge could build up again.
! Do not use diesel to refuel vehicles with a
gasoline engine. Do not switch on the
ignition if you accidentally refuel with the
wrong fuel. Otherwise, the fuel will enter
the fuel system. Even small amounts of the
wrong fuel could result in damage to the
fuel system and the engine. Notify a
qualified specialist workshop and have the
fuel tank and fuel lines drained completely.
! Overfilling the fuel tank could damage the
fuel system.
! Take care not to spill any fuel on painted
surfaces. You could otherwise damage the
paintwork.
! Use a filter when refueling from a fuel can.
Otherwise, the fuel lines and/or injection
system could be blocked by particles from
the fuel can. If you overfill the fuel tank, fuel could spray
out when the fuel pump nozzle is removed.
For further information on fuel and fuel quality
(Y page 423). Refueling
General information Pay attention to the important safety notes
(Y
page 187).
If you unlock/lock the vehicle from the
outside, the fuel filler flap also unlocks/locks.
The position of the fuel filler cap is shown in
the instrument cluster 00B6. The arrow next
to the filling pump indicates the side of the
vehicle.
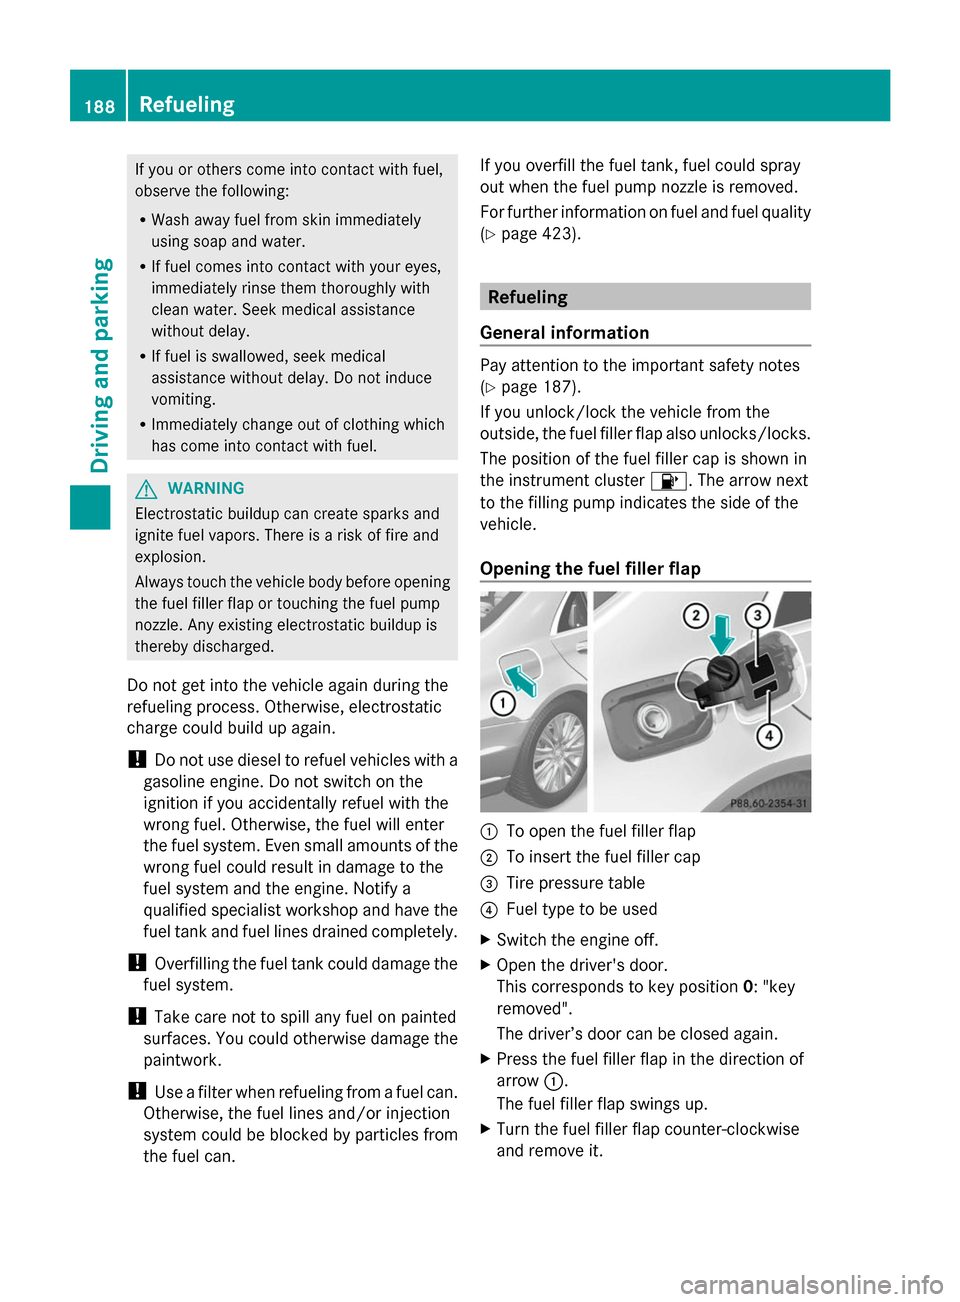
Opening the fuel filler flap 0043
To open the fuel filler flap
0044 To insert the fuel filler cap
0087 Tire pressure table
0085 Fuel type to be used
X Switch the engine off.
X Open the driver's door.
This corresponds to key position 0: "key
removed".
The driver’s door can be closed again.
X Press the fuel filler flap in the direction of
arrow 0043.
The fuel filler flap swings up.
X Turn the fuel filler flap counter-clockwise
and remove it. 188
RefuelingDriving and parking
Page 191 of 434
X
Insert the fuel filler cap into the holder on
the inside of filler flap 0044.
X Completely insert the filler neck of the fuel
pump nozzle into the tank, hook in place
and refuel.
X Only fill the tank until the pump nozzle
switches off.
i Do not add any more fuel after the pump
stops filling for the first time. Otherwise,
fuel may leak out.
Closing the fuel filler flap X
Replace the cap on the filler neck and turn
clockwise until it engages audibly.
X Close the fuel filler flap.
i Close the fuel filler flap before locking the
vehicle.
i If you are driving with the fuel filler cap
open, the 00B6reserve fuel warning lamp
flashes. A message appears in the
multifunction display (Y page 286).
In addition, the 00B9Check Engine warning
lamp may light up (Y page 308).
For further information on warning and
indicator lamps in the instrument cluster,
see (Y page 308). Refueling
189Driving and parking Z
Page 192 of 434
Problems with fuel and the fuel tank
Problem Possible causes/consequences and
0050
0050Solutions Fuel is leaking from the
vehicle.
G
WARNING
The fuel line or the fuel tank is faulty.
Risk of explosion or fire.
X Apply the electric parking brake.
X Shift the transmission to position P.
X Press the Start/Stop button.
The engine stops and all the indicator lamps in the instrument
cluster go out.
i When the driver's door is open, this corresponds to key
position 0: "Key removed".
X Do not restart the engine under any circumstances.
X Consult a qualified specialist workshop. The fuel filler flap
cannot be opened. The fuel filler flap is not unlocked.
or
The SmartKey battery is discharged.
X
Unlock the vehicle (Y page 85).
or
X Unlock the vehicle using the mechanical key (Y page 86).The fuel filler flap is unlocked, but the opening mechanism is
jammed.
X
Consult a qualified specialist workshop. Parking
Important safety notes
G
WARNING
Flammable material such as leaves, grass or
twigs may ignite if they come into contact with
hot parts of the exhaust system or exhaust
gas flow. There is a risk of fire.
Park the vehicle so that no flammable
materials come into contact with parts of the
vehicle which are hot. Take particular care not
to park on dry grassland or harvested grain
fields. G
WARNING
If you leave children unsupervised in the
vehicle, they could set it in motion by, for
example:
R release the parking brake.
R shift the automatic transmission out of the
parking position P.
R start the engine.
In addition, they may operate vehicle
equipment and become trapped. There is a
risk of an accident and injury.
When leaving the vehicle, always take the
SmartKey with you and lock the vehicle. Never
leave children unsupervised in the vehicle. 190
ParkingDriving and parking
Page 193 of 434
!
Always secure the vehicle correctly
against rolling away. Otherwise, the vehicle
or its drivetrain could be damaged.
To ensure that the vehicle is secured against
rolling away unintentionally:
R the electric parking brake must be applied.
R the transmission must be in position Pand
the SmartKey must be removed from the
ignition lock.
R the front wheels must be turned towards
the curb on steep uphill or downhill
gradients.
R the empty vehicle must be secured at the
front axle with a wheel chock or similar, for
example, on uphill or downhill gradients.
R a laden vehicle must also be secured at the
rear axle with a wheel chock or similar, for
example, on uphill or downhill gradients. Switching off the engine
Important safety notes G
WARNING
The automatic transmission switches to
neutral position Nwhen you switch off the
engine. The vehicle may roll away. There is a
risk of an accident.
After switching off the engine, always switch
to parking position P. Prevent the parked
vehicle from rolling away by applying the
parking brake.
i If the engine cannot be switched off as
described here, see "Emergency engine
cutoff" (Y page 381).
Using the SmartKey X
Apply the electric parking brake.
X Shift the transmission to position P.
X Turn the SmartKey to position 0in the
ignition lock and remove it.
The immobilizer is activated. i
If you turn off the engine with the
SmartKey and then remove it from the
ignition lock or open a front door, the
automatic transmission shifts to P
automatically.
With the Start/Stop button X
Apply the electric parking brake.
X Shift the transmission to position P.
X Press the Start/Stop button (Y page 171).
The engine stops and all the indicator
lamps in the instrument cluster go out.
i When the driver's door is closed, this
corresponds to key position 1. When the
driver's door is open, this corresponds to
key position 0: "Key removed".
i If you turn off the engine with the Start/
Stop button, the automatic transmission
shifts to N. If you then open one of the front
doors, the automatic transmission shifts to
P.
If you drive through a car wash with a
conveyor, you can:
R switch on the ignition using the Start/
Stop button and shift the transmission to
N
R insert the SmartKey into the ignition
lock, switch on the ignition and shift the
transmission to N
i In the event of an emergency, the engine
can be turned off while the vehicle is in
motion by pressing and holding the Start/
Stop button for three seconds. This
function operates independently of the
ECO start/stop automatic engine switch-
off function. Parking
191Driving and parking Z
Page 194 of 434
Electric parking brake
General notes G
WARNING
If you leave children unsupervised in the
vehicle, they could set it in motion by, for
example:
R release the parking brake.
R shift the automatic transmission out of the
parking position P.
R start the engine.
In addition, they may operate vehicle
equipment and become trapped. There is a
risk of an accident and injury.
When leaving the vehicle, always take the
SmartKey with you and lock the vehicle. Never
leave children unsupervised in the vehicle.
The function of the electric parking brake is
dependent on the on-board voltage. If the on-
board voltage is low or there is a malfunction
in the system, it may not be possible to apply
the released parking brake.
X If this is the case, only park the vehicle on
level ground and secure it to prevent it
rolling away.
X Shift the automatic transmission to
position P.
It may not be possible to release an applied
parking brake, if the on-board voltage is low
or there is a malfunction in the system.
Contact a qualified specialist workshop.
i The electric parking brake performs a
function test at regular intervals while the
engine is switched off. The sounds that can
be heard while this is occurring are normal. Applying/releasing manually X
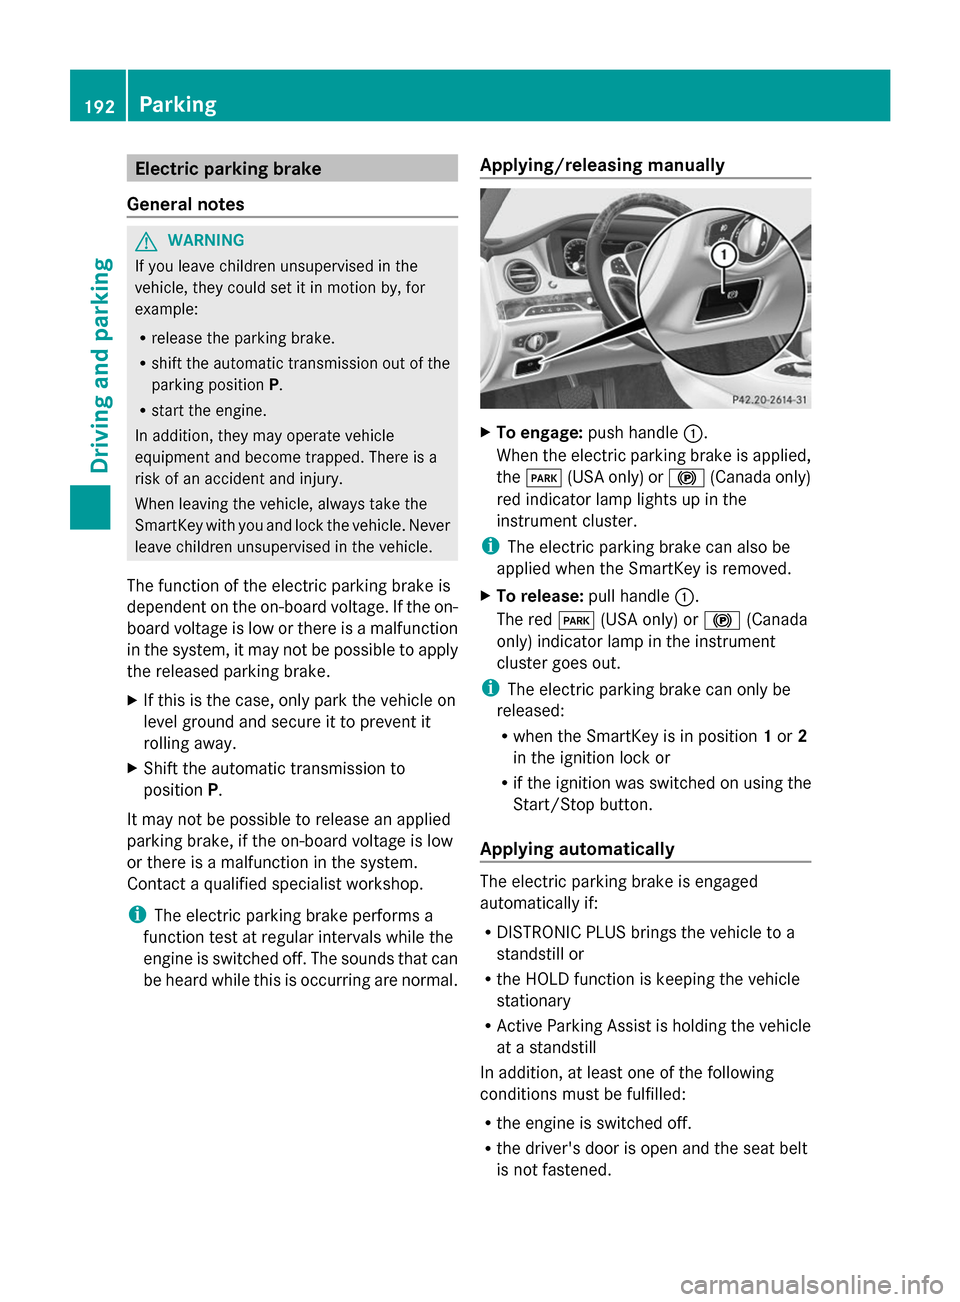
To engage: push handle 0043.
When the electric parking brake is applied,
the 0049 (USA only) or 0024(Canada only)
red indicator lamp lights up in the
instrument cluster.
i The electric parking brake can also be
applied when the SmartKey is removed.
X To release: pull handle0043.
The red 0049(USA only) or 0024(Canada
only) indicator lamp in the instrument
cluster goes out.
i The electric parking brake can only be
released:
R when the SmartKey is in position 1or 2
in the ignition lock or
R if the ignition was switched on using the
Start/Stop button.
Applying automatically The electric parking brake is engaged
automatically if:
R
DISTRONIC PLUS brings the vehicle to a
standstill or
R the HOLD function is keeping the vehicle
stationary
R Active Parking Assist is holding the vehicle
at a standstill
In addition, at least one of the following
conditions must be fulfilled:
R the engine is switched off.
R the driver's door is open and the seat belt
is not fastened. 192
ParkingDriving and parking
Page 199 of 434
!
Vehicles with 4MATIC: function or
performance tests may only be carried out
on a 2-axle dynamometer. If you wish to
operate the vehicle on such a
dynamometer, please consult an
authorized Mercedes-Benz Center in
advance. You could otherwise damage the
drive train or the brake system.
! Vehicles with 4MATIC: the ESP®
system
operates automatically. The engine and the
ignition must therefore be switched off (the
SmartKey must be in position 0or 1in the
ignition lock or the Start/Stop button must
be in position 0or 1) if the electric parking
brake is tested on a brake dynamometer.
Braking triggered automatically by ESP ®
may cause severe damage to the brake
system.
! Vehicles without 4MATIC: the ESP®
system operates automatically. The engine
and the ignition must therefore be switched
off (the SmartKey must be in position 0or
1 in the ignition lock or the Start/Stop
button must be in position 0or 1) if:
R the electric parking brake is tested using
a brake dynamometer.
R the vehicle is towed with one axle raised.
Braking triggered automatically by ESP ®
may cause severe damage to the brake
system.
All checks and maintenance work on the
brake system must be carried out at a
qualified specialist workshop. Consult a
qualified specialist workshop to arrange this.
Have brake pads installed and brake fluid
replaced at a qualified specialist workshop.
If the brake system has only been subject to
moderate loads, you should test the
functionality of your brakes at regular
intervals.
Information on BAS (Brake Assist)
(Y page 71) and BAS PLUS (Brake Assist
PLUS) (Y page 72). For safety reasons, Mercedes-Benz
recommends only installing the following
brake disks and brake pads/linings:
R
brake disks that have been approved by
Mercedes-Benz
R brake pads/linings that have been
approved by Mercedes-Benz or that are of
an equivalent standard of quality
Other brake disks or brake pads/linings can
compromise the safety of your vehicle.
Always replace all brake disks and brake
pads/linings on an axle at the same time.
Always install new brake pads/linings when
replacing brake disks.
The vehicle is equipped with lightweight
brake disks to which the wheel assembly with
rim and threaded connection is matched.
The use of brake disks other than those
approved by Mercedes-Benz can change the
track width and is subject to approval, if
applicable.
Shock-type loads when handling the brake
disks, such as when changing wheels, can
lead to a reduction in comfort when driving
with lightweight brake disks. Avoid shock-
type loads on the lightweight brake disks,
particularly on the brake plate.
Mercedes-Benz recommends that you only
use brake fluid that has been specially
approved for your vehicle by Mercedes-Benz,
or which corresponds to an equivalent quality
standard. Brake fluid which has not been
approved for Mercedes-Benz vehicles or
which is not of an equivalent quality could
affect your vehicle's operating safety.
AMG high-performance and ceramic
brakes The high-performance brake system is only
installed on the S 63 AMG 4MATIC. Driving tips
197Driving and parking Z
Page 200 of 434
The AMG brake systems are designed for
heavy loads. This may lead to noise when
braking. This will depend on:
R Speed
R Braking force
R Environmental conditions, such as
temperature and humidity
The wear of individual components of the
brake system, such as the brake pads/linings
or brake discs, depends on the individual
driving style and operating conditions.
For this reason, it is impossible to state a
mileage that will be valid under all
circumstances. An aggressive driving style
will lead to high wear. You can obtain further
information about this from your authorized
Mercedes-Benz Center.
New and replaced brake pads and discs only
reach their optimum braking effect after
several hundred kilometers of driving.
Compensate for this by applying greater force
to the brake pedal. Keep this in mind, and
adapt your driving and braking accordingly
during this break-in period.
Excessive heavy braking results in
correspondingly high brake wear. Observe
the brake wear warning lamp in the
instrument cluster and note any brake status
messages in the multifunction display.
Especially for high performance driving, it is
important to maintain and have the brake
system checked regularly. Driving on wet roads
Hydroplaning If water has accumulated to a certain depth
on the road surface, there is a danger of
hydroplaning occurring, even if:
R you drive at low speeds.
R the tires have adequate tread depth. For this reason, in the event of heavy rain or
in conditions in which hydroplaning may
occur, you must drive in the following
manner:
R lower your speed.
R avoid ruts.
R brake carefully.
Driving on flooded roads !
Do not drive through flooded areas.
Check the depth of any water before driving
through it. Drive slowly through standing
water. Otherwise, water may enter the
vehicle interior or the engine compartment.
This can damage the electronic
components in the engine or the automatic
transmission. Water can also be drawn in
by the engine's air suction nozzles and this
can cause engine damage. Winter driving
G
WARNING
If you shift down on a slippery road surface in
an attempt to increase the engine's braking
effect, the drive wheels could lose their grip.
There is an increased danger of skidding and
accidents.
Do not shift down for additional engine
braking on a slippery road surface. G
DANGER
If the exhaust pipe is blocked or adequate
ventilation is not possible, poisonous gases
such as carbon monoxide (CO) may enter the
vehicle. This is the case, e.g. if the vehicle
becomes trapped in snow. There is a risk of
fatal injury.
If you leave the engine or the auxiliary heating
running, make sure the exhaust pipe and area
around the vehicle are clear of snow. To
ensure an adequate supply of fresh air, open
a window on the side of the vehicle that is not
facing into the wind. 198
Driving tipsDriving and parking
Page 216 of 434

with the curb as the vehicle is lowered. Your
vehicle could otherwise be damaged.
Crosswind driving assistance The crosswind stabilization operates by
changing wheel loads through adjusting the
ABC spring struts. It reduces impairments in
handling when driving in a straight line and
assists during countersteering.
Crosswind driving assistance is active at
vehicle speeds above 50 mph (80 km/h)
when driving straight ahead or cornering
gently.
Active Body Control (ABC) Vehicle level
All vehicles except AMG vehicles:
depending on the vehicle level that has been
set, the vehicle automatically adjusts its
height dependent on the current speed. The
vehicle is lowered by up to 0.6 in (15 mm) as
the speed increases. As the speed is reduced,
the vehicle is raised up to the set vehicle
height.
AMG vehicles: depending on the vehicle
level that has been selected, the vehicle
automatically adjusts its height dependent on
the current speed. The vehicle is lowered by
up to 0.4 in (10 mm) below the normal level
as the speed increases. As the speed is
reduced, the vehicle is raised up to the set
vehicle height.
Select the "Normal" setting for normal road
surfaces and "Raised" for driving with snow
chains or on particularly poor road surfaces.
Your selection remains stored even if you
remove the SmartKey from the ignition lock. Setting the raised vehicle level
X
Start the engine.
X If indicator lamp 0044
0044 is not lit: press
button 0043.
All vehicles except AMG vehicles:
indicator lamp 0044lights up. The vehicle
height is adjusted to raised level.
AMG vehicles: indicator lamp0044lights up.
The vehicle is raised by 1.5 in (40 mm)
compared to the normal level. Setting the normal vehicle level
X
Start the engine.
X If indicator lamp 0044
0044 is lit: press
button 0043.
Indicator lamp 0044goes out. The vehicle is
adjusted to normal level.
Suspension tuning
The electronically controlled ABC suspension
system works continuously. This improves
driving safety and comfort. The system
detects the vehicle level and the vehicle load
and adjusts the setting accordingly. You can 214
Driving systemsDriving and parking