2014 MERCEDES-BENZ S-CLASS COUPE oil reset
[x] Cancel search: oil resetPage 20 of 413

Restraint system
Display messag e............................ 275
Introduction ..................................... 42
Warning lamp ................................. 306
Warning lamp (function) ................... 43
Rev counter ........................................ 242
Reversing camera
Cleaning instructions ..................... 347
Function/note s............................. 217
Switching on/of f........................... 218
Reversing feature
Side windows ................................... 99
Reversing function
Boot lid ............................................ 94
Roller sunblind ............................... 102
Reversing lamp (display message) .. 281
ROAD SURFACE SCAN ....................... 206
Roller sunblind
Panorama roof ............................... 102
Rear window .................................. 322
Roller sunblind of the panorama
roof
Opening and closing ...................... 103
Operating ....................................... 102
Resetting ....................................... 103
Roof lining and carpets (cleaning
instructions) ...................................... 351
Roof load (maximum) ........................ 408S
Safety Automatic front-passenger front
airbag deactivation system .............. 51
Child restraint systems .................... 61
Children in the vehicle ..................... 60
see Operating safety
Safety system
see Driving safety systems
Seat
Seat backrest display message ..... 297
Seat belt
Correct usage .................................. 45
Seat belts
Adjusting the driver's and front-
passenger seat belt ......................... 47
Cleaning ......................................... 351
Display message ............................ 274 Fastening ......................................... 46
Important safety guidelines ............. 44
Introduction ..................................... 44
Rear seat belt status indicator ......... 48
Releasing ......................................... 47
Warning lamp ................................. 300
Warning lamp (function) ................... 47
Seating
Seating comfort packag e............... 111
Seating comfort package ................. 111
Seats
Active multicontour seat ................ 111
Adjusting (electrically) ................... 108
Adjusting the 4-way lumbar sup-
port ................................................ 111
Adjusting the head restraint .......... 109
Cleaning the cover ......................... 350
Correct driver's seat position ........ 106
EASY-ENTRY/EXIT system ............. 116
Folding the backrests forward/
back ............................................... 110
Important safety notes .................. 107
Seat heating .................................. 111
Seat heating problem .................... 113
Seat ventilation .............................. 113
Seat ventilation problem ................ 114
Storing settings (memory func-
tion) ............................................... 120
Switching seat heating on/of f....... 111
Switching the seat ventilation on/ off .................................................. 113
Section
Wheels and tyres ........................... 376
Selector lever
Cleaning ......................................... 350
see Automatic transmission
Sensors (cleaning instructions) ....... 347
Service
see ASSYST PLUS
Service Centre
see Qualified specialist workshop
Service menu (on-board com-
puter) .................................................. 256
Service products
Brake fluid ..................................... 406
Coolant (engine) ............................ 406
Engine oil ....................................... 405
Fuel ................................................ 403 Index
17
Page 22 of 413

Stowage net ................................... 317
Stowage well beneath the boot
floor .................................................... 319
Summer tyres
In winter ........................................ 378
Sun visor ............................................ 321
Suspension tuning
Active Body Control ABC ............... 205
AIRMATIC ...................................... 208
SETUP (on-board computer) .......... 264
Switching the auxiliary heating/
ventilation
On/off ........................................... 149 T
Tail lamps Display message ............................ 280
see Lights
Technical data
Capacities ...................................... 402
Information .................................... 400
Tyres/wheels ................................. 391
Vehicle data ................................... 408
Telephone
Accepting a call (multifunction
steering wheel) .............................. 255
Display message ............................ 298
Introduction ................................... 254
Menu (on-board computer) ............ 254
Number from the phone book ........ 255
Redialling ....................................... 255
Rejecting/ending a call ................. 255
Telephone compartment ................ 316
Temperature
Coolant .......................................... 242
Engine oil (on-board computer) ...... 263
Outside temperature ...................... 243
Setting (climate control )................ 142
TEMPOMAT
Function/note s............................. 186
TIREFIT kit .......................................... 357
Top Tether ............................................ 62
Total distance recorder .................... 247
Tow-away protection
Activating ......................................... 81
Deactivating ..................................... 81
Function ........................................... 81 Tow-starting
Emergency engine starting ............ 370
Important safety notes .................. 367
Towing
Important safety notes .................. 367
Notes for 4MATIC vehicles ............ 370
With the rear axle raised ................ 369
Towing away
Fitting the towing ey e.................... 369
Removing the towing eye ............... 369
With both axles on the ground ....... 369
Towing eye ......................................... 355
Traffic Sign Assist
Activating ....................................... 228
Activating/deactivating the warn-ing function .................................... 258
Display message ............................ 289
Function/note s............................. 227
Important safety notes .................. 228
Instrument cluster display ............. 228
Transmission
see Automatic transmission
Transporting the vehicle .................. 370
Trim pieces (cleaning instruc-
tions) .................................................. 350
Trip computer (on-board com-
puter) .................................................. 248
Trip meter
Calling up ....................................... 247
Resetting (on-board computer) ...... 249
Turn signals
Switching on/of f........................... 126
TV
Operating (on-board computer) ..... 254
Two-way radio
Frequencies ................................... 400
Installation ..................................... 400
Transmission output (maximum) .... 400
Windscreen (infrared reflective) ..... 334
Type identification plate
see Vehicle identification plate
Tyre pressure
Calling up (on-board computer) ..... 381
Display message ............................ 293
Important safety notes .................. 381
Not reached (TIREFIT) .................... 359
Reached (TIREFIT) .......................... 359
Recommended ............................... 380 Index
19
Page 266 of 413

X
Press ato confirm.
X Press the :or9 button to select the
Limit speed (winter tyres)
Limit speed (winter tyres) function.
You will see the current setting.
X Press ato confirm.
X Press the :or9 button to adjust
permanent SPEEDTRONIC in increments of
ten (240 km/h 240 km/h to160 km/h
160 km/h). The Off
Offset-
ting switches permanent SPEEDTRONIC
off.
X Press the abutton to store the entry.
For further information on permanent SPEED- TRONIC (Y page 191).
Restoring the factory settings X
Use ò on the steering wheel to call up
the list of menus.
X Press the :or9 button on the steer-
ing wheel to select the Settings Settingsmenu.
X Confirm by pressing aon the steering
wheel.
X Press the :or9 button to select the
Factory settings
Factory settings submenu.
X Press ato confirm.
The Reset all settings? Reset all settings? message
appears.
X Press the :or9 button to select No
No
or Yes
Yes.
X Press the abutton to confirm the selec-
tion.
If you have selected Yes Yes, the multifunction
display shows a confirmation message.
For safety reasons, not all functions are reset: the Limit
Limit speed
speed (winter
(winter tyres)
tyres) function
in permanent SPEEDTRONIC can only be set
in the Vehicle
Vehicle submenu. AMG menu in AMG vehicles
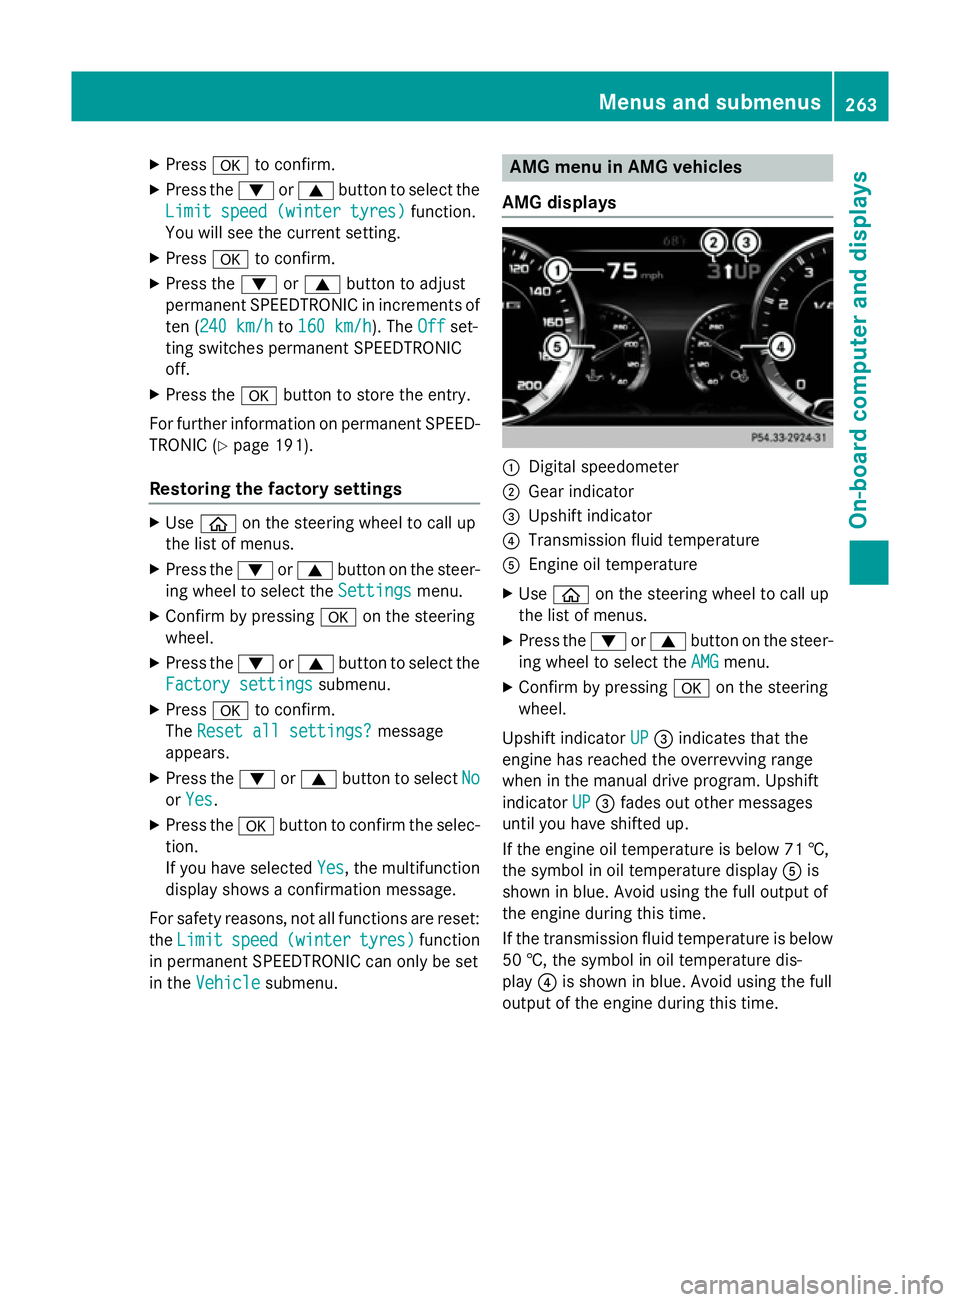
AMG displays :
Digital speedometer
; Gear indicator
= Upshift indicator
? Transmission fluid temperature
A Engine oil temperature
X Use ò on the steering wheel to call up
the list of menus.
X Press the :or9 button on the steer-
ing wheel to select the AMG
AMGmenu.
X Confirm by pressing aon the steering
wheel.
Upshift indicator UP
UP= indicates that the
engine has reached the overrevving range
when in the manual drive program. Upshift
indicator UP UP= fades out other messages
until you have shifted up.
If the engine oil temperature is below 71 †,
the symbol in oil temperature display Ais
shown in blue. Avoid using the full output of
the engine during this time.
If the transmission fluid temperature is below
50 †, the symbol in oil temperature dis-
play ?is shown in blue. Avoid using the full
output of the engine during this time. Menus and submenus
263On-board computer and displays Z
Page 345 of 413

X
Top up with the premixed washer fluid.
X To close: press cap :onto the filler neck
until it engages.
If the washer fluid level drops below the rec-
ommended minimum of 1 litre, a message
appears in the multifunction display prompt-
ing you to top up the washer fluid
(Y page 298).
Further information on windscreen washer
fluid/antifreeze (Y page 407).ASSYST PLUS
Service message
The ASSYST PLUS service interval display
informs you of the next service due date.
Information on the type of service and service
intervals (see the separate Service Booklet).
You can obtain further information from a
Mercedes-Benz Service Centre.
i The ASSYST PLUS service interval display
does not show any information on the
engine oil level. Observe the notes on the
engine oil level (Y page 338).
The multifunction display shows a service
message for a few seconds, e.g.:
R Service A in .. days
Service A in .. days
R Service A due Service A due
R Service A overdue by .. days
Service A overdue by .. days
Depending on the operating conditions of the vehicle, the remaining time or distance until
the next service due date is displayed.
The letter indicates which service is due. A
A
stands for a minor service and B
B for a major
service. A number or another letter may be
displayed after the letter.
Only for certain countries: the position after
the letter A
A or B Bindicates any necessary addi-
tional maintenance work to be performed. If
you notify a qualified specialist workshop of
this display, you will receive a statement on
the associated costs. The ASSYST PLUS service interval display
does not take into account any periods of
time during which the battery is disconnec-
ted.
Maintaining the time-dependent service
schedule:
X Note down the service due date displayed
in the multifunction display before discon-
necting the battery.
or X After reconnecting the battery, subtract
the battery disconnection periods from the
service date shown on the display. Hiding service messages
X Press the aor% button on the steer-
ing wheel. Displaying service messages
X Switch the ignition on.
X Use ò on the steering wheel to call up
the list of menus.
X Press the 9or: button on the steer-
ing wheel to select the Service Servicemenu and
press ato confirm.
X Press the 9or: button on the steer-
ing wheel to select the ASSYST PLUS
ASSYST PLUSsub-
menu and press ato confirm.
The service due date appears in the multi-
function display. Information about Service
Resetting the ASSYST PLUS service
interval display !
If the ASSYST PLUS service interval dis-
play has been inadvertently reset, this set-
ting can be corrected at a qualified special-
ist workshop.
Have service work carried out as described in the Service Booklet. This may otherwise 342
ASSYST PLUSMaintenance and care
Page 346 of 413

lead to increased wear and damage to the
major assemblies or the vehicle.
A qualified specialist workshop, e.g. a
Mercedes-Benz Service Centre, will reset the ASSYST PLUS service interval display after
the service work has been carried out. You
can also obtain further information on main-
tenance work, for example.
Special service requirements The prescribed service interval is based on
normal operation of the vehicle. Service work
will need to be performed more often if the
vehicle is operated under arduous conditions
or increased loads, for example:
R regular city driving with frequent intermedi-
ate stops
R if the vehicle is primarily used to travel
short distances
R for frequent operation in mountainous ter-
rain or on poor road surfaces
R if the engine is often left idling for long peri-
ods
In these or similar operating conditions, have,
for example, the air filter, engine oil and oil
filter changed more frequently. The tyres
must be checked more frequently if the vehi-
cle is operated under increased loads. Fur-
ther information can be obtained at a quali-
fied specialist workshop, e.g. a Mercedes-
Benz Service Centre.
Driving abroad An extensive Mercedes-Benz Service network
is also available in other countries. You can
obtain further information from any
Mercedes-Benz Service Centre. Care
General notes
H
Environmental note
Dispose of empty packaging and cleaning
cloths in an environmentally responsible man- ner.
! For cleaning your vehicle, do not use any
of the following:
R dry, rough or hard cloths
R abrasive cleaning agents
R solvents
R cleaning agents containing solvents
Do not scrub.
Do not touch the surfaces or protective
films with hard objects, e.g. a ring or ice
scraper. You could otherwise scratch or
damage the surfaces and protective film.
! Do not park up the vehicle for an extended
period straight after cleaning it, particularly after having cleaned the wheels with wheel cleaner. Wheel cleaners could cause
increased corrosion of the brake discs and
brake pads/linings. For this reason, you
should drive for a few minutes after clean-
ing. Braking heats the brake discs and the
brake pads/linings, thus drying them. The
vehicle can then be parked up.
Regular care of your vehicle is a condition for
retaining the quality in the long term.
Use care products and cleaning agents rec-
ommended and approved by Mercedes-Benz. Washing the vehicle and cleaning the
paintwork
Automatic car wash G
WARNING
Braking efficiency is reduced after the vehicle has been washed. There is a risk of an acci-
dent. Care
343Maintenance and care
Z