2014 MERCEDES-BENZ S-CLASS COUPE change wheel
[x] Cancel search: change wheelPage 10 of 413

Care
360° camera ................................ .348
Automatic car wash ....................... 343
Carpets .......................................... 351
Display .......................................... .349
Exhaust pipe .................................. 348
Exterior lighting ............................ .347
Gear or selector lever .................... 350
High-pressure cleaner .................... 345
Interior .......................................... .349
Matt paintwork .............................. 346
Night View Assist Plus ................... 349
Notes ............................................. 343
Paint .............................................. 345
Plastic trim ................................... .349
Reversing camera .......................... 347
Roof lining ...................................... 351
Seat belt ........................................ 351
Seat cover ..................................... 350
Sensors ......................................... 347
Steering wheel ............................... 350
Trim pieces ................................... .350
Washing by hand ........................... 345
Wheels .......................................... .346
Windows ........................................ 346
Wiper blades .................................. 347
Wooden trim .................................. 350
CD player/CD changer(on-board
computer) .......................................... 253
Central locking
Locking/unlocking (key ).................. 85
Centre console
Overview .......................................... 36
Stowage space .............................. 315
Centre console in the rear com-
partment
Stowage compartment .................. 317
Child seat
Forward-facing restraint system ...... 64
ISOFIX .............................................. 62
On the front-passenger sea t............ 63
Rearward-facing restraint system .... 64
Recommendations ........................... 67
Suitable positions ............................ 65
Top Tether ....................................... 62
Children
In the vehicle ................................... 60
Restraint systems ............................ 61 Cigarette lighter
................................ 322
Cleaning
Mirror turn signal ........................... 347
Climate control
Automatic air conditioning ............. 137
Auxiliary heating/ventilation .......... 148
Controlling automaticall y............... 141
Convenience opening/closing
(air-recirculation mode) ................. 145
Cooling with air dehumidification .. 139
Demisting the windows .................. 143
Demisting the windscreen ............. 143
ECO start/stop function ................ 138
Important safety notes .................. 136
Indicator lamp ................................ 141
Ionisation ....................................... 148
Notes on using the automatic cli-
mate control .................................. 138
Overview of systems ...................... 136
Perfume atomizer .......................... 146
Problem with the rear window
heating .......................................... 145
Problems with cooling with air
dehumidification ............................ 141
Setting the air distribution ............. 142
Setting the air vents ...................... 154
Setting the airflow ......................... 143
Setting the climate mod e............... 142
Setting the temperature ................ 142
Switching air-recirculation mode
on/of f............................................ 145
Switching on/of f........................... 139
Switching residual heat on/off ...... 146
Switching the rear window heat-
ing on/of f...................................... 144
Switching the synchronisation
function on and off ........................ 143
Cockpit
Overview .......................................... 30
COLLISION PREVENTION ASSIST
PLUS
Activating/deactivating ................. 258
Display message ............................ 273
Operation/note s.............................. 72
COMAND display
Cleaning ......................................... 349
Combination switch .......................... 126 Index
7
Page 26 of 413
Do not install accessories such as audio
systems in these areas. Do not carry out
repairs or welding. You could impair the
operating efficiency of the restraint sys-
tems.
Have accessories retrofitted at a qualified
specialist workshop.
You could jeopardise the operating safety of
your vehicle if you use parts, tyres and wheels
as well as accessories relevant to safety
which have not been approved by Mercedes. This could lead to malfunctions in safety-rel-
evant systems, e.g. the brake system. Use
only genuine Mercedes-Benz parts or parts of
equal quality. Only use tyres, wheels and
accessories that have been specifically
approved for your vehicle.
Mercedes-Benz tests genuine parts and con-
version parts and accessories that have been specifically approved for your vehicle for their
reliability, safety and suitability. Despite
ongoing market research, Mercedes-Benz is
unable to assess other parts. Mercedes-Benz therefore accepts no responsibility for the
use of such parts in Mercedes-Benz vehicles,even if they have been officially approved or
independently approved by a testing centre.
In Germany, certain parts are only officially
approved for installation or modification if
they comply with legal requirements. This
also applies to some other countries. All gen-
uine Mercedes-Benz parts meet the approval
requirements. The use of non-approved parts may invalidate the vehicle's general operating
permit.
This is the case:
R if they cause a change of the vehicle type
from that for which the vehicle's general
operating permit was granted
R if other road users could be endangered
R if the emission or noise levels are adversely
affected
Always specify the vehicle identification num- ber (VIN) when ordering genuine Mercedes-
Benz parts (Y page 402). Owner's Manual
Vehicle equipment
This Owner's Manual describes all models
and all standard and optional equipment
available for your vehicle at the time of pub-
lication of the Owner's Manual. Country-spe- cific differences are possible. Note that your
vehicle may not be fitted with all features
described. This is also the case for systems
and functions relevant to safety. Therefore,
the equipment on your vehicle may differ from
that in the descriptions and illustrations.
The original purchase contract documenta-
tion for your vehicle contains a list of all of the
systems in your vehicle.
Should you have any questions concerning
equipment and operation, please consult a
Mercedes-Benz Service Centre.
The Owner's Manual and Service Booklet are important documents and should kept in the
vehicle. Operating safety
Important safety notes
G
WARNING
If you do not have the prescribed service/
maintenance work or necessary repairs car-
ried out, this could result in malfunctions or
system failures. There is a risk of an accident. Always have the prescribed service/mainte-
nance work as well as necessary repairs car-
ried out at a qualified specialist workshop. G
WARNING
If you switch off the ignition while driving,
safety-relevant functions are only available
with limitations, or not at all. This could affect, for example, the power steering and the brake
boosting effect. You will require considerably
more effort to steer and brake. There is a risk of an accident.
Do not switch off the ignition while driving. Introduction
23 Z
Page 27 of 413
G
WARNING
Flammable material such as leaves, grass or
twigs may ignite if they come into contact with hot parts of the exhaust system. There is a risk of fire.
When driving off road or on unpaved roads,
check the vehicle's underside regularly. In
particular, remove parts of plants or other
flammable materials which have become
trapped. In the case of damage, contact a
qualified specialist workshop. G
WARNING
Modifications to electronic components, their software as well as wiring could affect their
function and/or the operation of other net-
worked components. This could in particular
also be the case for systems relevant to
safety. They might not function properly any-
more and/or jeopardise the operational
safety of the vehicle. There is an increased
risk of an accident and injury.
Do not attempt to modify the wiring as well as
electronic components or their software.
Always have work on electrical and electronic components carried out at a qualified special-
ist workshop.
If you make any changes to the vehicle elec-
tronics, the general operating permit is ren-
dered invalid.
! There is a risk of damage to the vehicle if:
R the vehicle becomes stuck, e.g. on a high
kerb or an unpaved road
R you drive too fast over an obstacle, e.g. a
kerb or a pothole in the road
R a heavy object strikes the underbody or
parts of the chassis
In situations like this, the body, the under-
body, chassis parts, wheels or tyres could
be damaged without the damage being visi-
ble. Components damaged in this way can
unexpectedly fail or, in the case of an acci-
dent, no longer withstand the strain they
are designed for. If the underbody panelling is damaged,
combustible materials such as leaves,
grass or twigs can gather between the
underbody and the underbody panelling. If
these materials come in contact with hot
parts of the exhaust system, they can catch fire.
In such situations, have the vehicle
checked and repaired immediately at a
qualified specialist workshop. If, upon con-
tinuing your journey, you notice that driving
safety is impaired, pull over and stop the
vehicle immediately, paying attention to
road and traffic conditions. In such cases,
consult a qualified specialist workshop. Declarations of conformity
Wireless vehicle components The following information applies to all com-
ponents of the vehicle and the information
systems and communication devices integra-
ted into the vehicle which receive and/or
transmit radio waves:
The components of this vehicle that receive
and/or transmit radio waves are compliant
with the basic requirements and all other rel- evant conditions of Directive 1999/5/EC.
You can obtain further information from any
Mercedes-Benz Service Centre.
Electromagnetic compatibility The electromagnetic compatibility of the vehi-
cle components has been checked and certi-fied according to the currently valid version of
Regulation ECE-R 10. Diagnostics connection
The diagnostics connection is only intended
for the connection of diagnostic equipment at a qualified specialist workshop. 24
Introduction
Page 37 of 413
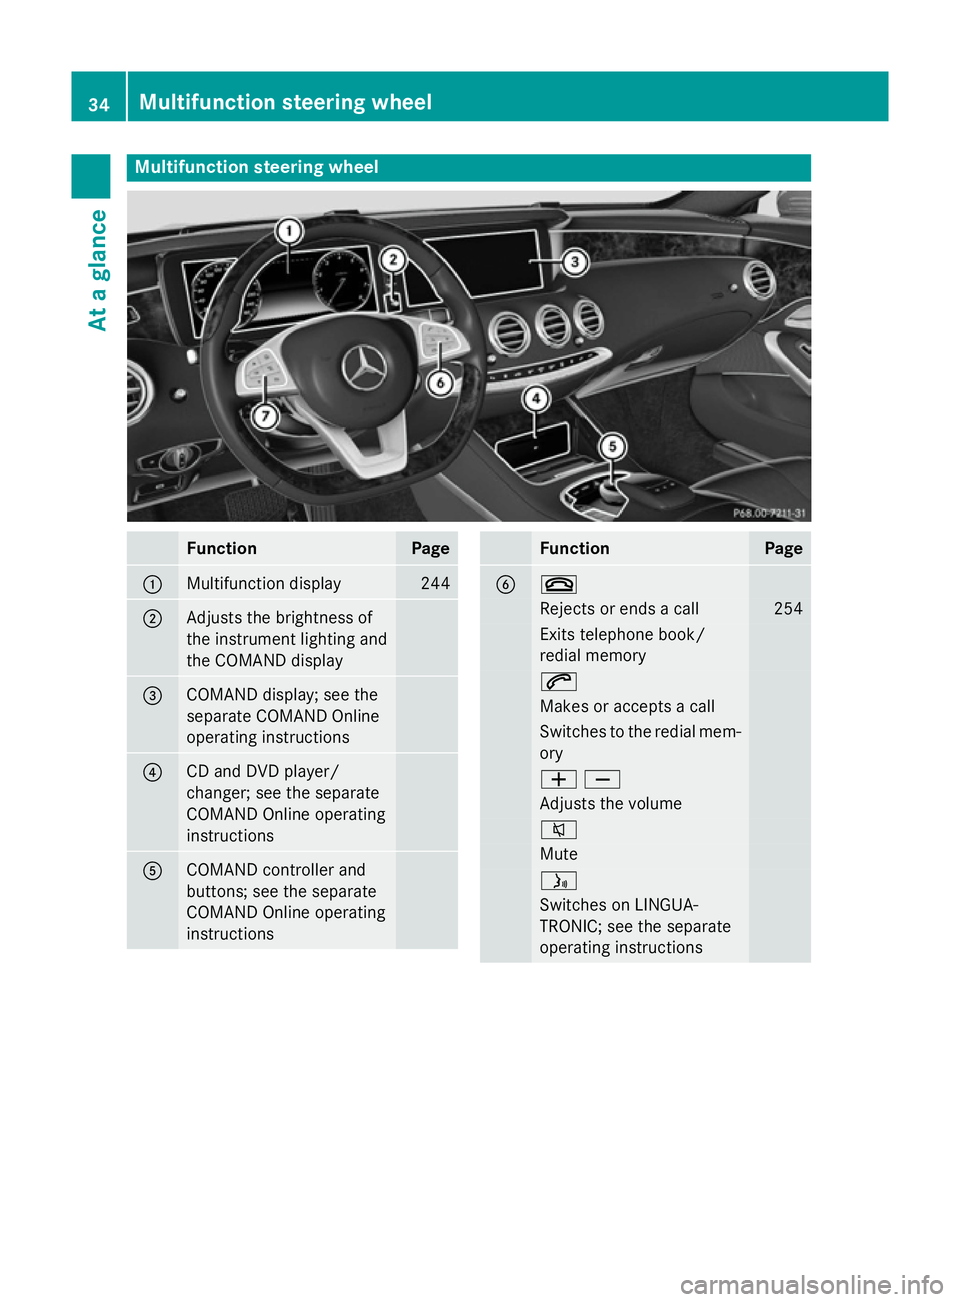
Multifunction steering wheel
Function Page
:
Multifunction display 244
;
Adjusts the brightness of
the instrument lighting and
the COMAND display
=
COMAND display; see the
separate COMAND Online
operating instructions
?
CD and DVD player/
changer; see the separate
COMAND Online operating
instructions
A
COMAND controller and
buttons; see the separate
COMAND Online operating
instructions Function Page
B ~
Rejects or ends a call 254
Exits telephone book/
redial memory 6
Makes or accepts a call
Switches to the redial mem-
ory WX
Adjusts the volume
8
Mute
ó
Switches on LINGUA-
TRONIC; see the separate
operating instructions 34
Multifunction steering wheelAt a glance
Page 112 of 413
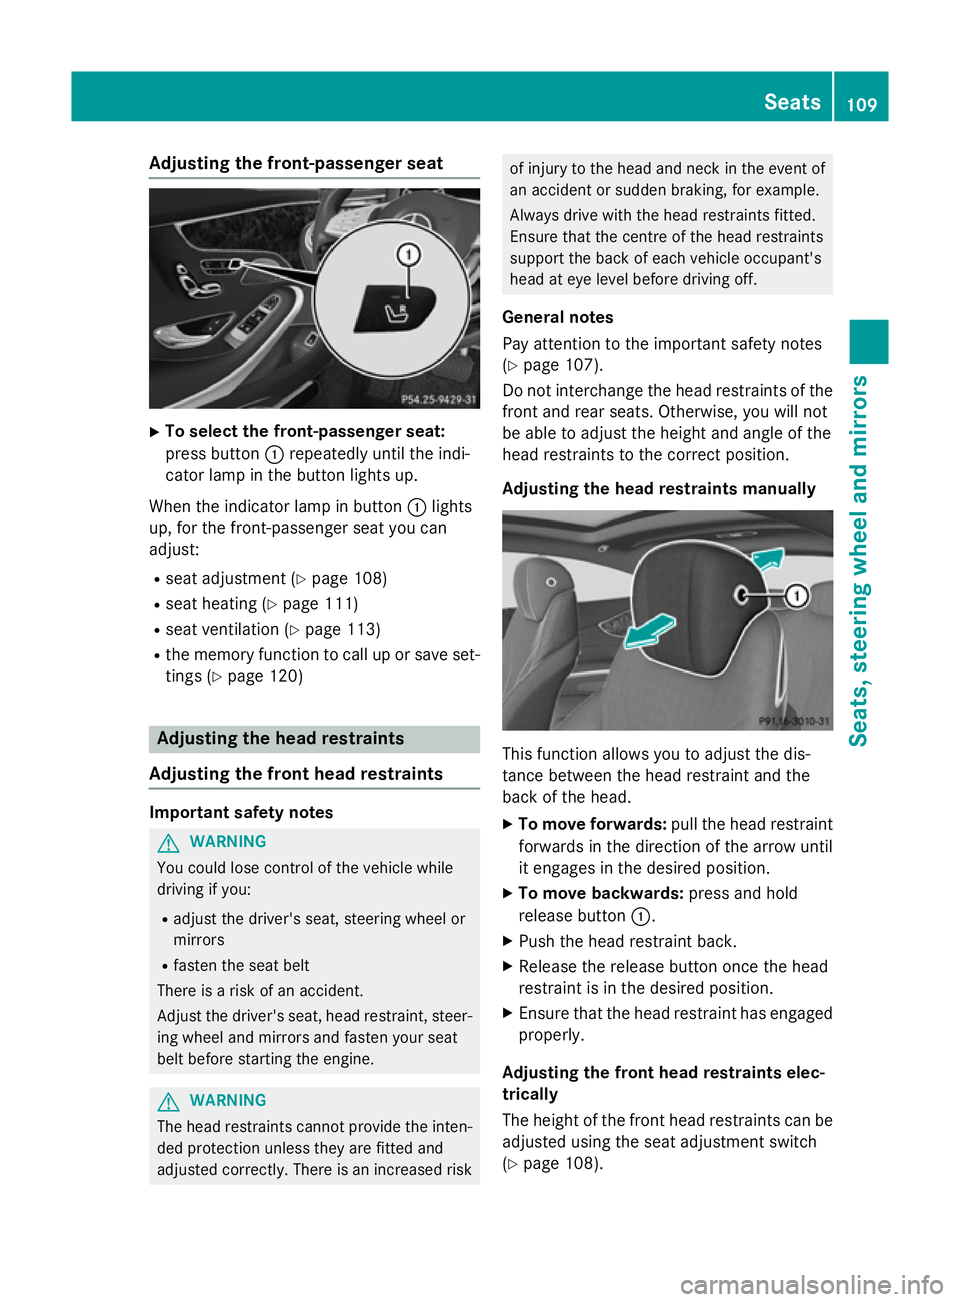
Adjusting the front-passenger seat
X
To select the front-passenger seat:
press button :repeatedly until the indi-
cator lamp in the button lights up.
When the indicator lamp in button :lights
up, for the front-passenger seat you can
adjust:
R seat adjustment (Y page 108)
R seat heating (Y page 111)
R seat ventilation (Y page 113)
R the memory function to call up or save set-
tings (Y page 120) Adjusting the head restraints
Adjusting the front head restraints Important safety notes
G
WARNING
You could lose control of the vehicle while
driving if you:
R adjust the driver's seat, steering wheel or
mirrors
R fasten the seat belt
There is a risk of an accident.
Adjust the driver's seat, head restraint, steer-
ing wheel and mirrors and fasten your seat
belt before starting the engine. G
WARNING
The head restraints cannot provide the inten-
ded protection unless they are fitted and
adjusted correctly. There is an increased risk of injury to the head and neck in the event of
an accident or sudden braking, for example.
Always drive with the head restraints fitted.
Ensure that the centre of the head restraints
support the back of each vehicle occupant's
head at eye level before driving off.
General notes
Pay attention to the important safety notes
(Y page 107).
Do not interchange the head restraints of the
front and rear seats. Otherwise, you will not
be able to adjust the height and angle of the
head restraints to the correct position.
Adjusting the head restraints manually This function allows you to adjust the dis-
tance between the head restraint and the
back of the head.
X To move forwards: pull the head restraint
forwards in the direction of the arrow until
it engages in the desired position.
X To move backwards: press and hold
release button :.
X Push the head restraint back.
X Release the release button once the head
restraint is in the desired position.
X Ensure that the head restraint has engaged
properly.
Adjusting the front head restraints elec-
trically
The height of the front head restraints can be adjusted using the seat adjustment switch
(Y page 108). Seats
109Seats, steering wheel and mirrors Z
Page 152 of 413
When the auxiliary heating is switched on,
make sure that:
R no flammable materials come into contact
with hot vehicle components
R the exhaust gas can escape from the
exhaust pipe unhindered
R the exhaust gas does not come into contact
with flammable materials.
The auxiliary heating and the exhaust gas out-
let are situated behind the right-hand front
wheel.
! Operating the auxiliary heating/ventila-
tion draws on the vehicle battery. After you
have heated or ventilated the vehicle a
maximum of two times, drive for a longer
distance.
Switch the auxiliary heating on regularly once
a month for about ten minutes.
The auxiliary heating heats the air in the vehi-
cle interior to the set temperature. This
occurs without using the heat of the running
engine. The auxiliary heating is operated
directly using the vehicle's fuel. For this rea-
son, the tank content must be at least at
reserve fuel level to ensure that the auxiliary
heating functions.
The auxiliary heating/ventilation automati-
cally adjusts to changes in temperature and
weather conditions. For this reason, the aux- iliary heating could switch from ventilation
mode to heating mode or from heating mode to ventilation mode.
The auxiliary heating switches off when the
engine is switched off. The auxiliary ventila-
tion switches off when you turn the key to key
position 2(Y page 159).
The auxiliary heating switches off automati-
cally after 30 minutes. This time limit can be
altered. To do this, visit a qualified specialist
workshop.
You cannot use the auxiliary ventilation to
cool the vehicle interior to a temperature
lower than the outside temperature. Before switching on X
Turn the key to position 2in the ignition
lock (Y page 159).
X Set the desired temperature using the
w rocker switch on the front control unit
or using COMAND Online (see the separate operating instructions).
If you do not alter the temperature before
switching on the auxiliary heating, the last
temperature setting will be adopted.
Auxiliary heating or ventilation can also be
switched on if the manually set climate con-
trol is activated. Optimum comfort can be
attained when the system is set to automatic
mode. Set the temperature to 22 †.
You can activate or deactivate the auxiliary
heating/ventilation:
R using the rocker switch on the centre con-
sole (Y page 149)
R using the remote control (Y page 150)
The on-board computer can be used to spec- ify up to three departure times, one of which
may be preselected:
R using the remote control (Y page 150)
R using COMAND Online (see the separate
operating instructions)
Switching the auxiliary heating/venti-
lation on/off using the centre console
rocker switch The colours of the indicator lamps on the
rocker switch have the following meanings:
Blue Auxiliary ventilation switched on
Red Auxiliary heating switched on
Yellow Departure time preselected Operating the climate control system
149Climate control Z
Page 174 of 413
Kickdown
Use kickdown for maximum acceleration.
X Depress the accelerator pedal beyond the
pressure point.
The transmission shifts to a lower gear
depending on the engine speed.
X Ease off the accelerator pedal once the
desired speed is reached.
The automatic transmission shifts back up. Program selector button
X
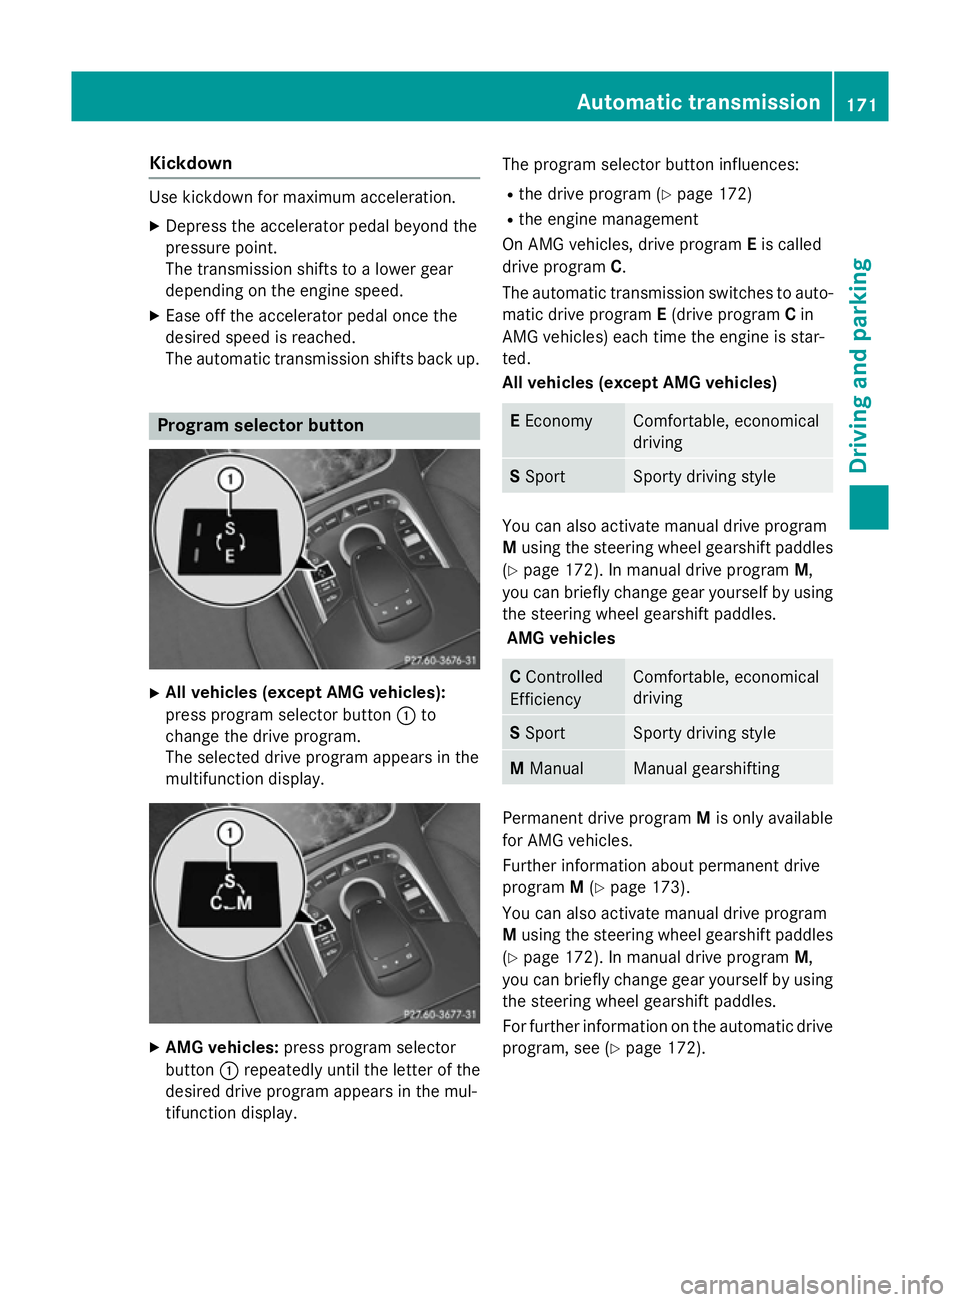
All vehicles (except AMG vehicles):
press program selector button :to
change the drive program.
The selected drive program appears in the
multifunction display. X
AMG vehicles: press program selector
button :repeatedly until the letter of the
desired drive program appears in the mul-
tifunction display. The program selector button influences:
R the drive program (Y page 172)
R the engine management
On AMG vehicles, drive program Eis called
drive program C.
The automatic transmission switches to auto-
matic drive program E(drive program Cin
AMG vehicles) each time the engine is star-
ted.
All vehicles (except AMG vehicles) E
Economy Comfortable, economical
driving
S
Sport Sporty driving style
You can also activate manual drive program
M
using the steering wheel gearshift paddles
(Y page 172). In manual drive program M,
you can briefly change gear yourself by using
the steering wheel gearshift paddles.
AMG vehicles C
Controlled
Efficiency Comfortable, economical
driving
S
Sport Sporty driving style
M
Manual Manual gearshifting
Permanent drive program
Mis only available
for AMG vehicles.
Further information about permanent drive
program M(Y page 173).
You can also activate manual drive program
M using the steering wheel gearshift paddles
(Y page 172). In manual drive program M,
you can briefly change gear yourself by using
the steering wheel gearshift paddles.
For further information on the automatic drive program, see (Y page 172). Automatic trans
mission
171Driving an d parking Z
Page 175 of 413
Steering wheel gearshift paddles
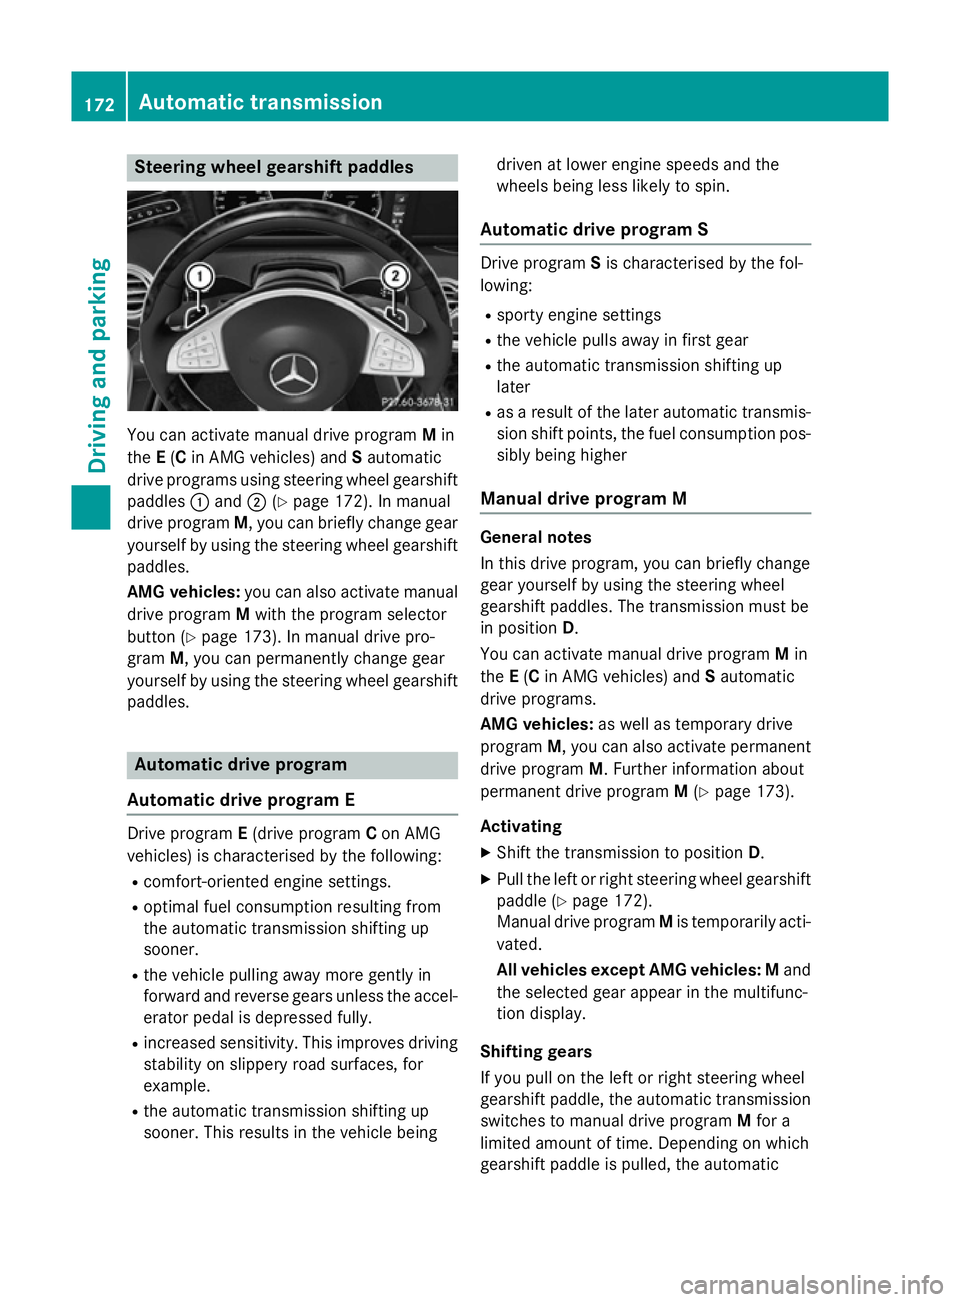
You can activate manual drive program
Min
the E(C in AMG vehicles) and Sautomatic
drive programs using steering wheel gearshift paddles :and ;(Ypage 172). In manual
drive program M, you can briefly change gear
yourself by using the steering wheel gearshift
paddles.
AMG vehicles: you can also activate manual
drive program Mwith the program selector
button (Y page 173). In manual drive pro-
gram M, you can permanently change gear
yourself by using the steering wheel gearshift
paddles. Automatic drive program
Automatic drive program E Drive program
E(drive program Con AMG
vehicles) is characterised by the following:
R comfort-oriented engine settings.
R optimal fuel consumption resulting from
the automatic transmission shifting up
sooner.
R the vehicle pulling away more gently in
forward and reverse gears unless the accel-
erator pedal is depressed fully.
R increased sensitivity. This improves driving
stability on slippery road surfaces, for
example.
R the automatic transmission shifting up
sooner. This results in the vehicle being driven at lower engine speeds and the
wheels being less likely to spin.
Automatic drive program S Drive program
Sis characterised by the fol-
lowing:
R sporty engine settings
R the vehicle pulls away in first gear
R the automatic transmission shifting up
later
R as a result of the later automatic transmis-
sion shift points, the fuel consumption pos- sibly being higher
Manual drive program M General notes
In this drive program, you can briefly change
gear yourself by using the steering wheel
gearshift paddles. The transmission must be
in position
D.
You can activate manual drive program Min
the E(C in AMG vehicles) and Sautomatic
drive programs.
AMG vehicles: as well as temporary drive
program M, you can also activate permanent
drive program M. Further information about
permanent drive program M(Y page 173).
Activating X Shift the transmission to position D.
X Pull the left or right steering wheel gearshift
paddle (Y page 172).
Manual drive program Mis temporarily acti-
vated.
All vehicles except AMG vehicles:M and
the selected gear appear in the multifunc-
tion display.
Shifting gears
If you pull on the left or right steering wheel
gearshift paddle, the automatic transmission
switches to manual drive program Mfor a
limited amount of time. Depending on which
gearshift paddle is pulled, the automatic 172
Automatic transmissionDriving and parking