2014 MERCEDES-BENZ S-CLASS COUPE ECU
[x] Cancel search: ECUPage 319 of 413
X
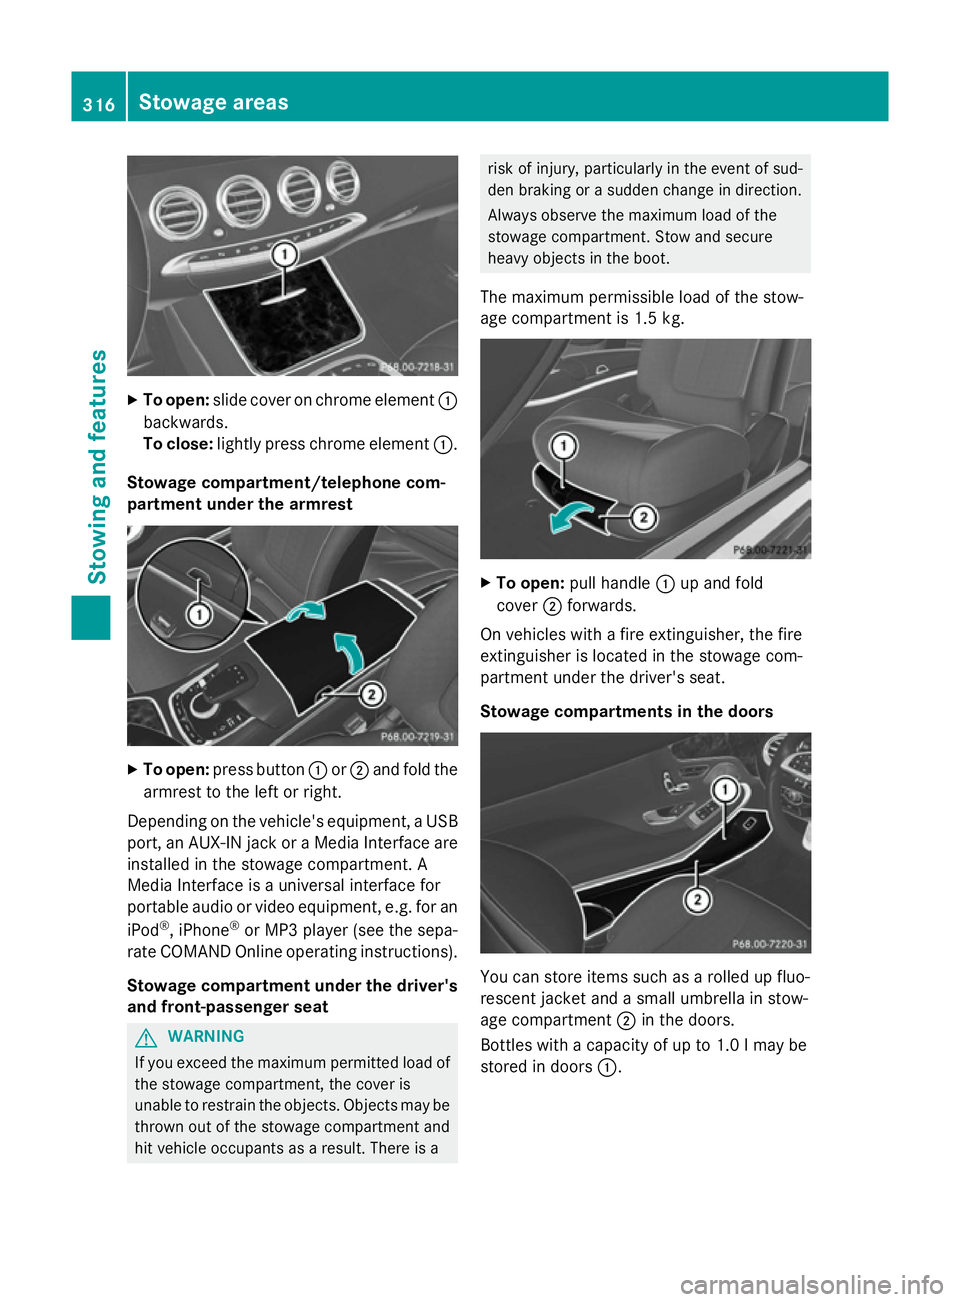
To open: slide cover on chrome element :
backwards.
To close: lightly press chrome element :.
Stowage compartment/telephone com-
partment under the armrest X
To open: press button :or; and fold the
armrest to the left or right.
Depending on the vehicle's equipment, a USB port, an AUX-IN jack or a Media Interface areinstalled in the stowage compartment. A
Media Interface is a universal interface for
portable audio or video equipment, e.g. for an
iPod ®
, iPhone ®
or MP3 player (see the sepa-
rate COMAND Online operating instructions).
Stowage compartment under the driver'sand front-passenger seat G
WARNING
If you exceed the maximum permitted load of the stowage compartment, the cover is
unable to restrain the objects. Objects may be
thrown out of the stowage compartment and
hit vehicle occupants as a result. There is a risk of injury, particularly in the event of sud-
den braking or a sudden change in direction.
Always observe the maximum load of the
stowage compartment. Stow and secure
heavy objects in the boot.
The maximum permissible load of the stow-
age compartment is 1.5 kg. X
To open: pull handle :up and fold
cover ;forwards.
On vehicles with a fire extinguisher, the fire
extinguisher is located in the stowage com-
partment under the driver's seat.
Stowage compartments in the doors You can store items such as a rolled up fluo-
rescent jacket and a small umbrella in stow-
age compartment ;in the doors.
Bottles with a capacity of up to 1.0 lmay be
stored in doors :.316
Stowage areasStowing and features
Page 320 of 413
Rear stowage compartments
Stowage compartment in the rear seat
armrest X
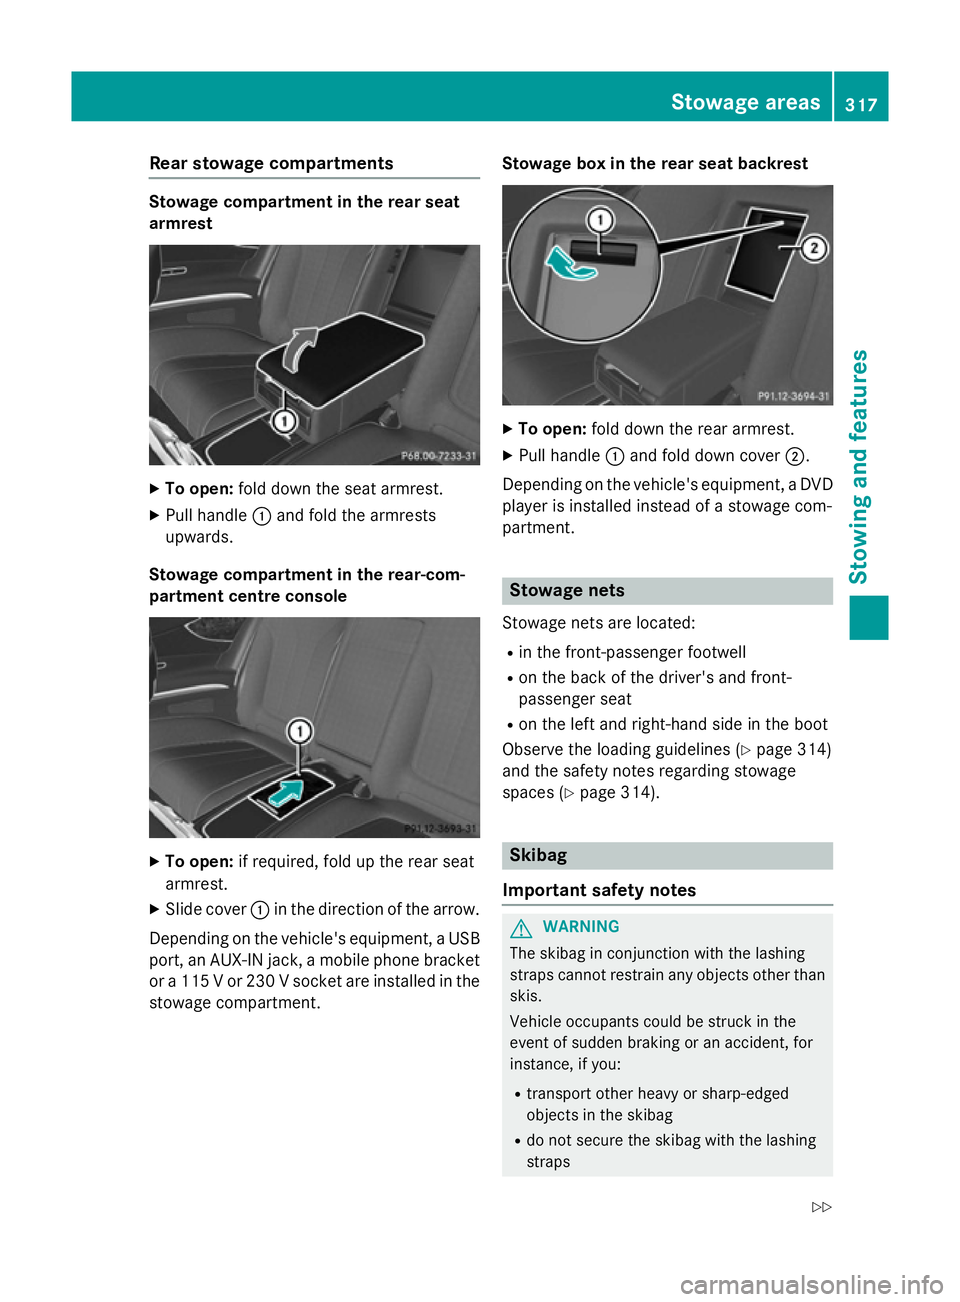
To open: fold down the seat armrest.
X Pull handle :and fold the armrests
upwards.
Stowage compartment in the rear-com-
partment centre console X
To open: if required, fold up the rear seat
armrest.
X Slide cover :in the direction of the arrow.
Depending on the vehicle's equipment, a USB port, an AUX-IN jack, a mobile phone bracketor a 115 V or 230 V socket are installed in the
stowage compartment. Stowage box in the rear seat backrest X
To open: fold down the rear armrest.
X Pull handle :and fold down cover ;.
Depending on the vehicle's equipment, a DVD
player is installed instead of a stowage com-
partment. Stowage nets
Stowage nets are located: R in the front-passenger footwell
R on the back of the driver's and front-
passenger seat
R on the left and right-hand side in the boot
Observe the loading guidelines (Y page 314)
and the safety notes regarding stowage
spaces (Y page 314). Skibag
Important safety notes G
WARNING
The skibag in conjunction with the lashing
straps cannot restrain any objects other than skis.
Vehicle occupants could be struck in the
event of sudden braking or an accident, for
instance, if you:
R transport other heavy or sharp-edged
objects in the skibag
R do not secure the skibag with the lashing
straps Stowage areas
317Stowing and features
Z
Page 321 of 413
There is a risk of accident and injury.
Store only skis in the skibag. Always secure
the skibag with the lashing straps so that it
cannot move around.
Observe the following points when using the
skibag:
R do not transport more than three pairs of
skis in the skibag.
R when carefully sliding the skis into or
removing them from the skibag, mind the
sharp edges and corners of the skis.
R stow the skis as described in the following:
- when sliding the skis in, position the run-
ning surfaces of the respective pair of
skis together.
- position one pair of skis at the bottom
with the tips of the skis to the outside.
- position the two additional pairs of skis
on the left and right-hand sides above the
lower pair of skis. The tips of the skis
being offset by 90° to the tips of the skis
below.
Unfolding the skibag and loading skis X
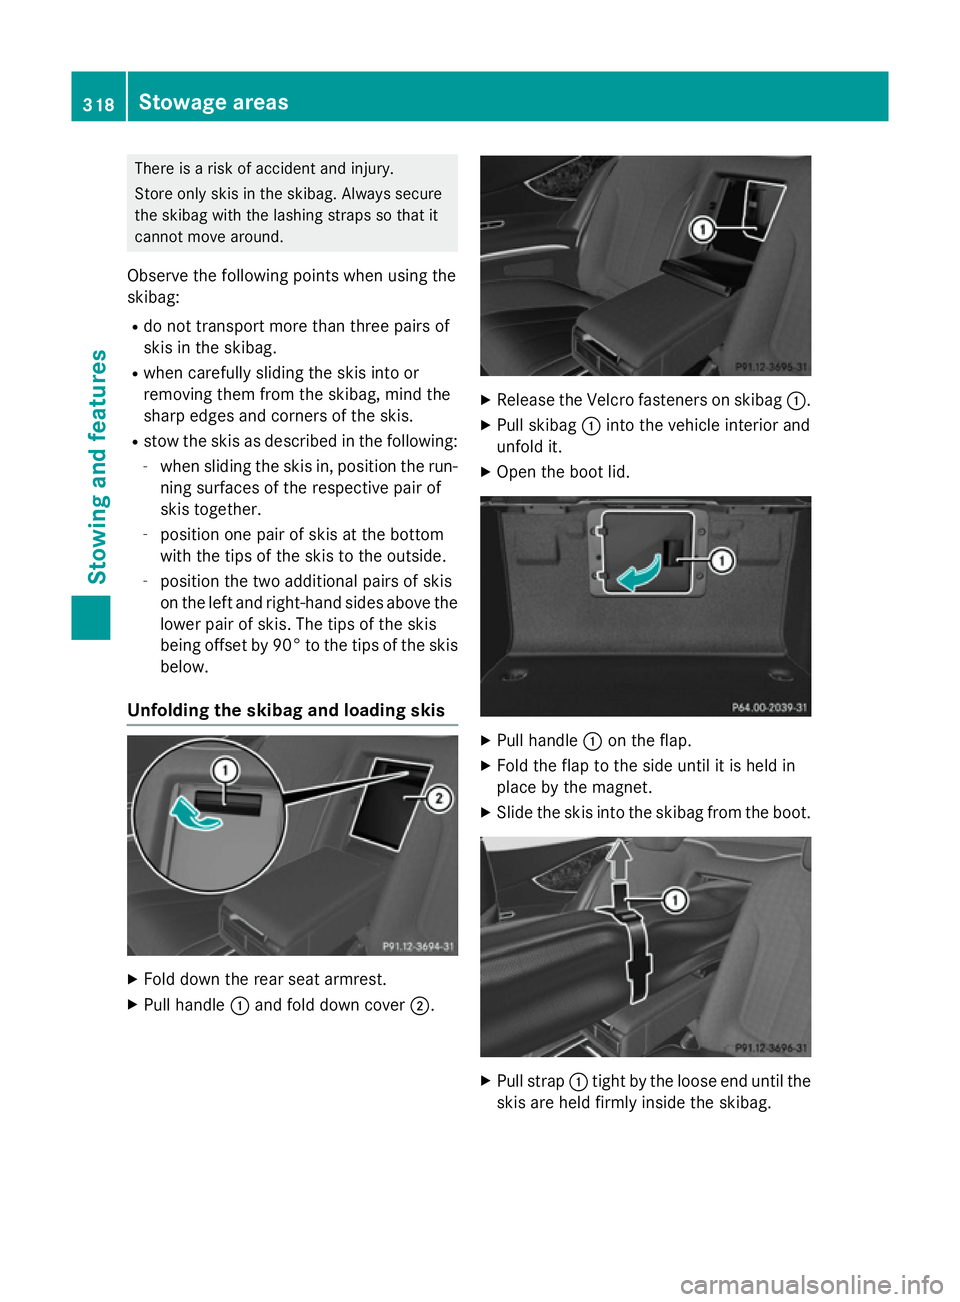
Fold down the rear seat armrest.
X Pull handle :and fold down cover ;. X
Release the Velcro fasteners on skibag :.
X Pull skibag :into the vehicle interior and
unfold it.
X Open the boot lid. X
Pull handle :on the flap.
X Fold the flap to the side until it is held in
place by the magnet.
X Slide the skis into the skibag from the boot. X
Pull strap :tight by the loose end until the
skis are held firmly inside the skibag. 318
Stowage areasStowing and features
Page 322 of 413
X
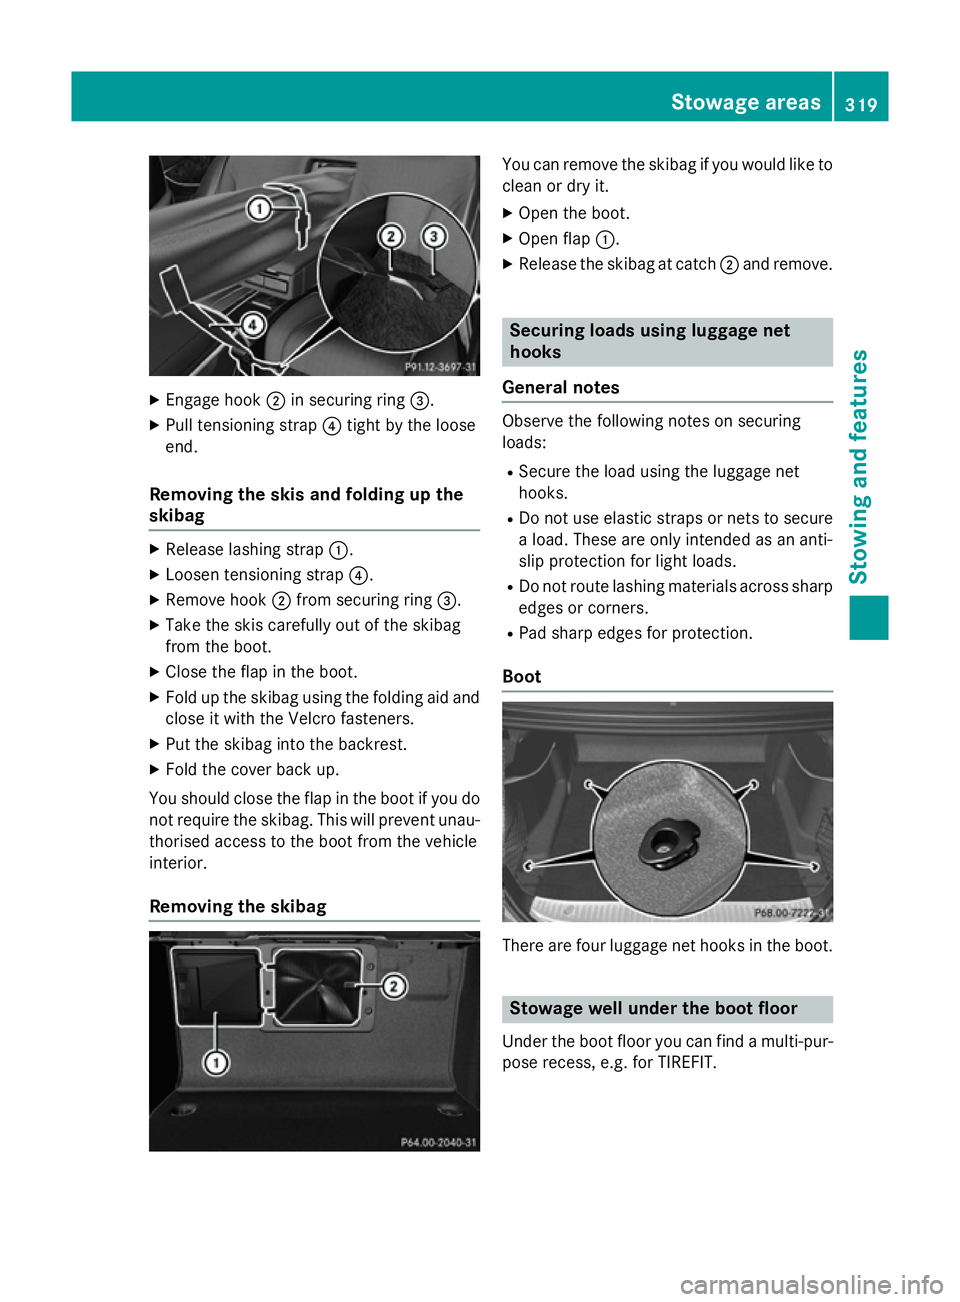
Engage hook ;in securing ring =.
X Pull tensioning strap ?tight by the loose
end.
Removing the skis and folding up the
skibag X
Release lashing strap :.
X Loosen tensioning strap ?.
X Remove hook ;from securing ring =.
X Take the skis carefully out of the skibag
from the boot.
X Close the flap in the boot.
X Fold up the skibag using the folding aid and
close it with the Velcro fasteners.
X Put the skibag into the backrest.
X Fold the cover back up.
You should close the flap in the boot if you do not require the skibag. This will prevent unau-
thorised access to the boot from the vehicle
interior.
Removing the skibag You can remove the skibag if you would like to
clean or dry it.
X Open the boot.
X Open flap :.
X Release the skibag at catch ;and remove. Securing loads using luggage net
hooks
General notes Observe the following notes on securing
loads:
R Secure the load using the luggage net
hooks.
R Do not use elastic straps or nets to secure
a load. These are only intended as an anti-
slip protection for light loads.
R Do not route lashing materials across sharp
edges or corners.
R Pad sharp edges for protection.
Boot There are four luggage net hooks in the boot.
Stowage well under the boot floor
Under the boot floor you can find a multi-pur-
pose recess, e.g. for TIREFIT. Sto
wage areas
319Stowing and features Z
Page 323 of 413
X
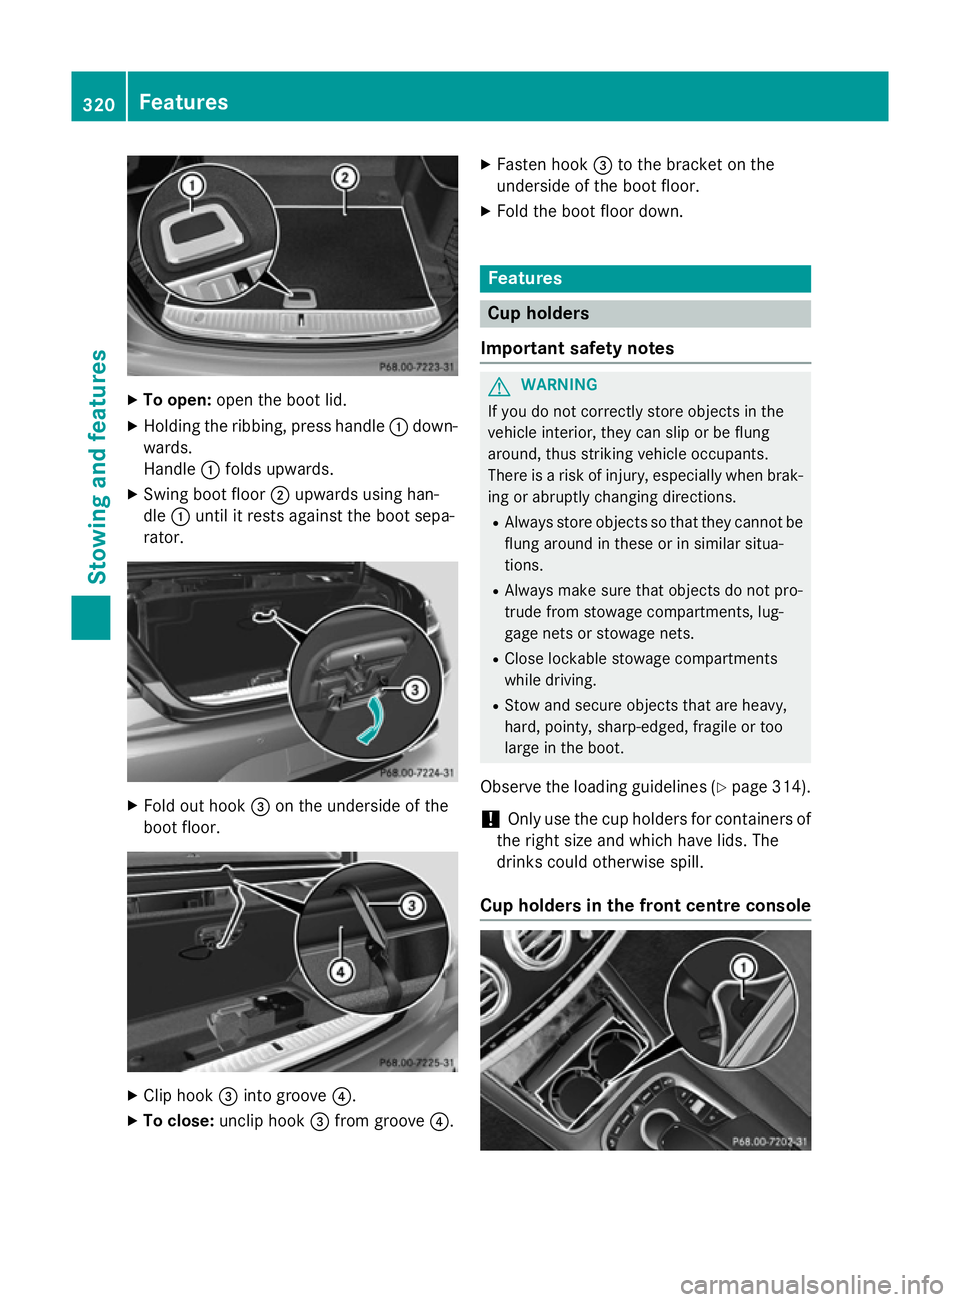
To open: open the boot lid.
X Holding the ribbing, press handle :down-
wards.
Handle :folds upwards.
X Swing boot floor ;upwards using han-
dle :until it rests against the boot sepa-
rator. X
Fold out hook =on the underside of the
boot floor. X
Clip hook =into groove ?.
X To close: unclip hook =from groove ?.X
Fasten hook =to the bracket on the
underside of the boot floor.
X Fold the boot floor down. Features
Cup holders
Important safety notes G
WARNING
If you do not correctly store objects in the
vehicle interior, they can slip or be flung
around, thus striking vehicle occupants.
There is a risk of injury, especially when brak- ing or abruptly changing directions.
R Always store objects so that they cannot be
flung around in these or in similar situa-
tions.
R Always make sure that objects do not pro-
trude from stowage compartments, lug-
gage nets or stowage nets.
R Close lockable stowage compartments
while driving.
R Stow and secure objects that are heavy,
hard, pointy, sharp-edged, fragile or too
large in the boot.
Observe the loading guidelines (Y page 314).
! Only use the cup holders for containers of
the right size and which have lids. The
drinks could otherwise spill.
Cup holders in the front centre console 320
FeaturesSto
wing an d features
Page 336 of 413

America
Country Radio type approval num-
ber
Frequency range (MHz)
BB (Barba-
dos) Registration not required
MHz: 27, 40, 433, 868
CL (Chile) 38447/F-23 No.3.3634
MHz: 40, 433
3943/DFRS05165/F-50
MHz: 280 to 433
GF (French
Guyana) Article 6 of Directive
1999/5/EC R&TTE 10668
13 May 05
MHz: 27, 30, 40, 433, 868
GP (Guade-
loupe) Article 6 of Directive
1999/5/EC R&TTE 10668
13 May 05
MHz: 27, 30, 40, 433, 868
MQ (Martini-
que) Article 6 of Directive
1999/5/EC R&TTE 11 July
05
MHz: 27, 30, 40, 433, 868
MX (Mexico) MHz: 280 to 390
Asia
Country Radio type approval num-
ber
Frequency range (MHz)
AE (United
Arab Emi-
rates) 1623/5/10-2/26/76
MHz: 433
JO (Jordan) TRC/LPD/2005/23
MHz: 27, 30, 40, 433, 868
KW (Kuwait) 5 October 2005
MHz: 27, 30, 40, 418, 433,
868
SA (Saudi
Arabia) 11_02_05/5024-5-6
MHz: 418, 433 Country Radio type approval num-
ber
Frequency range (MHz)
SY (Syria) 279/4/14 / 05 March 06
TR (Turkey) National Certification 23
July 07
MHz: 433
Australia
Country Radio type approval num-
ber
Frequency range (MHz)
AU (Aus-
tralia) 28 June 2005
MHz: 27, 30, 40, 433, 868
NZ (New
Zealand) 20 March 06
MHz: 27, 30, 40, 433
Floormats
G
WARNING
Objects in the driver's footwell may restrict
the clearance around the pedals or block a
depressed pedal. This jeopardises the oper-
ating and road safety of the vehicle. There is a risk of an accident.
Stow all objects securely in the vehicle so that
they do not get into the driver's footwell.
Always fit the floormats securely and as pre-
scribed in order to ensure that there is always sufficient room for the pedals. Do not use
loose floormats and do not place several floor-mats on top of one another. Features
333Stowing and featu res Z
Page 343 of 413
Adding engine oil
G
WARNING
Certain components in the engine compart-
ment could be very hot, e.g. the engine, the
radiator and parts of the exhaust system.
There is a risk of injury when accessing the
engine compartment.
As far as possible, allow the engine to cool
down and only touch the components descri- bed in the following. G
WARNING
If engine oil comes into contact with hot com- ponents in the engine compartment, it may
ignite. There is a risk of fire and injury.
Make sure that engine oil does not spill out
over the filler neck. Allow the engine to cool
down and thoroughly clean the components
that have come into contact with engine oil
before you start the engine. H
Environmental note
When topping up the oil, take care not to spill
any. If oil enters the soil or waterways, it is
harmful to the environment.
! Only use engine oils and oil filters that
have been approved for vehicles with a ser-
vice system. You can obtain a list of the
engine oils and oil filters tested and
approved in accordance with the
Mercedes-Benz Specifications for Service
Products at any Mercedes-Benz Service
Centre.
Damage to the engine or exhaust system is caused by the following:
R using engine oils and oil filters that have
not been specifically approved for the
service system
R changing the engine oil and oil filter after
missing the change interval required by
the service system
R using engine oil additives
! Do not add too much oil. Topping up with
too much engine oil can result in damage to the engine or to the catalytic converter.
Have excess engine oil siphoned off.
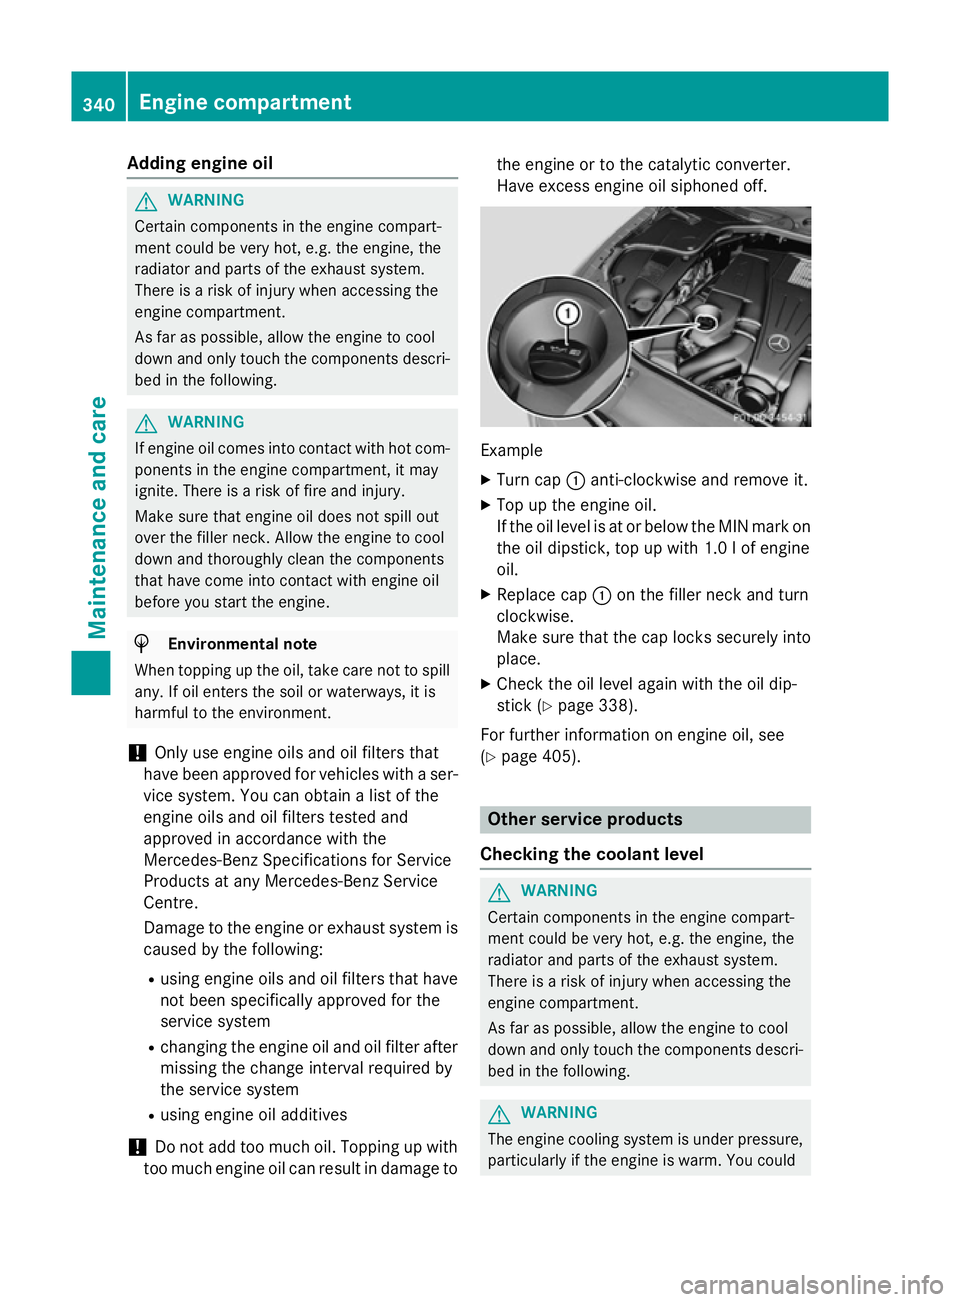
Example
X Turn cap :anti-clockwise and remove it.
X Top up the engine oil.
If the oil level is at or below the MIN mark on
the oil dipstick, top up with 1.0 l of engine
oil.
X Replace cap :on the filler neck and turn
clockwise.
Make sure that the cap locks securely into place.
X Check the oil level again with the oil dip-
stick (Y page 338).
For further information on engine oil, see
(Y page 405). Other service products
Checking the coolant level G
WARNING
Certain components in the engine compart-
ment could be very hot, e.g. the engine, the
radiator and parts of the exhaust system.
There is a risk of injury when accessing the
engine compartment.
As far as possible, allow the engine to cool
down and only touch the components descri- bed in the following. G
WARNING
The engine cooling system is under pressure, particularly if the engine is warm. You could 340
Engine compartmentMaintenance and care
Page 350 of 413
Cleaning the wiper blades
G
WARNING
If the windscreen wipers are set in motion
when cleaning the windscreen or wiper
blades, you could become trapped. There is a danger of injury.
Always switch off the windscreen wipers and
the ignition before cleaning the windscreen orwiper blades.
! Do not pull on the wiper blade. Otherwise,
the wiper blade could be damaged.
! Do not clean wiper blades too often and
do not rub them too hard. Otherwise, the
graphite coating could be damaged. This
could cause wiper noise.
! Hold the wiper arm securely when folding
back. The windscreen could be damaged if
the wiper arm hits against it suddenly.
X Fold the wiper arms away from the wind-
screen.
X Clean the wiper blades carefully using a
damp cloth.
X Fold the windscreen wipers back again
before switching on the ignition.
Cleaning the exterior lighting !
Only use cleaning agents or cleaning
cloths that are suitable for plastic lenses.
Unsuitable cleaning agents or cleaning
cloths could scratch or damage the plastic lenses of the exterior lighting.
X Clean the plastic lenses of the exterior
lighting using a wet sponge and a mild
cleaning agent, e.g. Mercedes-Benz car
shampoo or cleaning cloths.
Mirror turn signals !
Only use cleaning agents or cleaning
cloths that are suitable for plastic lenses.
Unsuitable cleaning agents or cleaning
cloths could scratch or damage the plastic lenses of the mirror turn signals. X
Clean the plastic lenses of the mirror turn
signals in the exterior mirror housing using
a wet sponge and mild cleaning agent, e.g.
Mercedes-Benz car shampoo or cleaning
cloths.
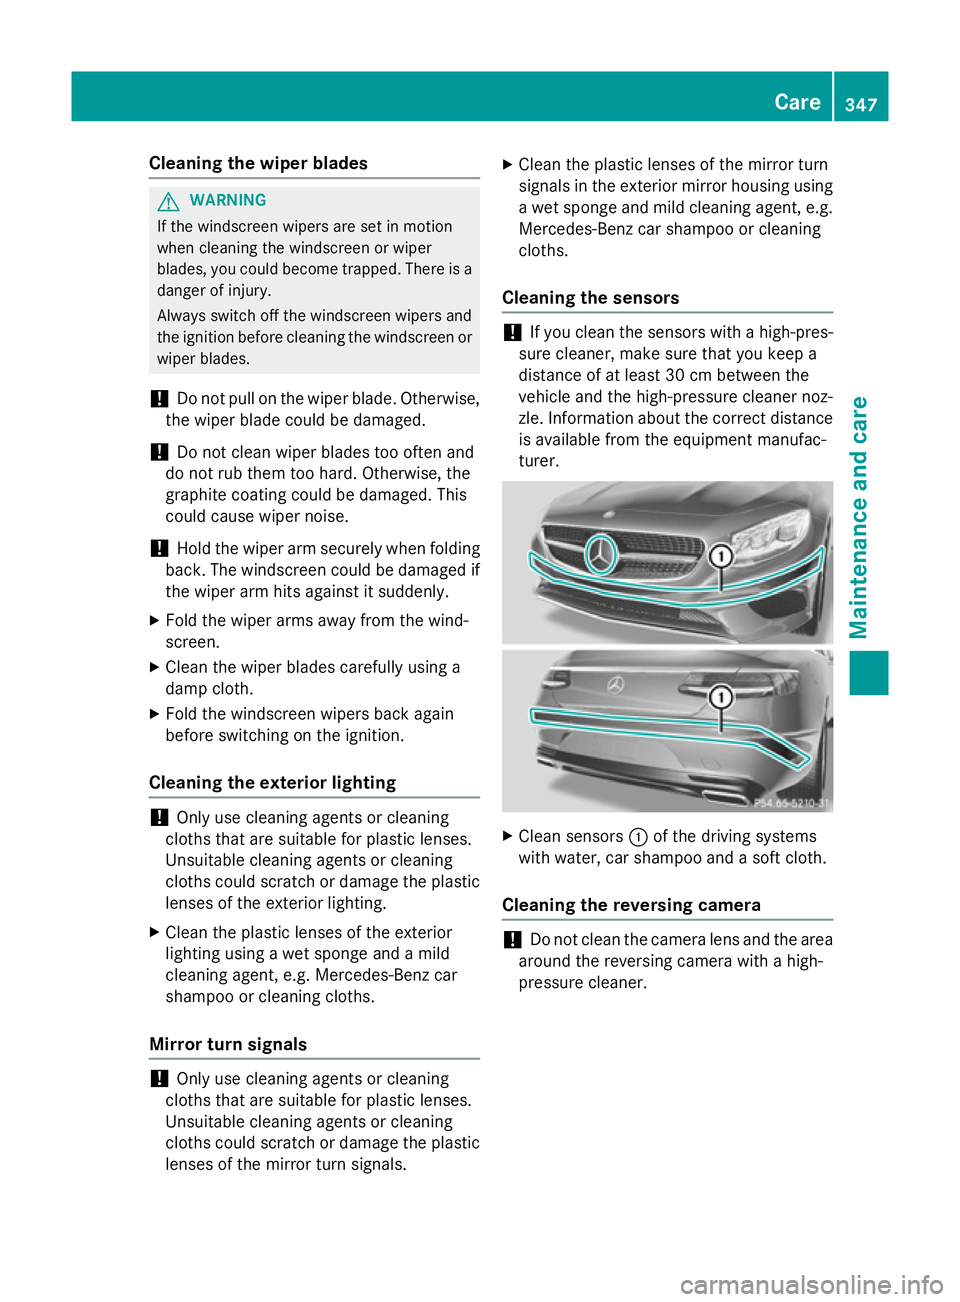
Cleaning the sensors !
If you clean the sensors with a high-pres-
sure cleaner, make sure that you keep a
distance of at least 30 cm between the
vehicle and the high-pressure cleaner noz-
zle. Information about the correct distance is available from the equipment manufac-
turer. X
Clean sensors :of the driving systems
with water, car shampoo and a soft cloth.
Cleaning the reversing camera !
Do not clean the camera lens and the area
around the reversing camera with a high-
pressure cleaner. Care
347Maintenance and care Z