2014 MERCEDES-BENZ S-CLASS COUPE warning light
[x] Cancel search: warning lightPage 79 of 413
Drive on carefully. Have ESP
®
checked at a
qualified specialist workshop.
! Vehicles with 4MATIC: switch off the igni-
tion when the electric parking brake is
being tested using a dynamometer.
Application of the brakes by ESP ®
may oth-
erwise destroy the brake system.
Vehicles without 4MATIC: when towing your
vehicle with the rear axle raised, it is impor-
tant that you observe the notes on ESP ®
(Y page 369).
ESP ®
is deactivated if the åwarning lamp
in the instrument cluster lights up continu-
ously when the engine is running.
If the ÷ warning lamp lights up continu-
ously, ESP ®
is not available due to a malfunc-
tion.
Observe the information on warning lamps
(Y page 304) and display messages which
may be shown in the instrument cluster
(Y page 266).
Only use wheels with the recommended tyre
sizes. Only then will ESP ®
function properly.
Characteristics of ESP ®General notes
If the
÷ ESP warning lamp goes out before
beginning the journey, ESP ®
is automatically
active.
If ESP ®
intervenes, the ÷ESP®
warning
lamp flashes in the instrument cluster.
If ESP ®
intervenes:
X Do not deactivate ESP ®
under any circum-
stances.
X When pulling away, only depress the accel-
erator pedal as far as is necessary.
X Adapt your driving style to suit the prevail-
ing road and weather conditions. ECO start/stop function
The ECO start/stop function switches the
engine off automatically if the vehicle stops
moving. When pulling away again, the engine
starts automatically. ESP ®
remains in its pre-
viously selected status. Example:if ESP®
was deactivated before the engine was
switched off, ESP ®
remains deactivated when
the engine is switched on again.
Deactivating/activating ESP ® Important safety notes
i Observe the "Important safety notes" sec-
tion (Y page 69).
You can select between the following states
of ESP ®
:
R ESP ®
is activated
R ESP ®
is deactivated G
WARNING
If you deactivate ESP ®
, ESP ®
no longer sta-
bilises the vehicle. There is an increased risk
of skidding and an accident.
Only deactivate ESP ®
in the situations descri-
bed in the following.
It may be best to deactivate ESP ®
in the fol-
lowing situations:
R when using snow chains
R in deep snow
R on sand or gravel
i Activate ESP ®
as soon as the situations
described above no longer apply. ESP ®
will
otherwise not be able to stabilise the vehi-
cle if the vehicle starts to skid or a wheel
starts to spin.
Deactivating/activating ESP ®
You can deactivate or activate ESP ®
via the
on-board computer.
X To deactivate: (Ypage 257).
The å ESP®
OFF warning lamp in the
instrument cluster lights up. 76
Driving safety systemsSafety
Page 82 of 413
R
a narrow vehicle travelling in front, e.g. a
motorcycle
R a vehicle travelling in front on a different
line
Detection by the camera system is also
impaired in the event of:
R dirt on the camera or if the camera is cov-
ered
R glare on the camera system, e.g. from the
sun being low in the sky
R darkness
R if:
- pedestrians move quickly, e.g. into the
path of the vehicle
- the camera system no longer detects a
pedestrian as a person due to special
clothing or other objects
- a pedestrian is concealed by other
objects
- the typical outline of a person is not dis-
tinguishable from the background
Following damage to the front end of the vehi-
cle, have the radar sensor settings and oper- ation checked at a qualified specialist work-
shop. This also applies to collisions at slow
speeds where there is no visible damage to
the front of the vehicle.
Following damage to the windscreen, have
the configuration and operation of the cam-
era system checked at a qualified specialist
workshop.
Function X
To activate/deactivate: activate or deac-
tivate PRE-SAFE ®
Brake in the on-board
computer (Y page 258).
If the PRE-SAFE ®
Brake is not activated, the
æ symbol appears in the multifunction
display.
This function will issue a warning if:
R at a speed of around 30 km/h or more, the
distance maintained to the vehicle travel-
ling in front is insufficient for several sec-
onds. The
· distance warning lamp then lights
up in the instrument cluster.
R at a speed of approximately 7 km/h or
higher, you very quickly approach a vehicle
in front or a pedestrian.
An intermittent warning tone will then
sound and the ·distance warning lamp
lights up in the instrument cluster.
X Brake immediately to defuse the situation.
or
X Take evasive action provided it is safe to do
so.
i If there is an increased risk of collision,
preventive passenger protection measures
(PRE-SAFE ®
) are activated.
If the risk of collision with the vehicle in front
remains and you do not brake, take evasive
action or accelerate significantly, the vehicle
may perform automatic emergency braking,
up to the point of full brake application. Auto- matic emergency braking is not performed
until immediately prior to an imminent acci-
dent.
You can prevent the intervention of PRE-
SAFE ®
Brake at any time by:
R depressing the accelerator pedal further
R activating kickdown
R releasing the brake pedal
The braking action of PRE-SAFE ®
Brake is
ended automatically if:
R you manoeuvre to avoid the obstacle
R there is no longer a risk of collision
R there is no longer an obstacle detected in
front of your vehicle STEER CONTROL
General notes STEER CONTROL helps you by transmitting a
noticeable steering force to the steering
wheel in the direction required for vehicle
stabilisation. Driving safety systems
79Safety Z
Page 93 of 413
Problem
Possible causes/consequences and
M
MSolutions The engine cannot be
started using the key. The on-board voltage is too low.
X Switch off non-essential consumers, e.g. seat heating or interior
lighting, and try to start the engine again.
If this does not work:
X Check the starter battery and charge it if necessary
(Y page 362).
or
X Jump-start the vehicle (Y page 364).
or
X Consult a qualified specialist workshop. The engine cannot be
started using the Start/
Stop button. The key is
in the vehicle. The vehicle is locked.
X Unlock the vehicle and try to start the vehicle again. The key battery is discharged or nearly discharged.
X Check the key battery (Y page 88) and replace it if necessary
(Y page 88).
If this does not work: X Start your vehicle with the key in the ignition lock. There is interference from a powerful source of radio waves.
X Start your vehicle with the key in the ignition lock. You have lost a key. X
Have the key deactivated at a qualified specialist workshop.
X Report the loss immediately to the vehicle insurers.
X If necessary, have the locks changed as well. You have lost the emer-
gency key element. X
Report the loss immediately to the vehicle insurers.
X If necessary, have the locks changed as well. Doors
Important safety notes
United Kingdom only: G
WARNING
When the double locks are activated, the
doors can no longer be opened from the
inside. People in the vehicle can no longer get out, e.g. in hazardous situations. There is a
risk of injury. Therefore, do not leave any people unsuper-
vised in the vehicle, particularly children, eld- erly people or people in need of special assis-
tance. Do not activate the double lock when
people are in the vehicle.
If the vehicle has been locked from the out-
side, the double-lock function is activated as
standard. It is then not possible to open the
doors from inside the vehicle. You can deac-
tivate the double lock function by deactivat-
ing the interior motion sensor (Y page 81).90
DoorsOpening and closing
Page 94 of 413
The doors can then be opened from the inside
after the vehicle has been locked from the
outside. The anti-theft alarm system is trig-
gered if the door is opened from the inside.
Switch off the alarm .
All countries: G
WARNING
If children are left unsupervised in the vehicle, they can:
R open doors and endanger other persons or
road users
R climb out and be injured by the traffic
R operate vehicle equipment and, for exam-
ple, trap themselves.
Children could also set the vehicle in motion, for example by:
R releasing the parking brake
R shifting the automatic transmission out of
park position P
R starting the engine.
There is a risk of an accident and injury.
When leaving the vehicle, always take the key
with you and lock the vehicle. Never leave
children unattended in the vehicle. Always
keep the key out of reach of children.
Stow luggage or loads preferably in the boot. Observe the loading guidelines (Y page 314).Unlocking and opening the doors
from the inside
i When a door is opened, the side window
on that side opens slightly. When the door
is closed, the side window is raised again.
! The side windows will not open/close if
the battery is discharged or if the side win-
dows have iced up. It will then not be pos-
sible to close the door. Do not attempt to
force the door to close. You could other-
wise damage the door or the side window.
Only for the United Kingdom: if the vehicle
has been locked with the key or with KEY-
LESS-GO, the double lock function is activa- ted as standard. It is then not possible to open
the doors from inside the vehicle. You can
deactivate the double lock function by deac-
tivating the interior motion sensor . The doors can then be opened from the inside after thevehicle has been locked from the outside. The
anti-theft alarm system is triggered if the door
is opened from the inside. Switch off the
alarm (Y page 80).
For all countries except the United King-
dom:
You can open a door from inside the vehicle
even if it has been locked. If the vehicle has
previously been locked with the key or with
KEYLESS-GO, opening a door from the inside will trigger the anti-theft alarm system.
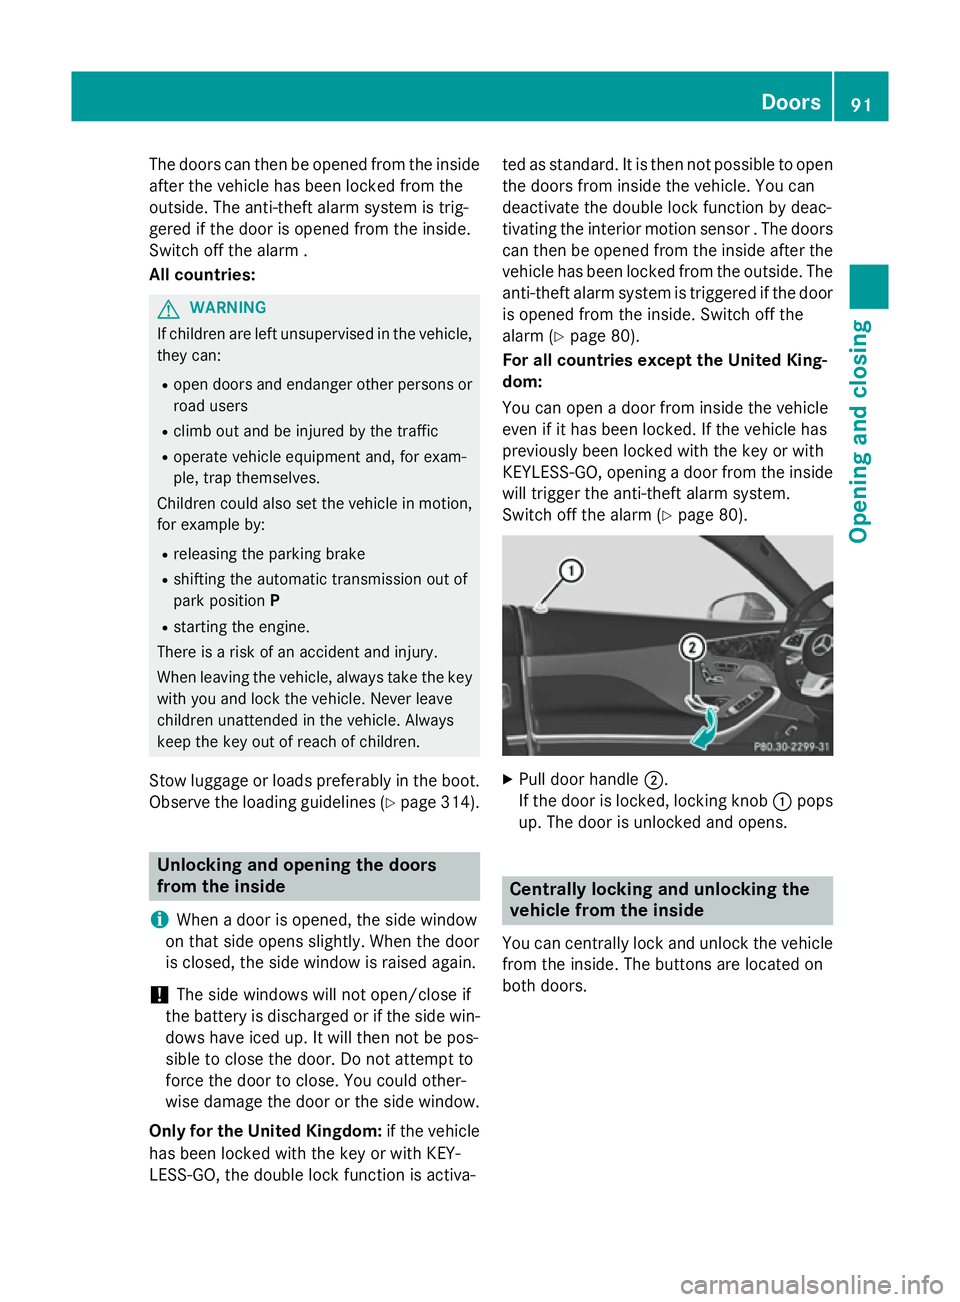
Switch off the alarm (Y page 80). X
Pull door handle ;.
If the door is locked, locking knob :pops
up. The door is unlocked and opens. Centrally locking and unlocking the
vehicle from the inside
You can centrally lock and unlock the vehicle from the inside. The buttons are located on
both doors. Doors
91Opening and closing Z
Page 98 of 413
again automatically. The automatic obstacle
recognition with reversing function is only an aid. It is not a substitute for your attentive-
ness when opening and closing the boot lid. G
WARNING
The reversing function does not react:
R to soft, light and thin objects, e.g. small fin-
gers
R over the last 8 mm of the closing path
This means that the reversing feature cannot
prevent someone being trapped in these sit-
uations. There is a risk of injury.
When closing make sure that no parts of the
body are in the closing area.
If someone is trapped:
R press the Fbutton on the key or
R press the remote operating switch on the
driver's door or
R press the closing or locking button on the
boot lid. Opening/closing automatically from
the outside
Important safety notes G
WARNING
Parts of the body could become trapped dur-
ing automatic closing of the boot lid. More-
over, people, e.g. children, may be standing in the closing area or may enter the closing area
during the closing process. There is a risk of
injury.
Make sure that nobody is in the vicinity of the closing area during the closing process.
Use one of the following options to stop the
closing process:
R Press the Fbutton on the key.
R press the remote operating switch on the
driver’s door.
R Press the closing or locking button on the
boot lid. !
The boot lid swings upwards when
opened. Therefore, make sure that there is
sufficient clearance above the boot lid.
i The opening dimensions of the boot lid
can be found in the "Vehicle data" section
(Y page 408).
Opening You can open the boot lid automatically using
the key.
X Press and hold the Fbutton on the key
until the boot lid opens.
Closing You can close the boot lid automatically using
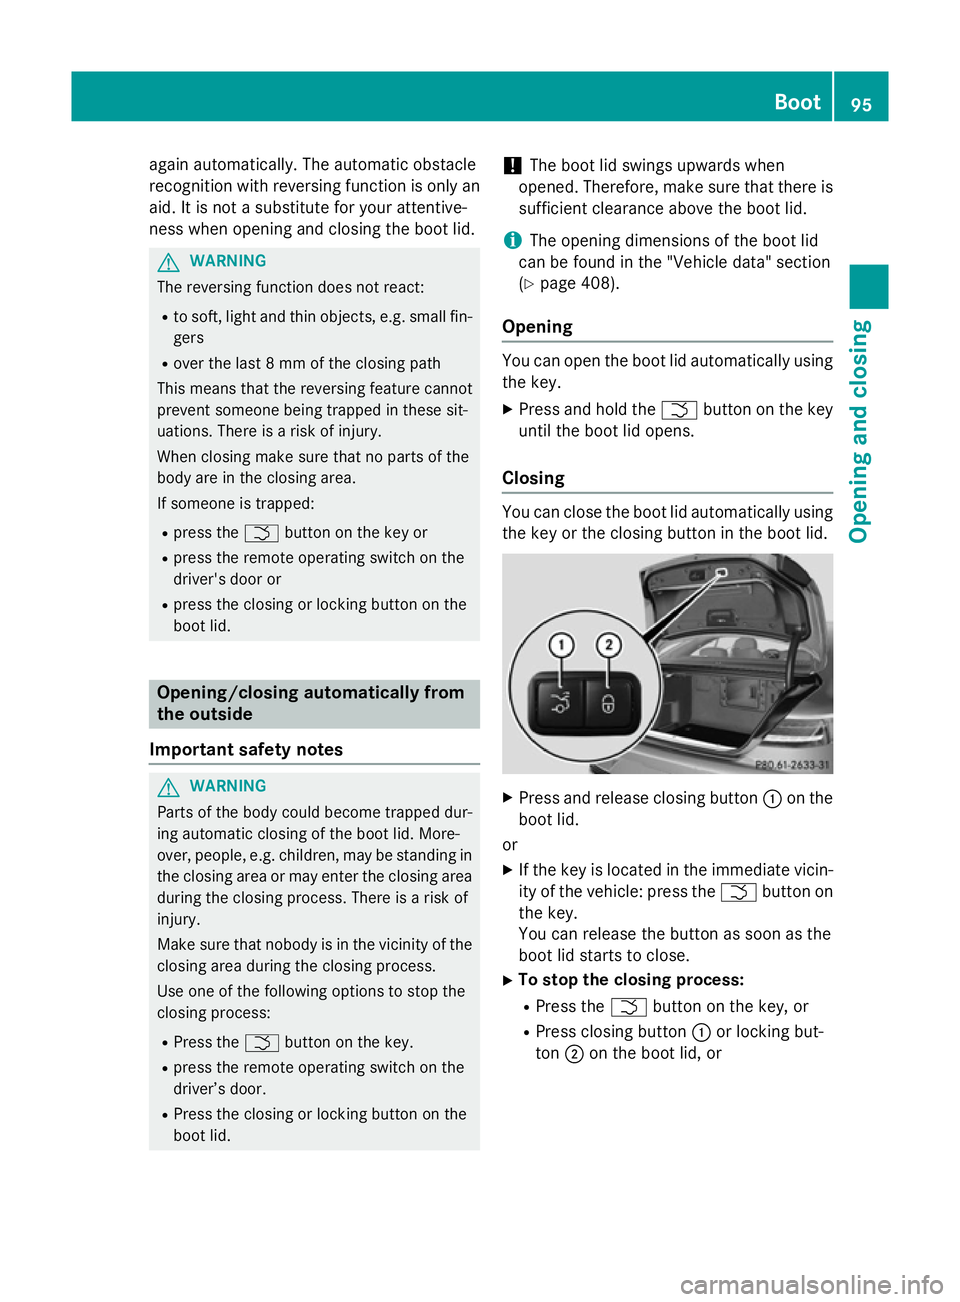
the key or the closing button in the boot lid. X
Press and release closing button :on the
boot lid.
or X If the key is located in the immediate vicin-
ity of the vehicle: press the Fbutton on
the key.
You can release the button as soon as the
boot lid starts to close.
X To stop the closing process:
R Press the Fbutton on the key, or
R Press closing button :or locking but-
ton ;on the boot lid, or Boot
95Opening and closing Z
Page 102 of 413
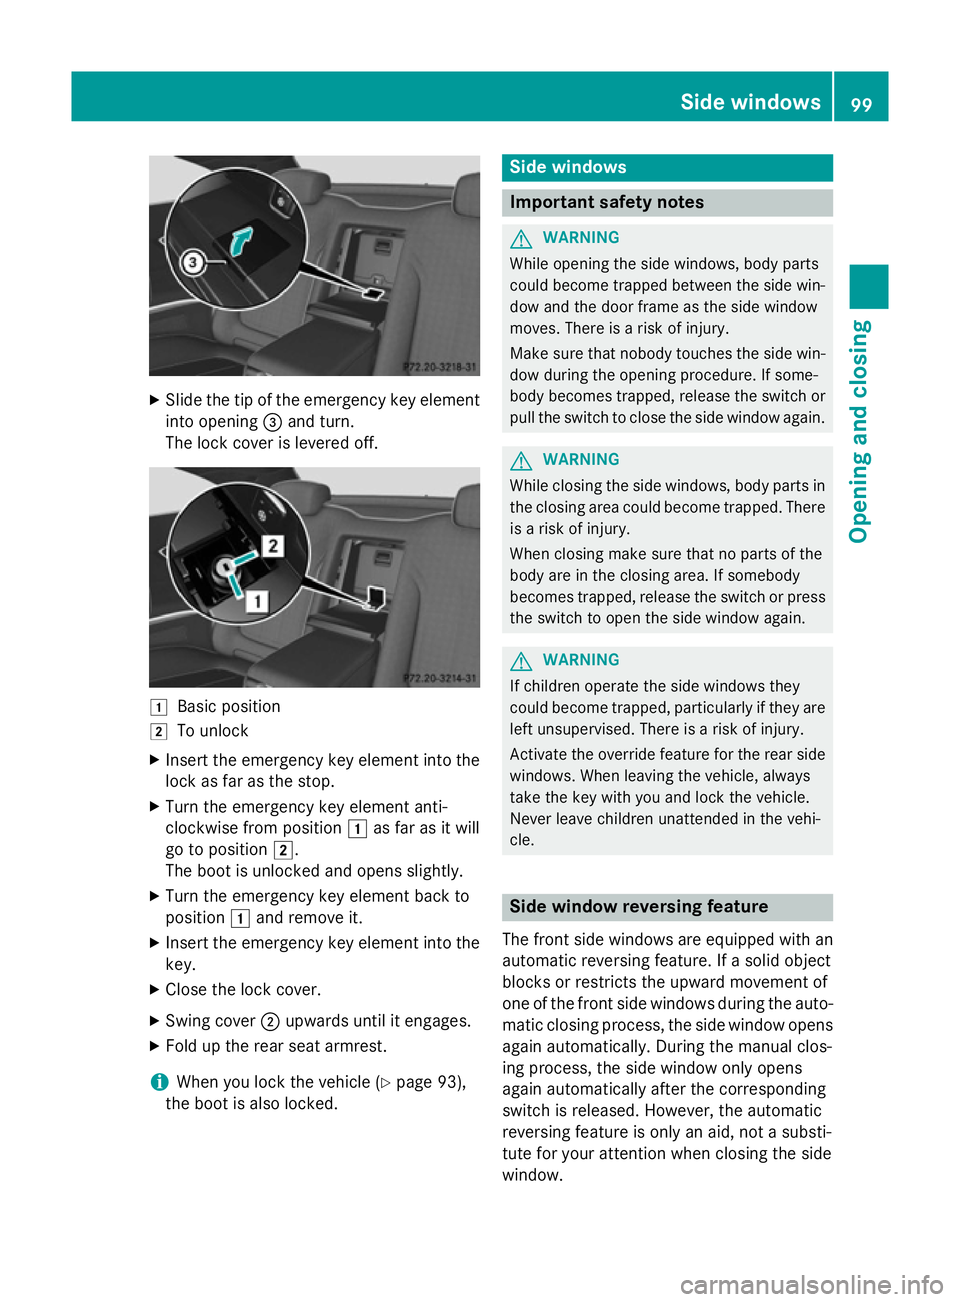
X
Slide the tip of the emergency key element
into opening =and turn.
The lock cover is levered off. 1
Basic position
2 To unlock
X Insert the emergency key element into the
lock as far as the stop.
X Turn the emergency key element anti-
clockwise from position 1as far as it will
go to position 2.
The boot is unlocked and opens slightly.
X Turn the emergency key element back to
position 1and remove it.
X Insert the emergency key element into the
key.
X Close the lock cover.
X Swing cover ;upwards until it engages.
X Fold up the rear seat armrest.
i When you lock the vehicle (Y
page 93),
the boot is also locked. Side windows
Important safety notes
G
WARNING
While opening the side windows, body parts
could become trapped between the side win- dow and the door frame as the side window
moves. There is a risk of injury.
Make sure that nobody touches the side win-
dow during the opening procedure. If some-
body becomes trapped, release the switch or pull the switch to close the side window again. G
WARNING
While closing the side windows, body parts in the closing area could become trapped. There is a risk of injury.
When closing make sure that no parts of the
body are in the closing area. If somebody
becomes trapped, release the switch or press
the switch to open the side window again. G
WARNING
If children operate the side windows they
could become trapped, particularly if they are left unsupervised. There is a risk of injury.
Activate the override feature for the rear side
windows. When leaving the vehicle, always
take the key with you and lock the vehicle.
Never leave children unattended in the vehi-
cle. Side window reversing feature
The front side windows are equipped with an
automatic reversing feature. If a solid object
blocks or restricts the upward movement of
one of the front side windows during the auto- matic closing process, the side window opens again automatically. During the manual clos-
ing process, the side window only opens
again automatically after the corresponding
switch is released. However, the automatic
reversing feature is only an aid, not a substi-
tute for your attention when closing the side
window. Side windows
99Opening and closing Z
Page 103 of 413
G
WARNING
The reversing function does not react:
R to soft, light and thin objects, e.g. small fin-
gers
R while resetting
This means that the reversing feature cannot
prevent someone being trapped in these sit-
uations. There is a risk of injury.
When closing, make sure that no parts of the
body are in the closing area. If someone
becomes trapped, press the switch to open
the side window again. Opening and closing the side win-
dows
The switches for all side windows are located
on the driver's door. There is also a switch for
the front-passenger side window on the front- passenger door.
The switches on the driver's door take prec-
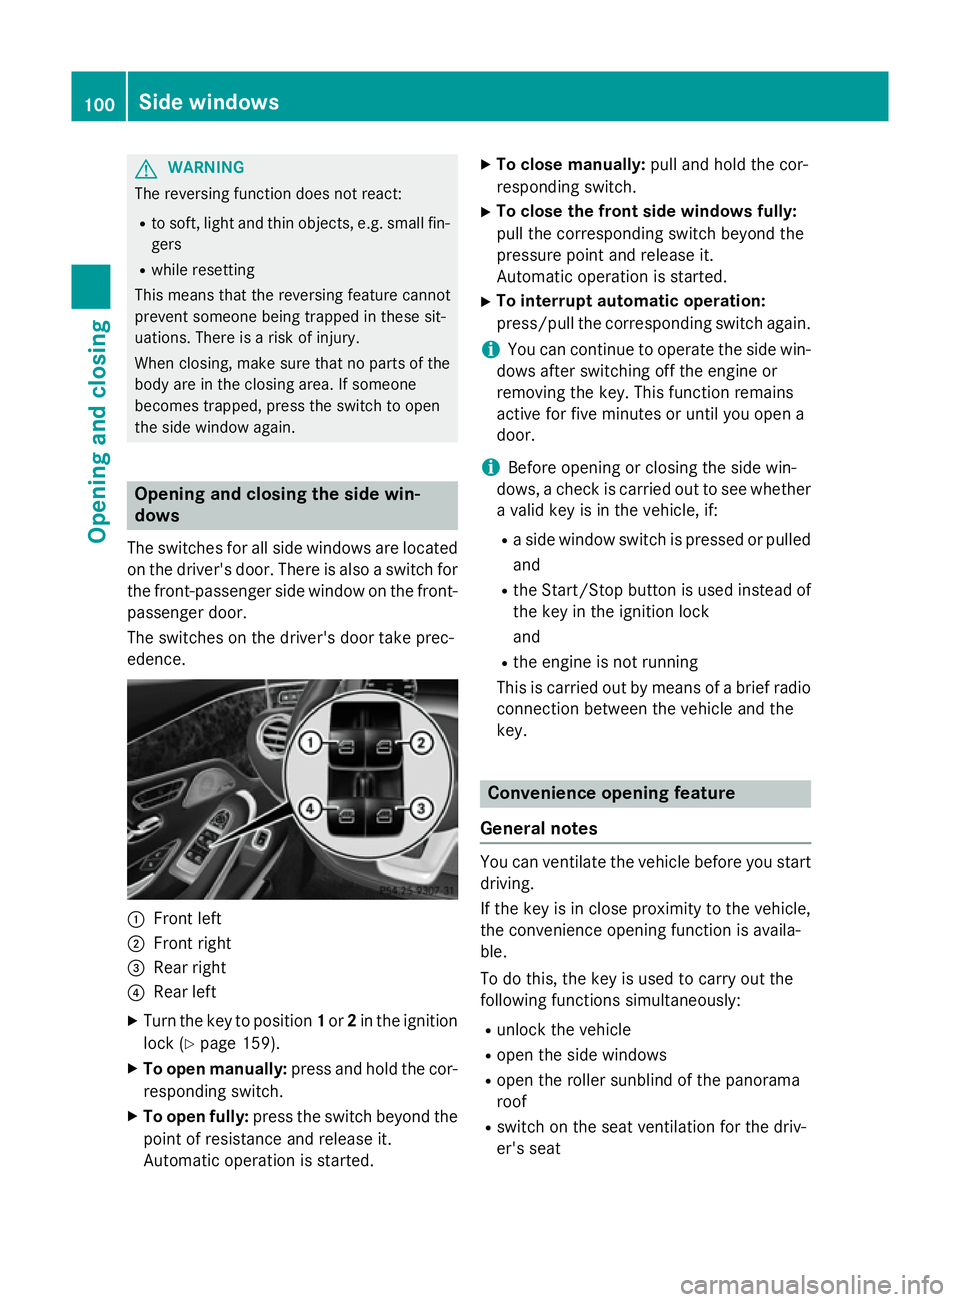
edence. :
Front left
; Front right
= Rear right
? Rear left
X Turn the key to position 1or 2in the ignition
lock (Y page 159).
X To open manually: press and hold the cor-
responding switch.
X To open fully: press the switch beyond the
point of resistance and release it.
Automatic operation is started. X
To close manually: pull and hold the cor-
responding switch.
X To close the front side windows fully:
pull the corresponding switch beyond the
pressure point and release it.
Automatic operation is started.
X To interrupt automatic operation:
press/pull the corresponding switch again.
i You can continue to operate the side win-
dows after switching off the engine or
removing the key. This function remains
active for five minutes or until you open a
door.
i Before opening or closing the side win-
dows, a check is carried out to see whether a valid key is in the vehicle, if:
R a side window switch is pressed or pulled
and
R the Start/Stop button is used instead of
the key in the ignition lock
and
R the engine is not running
This is carried out by means of a brief radio
connection between the vehicle and the
key. Convenience opening feature
General notes You can ventilate the vehicle before you start
driving.
If the key is in close proximity to the vehicle,
the convenience opening function is availa-
ble.
To do this, the key is used to carry out the
following functions simultaneously:
R unlock the vehicle
R open the side windows
R open the roller sunblind of the panorama
roof
R switch on the seat ventilation for the driv-
er's seat 100
Side windowsOpening and closing
Page 104 of 413
Convenience opening feature
X
Press and hold the %button until the
side windows are in the desired position.
The roller sunblind of the panorama roof
opens.
X To interrupt convenience opening:
release the %button. Convenience closing feature
Important safety notes G
WARNING
When using convenience closing, you could
become trapped within the sweep of the clos- ing window. There is a risk of injury.
Monitor the entire closing procedure when
using convenience closing. When closing,
make sure that no one has any parts of the
body within the closing area.
You can close the side windows and the roller sunblind for the panorama roof after you lock
the vehicle.
i Notes on the automatic reversing feature
for:
R the side windows (Y page 99)
R the roller sunblind (Y page 102)
Using the key X
Press and hold the &button until the
side windows and the roller sunblind of the panorama roof are fully closed.
X Make sure that all the side windows are
closed.
X To interrupt convenience closing:
release the &button.
Using KEYLESS-GO The key must be outside the vehicle. All the
doors must be closed. X
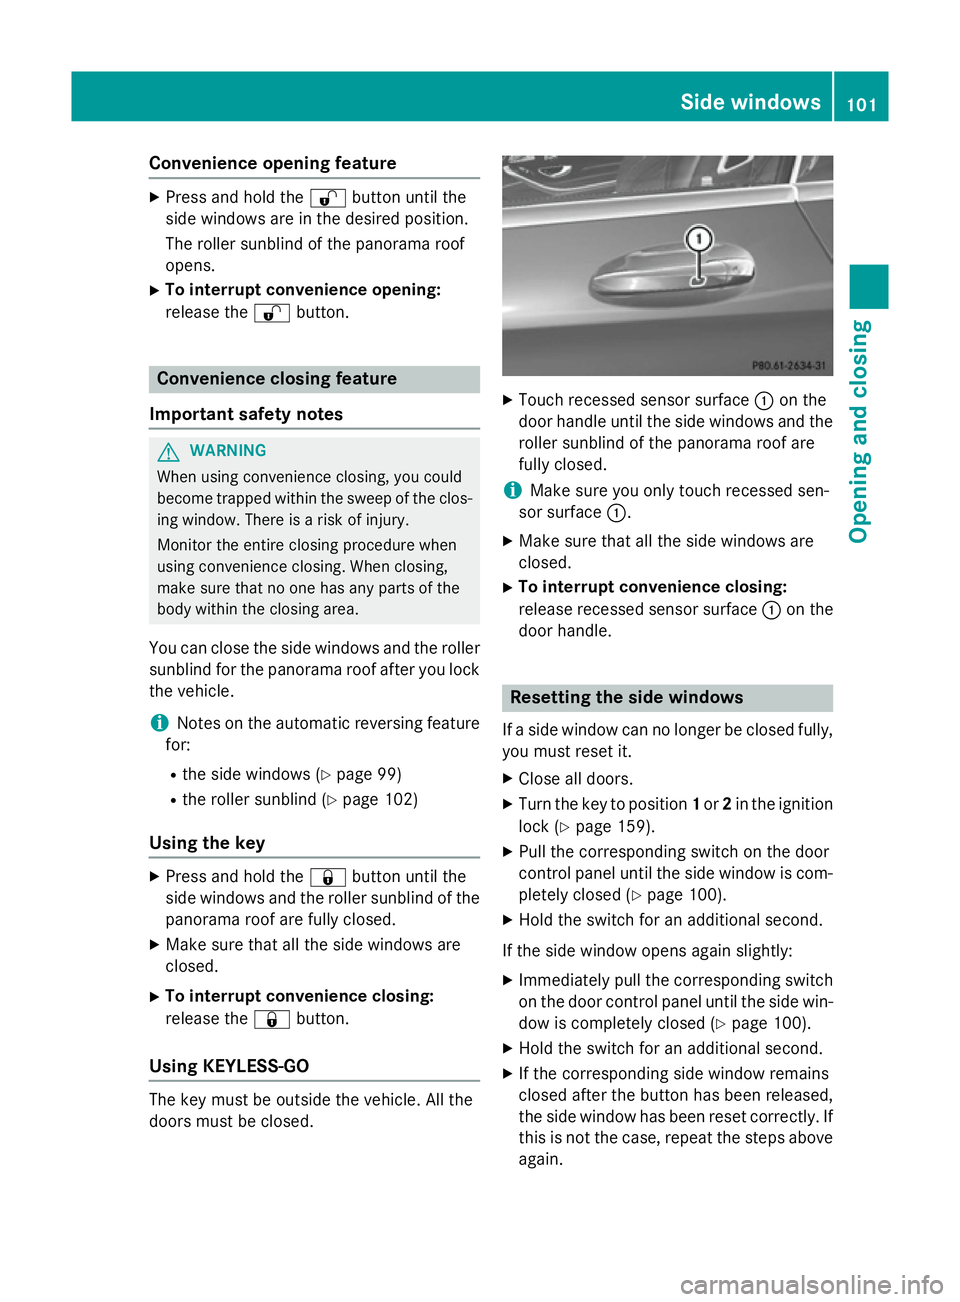
Touch recessed sensor surface :on the
door handle until the side windows and the roller sunblind of the panorama roof are
fully closed.
i Make sure you only touch recessed sen-
sor surface :.
X Make sure that all the side windows are
closed.
X To interrupt convenience closing:
release recessed sensor surface :on the
door handle. Resetting the side windows
If a side window can no longer be closed fully, you must reset it.
X Close all doors.
X Turn the key to position 1or 2in the ignition
lock (Y page 159).
X Pull the corresponding switch on the door
control panel until the side window is com- pletely closed (Y page 100).
X Hold the switch for an additional second.
If the side window opens again slightly: X Immediately pull the corresponding switch
on the door control panel until the side win-
dow is completely closed (Y page 100).
X Hold the switch for an additional second.
X If the corresponding side window remains
closed after the button has been released,
the side window has been reset correctly. If
this is not the case, repeat the steps aboveagain. Side windows
101Opening and closing Z