2014 MERCEDES-BENZ S-CLASS COUPE reset
[x] Cancel search: resetPage 105 of 413
Problems with the side windows
G
WARNING
If you close a side window again immediately after it has been blocked or reset, the side window
closes with increased or maximum force. The reversing function is then not active. Parts of the
body could be trapped in the closing area in the process. This poses an increased risk of injury or even fatal injury.
Make sure that no parts of the body are in the closing area. To stop the closing process, releasethe switch or push the switch again to reopen the side window. Problem
Possible causes/consequences and
M MSolutions A side window cannot
be closed because it is
blocked by objects, e.g.
leaves in the window
guide. X
Remove the objects.
X Close the side window. A side window cannot
be closed and you can-
not see the cause. If a side window is obstructed during closing and reopens again
slightly:
X Immediately after the window blocks, pull the corresponding
switch again until the side window has closed.
The side window is closed with increased force.
If a side window is obstructed again during closing and reopens
again slightly: X Immediately after the window blocks, pull the corresponding
switch again until the side window has closed.
The side window is closed without the anti-entrapment feature. Panorama roof
Operating the roller sunblind for the
panorama roof
Important safety notes G
WARNING
When opening or closing the roller sunblind,
parts of the body could be trapped between
the roller sunblind and the frame. There is a
risk of injury.
When opening or closing make sure that no
parts of the body are in the sweep of the roller sunblind. If someone is trapped:
R release the switch immediately or
R press the switch in any direction during
automatic operation
The opening/closing process is stopped.
The roller sunblind shields the vehicle interior
from sunlight.
Roller sunblind reversing feature The roller sunblind is equipped with an auto-
matic reversing feature. If an object blocks or
restricts the roller sunblind during the closing
process, the roller sunblind automatically
opens again a little. The automatic reversing 102
Panorama roofOpening and closing
Page 106 of 413
feature is only an aid, not a substitute for your
attention when closing the roller sunblind. G
WARNING
The reversing feature especially does not
react to soft, light and thin objects, such as
small fingers. This means that the reversing
feature cannot prevent someone being trap-
ped in these situations. There is a risk of
injury.
When closing make sure that no parts of the
body are in the sweep of the roller sunblind.
If someone is trapped:
R release the switch immediately or
R during automatic operation, press the
switch briefly in any direction
The closing process is stopped.
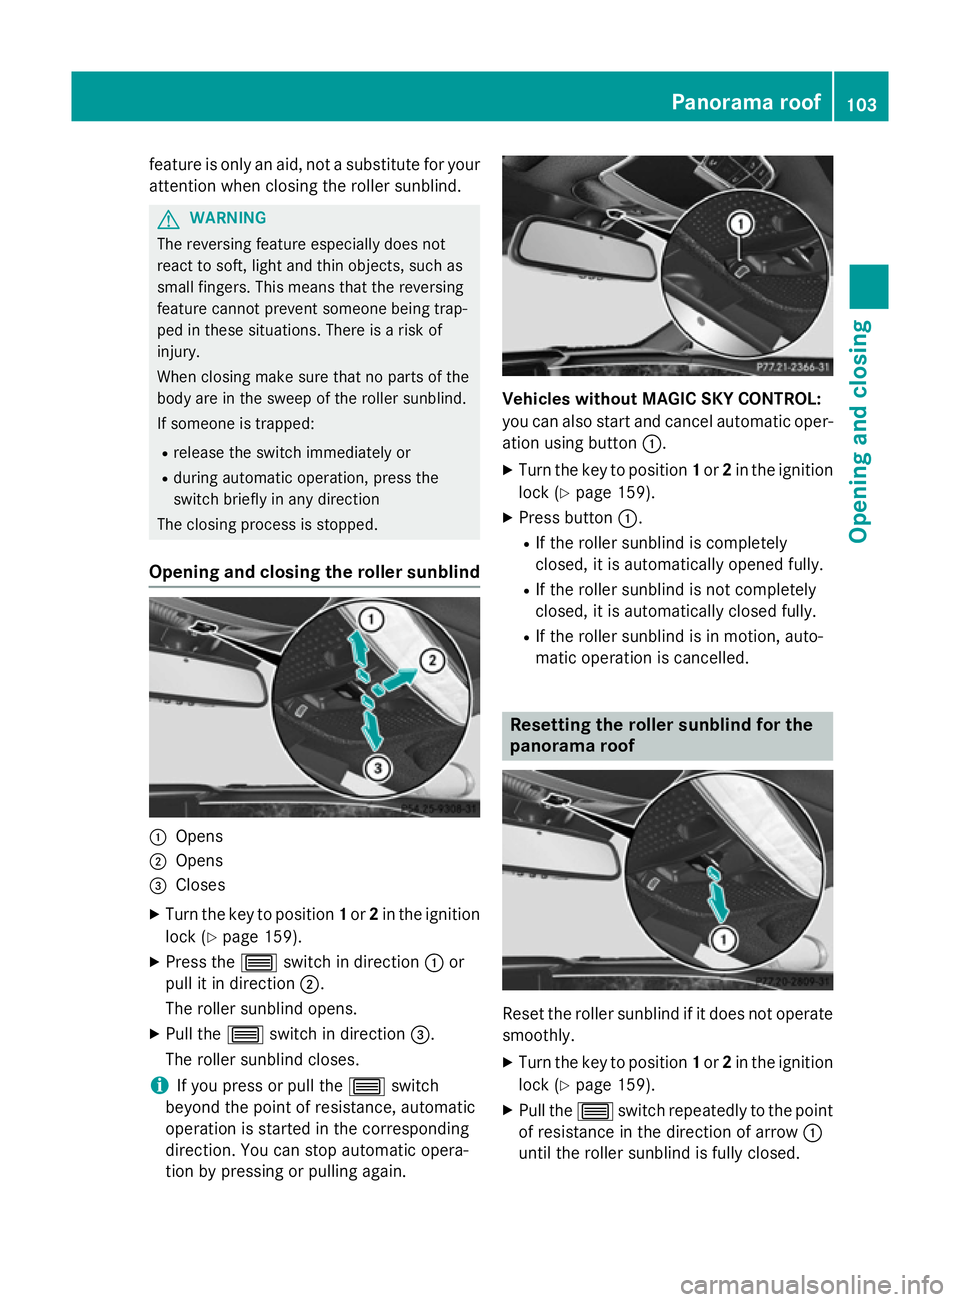
Opening and closing the roller sunblind :
Opens
; Opens
= Closes
X Turn the key to position 1or 2in the ignition
lock (Y page 159).
X Press the 3switch in direction :or
pull it in direction ;.
The roller sunblind opens.
X Pull the 3switch in direction =.
The roller sunblind closes.
i If you press or pull the
3switch
beyond the point of resistance, automatic
operation is started in the corresponding
direction. You can stop automatic opera-
tion by pressing or pulling again. Vehicles without MAGIC SKY CONTROL:
you can also start and cancel automatic oper-
ation using button :.
X Turn the key to position 1or 2in the ignition
lock (Y page 159).
X Press button :.
R If the roller sunblind is completely
closed, it is automatically opened fully.
R If the roller sunblind is not completely
closed, it is automatically closed fully.
R If the roller sunblind is in motion, auto-
matic operation is cancelled. Resetting the roller sunblind for the
panorama roof
Reset the roller sunblind if it does not operate
smoothly.
X Turn the key to position 1or 2in the ignition
lock (Y page 159).
X Pull the 3switch repeatedly to the point
of resistance in the direction of arrow :
until the roller sunblind is fully closed. Panorama roof
103Opening and closing Z
Page 121 of 413
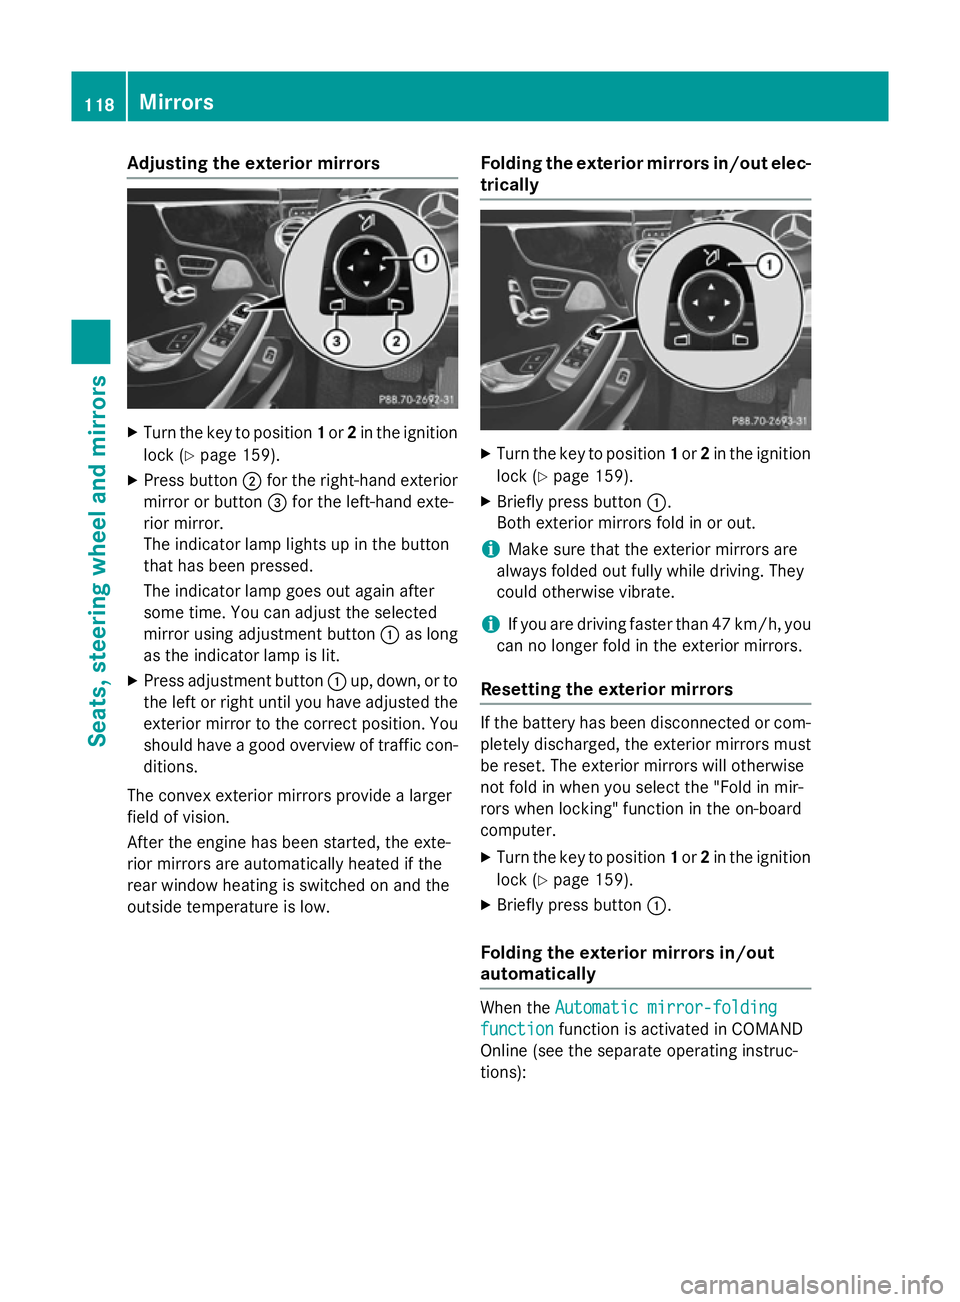
Adjusting the exterior mirrors
X
Turn the key to position 1or 2in the ignition
lock (Y page 159).
X Press button ;for the right-hand exterior
mirror or button =for the left-hand exte-
rior mirror.
The indicator lamp lights up in the button
that has been pressed.
The indicator lamp goes out again after
some time. You can adjust the selected
mirror using adjustment button :as long
as the indicator lamp is lit.
X Press adjustment button :up, down, or to
the left or right until you have adjusted the
exterior mirror to the correct position. You
should have a good overview of traffic con- ditions.
The convex exterior mirrors provide a larger
field of vision.
After the engine has been started, the exte-
rior mirrors are automatically heated if the
rear window heating is switched on and the
outside temperature is low. Folding the exterior mirrors in/out elec-
trically X
Turn the key to position 1or 2in the ignition
lock (Y page 159).
X Briefly press button :.
Both exterior mirrors fold in or out.
i Make sure that the exterior mirrors are
always folded out fully while driving. They
could otherwise vibrate.
i If you are driving faster than 47 km/h, you
can no longer fold in the exterior mirrors.
Resetting the exterior mirrors If the battery has been disconnected or com-
pletely discharged, the exterior mirrors must
be reset. The exterior mirrors will otherwise
not fold in when you select the "Fold in mir-
rors when locking" function in the on-board
computer.
X Turn the key to position 1or 2in the ignition
lock (Y page 159).
X Briefly press button :.
Folding the exterior mirrors in/out
automatically When the
Automatic mirror-folding Automatic mirror-folding
function
function function is activated in COMAND
Online (see the separate operating instruc-
tions): 118
MirrorsSeats
, steering wheel and mirrors
Page 122 of 413
R
the exterior mirrors fold in automatically as
soon as you lock the vehicle from the out-
side
R the exterior mirrors fold out automatically
again as soon as you unlock the vehicle
i If the exterior mirrors have been folded in
manually, they do not fold out.
Exterior mirror pushed out of position If an exterior mirror has been pushed out of
position (forwards or backwards), proceed as
follows:
X Press and hold button :until you hear a
click and the mirror engages audibly into
position (Y page 118).
The mirror housing is engaged again and
you can adjust the exterior mirrors as usual
(Y page 118). Automatic anti-dazzle mirrors
The rear-view mirror and the exterior mirror
on the driver's side automatically go into anti- dazzle mode if the following conditions are
met simultaneously:
R the ignition is switched on.
R incident light from headlamps strikes the
sensor in the rear-view mirror.
The mirrors do not dip if reverse gear is
engaged or if the interior lighting is switched
on. Parking position of the exterior mirror
on the front-passenger side
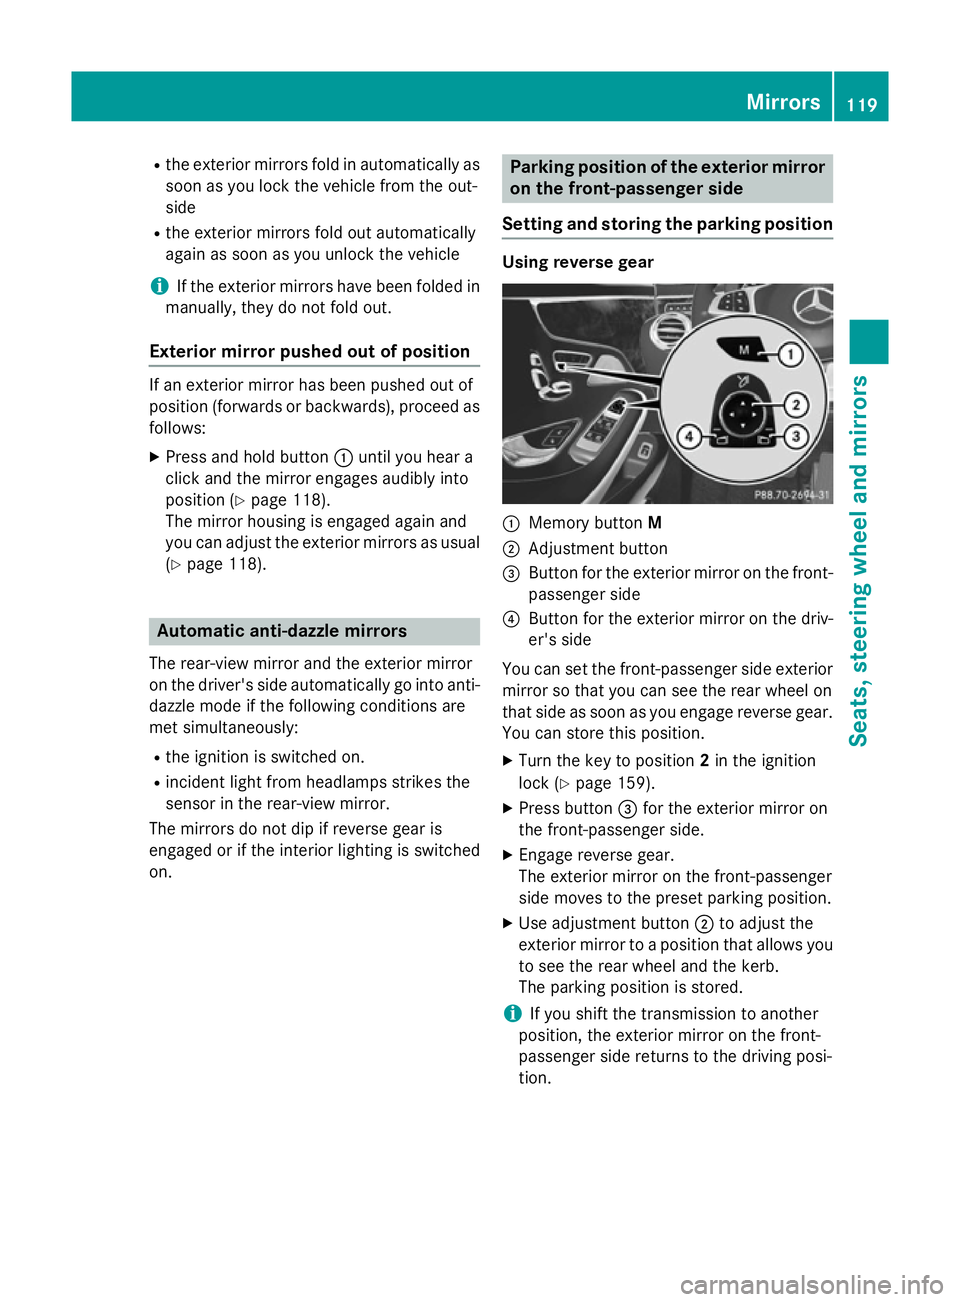
Setting and storing the parking position Using reverse gear
:
Memory button M
; Adjustment button
= Button for the exterior mirror on the front-
passenger side
? Button for the exterior mirror on the driv-
er's side
You can set the front-passenger side exterior
mirror so that you can see the rear wheel on
that side as soon as you engage reverse gear. You can store this position.
X Turn the key to position 2in the ignition
lock (Y page 159).
X Press button =for the exterior mirror on
the front-passenger side.
X Engage reverse gear.
The exterior mirror on the front-passenger
side moves to the preset parking position.
X Use adjustment button ;to adjust the
exterior mirror to a position that allows you
to see the rear wheel and the kerb.
The parking position is stored.
i If you shift the transmission to another
position, the exterior mirror on the front-
passenger side returns to the driving posi-
tion. Mirrors
119Seats, steering wheel and mirrors Z
Page 123 of 413
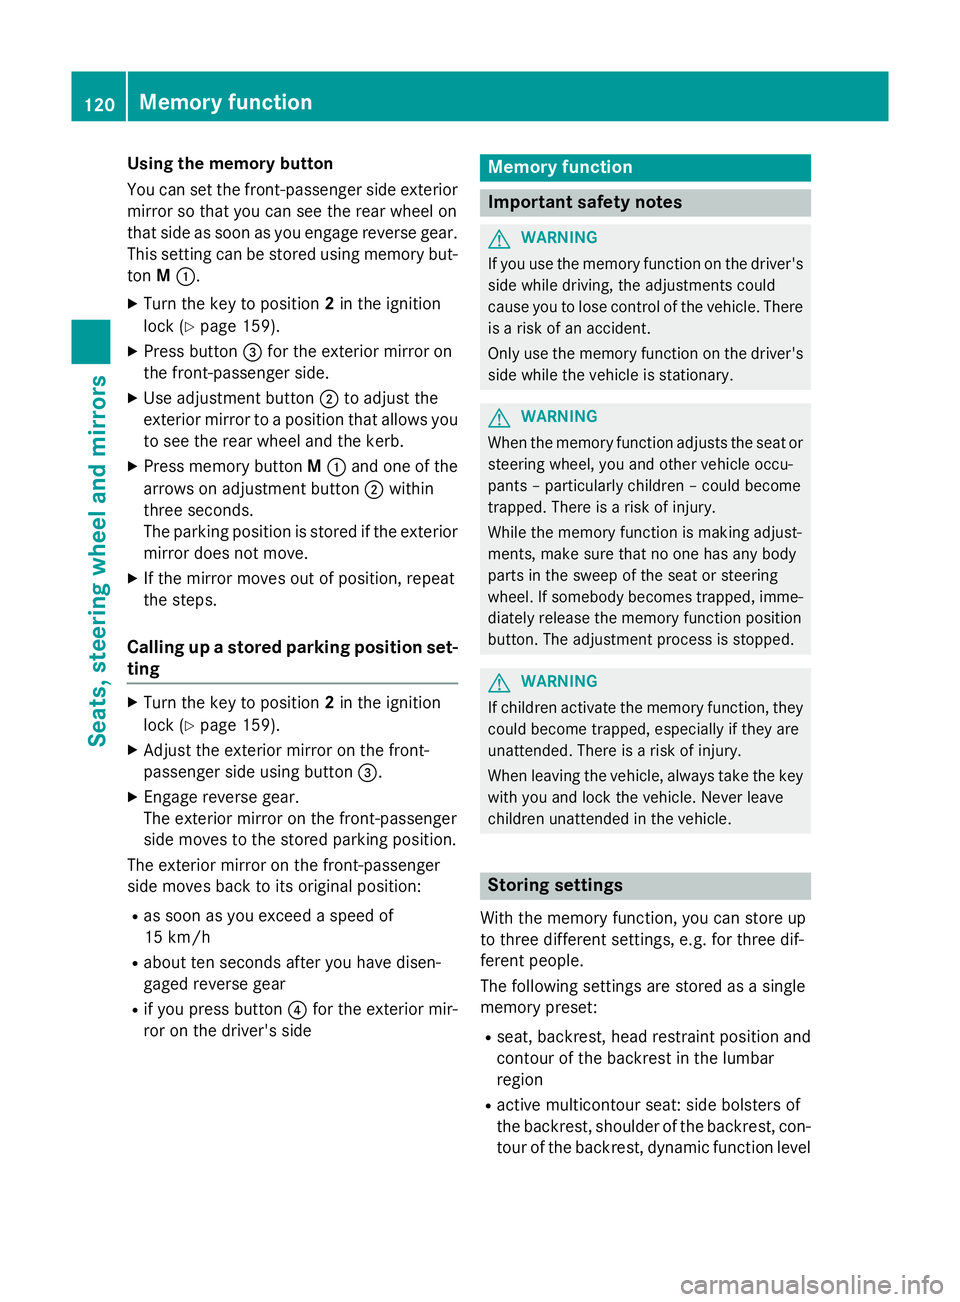
Using the memory button
You can set the front-passenger side exterior
mirror so that you can see the rear wheel on
that side as soon as you engage reverse gear.
This setting can be stored using memory but-
ton M:.
X Turn the key to position 2in the ignition
lock (Y page 159).
X Press button =for the exterior mirror on
the front-passenger side.
X Use adjustment button ;to adjust the
exterior mirror to a position that allows you to see the rear wheel and the kerb.
X Press memory button M: and one of the
arrows on adjustment button ;within
three seconds.
The parking position is stored if the exterior
mirror does not move.
X If the mirror moves out of position, repeat
the steps.
Calling up a stored parking position set- ting X
Turn the key to position 2in the ignition
lock (Y page 159).
X Adjust the exterior mirror on the front-
passenger side using button =.
X Engage reverse gear.
The exterior mirror on the front-passenger
side moves to the stored parking position.
The exterior mirror on the front-passenger
side moves back to its original position:
R as soon as you exceed a speed of
15 km/h
R about ten seconds after you have disen-
gaged reverse gear
R if you press button ?for the exterior mir-
ror on the driver's side Memory function
Important safety notes
G
WARNING
If you use the memory function on the driver's side while driving, the adjustments could
cause you to lose control of the vehicle. There
is a risk of an accident.
Only use the memory function on the driver's
side while the vehicle is stationary. G
WARNING
When the memory function adjusts the seat or steering wheel, you and other vehicle occu-
pants – particularly children – could become
trapped. There is a risk of injury.
While the memory function is making adjust-
ments, make sure that no one has any body
parts in the sweep of the seat or steering
wheel. If somebody becomes trapped, imme-
diately release the memory function position
button. The adjustment process is stopped. G
WARNING
If children activate the memory function, they
could become trapped, especially if they are
unattended. There is a risk of injury.
When leaving the vehicle, always take the key with you and lock the vehicle. Never leave
children unattended in the vehicle. Storing settings
With the memory function, you can store up
to three different settings, e.g. for three dif-
ferent people.
The following settings are stored as a single
memory preset:
R seat, backrest, head restraint position and
contour of the backrest in the lumbar
region
R active multicontour seat: side bolsters of
the backrest, shoulder of the backrest, con-
tour of the backrest, dynamic function level 120
Memory functionSeats, steering wheel and mirrors
Page 185 of 413
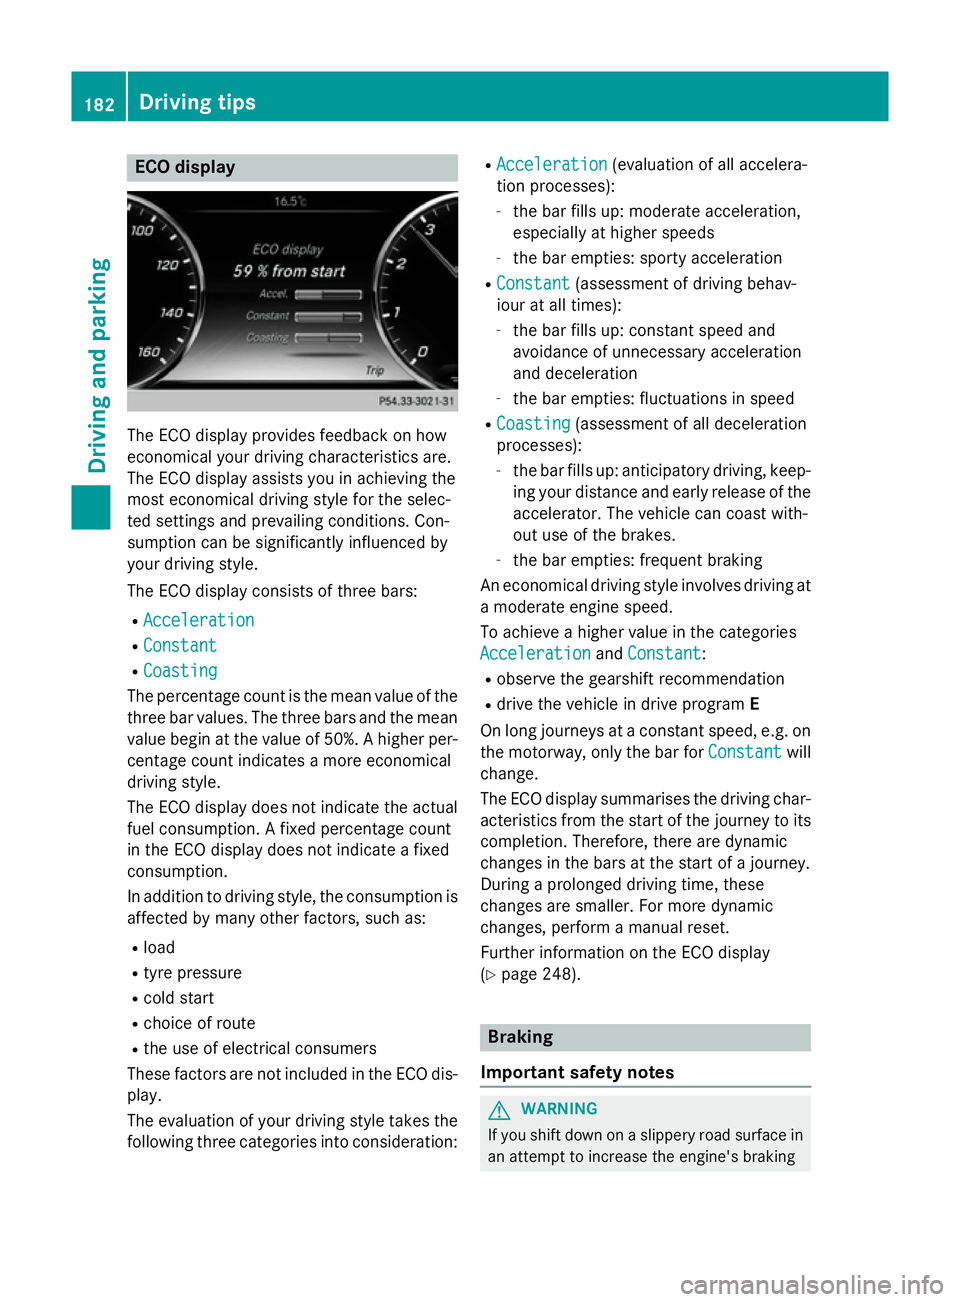
ECO display
The ECO display provides feedback on how
economical your driving characteristics are.
The ECO display assists you in achieving the
most economical driving style for the selec-
ted settings and prevailing conditions. Con-
sumption can be significantly influenced by
your driving style.
The ECO display consists of three bars:
R Acceleration
Acceleration
R Constant Constant
R Coasting
Coasting
The percentage count is the mean value of the three bar values. The three bars and the mean
value begin at the value of 50%. A higher per- centage count indicates a more economical
driving style.
The ECO display does not indicate the actual
fuel consumption. A fixed percentage count
in the ECO display does not indicate a fixed
consumption.
In addition to driving style, the consumption is
affected by many other factors, such as:
R load
R tyre pressure
R cold start
R choice of route
R the use of electrical consumers
These factors are not included in the ECO dis-
play.
The evaluation of your driving style takes the following three categories into consideration: R
Acceleration
Acceleration (evaluation of all accelera-
tion processes):
- the bar fills up: moderate acceleration,
especially at higher speeds
- the bar empties: sporty acceleration
R Constant Constant (assessment of driving behav-
iour at all times):
- the bar fills up: constant speed and
avoidance of unnecessary acceleration
and deceleration
- the bar empties: fluctuations in speed
R Coasting Coasting (assessment of all deceleration
processes):
- the bar fills up: anticipatory driving, keep-
ing your distance and early release of the
accelerator. The vehicle can coast with-
out use of the brakes.
- the bar empties: frequent braking
An economical driving style involves driving at a moderate engine speed.
To achieve a higher value in the categories
Acceleration Acceleration andConstant
Constant:
R observe the gearshift recommendation
R drive the vehicle in drive program E
On long journeys at a constant speed, e.g. on
the motorway, only the bar for Constant
Constantwill
change.
The ECO display summarises the driving char- acteristics from the start of the journey to its
completion. Therefore, there are dynamic
changes in the bars at the start of a journey.
During a prolonged driving time, these
changes are smaller. For more dynamic
changes, perform a manual reset.
Further information on the ECO display
(Y page 248). Braking
Important safety notes G
WARNING
If you shift down on a slippery road surface in an attempt to increase the engine's braking 182
Driving tipsDriving and parking
Page 229 of 413
Important safety notes
ATTENTION ASSIST is only an aid. It may not
always detect fatigue or lapses in concentra-
tion until too late, or may not detect them at
all. The system is not a substitute for a well-
rested and attentive driver.
The functionality of ATTENTION ASSIST is
restricted, and warnings may be delayed or
not occur at all:
R if the length of the journey is less than
approximately 30 minutes
R if the road condition is poor, e.g. if the sur-
face is uneven or if there are potholes
R if there is a strong side wind
R if you have adopted a sporty driving style
with high cornering speeds or high rates of
acceleration
R if you are predominantly driving at a speed
below 60 km/h or above 200 km/h
R if you are driving with the active Steer
Assist of DISTRONIC PLUS
R if the time has been set incorrectly
R in active driving situations, such as when
you change lanes or change your speed
ATTENTION ASSIST is reset and starts
assessing your tiredness again when you con- tinue your journey if:
R you switch off the engine
R you take off your seat belt and open the
driver's door, e.g. for a change of drivers or
to take a break
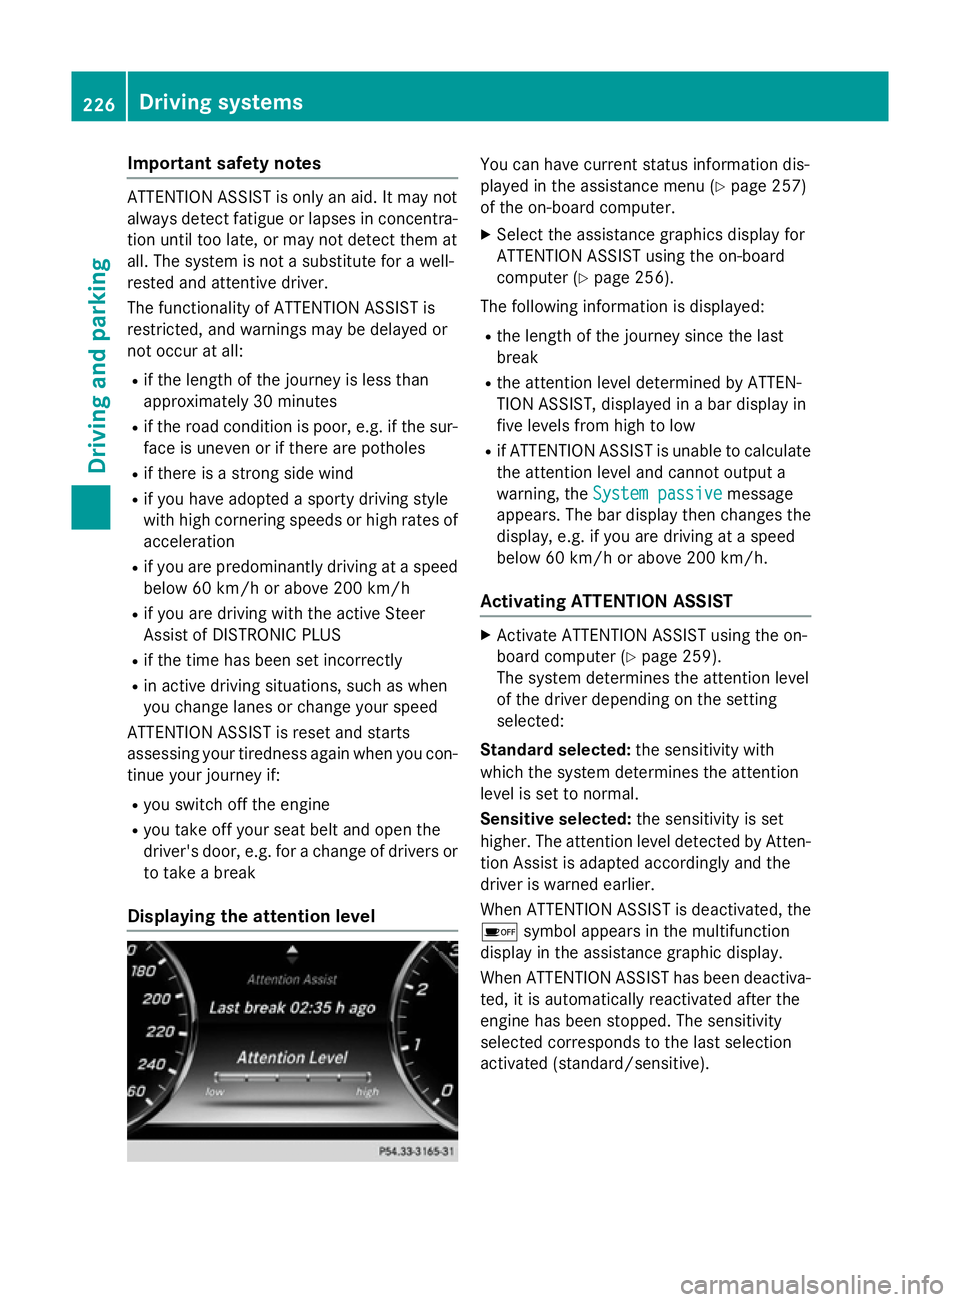
Displaying the attention level You can have current status information dis-
played in the assistance menu (Y
page 257)
of the on-board computer.
X Select the assistance graphics display for
ATTENTION ASSIST using the on-board
computer (Y page 256).
The following information is displayed:
R the length of the journey since the last
break
R the attention level determined by ATTEN-
TION ASSIST, displayed in a bar display in
five levels from high to low
R if ATTENTION ASSIST is unable to calculate
the attention level and cannot output a
warning, the System passive System passive message
appears. The bar display then changes the
display, e.g. if you are driving at a speed
below 60 km/h or above 200 km/h.
Activating ATTENTION ASSIST X
Activate ATTENTION ASSIST using the on-
board computer (Y page 259).
The system determines the attention level
of the driver depending on the setting
selected:
Standard selected: the sensitivity with
which the system determines the attention
level is set to normal.
Sensitive selected: the sensitivity is set
higher. The attention level detected by Atten- tion Assist is adapted accordingly and the
driver is warned earlier.
When ATTENTION ASSIST is deactivated, the é symbol appears in the multifunction
display in the assistance graphic display.
When ATTENTION ASSIST has been deactiva-
ted, it is automatically reactivated after the
engine has been stopped. The sensitivity
selected corresponds to the last selection
activated (standard/sensitive). 226
Driving systemsDriving and pa
rking
Page 251 of 413
X
Use ò on the steering wheel to call up
the list of menus.
X Press the :or9 button on the steer-
ing wheel to select the Trip
Tripmenu.
X Confirm by pressing aon the steering
wheel.
X Press the :or9 button to select
approximate range :and current fuel con-
sumption ;(not for AMG vehicles).
Approximate range :that can be covered is
calculated according to your current driving
style and the amount of fuel in the tank. If
there is only a small amount of fuel left in the fuel tank, the display shows a vehicle being
refuelled Cinstead of range :.
Recuperation display =shows you if energy
is being recuperated from the kinetic energy
in overrun mode and saved in the battery.
Recuperation display =depends on the
engine installed and is therefore not available
in all vehicles.
ECO display The ECO display is not available for AMG vehi-
cles.
X Use ò on the steering wheel to call up
the list of menus.
X Press the :or9 button on the steer-
ing wheel to select the Trip Tripmenu.
X Confirm by pressing aon the steering
wheel.
X Press :or9 to select ECO
ECOdisplay
display. If the ignition remains switched off for longer
than four hours, the ECO display will be auto-
matically reset.
Further information on the ECO display; see
(Y page 182).
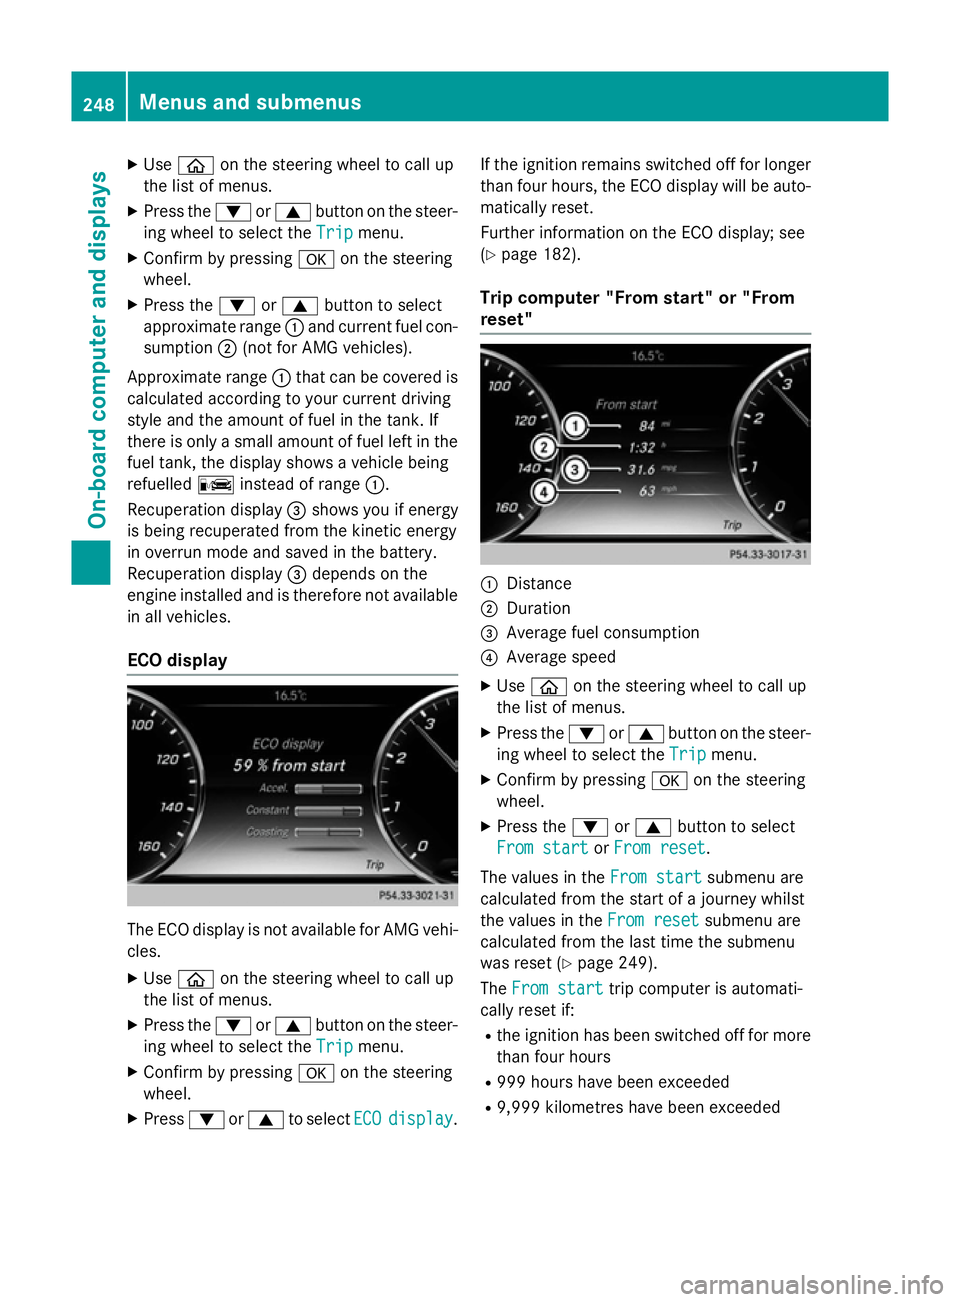
Trip computer "From start" or "From
reset" :
Distance
; Duration
= Average fuel consumption
? Average speed
X Use ò on the steering wheel to call up
the list of menus.
X Press the :or9 button on the steer-
ing wheel to select the Trip Tripmenu.
X Confirm by pressing aon the steering
wheel.
X Press the :or9 button to select
From start From start orFrom reset
From reset.
The values in the From start
From startsubmenu are
calculated from the start of a journey whilst
the values in the From reset From resetsubmenu are
calculated from the last time the submenu
was reset (Y page 249).
The From start From start trip computer is automati-
cally reset if:
R the ignition has been switched off for more
than four hours
R 999 hours have been exceeded
R 9,999 kilometres have been exceeded 248
Menus and submenusOn-board computer and displays