2014 MERCEDES-BENZ S-CLASS COUPE fuel reserve
[x] Cancel search: fuel reservePage 14 of 413
Exhaust pipe
Cleaning ........................................ .348
Exterior lighting
Cleaning ......................................... 347
see Lights
Exterior mirrors
Adjusting ....................................... 118
Anti-dazzle mode (automatic) ....... .119
Folding in/out (automatically) ....... 118
Folding in/out (electrically) ........... 118
Out of position (troubleshooting) ... 119
Parking position ............................. 119
Resetting ....................................... 118
Storing settings (memory func-
tion) ............................................... 120 F
Fault message see Display messages
Features ............................................. 320
Filler cap
see Fuel filler flap
Fire extinguisher ............................... 354
First-aid kit ......................................... 354
Fitting a wheel
Fitting a wheel ............................... 390
Lowering the vehicle ...................... 391
Preparing the vehicle ..................... 386
Raising the vehicl e......................... 387
Removing a whee l.......................... 390
Securing the vehicle against roll-
ing away ........................................ 387
Flat tyre
Changing a wheel/fitting the
spare whee l................................... 385
MOExtended tyre s......................... 356
Preparing the vehicle ..................... 356
TIREFIT kit ...................................... 357
Floormat ............................................. 333
Foglamps (extended range) .............. 128
Frequencies
Garage door opener ....................... 330
Mobile phone ................................. 400
Two-way radio ................................ 400
Front-passenger front airbag deac-
tivation
Display message ............................ 278 Front-passenger front airbag deac-
tivation system
Operation ......................................... 52
Problems ......................................... 56
System self-test ............................... 54
Front-passenger seat
Adjusting from the driver's seat ..... 108
Fuel
Additives ........................................ 404
Consumption information .............. 404
Consumption statistics .................. 248
Displaying the current consump-
tion ................................................ 247
Displaying the rang e...................... 247
E10 ................................................ 403
Fuel gaug e....................................... 32
Grade (petrol) ................................ 403
Important safety notes .................. 403
Problem (malfunction) ................... 178
Refuelling ....................................... 175
Tank content/reserve fue l............. 403
Fuel filler flap
Opening ......................................... 176
Fuel level
Calling up the range (on-board
computer) ...................................... 247
Gaug e.............................................. 32
Fuel tank
Capacity ........................................ 403
Problem (malfunction) ................... 178
Fuses
Allocation chart ............................. 372
Before changing ............................. 371
Dashboard fuse box ....................... 371
Fuse box in the boot ...................... 372
Fuse box in the engine compart-
ment .............................................. 372
Fuse box in the front-passenger
footwell .......................................... 371
Important safety notes .................. 370 G
Garage door opener Clearing the memory ..................... 330
Frequencies ................................... 330
General notes ................................ 328
Important safety notes .................. 328 Index
11
Page 19 of 413

Perfume atomizer
Operating ....................................... 146
Perfume vial ................................... 146
Problem (malfunction) ...................1 48
Petrol ................................................. .403
Pets in the vehicle ............................... 69
Plastic trim (cleaning instruc-
tions) ................................................. .349
Power closing ...................................... 92
Power socket
Boot ............................................... 324
Power windows
see Side windows
PRE-SAFE ®
(anticipatory occupant
protection)
Operation ......................................... 59
PRE-SAFE ®
(preventive occupant
safety system)
Display message ............................ 272
PRE-SAFE ®
Brake
Activating/deactivating ................. 258
Display message ............................ 273
Function/notes ................................ 77
Important safety notes .................... 78
Warning lamp ................................. 309
PRE-SAFE ®
PLUS (anticipatory
occupant protection PLUS)
Operation ......................................... 59
Program selector button .................. 171
Protection against theft
ATA (Anti-Theft Alarm system) ......... 80
Immobiliser ...................................... 80
Interior motion sensor ..................... 81
Tow-away protectio n ........................81
Protection of the environment
General notes .................................. 22
Pulling away
Automatic transmission ................. 162
General notes ................................ 162
Hill start assist ............................... 162 Q
Qualified specialist workshop ........... 25R
Radiator cover ................................... 338 Radio
Selecting a station ......................... 251
Radio-based vehicle components
Declaration of conformity ................ 24
Reading lamp ..................................... 130
Rear compartment
Setting the air vents ..................... .156
Stowage compartment .................. 317
Rear foglamp
Display message ............................ 280
Switching on/off ........................... 125
Rear lamps
see Lights
Rear seats
Overview .......................................... 40
Rear window blind ............................ 322
Rear window heating
Problem (fault) ............................... 145
Switching on/off ........................... 144
Rear-compartment seat belt sta-
tus indicator ........................................ 48
Rear-view mirror
Anti-dazzle mode (automatic) ....... .119
Dipping (manual )........................... 117
Recuperation display ........................ 247
Refuelling
Fuel gaug e....................................... 32
Important safety notes .................. 175
Refuelling process ......................... 176
see Fuel
Remote control
Auxiliary heating/ventilation .......... 150
Changing the batteries (auxiliary
heating) ......................................... 152
Garage door opener ....................... 328
Programming (garage door
opener) .......................................... 328
Replacing bulbs
General notes ................................ 131
Replacing the battery (auxiliary
heating remote control) .................... 152
Reserve (fuel tank)
see Fuel
Reserve fuel
Display message ............................ 284
Warning lamp ................................. 307
Residual heat (climate control) ........ 14616
Index
Page 23 of 413
Tyre pressure loss warning
General notes ................................ 384
Important safety notes .................. 384
Restarting ...................................... 385
Tyre pressure monitor
Checking the tyre pressure elec-
tronically ........................................ 382
Function/note s............................. 381
General notes ................................ 381
Important safety notes .................. 381
Radio type approval for the tyre
pressure monitor ........................... 384
Restarting ...................................... 383
Warning lamp ................................. 310
Warning message .......................... 383
Tyres
Changing a whee l.......................... 385
Checking ........................................ 377
Direction of rotation ...................... 386
Display message ............................ 293
Important safety notes .................. 376
MOExtended tyre s......................... 378
Replacing ....................................... 386
Service life ..................................... 377
Storing ........................................... 386
Summer tyres in winter ................. 378
Tyre size (data ).............................. 391
Tyre tread ...................................... 377
Wheel and tyre combinations ........ 393
see Flat tyre U
Unlocking Emergency unlocking ....................... 93
From inside the vehicle (central
unlocking button) ............................. 91 V
Vanity mirror (in sun visor) .............. 321
Vehicle
Correct use ...................................... 25
Data acquisition ............................... 26
Display message ............................ 295
Electronics ..................................... 400
Equipment ....................................... 23
Implied warranty .............................. 26
Individual settings .......................... 257 Leaving parked up ......................... 181
Locking (in an emergency) ............... 93
Locking (key) ................................... 85
Lowering ........................................ 391
Operating safety .............................. 23
Pulling away ................................... 162
Raising ........................................... 387
Registration ..................................... 25
Securing from rolling away ............ 387
Towing away .................................. 367
Transporting .................................. 370
Unlocking (in an emergency) ........... 93
Unlocking (key) ................................ 85
Vehicle data ................................... 408
Vehicle dimensions ........................... 408
Vehicle emergency locking ................ 93
Vehicle identification number
see VIN
Vehicle identification plate .............. 402
Vehicle level
Active Body Control ABC ............... 204
Display message ............................ 285
Vehicle maintenance
see ASSYST PLUS
Vehicle tool kit .................................. 355
Video
Operating the DVD ......................... 253
VIN ...................................................... 402 W
Warning and indicator lamps ABS ................................................ 302
Brakes ........................................... 301
Distance warning signal ................. 309
ESP ®
.............................................. 304
ESP ®
OFF ....................................... 305
LIM (cruise control )........................ 186
LIM (DISTRONIC PLUS) .................. 193
LIM (variable SPEEDTRONIC) ......... 189
Overview .......................................... 33
Parking brake ................................ 306
PASSENGER AIR BAG ...................... 43
Reserve fuel ................................... 307
Seat belt ........................................ 300
Steering ......................................... 311
Tyre pressure monitor ................... 310
Warning triangle ................................ 35420
Index
Page 152 of 413
When the auxiliary heating is switched on,
make sure that:
R no flammable materials come into contact
with hot vehicle components
R the exhaust gas can escape from the
exhaust pipe unhindered
R the exhaust gas does not come into contact
with flammable materials.
The auxiliary heating and the exhaust gas out-
let are situated behind the right-hand front
wheel.
! Operating the auxiliary heating/ventila-
tion draws on the vehicle battery. After you
have heated or ventilated the vehicle a
maximum of two times, drive for a longer
distance.
Switch the auxiliary heating on regularly once
a month for about ten minutes.
The auxiliary heating heats the air in the vehi-
cle interior to the set temperature. This
occurs without using the heat of the running
engine. The auxiliary heating is operated
directly using the vehicle's fuel. For this rea-
son, the tank content must be at least at
reserve fuel level to ensure that the auxiliary
heating functions.
The auxiliary heating/ventilation automati-
cally adjusts to changes in temperature and
weather conditions. For this reason, the aux- iliary heating could switch from ventilation
mode to heating mode or from heating mode to ventilation mode.
The auxiliary heating switches off when the
engine is switched off. The auxiliary ventila-
tion switches off when you turn the key to key
position 2(Y page 159).
The auxiliary heating switches off automati-
cally after 30 minutes. This time limit can be
altered. To do this, visit a qualified specialist
workshop.
You cannot use the auxiliary ventilation to
cool the vehicle interior to a temperature
lower than the outside temperature. Before switching on X
Turn the key to position 2in the ignition
lock (Y page 159).
X Set the desired temperature using the
w rocker switch on the front control unit
or using COMAND Online (see the separate operating instructions).
If you do not alter the temperature before
switching on the auxiliary heating, the last
temperature setting will be adopted.
Auxiliary heating or ventilation can also be
switched on if the manually set climate con-
trol is activated. Optimum comfort can be
attained when the system is set to automatic
mode. Set the temperature to 22 †.
You can activate or deactivate the auxiliary
heating/ventilation:
R using the rocker switch on the centre con-
sole (Y page 149)
R using the remote control (Y page 150)
The on-board computer can be used to spec- ify up to three departure times, one of which
may be preselected:
R using the remote control (Y page 150)
R using COMAND Online (see the separate
operating instructions)
Switching the auxiliary heating/venti-
lation on/off using the centre console
rocker switch The colours of the indicator lamps on the
rocker switch have the following meanings:
Blue Auxiliary ventilation switched on
Red Auxiliary heating switched on
Yellow Departure time preselected Operating the climate control system
149Climate control Z
Page 155 of 413
X
Press the uand^ buttons simulta-
neously.
The Îsymbol in the remote control dis-
play flashes.
X Press the ,or. button to set the
desired departure time.
i The longer you press the
,or.
button, the faster the time changes.
X Press the uand^ buttons simulta-
neously.
The new departure time is stored.
When setting the departure time, observe the important safety notes (Y page 148).
Activating the set departure time X Briefly press the ubutton.
X Press the ,or. button repeatedly
until the desired departure time appears in
the display.
X Press the ubutton.
The Ísymbol, the departure time and,
depending on the selected departure time, the letter A, BorCappear in the display.
Deactivating the set departure time
X Briefly press the ubutton.
X Press the ,or. button.
The status of the auxiliary heating is shown in the display.
X Press the .button.
The first departure time stored appears in
the display.
X Press the ^button.
OFF
OFF is shown in the remote control display.
Switching the heater booster function
on/off The heater booster function helps the engine
reach its operating temperature faster during
its warm-up phase. This helps to heat the
vehicle interior faster. The heater booster
function switches on at lower outside tem-
peratures and lower coolant temperatures.
You can also activate the heater booster man- ually. X
Start the engine.
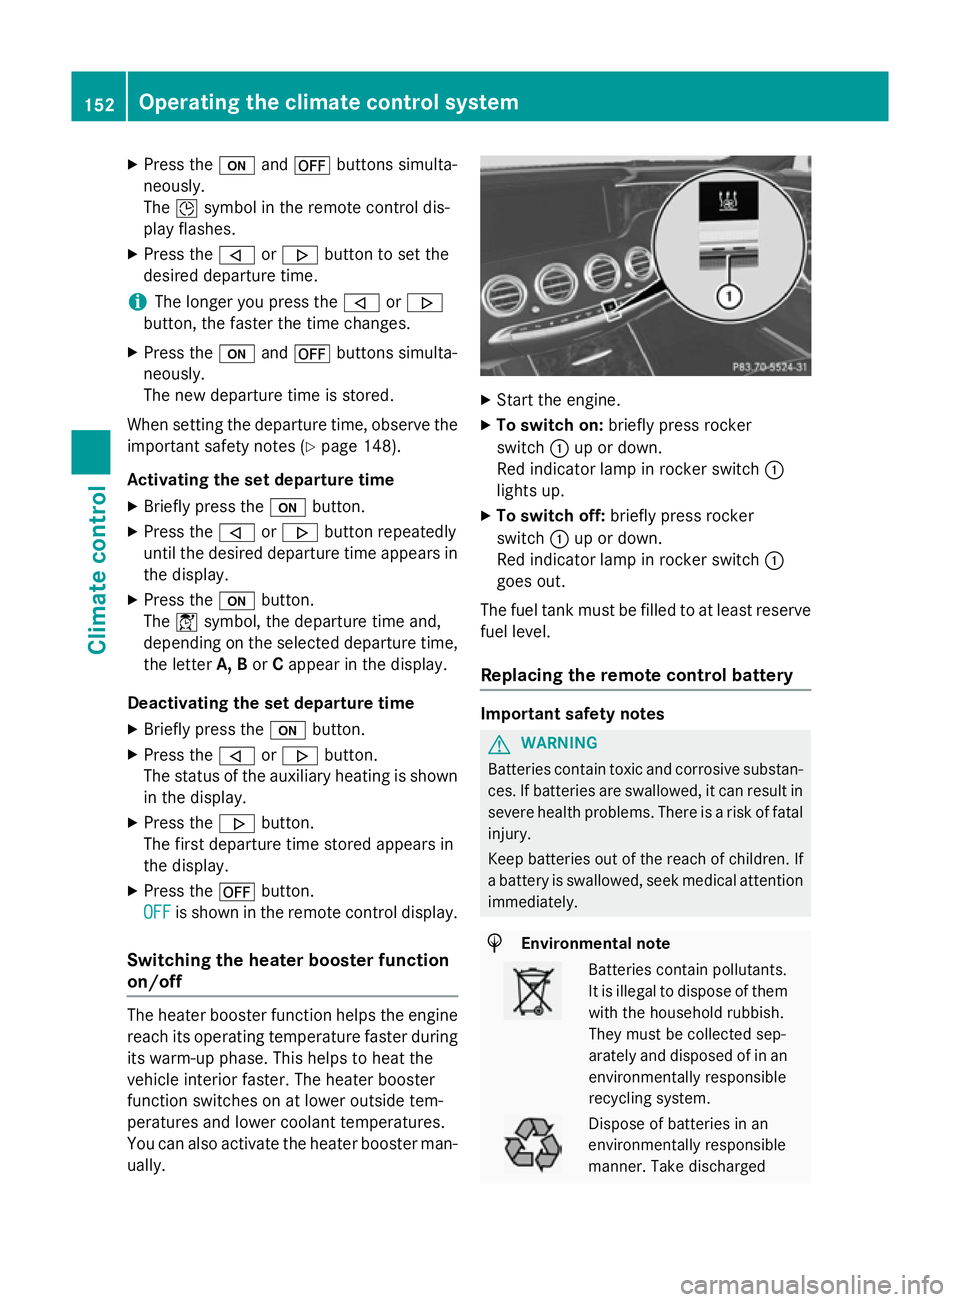
X To switch on: briefly press rocker
switch :up or down.
Red indicator lamp in rocker switch :
lights up.
X To switch off: briefly press rocker
switch :up or down.
Red indicator lamp in rocker switch :
goes out.
The fuel tank must be filled to at least reserve fuel level.
Replacing the remote control battery Important safety notes
G
WARNING
Batteries contain toxic and corrosive substan- ces. If batteries are swallowed, it can result in
severe health problems. There is a risk of fatal injury.
Keep batteries out of the reach of children. If
a battery is swallowed, seek medical attention immediately. H
Environmental note Batteries contain pollutants.
It is illegal to dispose of them
with the household rubbish.
They must be collected sep-
arately and disposed of in anenvironmentally responsible
recycling system. Dispose of batteries in an
environmentally responsible
manner. Take discharged152
Operating the climate control systemClimate control
Page 157 of 413
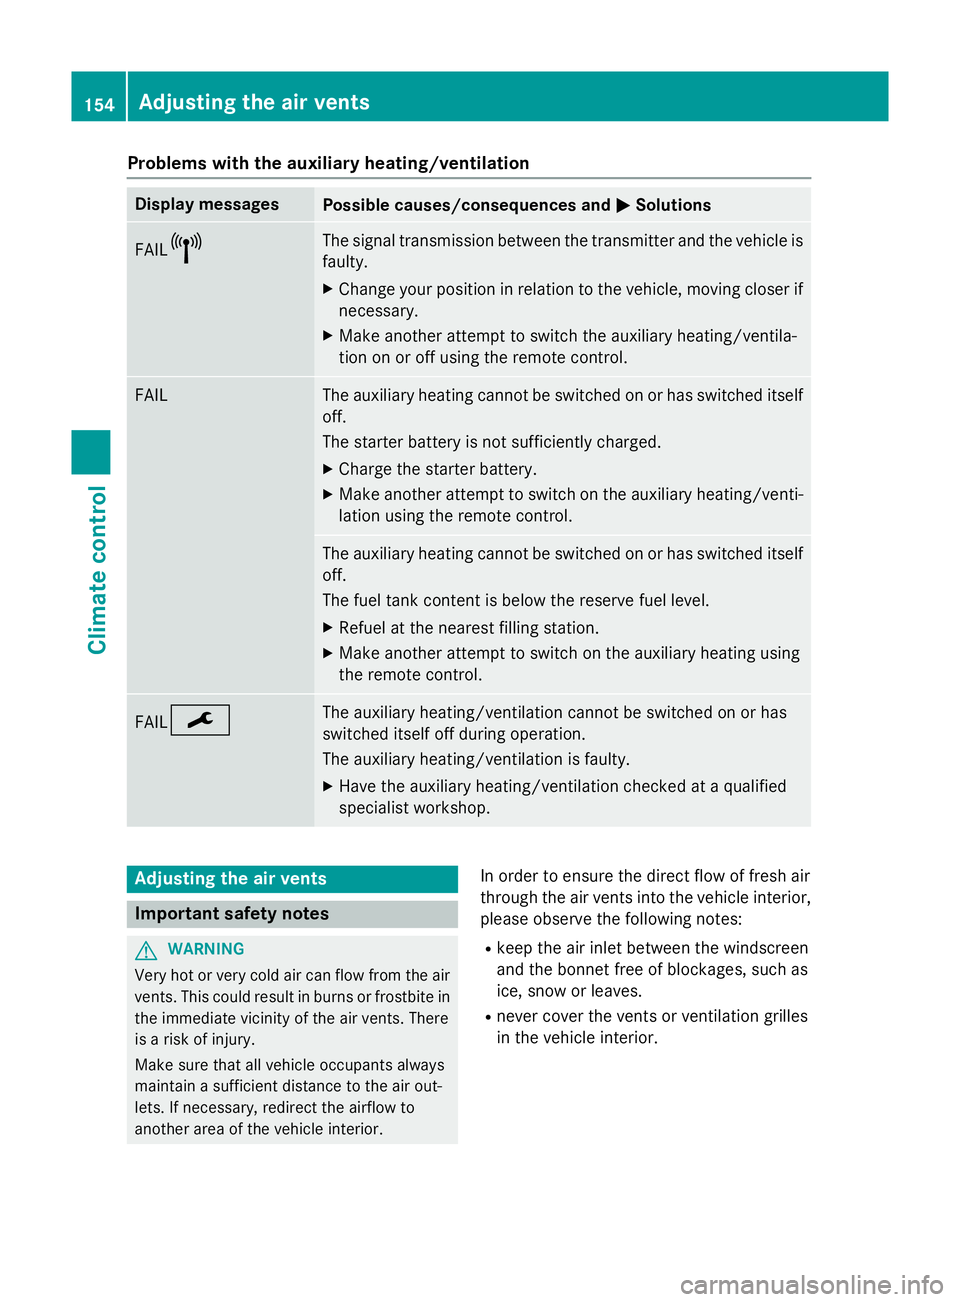
Problems with the auxiliary heating/ventilation
Display messages
Possible causes/consequences and
M
MSolutions FAIL¨ The signal transmission between the transmitter and the vehicle is
faulty.
X Change your position in relation to the vehicle, moving closer if
necessary.
X Make another attempt to switch the auxiliary heating/ventila-
tion on or off using the remote control. FAIL The auxiliary heating cannot be switched on or has switched itself
off.
The starter battery is not sufficiently charged.
X Charge the starter battery.
X Make another attempt to switch on the auxiliary heating/venti-
lation using the remote control. The auxiliary heating cannot be switched on or has switched itself
off.
The fuel tank content is below the reserve fuel level.
X Refuel at the nearest filling station.
X Make another attempt to switch on the auxiliary heating using
the remote control. FAIL¯ The auxiliary heating/ventilation cannot be switched on or has
switched itself off during operation.
The auxiliary heating/ventilation is faulty.
X Have the auxiliary heating/ventilation checked at a qualified
specialist workshop. Adjusting the air vents
Important safety notes
G
WARNING
Very hot or very cold air can flow from the air vents. This could result in burns or frostbite in the immediate vicinity of the air vents. There
is a risk of injury.
Make sure that all vehicle occupants always
maintain a sufficient distance to the air out-
lets. If necessary, redirect the airflow to
another area of the vehicle interior. In order to ensure the direct flow of fresh air
through the air vents into the vehicle interior,
please observe the following notes:
R keep the air inlet between the windscreen
and the bonnet free of blockages, such as
ice, snow or leaves.
R never cover the vents or ventilation grilles
in the vehicle interior. 154
Adjusting the air ventsClimate control
Page 169 of 413
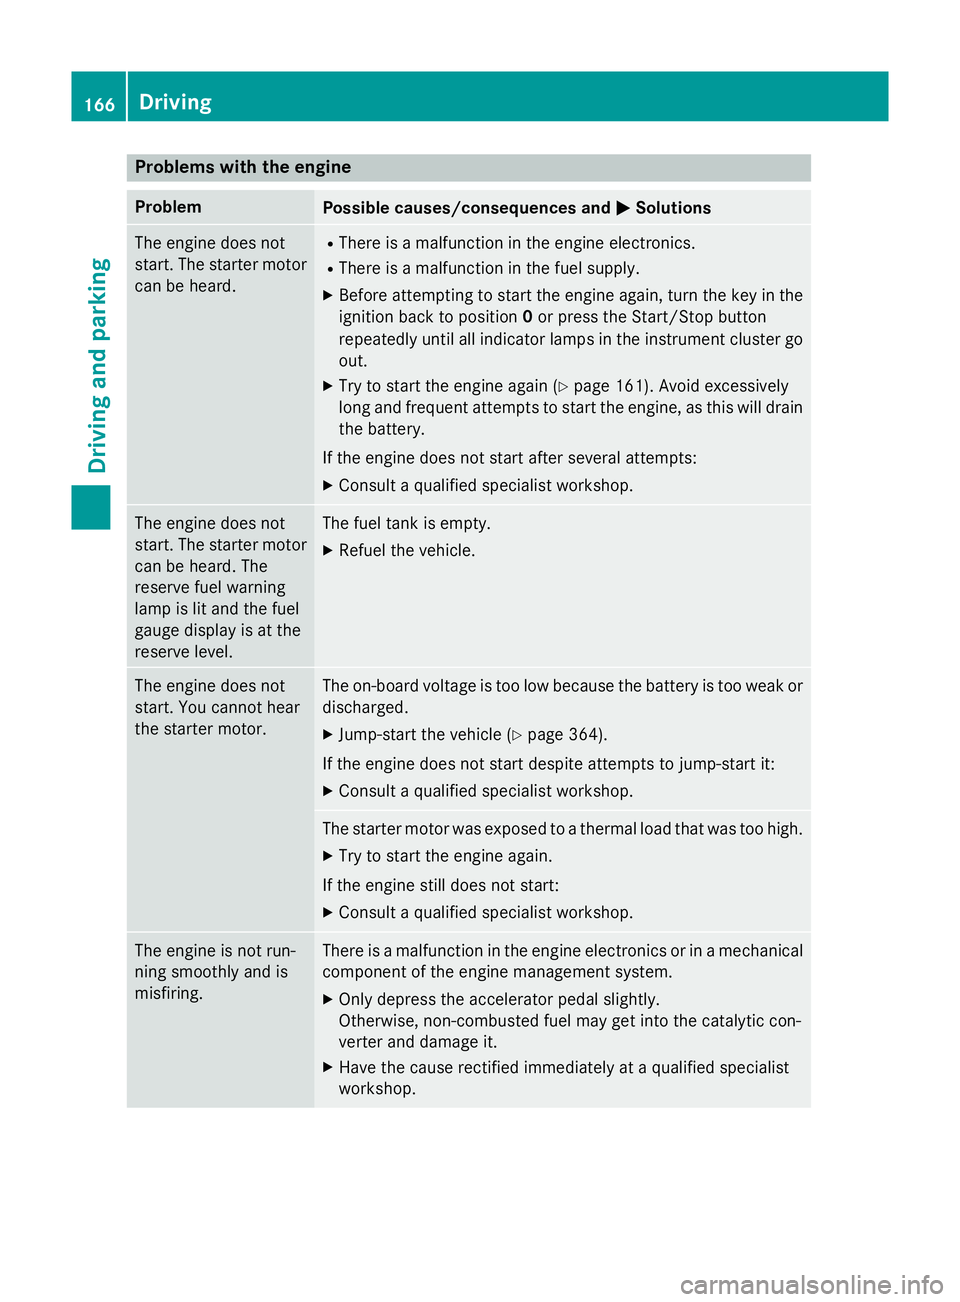
Problems with the engine
Problem
Possible causes/consequences and
M
MSolutions The engine does not
start. The starter motor
can be heard. R
There is a malfunction in the engine electronics.
R There is a malfunction in the fuel supply.
X Before attempting to start the engine again, turn the key in the
ignition back to position 0or press the Start/Stop button
repeatedly until all indicator lamps in the instrument cluster go
out.
X Try to start the engine again (Y page 161). Avoid excessively
long and frequent attempts to start the engine, as this will drain
the battery.
If the engine does not start after several attempts: X Consult a qualified specialist workshop. The engine does not
start. The starter motor
can be heard. The
reserve fuel warning
lamp is lit and the fuel
gauge display is at the
reserve level. The fuel tank is empty.
X Refuel the vehicle. The engine does not
start. You cannot hear
the starter motor. The on-board voltage is too low because the battery is too weak or
discharged.
X Jump-start the vehicle (Y page 364).
If the engine does not start despite attempts to jump-start it:
X Consult a qualified specialist workshop. The starter motor was exposed to a thermal load that was too high.
X Try to start the engine again.
If the engine still does not start:
X Consult a qualified specialist workshop. The engine is not run-
ning smoothly and is
misfiring. There is a malfunction in the engine electronics or in a mechanical
component of the engine management system.
X Only depress the accelerator pedal slightly.
Otherwise, non-combusted fuel may get into the catalytic con-
verter and damage it.
X Have the cause rectified immediately at a qualified specialist
workshop. 166
DrivingDriving and parking
Page 287 of 413
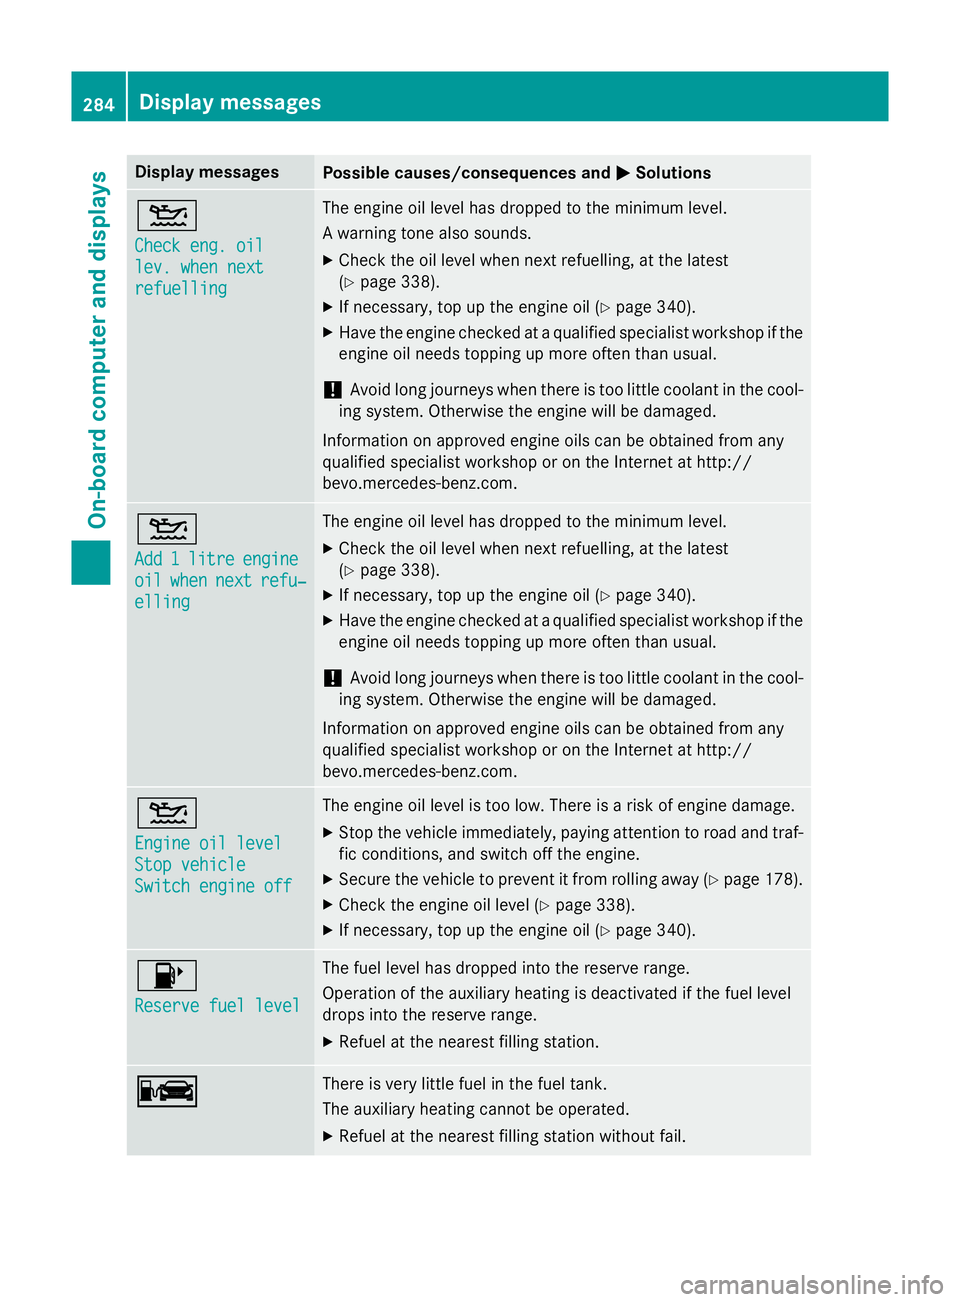
Display messages
Possible causes/consequences and
M
MSolutions 4
Check eng. oil Check eng. oil
lev. when next lev. when next
refuelling refuelling The engine oil level has dropped to the minimum level.
A warning tone also sounds.
X Check the oil level when next refuelling, at the latest
(Y page 338).
X If necessary, top up the engine oil (Y page 340).
X Have the engine checked at a qualified specialist workshop if the
engine oil needs topping up more often than usual.
! Avoid long journeys when there is too little coolant in the cool-
ing system. Otherwise the engine will be damaged.
Information on approved engine oils can be obtained from any
qualified specialist workshop or on the Internet at http://
bevo.mercedes-benz.co m.4
Add Add
1
1litre
litre engine
engine
oil
oil when
when next
next refu‐
refu‐
elling
elling The engine oil level has dropped to the minimum level.
X Check the oil level when next refuelling, at the latest
(Y page 338).
X If necessary, top up the engine oil (Y page 340).
X Have the engine checked at a qualified specialist workshop if the
engine oil needs topping up more often than usual.
! Avoid long journeys when there is too little coolant in the cool-
ing system. Otherwise the engine will be damaged.
Information on approved engine oils can be obtained from any
qualified specialist workshop or on the Internet at http://
bevo.mercedes-benz.com. 4
Engine oil level Engine oil level
Stop vehicle Stop vehicle
Switch engine off Switch engine off The engine oil level is too low. There is a risk of engine damage.
X Stop the vehicle immediately, paying attention to road and traf-
fic conditions, and switch off the engine.
X Secure the vehicle to prevent it from rolling away (Y page 178).
X Check the engine oil level (Y page 338).
X If necessary, top up the engine oil (Y page 340).8
Reserve fuel level Reserve fuel level The fuel level has dropped into the reserve range.
Operation of the auxiliary heating is deactivated if the fuel level
drops into the reserve range.
X Refuel at the nearest filling station. C C There is very little fuel in the fuel tank.
The auxiliary heating cannot be operated.
X Refuel at the nearest filling station without fail. 284
Display messagesOn-board computer and displays