2014 MERCEDES-BENZ S-CLASS COUPE dimensions
[x] Cancel search: dimensionsPage 9 of 413
B
BAS (Brake Assist System) ................. 70
BAS PLUS (Brake Assist System
PLUS) with Cross-Traffic Assist
Function/note s................................ 71
BAS PLUS Q (Brake Assist System
PLUS) with Cross-Traffic Assist
Important safety notes .................... 71
Battery (key)
Checking .......................................... 88
Important safety notes .................... 87
Replacing ......................................... 88
Battery (vehicle)
Charging ........................................ 362
Display message ............................ 283
Important safety notes .................. 360
Jump starting ................................. 364
Belt
see Seat belts
Belt tensioner
Activation ......................................... 57
Blind Spot Assist
see Active Blind Spot Assist
Bonnet
Active bonnet (pedestrian protec-tion) ............................................... 336
Closing ........................................... 338
Display message ............................ 297
Important safety notes .................. 336
Opening ......................................... 337
Boot
Emergency release .......................... 98
Important safety notes .................... 94
Locking separately ........................... 98
Opening/closing (automatically
from inside) ...................................... 97
Opening/closing (automatically
from outside) ................................... 95
Opening/closing (from the out-
side, HANDS-FREE ACCESS) ............ 96
Power closing .................................. 92
Boot lid
Display message ............................ 296
Obstacle recognition ........................ 94
Opening dimensions ...................... 408
Opening/closing .............................. 94
Boot load (maximum) ........................ 408Brake
EBD .................................................. 77
Brake Assist
see BAS (Brake Assist System)
Brake fluid
Display message ............................ 272
Notes ............................................. 406
Brake force distribution, elec-
tronic
see EBD (electronic brake force
distribution)
Brake lamps
Adaptive ........................................... 75
Display message ............................ 280
Brakes
ABS .................................................. 70
Adaptive Brake Assist ...................... 74
BAS .................................................. 70
BAS PLUS with Cross-Traffic
Assist ............................................... 71
Brake fluid (notes) ......................... 406
Display message ............................ 266
Driving tips .................................... 182
High-performance brake system .... 184
Hill start assist ............................... 162
HOLD function ............................... 202
Important safety notes .................. 182
Parking brake ................................ 180
Warning lamp ................................. 301
Breakdown
see Flat tyre
see Towing away
Brightness control (instrument
cluster lighting) ................................... 34
Buttons on the steering column ...... 243 C
Calling up a fault see Display messages
Camera
see 360° camera
Capacities (technical data) ............... 402
Car
see Vehicle
Car key
see Key
Car wash (care) ................................. 3436
Index
Page 23 of 413
Tyre pressure loss warning
General notes ................................ 384
Important safety notes .................. 384
Restarting ...................................... 385
Tyre pressure monitor
Checking the tyre pressure elec-
tronically ........................................ 382
Function/note s............................. 381
General notes ................................ 381
Important safety notes .................. 381
Radio type approval for the tyre
pressure monitor ........................... 384
Restarting ...................................... 383
Warning lamp ................................. 310
Warning message .......................... 383
Tyres
Changing a whee l.......................... 385
Checking ........................................ 377
Direction of rotation ...................... 386
Display message ............................ 293
Important safety notes .................. 376
MOExtended tyre s......................... 378
Replacing ....................................... 386
Service life ..................................... 377
Storing ........................................... 386
Summer tyres in winter ................. 378
Tyre size (data ).............................. 391
Tyre tread ...................................... 377
Wheel and tyre combinations ........ 393
see Flat tyre U
Unlocking Emergency unlocking ....................... 93
From inside the vehicle (central
unlocking button) ............................. 91 V
Vanity mirror (in sun visor) .............. 321
Vehicle
Correct use ...................................... 25
Data acquisition ............................... 26
Display message ............................ 295
Electronics ..................................... 400
Equipment ....................................... 23
Implied warranty .............................. 26
Individual settings .......................... 257 Leaving parked up ......................... 181
Locking (in an emergency) ............... 93
Locking (key) ................................... 85
Lowering ........................................ 391
Operating safety .............................. 23
Pulling away ................................... 162
Raising ........................................... 387
Registration ..................................... 25
Securing from rolling away ............ 387
Towing away .................................. 367
Transporting .................................. 370
Unlocking (in an emergency) ........... 93
Unlocking (key) ................................ 85
Vehicle data ................................... 408
Vehicle dimensions ........................... 408
Vehicle emergency locking ................ 93
Vehicle identification number
see VIN
Vehicle identification plate .............. 402
Vehicle level
Active Body Control ABC ............... 204
Display message ............................ 285
Vehicle maintenance
see ASSYST PLUS
Vehicle tool kit .................................. 355
Video
Operating the DVD ......................... 253
VIN ...................................................... 402 W
Warning and indicator lamps ABS ................................................ 302
Brakes ........................................... 301
Distance warning signal ................. 309
ESP ®
.............................................. 304
ESP ®
OFF ....................................... 305
LIM (cruise control )........................ 186
LIM (DISTRONIC PLUS) .................. 193
LIM (variable SPEEDTRONIC) ......... 189
Overview .......................................... 33
Parking brake ................................ 306
PASSENGER AIR BAG ...................... 43
Reserve fuel ................................... 307
Seat belt ........................................ 300
Steering ......................................... 311
Tyre pressure monitor ................... 310
Warning triangle ................................ 35420
Index
Page 97 of 413
X
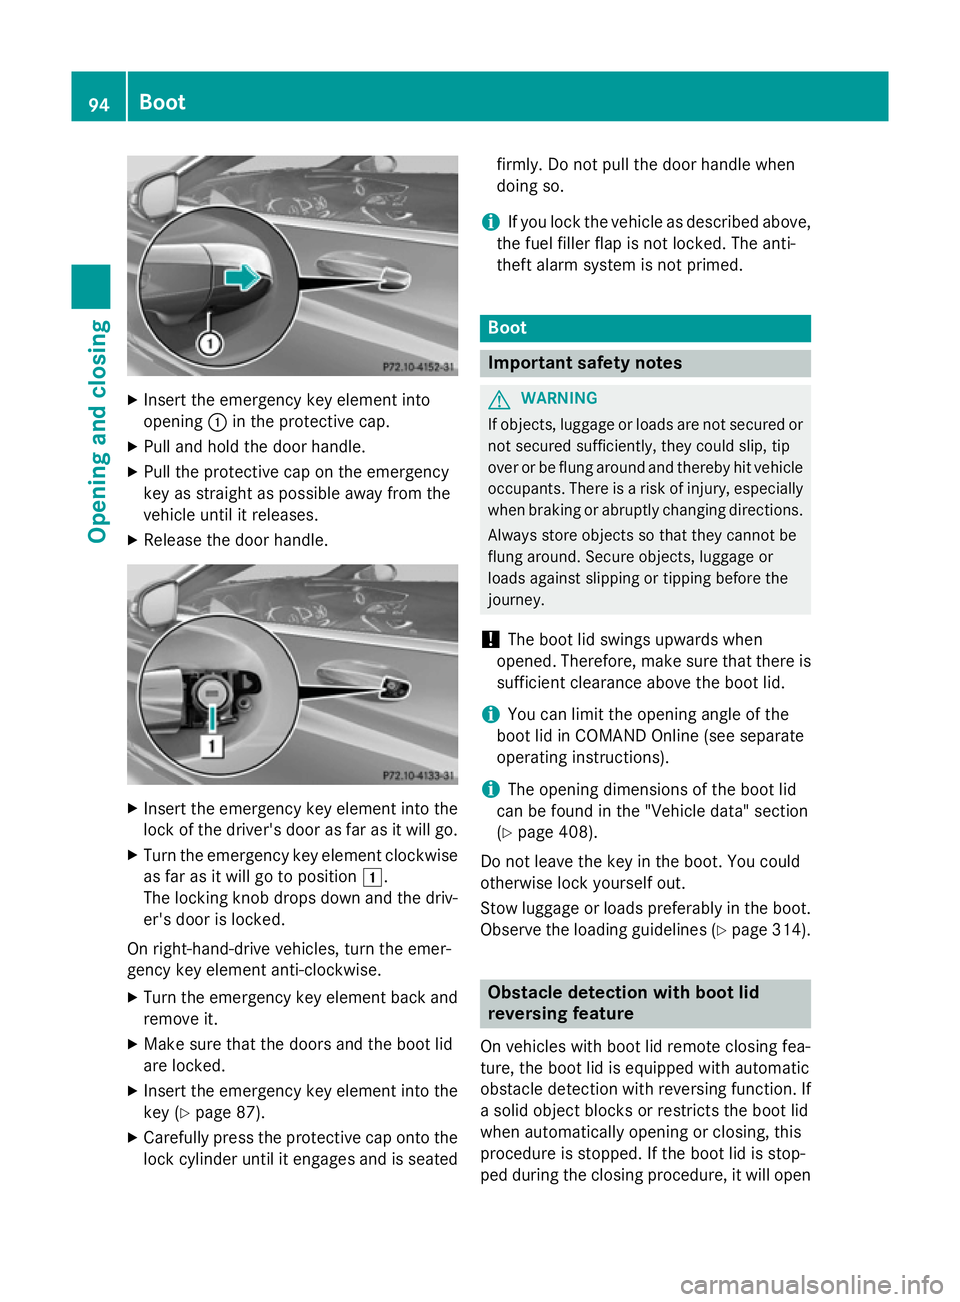
Insert the emergency key element into
opening :in the protective cap.
X Pull and hold the door handle.
X Pull the protective cap on the emergency
key as straight as possible away from the
vehicle until it releases.
X Release the door handle. X
Insert the emergency key element into the
lock of the driver's door as far as it will go.
X Turn the emergency key element clockwise
as far as it will go to position 1.
The locking knob drops down and the driv- er's door is locked.
On right-hand-drive vehicles, turn the emer-
gency key element anti-clockwise.
X Turn the emergency key element back and
remove it.
X Make sure that the doors and the boot lid
are locked.
X Insert the emergency key element into the
key (Y page 87).
X Carefully press the protective cap onto the
lock cylinder until it engages and is seated firmly. Do not pull the door handle when
doing so.
i If you lock the vehicle as described above,
the fuel filler flap is not locked. The anti-
theft alarm system is not primed. Boot
Important safety notes
G
WARNING
If objects, luggage or loads are not secured or not secured sufficiently, they could slip, tip
over or be flung around and thereby hit vehicle
occupants. There is a risk of injury, especially when braking or abruptly changing directions.
Always store objects so that they cannot be
flung around. Secure objects, luggage or
loads against slipping or tipping before the
journey.
! The boot lid swings upwards when
opened. Therefore, make sure that there is sufficient clearance above the boot lid.
i You can limit the opening angle of the
boot lid in COMAND Online (see separate
operating instructions).
i The opening dimensions of the boot lid
can be found in the "Vehicle data" section
(Y page 408).
Do not leave the key in the boot. You could
otherwise lock yourself out.
Stow luggage or loads preferably in the boot.
Observe the loading guidelines (Y page 314). Obstacle detection with boot lid
reversing feature
On vehicles with boot lid remote closing fea-
ture, the boot lid is equipped with automatic
obstacle detection with reversing function. If
a solid object blocks or restricts the boot lid
when automatically opening or closing, this
procedure is stopped. If the boot lid is stop-
ped during the closing procedure, it will open 94
BootOpening and closing
Page 98 of 413
again automatically. The automatic obstacle
recognition with reversing function is only an aid. It is not a substitute for your attentive-
ness when opening and closing the boot lid. G
WARNING
The reversing function does not react:
R to soft, light and thin objects, e.g. small fin-
gers
R over the last 8 mm of the closing path
This means that the reversing feature cannot
prevent someone being trapped in these sit-
uations. There is a risk of injury.
When closing make sure that no parts of the
body are in the closing area.
If someone is trapped:
R press the Fbutton on the key or
R press the remote operating switch on the
driver's door or
R press the closing or locking button on the
boot lid. Opening/closing automatically from
the outside
Important safety notes G
WARNING
Parts of the body could become trapped dur-
ing automatic closing of the boot lid. More-
over, people, e.g. children, may be standing in the closing area or may enter the closing area
during the closing process. There is a risk of
injury.
Make sure that nobody is in the vicinity of the closing area during the closing process.
Use one of the following options to stop the
closing process:
R Press the Fbutton on the key.
R press the remote operating switch on the
driver’s door.
R Press the closing or locking button on the
boot lid. !
The boot lid swings upwards when
opened. Therefore, make sure that there is
sufficient clearance above the boot lid.
i The opening dimensions of the boot lid
can be found in the "Vehicle data" section
(Y page 408).
Opening You can open the boot lid automatically using
the key.
X Press and hold the Fbutton on the key
until the boot lid opens.
Closing You can close the boot lid automatically using
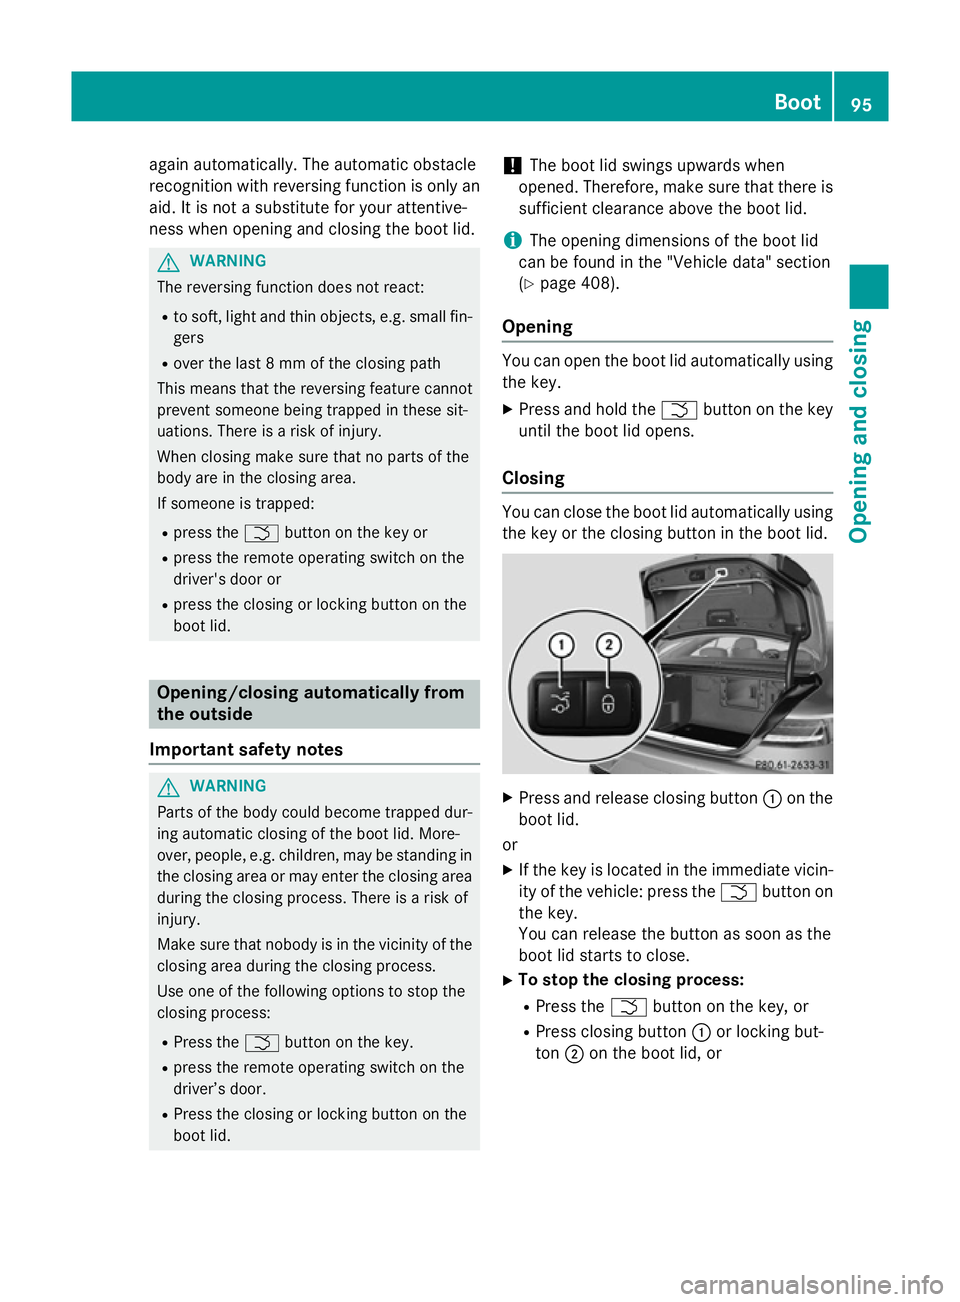
the key or the closing button in the boot lid. X
Press and release closing button :on the
boot lid.
or X If the key is located in the immediate vicin-
ity of the vehicle: press the Fbutton on
the key.
You can release the button as soon as the
boot lid starts to close.
X To stop the closing process:
R Press the Fbutton on the key, or
R Press closing button :or locking but-
ton ;on the boot lid, or Boot
95Opening and closing Z
Page 100 of 413
lid could thus be opened or closed unin-
tentionally, for example, if you:
- set down or lift up an object behind the
vehicle
- polish the rear of the vehicle
Do not carry the KEYLESS-GO key about
your person in such situations. This will
prevent the unintentional opening/closing
of the boot.
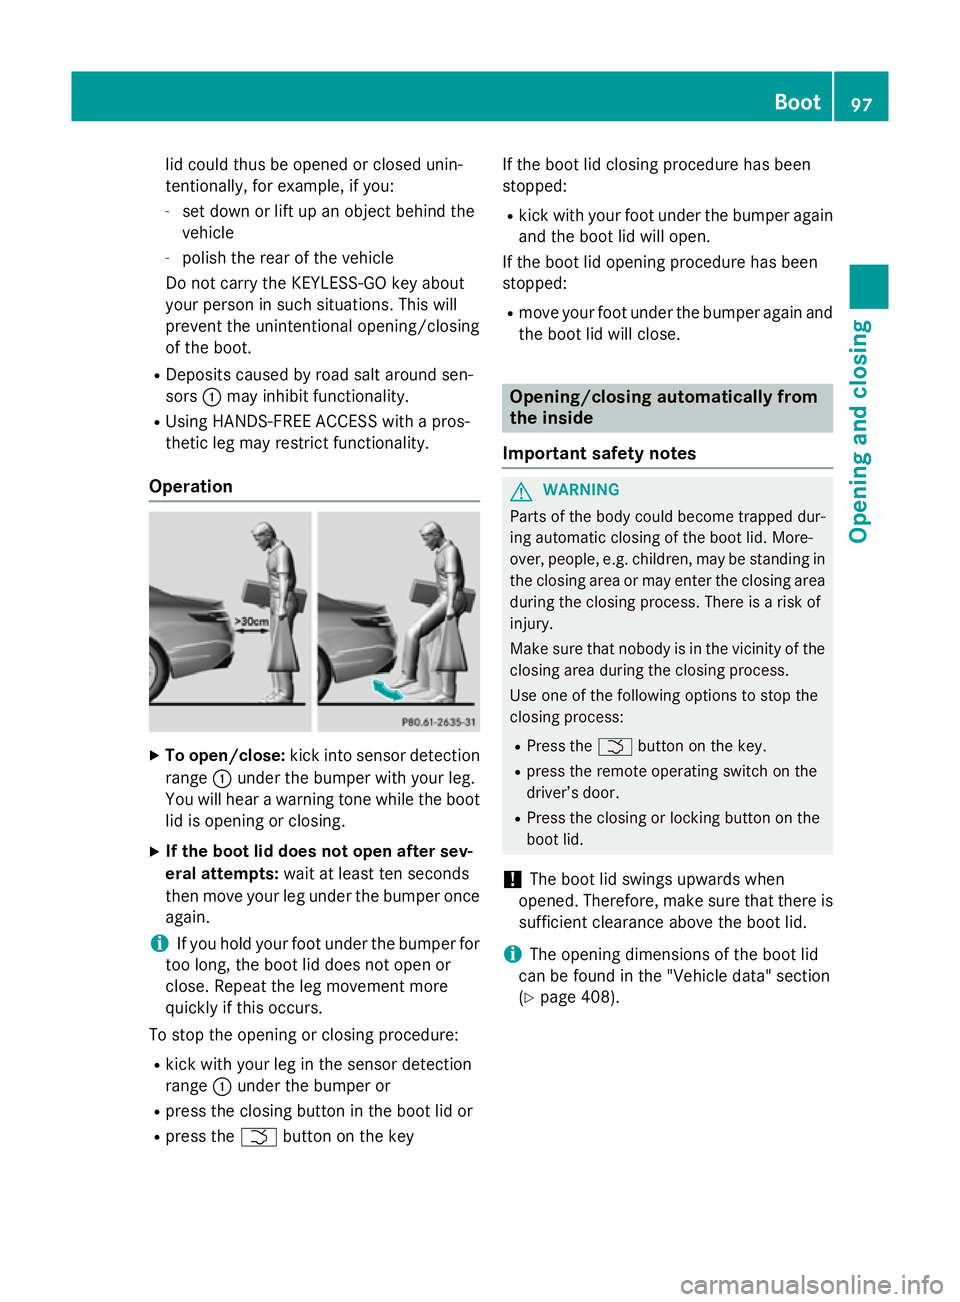
R Deposits caused by road salt around sen-
sors :may inhibit functionality.
R Using HANDS-FREE ACCESS with a pros-
thetic leg may restrict functionality.
Operation X
To open/close: kick into sensor detection
range :under the bumper with your leg.
You will hear a warning tone while the boot
lid is opening or closing.
X If the boot lid does not open after sev-
eral attempts: wait at least ten seconds
then move your leg under the bumper once again.
i If you hold your foot under the bumper for
too long, the boot lid does not open or
close. Repeat the leg movement more
quickly if this occurs.
To stop the opening or closing procedure:
R kick with your leg in the sensor detection
range :under the bumper or
R press the closing button in the boot lid or
R press the Fbutton on the key If the boot lid closing procedure has been
stopped:
R kick with your foot under the bumper again
and the boot lid will open.
If the boot lid opening procedure has been
stopped:
R move your foot under the bumper again and
the boot lid will close. Opening/closing automatically from
the inside
Important safety notes G
WARNING
Parts of the body could become trapped dur-
ing automatic closing of the boot lid. More-
over, people, e.g. children, may be standing in the closing area or may enter the closing area
during the closing process. There is a risk of
injury.
Make sure that nobody is in the vicinity of the closing area during the closing process.
Use one of the following options to stop the
closing process:
R Press the Fbutton on the key.
R press the remote operating switch on the
driver’s door.
R Press the closing or locking button on the
boot lid.
! The boot lid swings upwards when
opened. Therefore, make sure that there is
sufficient clearance above the boot lid.
i The opening dimensions of the boot lid
can be found in the "Vehicle data" section
(Y page 408). Boot
97Opening and closing Z
Page 379 of 413
Useful information
i This Owner's Manual describes all mod-
els, series and optional equipment for your
vehicle that were available at the time of
going to press. National variations are pos- sible. Note that your vehicle may not be
equipped with all of the functions descri-
bed. This is also the case for systems and
functions relevant to safety.
i Read the information on qualified special-
ist workshops: (Y page 25). Important safety notes
G
WARNING
If wheels and tyres of the wrong size are used, the wheel brakes or suspension components
may be damaged. There is a risk of an acci-
dent.
Always replace wheels and tyres with those
that fulfil the specifications of the original
part.
When replacing wheels, make sure to fit the
correct:
R designation
R type
When replacing tyres, make sure to fit the
correct:
R designation
R manufacturer
R type G
WARNING
A flat tyre severely impairs the driving, steer-
ing and braking characteristics of the vehicle.
There is a risk of accident.
Tyres without run-flat characteristics:
R do not drive with a flat tyre.
R immediately replace the flat tyre with your
emergency spare wheel or spare wheel, or
consult a qualified specialist workshop. Tyres with run-flat characteristics:
R pay attention to the information and warn-
ing notices on MOExtended tyres (tyres
with run-flat characteristics).
Accessories that are not approved for your
vehicle by Mercedes-Benz or that are not
being used correctly can impair operating
safety.
Before purchasing and using non-approved
accessories, visit a qualified specialist work-
shop and enquire about:
R suitability
R legal stipulations
R factory recommendations
Information on the dimensions and types of
wheels and tyres for your vehicle can be
found under "Wheel/tyre combinations"
(Y page 391).
Information on air pressure for the tyres on
your vehicle can be found:
R on the tyre pressure label on the fuel filler
flap (Y page 176)
R under "Tyre pressure" (Y page 380)
Modification work on the brake system and
wheels is not permitted. The use of wheel
spacers or brake dust shields is not permit-
ted. This invalidates the general operating
permit for the vehicle.
i Further information on wheels and tyres
can be obtained at any qualified specialist
workshop. Operation
Information on driving
Check the tyre pressures when the vehicle is
heavily laden and, if necessary, adjust.
While driving, pay attention to vibrations,
noises and unusual handling characteristics,
e.g. pulling to one side. This may indicate that the wheels or tyres are damaged. If you sus-
pect that a tyre is defective, reduce your
speed immediately. Stop the vehicle as soon 376
OperationWheels and tyres
Page 389 of 413
Interchanging the wheels
G
WARNING
Interchanging the front and rear wheels may
severely impair the driving characteristics if
the wheels or tyres have different dimensions. The wheel brakes or suspension components may also be damaged. There is a risk of acci-
dent.
Interchange front and rear wheels only if the
wheels and tyres are of the same dimensions.
! On vehicles fitted with a tyre pressure
monitor, electronic components are loca-
ted in the wheel.
Tyre-fitting tools should not be applied in
the area of the valve, as this could damage
the electronic components.
Only have tyres changed at a qualified spe- cialist workshop.
Interchanging the front and rear wheels of
differing dimensions can render the general
operating permit invalid.
Observe the instructions and safety notes in
the "Fitting a wheel" section (Y page 386).
The wear patterns on the front and rear tyres differ depending on the operating conditions.Interchange the wheels before a clear wear
pattern has formed on the tyres. Front tyres
typically wear more on the shoulders and the
rear tyres in the centre.
On vehicles that have the same size front and
rear wheels, you can interchange the wheels
every 5,000 to 10,000 km depending on the
degree of tyre wear. Ensure the direction of
rotation is maintained.
Clean the contact surfaces of the wheel and
the brake disc thoroughly every time a wheel is interchanged. Check the tyre pressure and,
if necessary, restart the tyre pressure loss
warning system (Y page 385) or the tyre pres-
sure monitor (Y page 383). Direction of rotation
Tyres with a specified direction of rotation
have additional benefits, e.g. if there is a risk of aquaplaning. You will only gain these ben-
efits if the correct direction of rotation is
observed.
An arrow on the sidewall of the tyre indicates
its correct direction of rotation. Storing wheels
Store wheels in a cool, dry and preferably
dark place if they are not being used. Protect the tyres against oil, grease, petrol and diesel. Cleaning the wheels
G
WARNING
The water jet of circular-jet nozzles (dirt grind- ers) can cause damage not visible from the
outside to tyres or chassis components. Com-
ponents damaged in this way can unexpect-
edly fail. There is a risk of an accident.
Do not use high-pressure cleaners with circu-
lar-jet nozzles to clean the vehicle. Have dam- aged tyres or chassis components replaced
immediately. Fitting a wheel
Preparing the vehicle X
Stop the vehicle on solid, non-slippery and
level ground.
X Apply the electric parking brake manually.
X Move the front wheels to the straight-
ahead position.
X Shift the transmission to position P.
X Make sure that "normal" level is selected
for AIRMATIC (Y page 207).
X Switch off the engine. 386
Changing a wheelWheels and ty
res
Page 411 of 413
Vehicle data
General notes
Please note that for the specified vehicle
data:
R the heights specified may vary as a result
of:
- tyres
- load
- condition of the suspension
- optional equipment
R optional equipment reduces the maximum
payload.
R vehicle-specific weight information can be
found on the vehicle identification plate
(Y page 402).
R only for certain countries: you can find vehi-
cle-specific vehicle data in the COC docu-
ments (CERTIFICATE OF CONFORMITY).
These documents are delivered with your
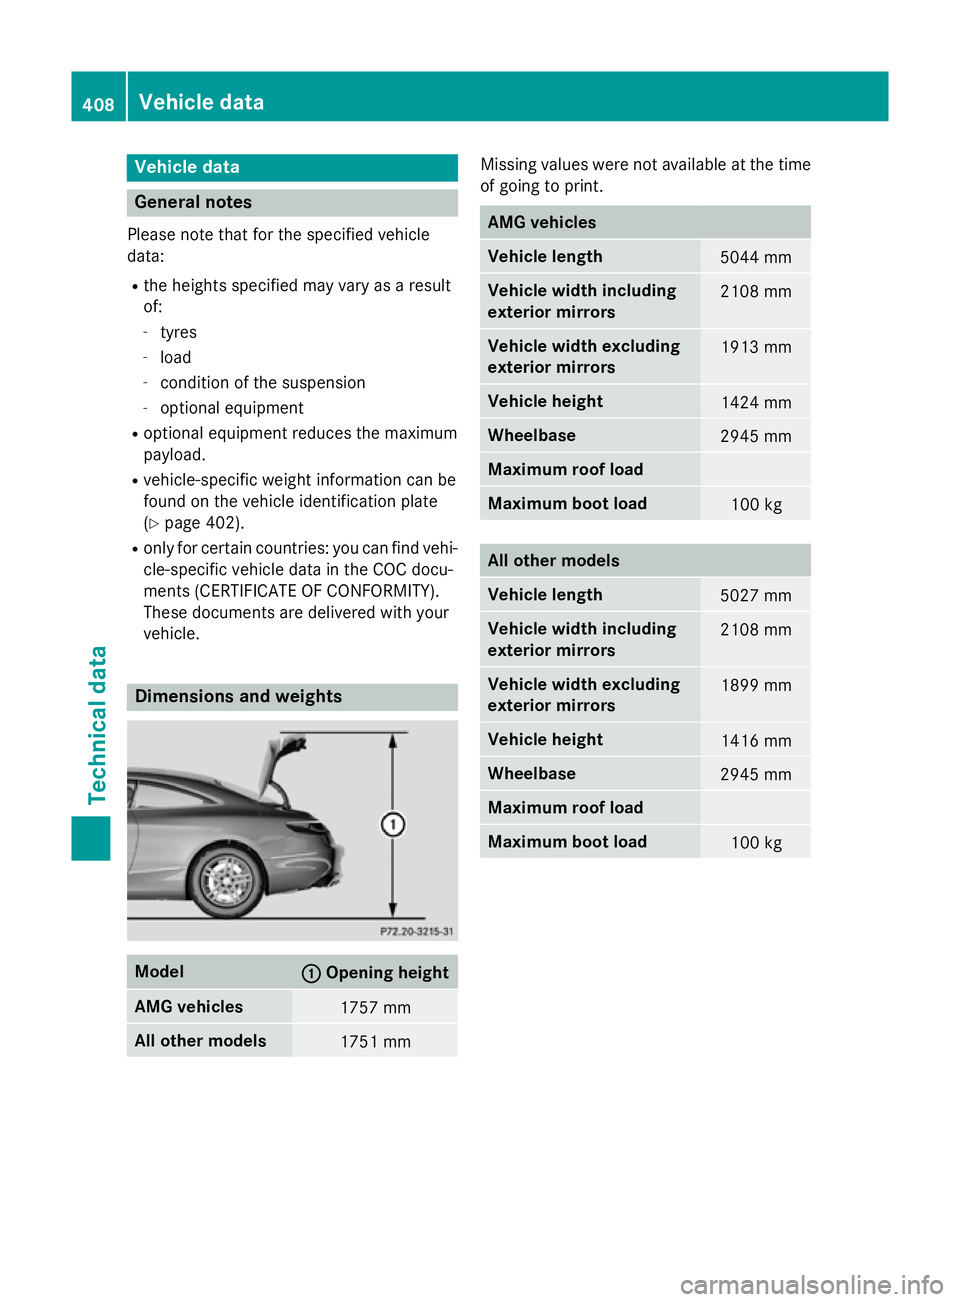
vehicle. Dimensions and weights
Model
: :
Opening height AMG vehicles
1757 mm
All other models
1751 mm Missing values were not available at the time
of going to print. AMG vehicles
Vehicle length
5044 mm
Vehicle width including
exterior mirrors
2108 mm
Vehicle width excluding
exterior mirrors
1913 mm
Vehicle height
1424 mm
Wheelbase
2945 mm
Maximum roof load
Maximum boot load
100 kg
All other models
Vehicle length
5027 mm
Vehicle width including
exterior mirrors
2108 mm
Vehicle width excluding
exterior mirrors
1899 mm
Vehicle height
1416 mm
Wheelbase
2945 mm
Maximum roof load
Maximum boot load
100 kg408
Vehicle dataTechnical data