2014 MERCEDES-BENZ E-SEDAN ECU
[x] Cancel search: ECUPage 66 of 430
seat belt for the center seat does not get
trapped. Otherwise, the seat belt could be
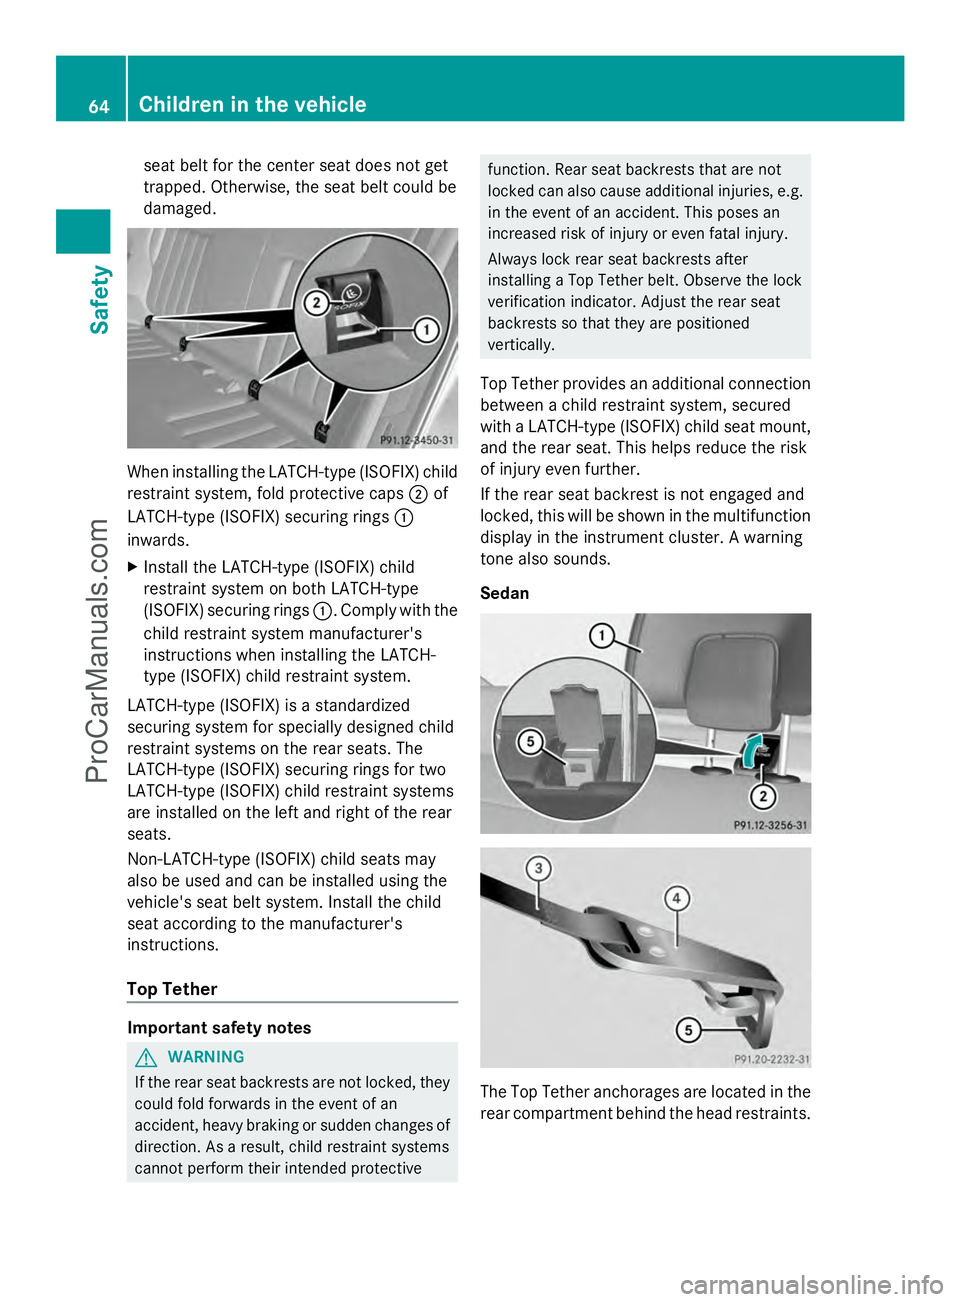
damaged. When installing the LATCH-type (ISOFIX) child
restraint system, fold protective caps ;of
LATCH-type (ISOFIX) securing rings :
inwards.
X Install the LATCH-type (ISOFIX) child
restraint system on both LATCH-type
(ISOFIX) securing rings :. Comply with the
child restraint system manufacturer's
instructions when installing the LATCH-
type (ISOFIX) child restraint system.
LATCH-type (ISOFIX) is a standardized
securing system for specially designed child
restraint systems on the rear seats. The
LATCH-type (ISOFIX) securing rings for two
LATCH-type (ISOFIX) child restraint systems
are installed on the left and right of the rear
seats.
Non-LATCH-type (ISOFIX) child seats may
also be used and can be installed using the
vehicle's seat belt system. Install the child
seat according to the manufacturer's
instructions.
Top Tether Important safety notes
G
WARNING
If the rear seat backrests are not locked, they
could fold forwards in the event of an
accident, heavy braking or sudden changes of
direction. As a result, child restraint systems
cannot perform their intended protective function. Rear seat backrests that are not
locked can also cause additional injuries, e.g.
in the event of an accident. This poses an
increased risk of injury or even fatal injury.
Always lock rear seat backrests after
installing a Top Tether belt. Observe the lock
verification indicator. Adjust the rear seat
backrests so that they are positioned
vertically.
Top Tether provides an additional connection
between a child restraint system, secured
with a LATCH-type (ISOFIX) child seat mount,
and the rear seat. This helps reduce the risk
of injury even further.
If the rear seat backrest is not engaged and
locked, this will be shown in the multifunction
display in the instrument cluster. A warning
tone also sounds.
Sedan The Top Tether anchorages are located in the
rear compartment behind the head restraints.64
Children in the vehicleSafety
ProCarManuals.com
Page 68 of 430
There is a risk of an accident and injury.
When leaving the vehicle, always take the
SmartKey with you and lock the vehicle. Never
leave children or animals unattended in the
vehicle. Always keep the SmartKey out of
reach of children. G
WARNING
If persons, particularly children are subjected
to prolonged exposure to extreme heat or
cold, there is a risk of injury, possibly even
fatal. Never leave children unattended in the
vehicle. G
WARNING
If children are traveling in the vehicle, they
could:
R open doors, thus endangering other people
or road users
R exit the vehicle and be caught by oncoming
traffic
R operate vehicle equipment and become
trapped
There is a risk of an accident and injury.
Always activate the child-proof locks and
override feature if children are traveling in the
vehicle. When leaving the vehicle, always take
the key with you and lock the vehicle. Never
leave children unattended in the vehicle.
You can activate the following child-proof
locks:
R rear doors (Y page 66)
R rear side windows (Y page 66)
Child-proof locks for the rear doors G
WARNING
Children could open a rear door from inside
the vehicle. This could result in serious
injuries or an accident. Therefore, when
children ride in the rear always secure the rear
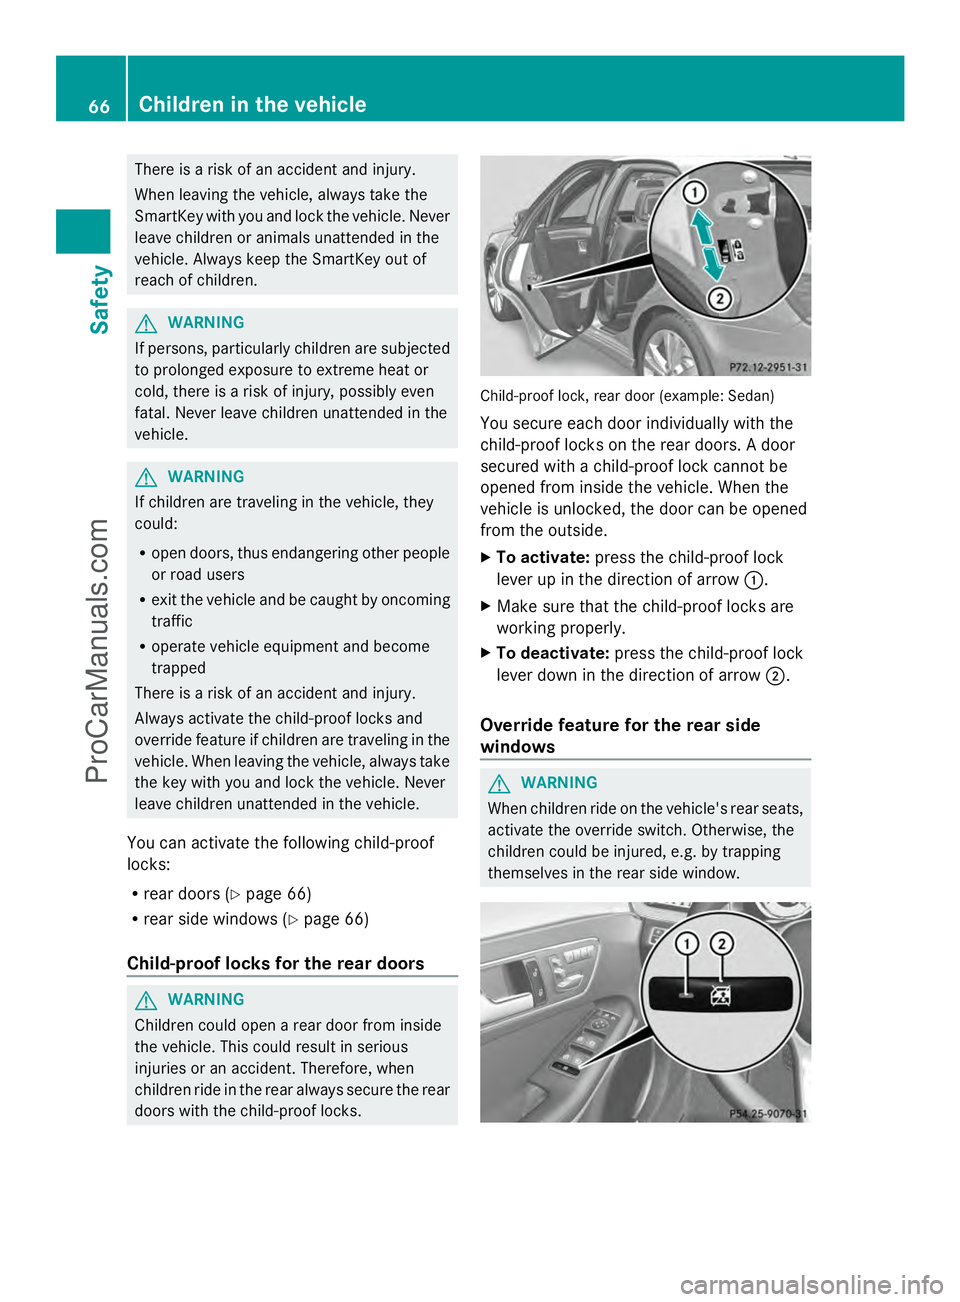
doors with the child-proof locks. Child-proof lock, rear door (example: Sedan)
You secure each door individually with the
child-proof locks on the rear doors. A door
secured with a child-proof lock cannot be
opened from inside the vehicle. When the
vehicle is unlocked, the door can be opened
from the outside.
X
To activate: press the child-proof lock
lever up in the direction of arrow :.
X Make sure that the child-proof locks are
working properly.
X To deactivate: press the child-proof lock
lever down in the direction of arrow ;.
Override feature for the rear side
windows G
WARNING
When children ride on the vehicle's rear seats,
activate the override switch. Otherwise, the
children could be injured, e.g. by trapping
themselves in the rear side window. 66
Children in the vehicleSafety
ProCarManuals.com
Page 91 of 430
will trigger the anti-theft alarm system.
Switch off the alarm (Y page 78).
You can only open the rear doors from inside
the vehicle if they are not secured by the
child-proof locks (Y page 66).X
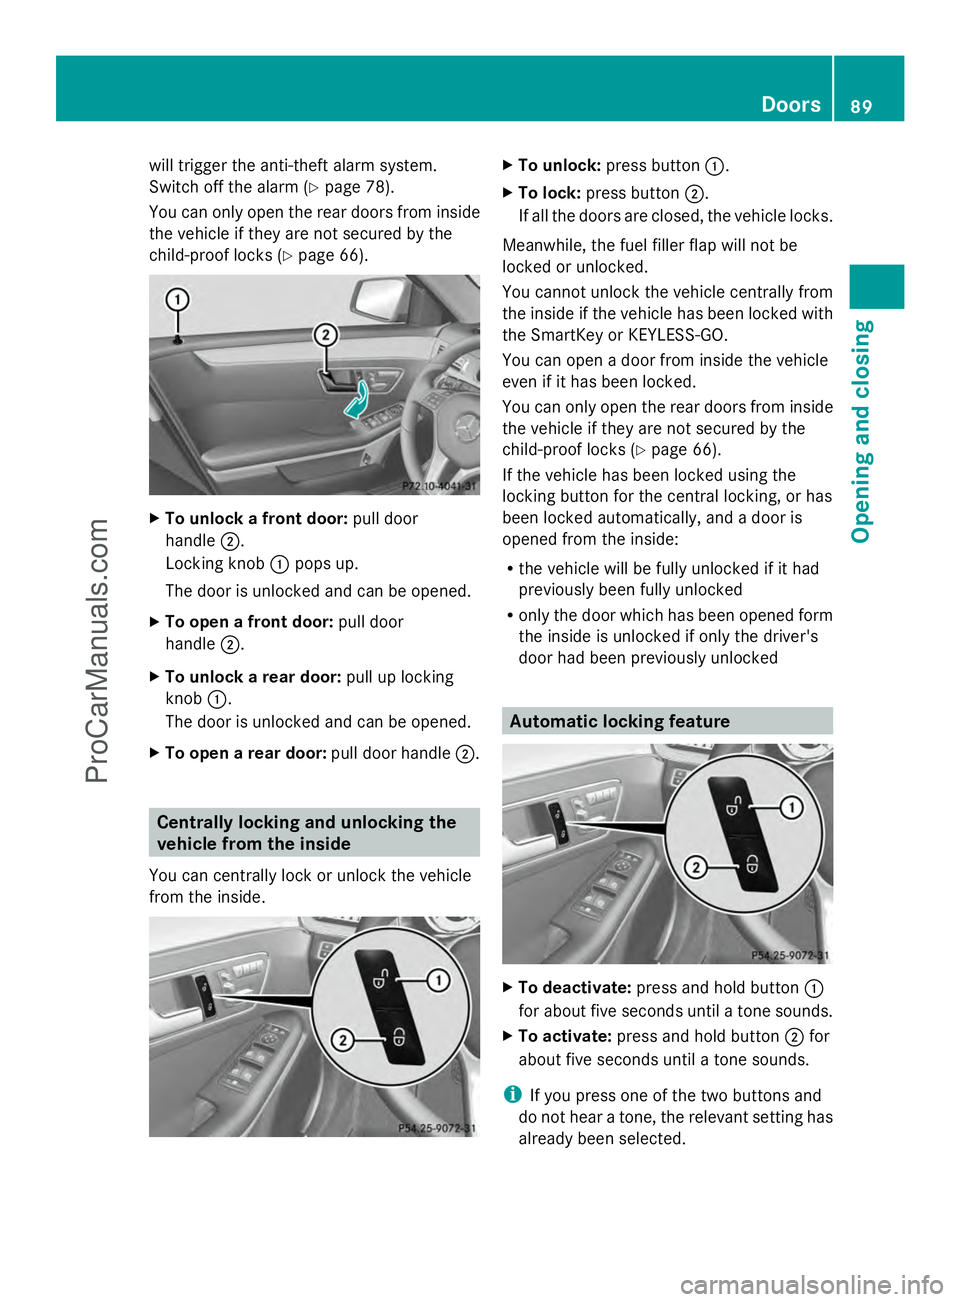
To unlock a front door: pull door
handle ;.
Locking knob :pops up.
The door is unlocked and can be opened.
X To open a front door: pull door
handle ;.
X To unlock a rear door: pull up locking
knob :.
The door is unlocked and can be opened.
X To open a rear door: pull door handle;. Centrally locking and unlocking the
vehicle from the inside
You can centrally lock or unlock the vehicle
from the inside. X
To unlock: press button :.
X To lock: press button ;.
If all the doors are closed, the vehicle locks.
Meanwhile, the fuel filler flap will not be
locked or unlocked.
You cannot unlock the vehicle centrally from
the inside if the vehicle has been locked with
the SmartKey or KEYLESS-GO.
You can open a door from inside the vehicle
even if it has been locked.
You can only open the rear doors from inside
the vehicle if they are not secured by the
child-proof locks (Y page 66).
If the vehicle has been locked using the
locking button for the central locking, or has
been locked automatically, and a door is
opened from the inside:
R the vehicle will be fully unlocked if it had
previously been fully unlocked
R only the door which has been opened form
the inside is unlocked if only the driver's
door had been previously unlocked Automatic locking feature
X
To deactivate: press and hold button :
for about five seconds until a tone sounds.
X To activate: press and hold button ;for
about five seconds until a tone sounds.
i If you press one of the two buttons and
do not hear a tone, the relevant setting has
already been selected. Doors
89Opening and closing Z
ProCarManuals.com
Page 160 of 430
Useful information
i This Operator's Manual describes all
models and all standard and optional
equipment of your vehicle available at the
time of publication of the Operator's
Manual. Country-specific differences are
possible. Please note that your vehicle may
not be equipped with all features
described. This also applies to safety-
related systems and functions.
i Read the information on qualified
specialist workshops: (Y page 26).Notes on breaking-in a new vehicle
Important safety notes
New and replaced brake pads and discs only
reach their optimum braking effect after
several hundred kilometers of driving.
Compensate for this by applying greater force
to the brake pedal. The first 1000 miles(1500 km)
The more you look after the engine when it is
new, the more satisfied you will be with its
performance in the future.
R You should therefore drive at varying
vehicle and engine speeds for the first
1000 miles (1500 km).
R Avoid heavy loads, e.g. driving at full
throttle, during this period.
R Change gear in good time, before the
tachometer needle is Ôof the way to the
red area of the tachometer.
R If possible, do not depress the accelerator
pedal past the point of resistance
(kickdown).
After 1000 miles (1500 km), you can increase
the engine speed gradually and accelerate
the vehicle to full speed. Additional breaking-in notes for AMG
vehicles:
R
Do not drive faster than 85 mph
(140 km/h) for the first 1,000 miles
(1,500 km).
R Only allow the engine to reach a maximum
engine speed of 4,500 rpm briefly.
R Change gear in good time.
i You should also observe these notes on
breaking in if the engine or parts of the drive
train on your vehicle have been replaced.
i Always observe the respective speed
limits. AMG vehicles with self-locking rear
axle differential
Your vehicle is equipped with a self-locking
differential on the rear axle. To protect the
differential on the rear axle, carry out an oil
change after a breaking-in phase of
2,000 miles (3,000 km). This oil change
prolongs the service life of the differential.
Have the oil change carried out at a qualified
specialist workshop. Driving
Important safety notes
G
WARNING
Objects in the driver's footwell can restrict the
pedal travel or obstruct a depressed pedal.
The operating and road safety of the vehicle
is jeopardized. There is a risk of an accident.
Make sure that all objects in the vehicle are
stowed correctly, and that they cannot enter
the driver's footwell. Install the floormats
securely and as specified in order to ensure
sufficient clearance for the pedals. Do not use
loose floormats and do not place floormats on
top of one another. 158
DrivingDriving and parking
ProCarManuals.com
Page 165 of 430
ECO start/stop function
Introduction The ECO start/stop function switches the
engine off automatically if the vehicle is
stopped under certain conditions.
The engine starts automatically when the
driver wants to pull away again. The ECO
start/stop function thereby helps you to
reduce the fuel consumption and emissions
of your vehicle.
Important safety notes G
WARNING
If the engine is switched off automatically and
you exit the vehicle, the engine is restarted
automatically. The vehicle may begin moving.
There is a risk of accident and injury.
If you wish to exit the vehicle, always turn off
the ignition and secure the vehicle against
rolling away.
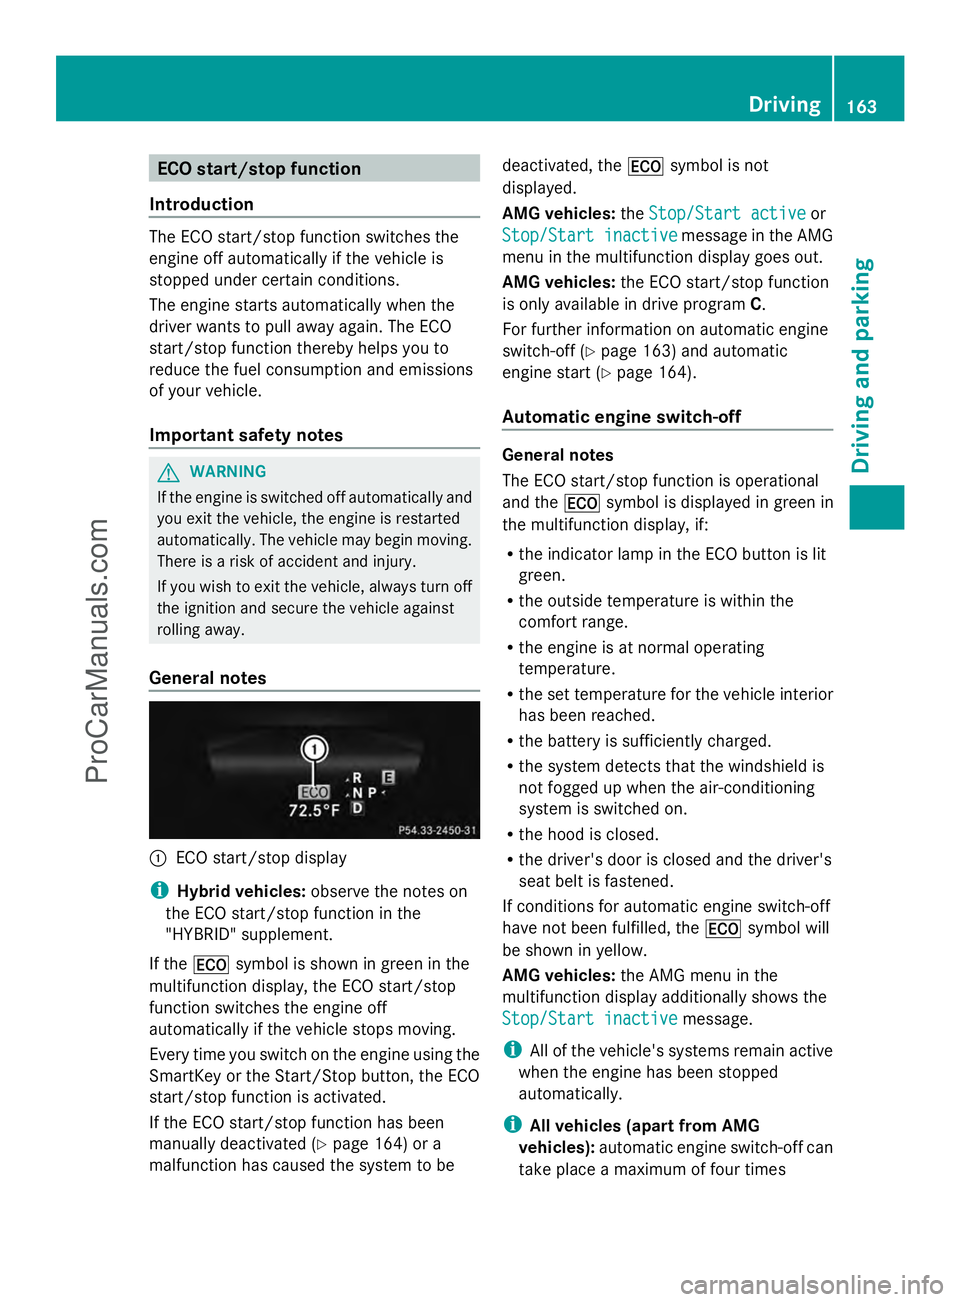
General notes :
ECO start/stop display
i Hybrid vehicles: observe the notes on
the ECO start/stop function in the
"HYBRID" supplement.
If the ¤ symbol is shown in green in the
multifunction display, the ECO start/stop
function switches the engine off
automatically if the vehicle stops moving.
Every time you switch on the engine using the
SmartKey or the Start/Stop button, the ECO
start/stop function is activated.
If the ECO start/stop function has been
manually deactivated (Y page 164) or a
malfunction has caused the system to be deactivated, the
¤symbol is not
displayed.
AMG vehicles: theStop/Start active Stop/Start active or
Stop/Start inactive Stop/Start inactive message in the AMG
menu in the multifunction display goes out.
AMG vehicles: the ECO start/stop function
is only available in drive program C.
For further information on automatic engine
switch-off (Y page 163) and automatic
engine start (Y page 164).
Automatic engine switch-off General notes
The ECO start/stop function is operational
and the
¤symbol is displayed in green in
the multifunction display, if:
R the indicator lamp in the ECO button is lit
green.
R the outside temperature is within the
comfort range.
R the engine is at normal operating
temperature.
R the set temperature for the vehicle interior
has been reached.
R the battery is sufficiently charged.
R the system detects that the windshield is
not fogged up when the air-conditioning
system is switched on.
R the hood is closed.
R the driver's door is closed and the driver's
seat belt is fastened.
If conditions for automatic engine switch-off
have not been fulfilled, the ¤symbol will
be shown in yellow.
AMG vehicles: the AMG menu in the
multifunction display additionally shows the
Stop/Start inactive Stop/Start inactive message.
i All of the vehicle's systems remain active
when the engine has been stopped
automatically.
i All vehicles (apart from AMG
vehicles): automatic engine switch-off can
take place a maximum of four times Driving
163Driving and parking Z
ProCarManuals.com
Page 166 of 430
consecutively (initial stop then repeated
three times). The ¤symbol is shown in
yellow in the multifunction display after the
engine has been started automatically for
the fourth time. When the ¤symbol is
shown in green in the multifunction display,
automatic engine switch-off is again
possible.
i AMG vehicles: times which the engine
can be automatically switched off.
Vehicles with automatic transmission
If the vehicle is braked to a standstill in Dor
N, the ECO start/stop function switches off
the engine automatically.
i The HOLD function can be activated if the
engine has been switched off
automatically. It is then not necessary to
continue applying the brakes during the
automatic stop phase. When you depress
the accelerator pedal, the engine starts
automatically and the braking effect of the
HOLD function is deactivated.
Automatic engine start General notes
The engine starts automatically if:
R
you switch off the ECO start/stop function
by pressing the ECO button.
R you engage reverse gear R.
R you switch to drive program S,S+ orM
(AMG vehicles).
R the vehicle starts to roll.
R the brake system requires this.
R the temperature in the vehicle interior
deviates from the set range.
R the system detects moisture on the
windshield when the air-conditioning
system is switched on.
R the condition of charge of the battery is too
low.
R the driver's seat belt is removed or the
driver's door is opened. Vehicles with automatic transmission
The engine is started automatically if you:
R release the brake pedal when HOLD is not
activated and the transmission is in
position Dor N.
R depress the accelerator pedal.
R move the transmission out of position P.
i Shifting the transmission to position P
does not start the engine.
i If you shift the transmission from Rto D,
the ECO start/stop function is available
again once the ¤symbol reappears in
green in the multifunction display.
Deactivating/activating the ECO start/
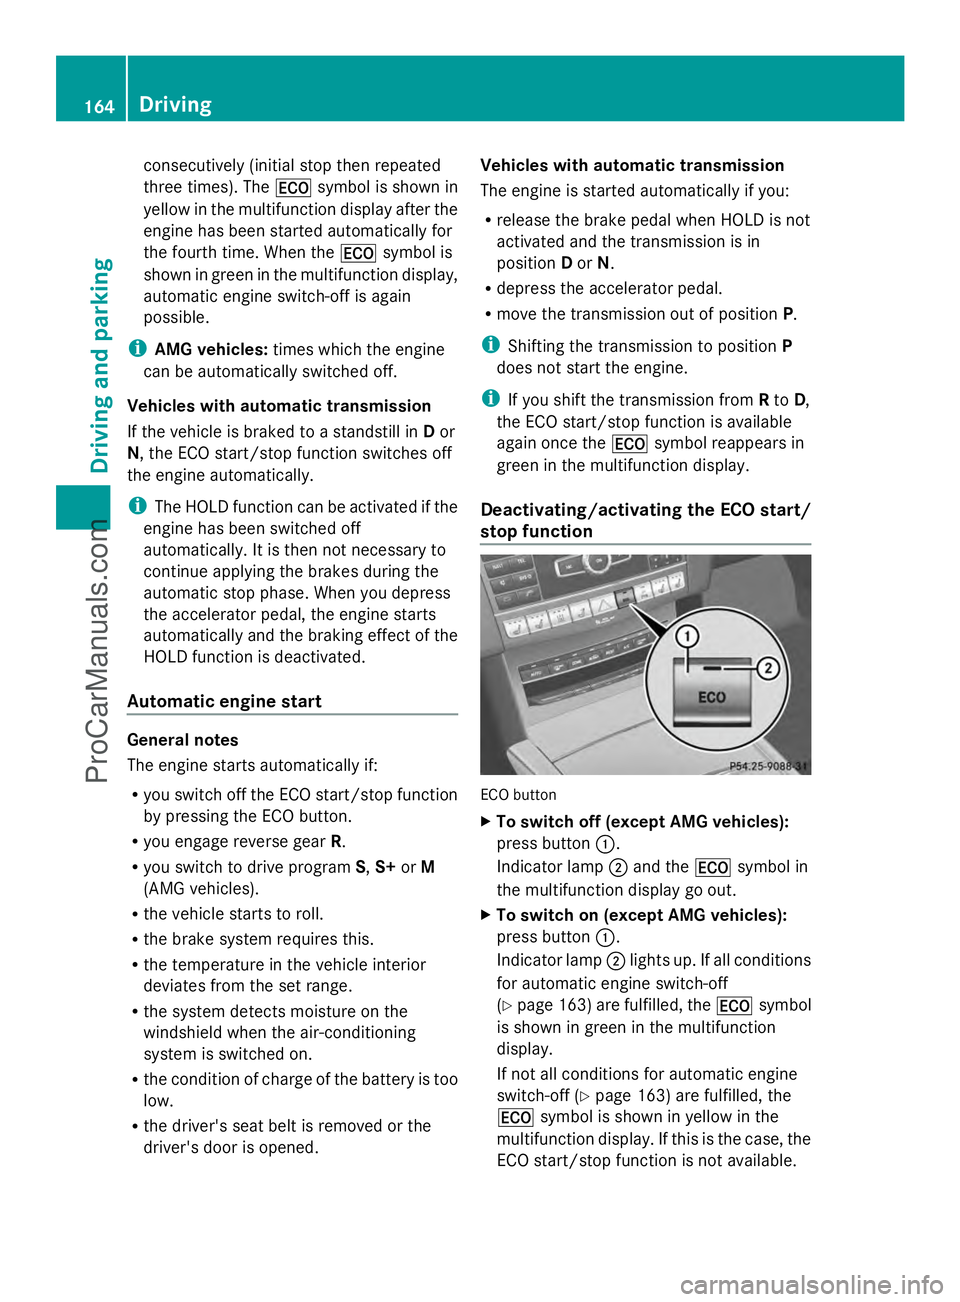
stop function ECO button
X
To switch off (except AMG vehicles):
press button :.
Indicator lamp ;and the ¤symbol in
the multifunction display go out.
X To switch on (except AMG vehicles):
press button :.
Indicator lamp ;lights up. If all conditions
for automatic engine switch-off
(Y page 163) are fulfilled, the ¤symbol
is shown in green in the multifunction
display.
If not all conditions for automatic engine
switch-off ( Ypage 163) are fulfilled, the
¤ symbol is shown in yellow in the
multifunction display. If this is the case, the
ECO start/stop function is not available. 164
DrivingDriving and parking
ProCarManuals.com
Page 172 of 430
R
Depress the brake pedal and keep it
depressed.
R Shift to neutral N.
R Release the brake pedal.
R If the parking brake is engaged, release it.
R Switch off the ignition and leave the
SmartKey in the ignition lock.
Engaging drive position D X
When the vehicle is stationary, depress the
brake pedal.
X Push the DIRECT SELECT lever down past
the first point of resistance. Transmission positions
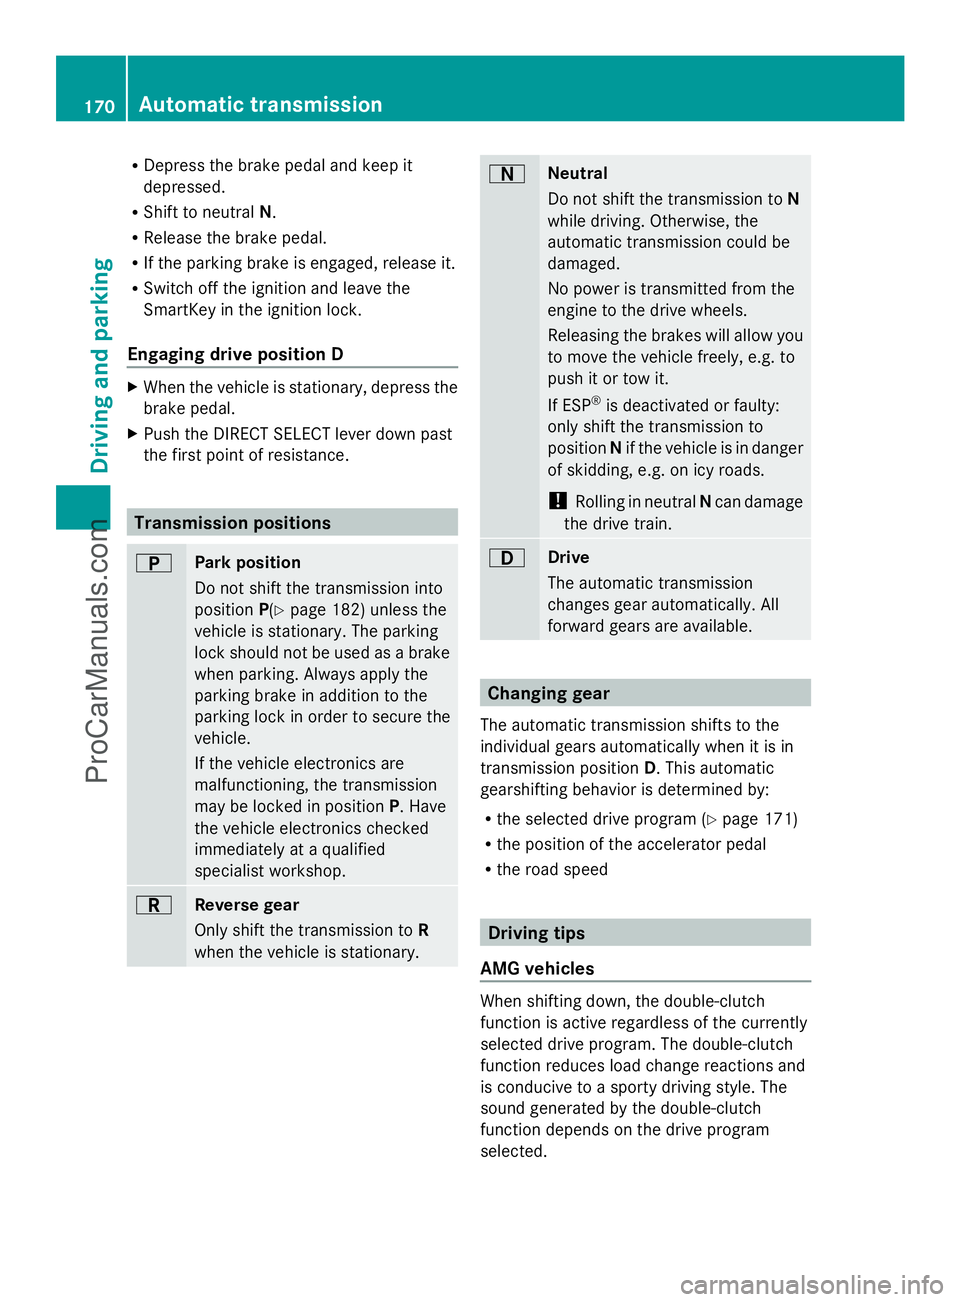
B
Park position
Do not shift the transmission into
position P(Ypage 182) unless the
vehicle is stationary. The parking
lock should not be used as a brake
when parking. Always apply the
parking brake in addition to the
parking lock in order to secure the
vehicle.
If the vehicle electronics are
malfunctioning, the transmission
may be locked in position P. Have
the vehicle electronics checked
immediately at a qualified
specialist workshop. C
Reverse gear
Only shift the transmission to R
when the vehicle is stationary. A
Neutral
Do not shift the transmission to
N
while driving. Otherwise, the
automatic transmission could be
damaged.
No power is transmitted from the
engine to the drive wheels.
Releasing the brakes will allow you
to move the vehicle freely, e.g. to
push it or tow it.
If ESP ®
is deactivated or faulty:
only shift the transmission to
position Nif the vehicle is in danger
of skidding, e.g. on icy roads.
! Rolling in neutral Ncan damage
the drive train. 7
Drive
The automatic transmission
changes gear automatically. All
forward gears are available.
Changing gear
The automatic transmission shifts to the
individual gears automatically when it is in
transmission position D. This automatic
gearshifting behavior is determined by:
R the selected drive program (Y page 171)
R the position of the accelerator pedal
R the road speed Driving tips
AMG vehicles When shifting down, the double-clutch
function is active regardless of the currently
selected drive program. The double-clutch
function reduces load change reactions and
is conducive to a sporty driving style. The
sound generated by the double-clutch
function depends on the drive program
selected.170
Automatic transmissionDriving an
d parking
ProCarManuals.com
Page 183 of 430
residues crystallize after time and
contaminate the affected surfaces.
! DEF is not a fuel additive and must not be
added to the fuel tank. If DEF is added to
the fuel tank, this can lead to engine
damage.
! Only screw on the DEF refill bottle hand-
tight. It could otherwise be damaged.
The DEF filler neck is under the trunk floor.
X Switch the ignition off.
X Open the trunk.
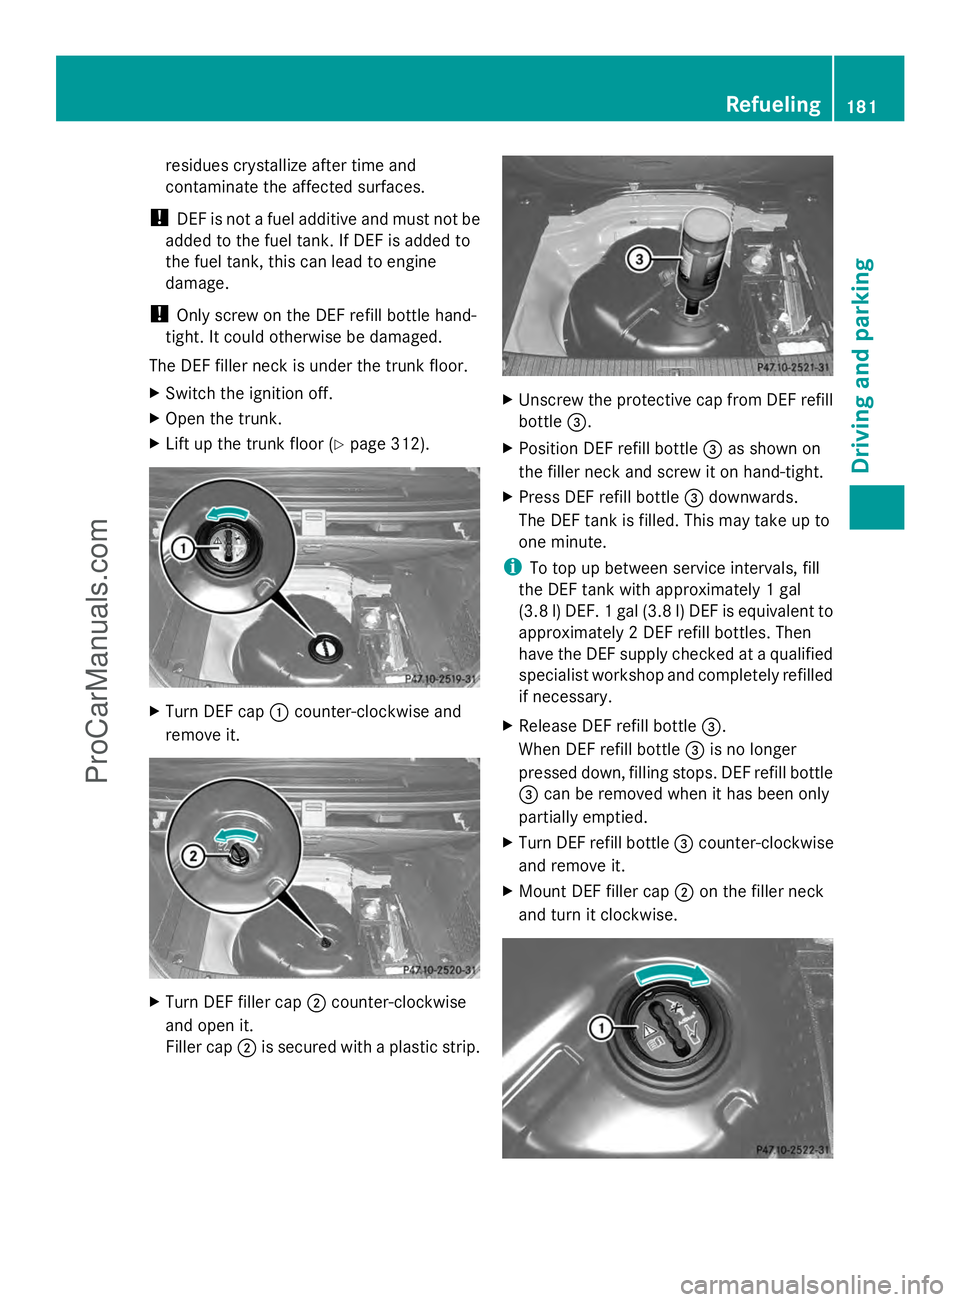
X Lift up the trunk floor ( Ypage 312). X
Turn DEF cap :counter-clockwise and
remove it. X
Turn DEF filler cap ;counter-clockwise
and open it.
Filler cap ;is secured with a plastic strip. X
Unscrew the protective cap from DEF refill
bottle =.
X Position DEF refill bottle =as shown on
the filler neck and screw it on hand-tight.
X Press DEF refill bottle =downwards.
The DEF tank is filled. This may take up to
one minute.
i To top up between service intervals, fill
the DEF tank with approximately 1 gal
(3.8 l) DEF. 1 gal (3.8 l) DEF is equivalent to
approximately 2 DEF refill bottles. Then
have the DEF supply checked at a qualified
specialist workshop and completely refilled
if necessary.
X Release DEF refill bottle =.
When DEF refill bottle =is no longer
pressed down, filling stops. DEF refill bottle
= can be removed when it has been only
partially emptied.
X Turn DEF refill bottle =counter-clockwise
and remove it.
X Mount DEF filler cap ;on the filler neck
and turn it clockwise. Refueling
181Driving and parking Z
ProCarManuals.com