2014 MERCEDES-BENZ E-SEDAN hood open
[x] Cancel search: hood openPage 13 of 430
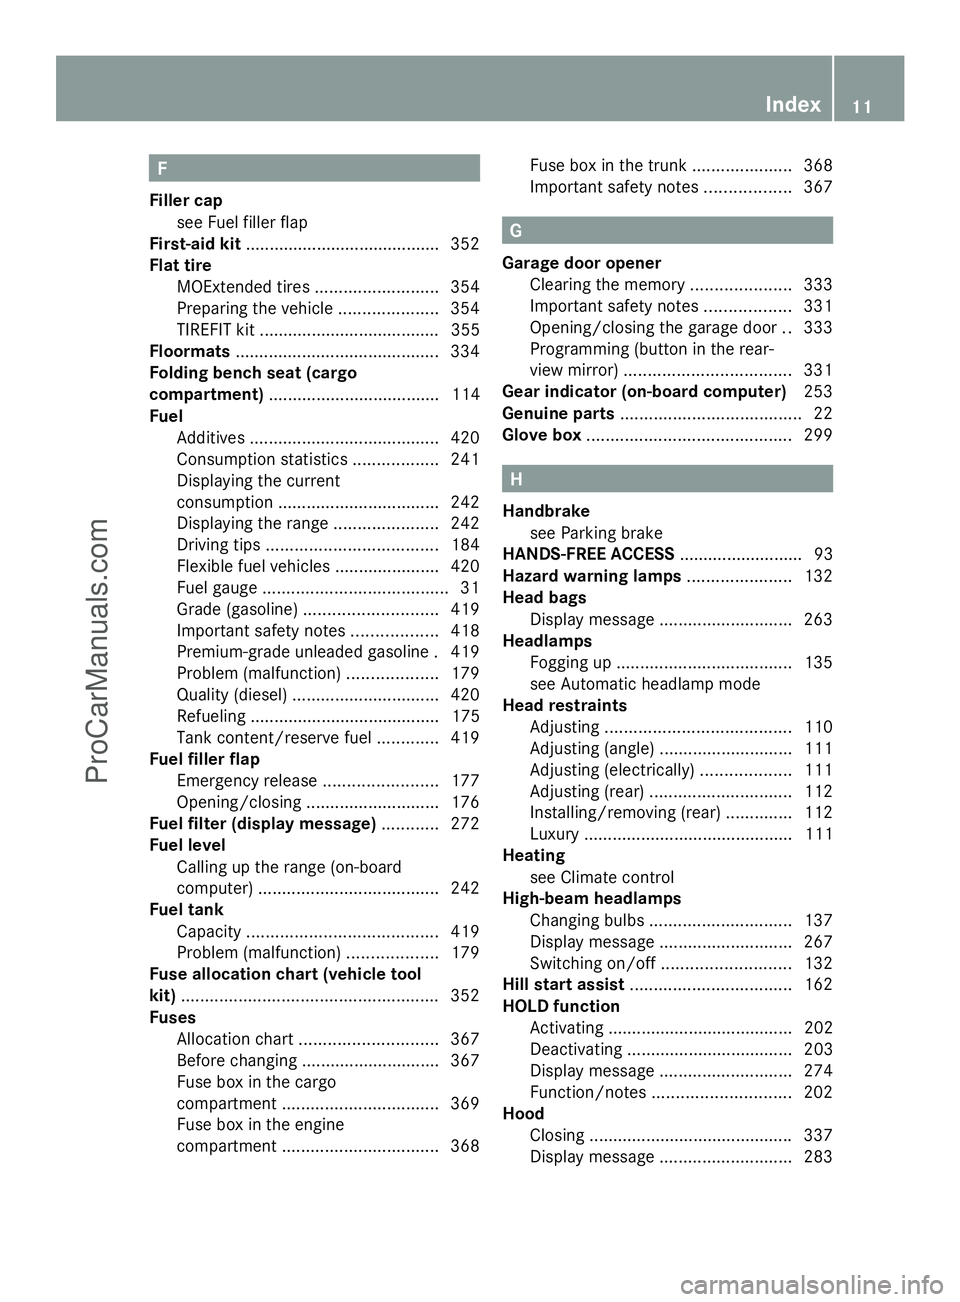
F
Filler cap see Fuel filler flap
First-aid kit ........................................ .352
Flat tire MOExtended tires ..........................354
Preparing the vehicle .....................354
TIREFIT kit ...................................... 355
Floormats ........................................... 334
Folding bench seat (cargo
compartment) .................................... 114
Fuel Additives ........................................ 420
Consumption statistics ..................241
Displaying the current
consumption .................................. 242
Displaying the range ......................242
Driving tips .................................... 184
Flexible fuel vehicles ......................420
Fuel gauge ....................................... 31
Grade (gasoline) ............................ 419
Important safety notes ..................418
Premium-grade unleaded gasoline .419
Problem (malfunction) ...................179
Quality (diesel )............................... 420
Refueling ........................................ 175
Tank content/reserve fuel .............419
Fuel filler flap
Emergency release ........................177
Opening/closing ............................ 176
Fuel filter (display message) ............272
Fuel level Calling up the range (on-board
computer) ...................................... 242
Fuel tank
Capacity ........................................ 419
Problem (malfunction) ...................179
Fuse allocation chart (vehicle tool
kit) ...................................................... 352
Fuses Allocation chart ............................. 367
Before changing ............................. 367
Fuse box in the cargo
compartment ................................. 369
Fuse box in the engine
compartment ................................. 368Fuse box in the trunk
.....................368
Important safety notes ..................367 G
Garage door opener Clearing the memory .....................333
Important safety notes ..................331
Opening/closing the garage door ..333
Programming (button in the rear-
view mirror) ................................... 331
Gear indicator (on-board computer) 253
Genuine parts ...................................... 22
Glove box ........................................... 299 H
Handbrake see Parking brake
HANDS-FREE ACCESS .......................... 93
Hazard warning lamps ......................132
Head bags Display message ............................ 263
Headlamps
Fogging up ..................................... 135
see Automatic headlamp mode
Head restraints
Adjusting ....................................... 110
Adjusting (angle) ............................ 111
Adjusting (electrically) ...................111
Adjusting (rear) .............................. 112
Installing/removing (rear) ..............112
Luxury ............................................ 111
Heating
see Climate control
High-beam headlamps
Changing bulbs .............................. 137
Display message ............................ 267
Switching on/off ........................... 132
Hill start assist .................................. 162
HOLD function Activating ....................................... 202
Deactivating ................................... 203
Display message ............................ 274
Function/notes ............................. 202
Hood
Closing .......................................... .337
Display message ............................ 283 Index
11ProCarManuals.com
Page 32 of 430
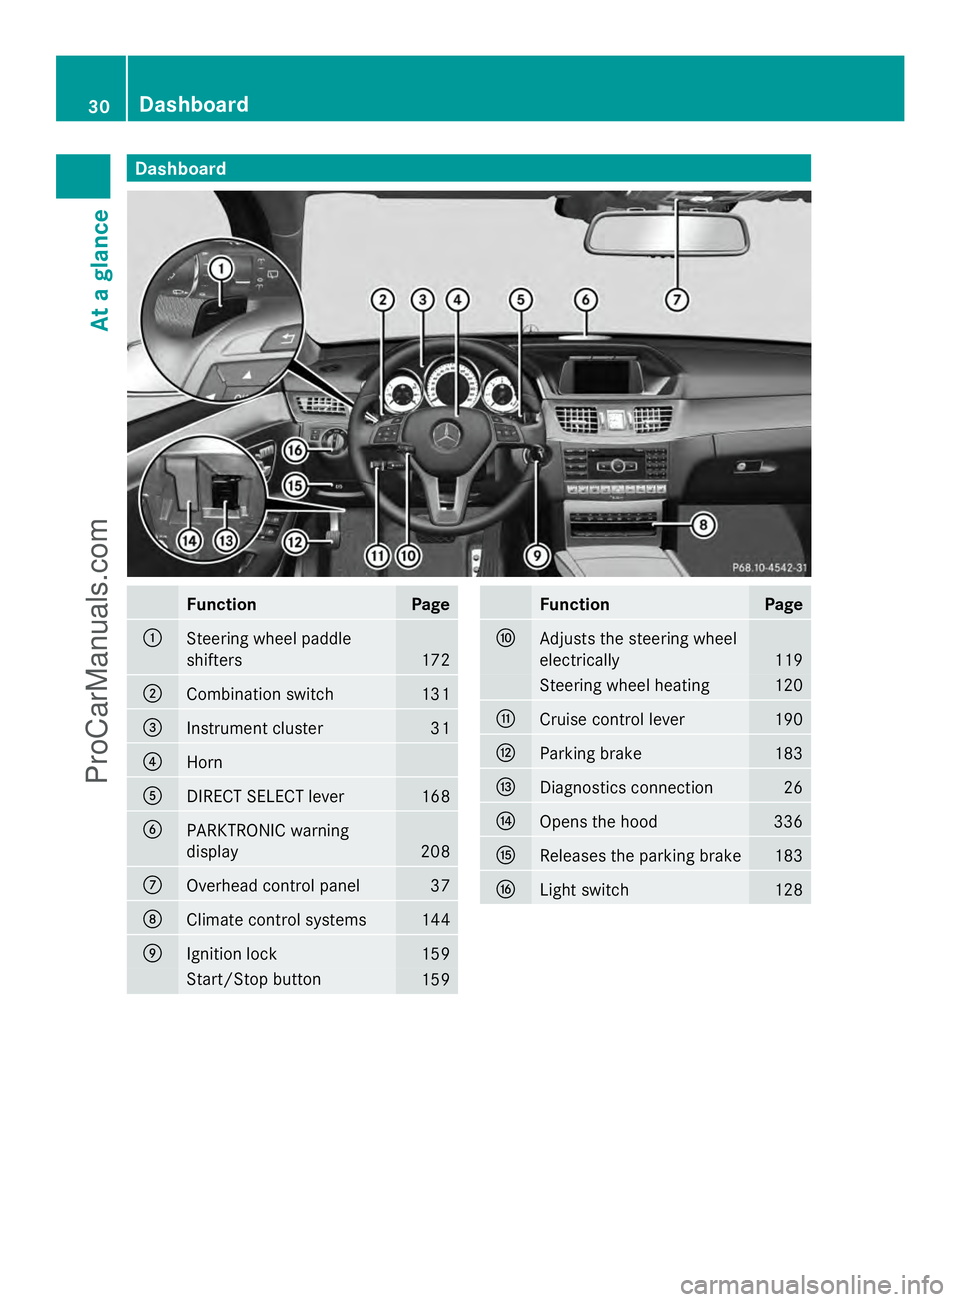
Dashboard
Function Page
:
Steering wheel paddle
shifters
172
;
Combination switch 131
=
Instrument cluster 31
?
Horn
A
DIRECT SELECT lever 168
B
PARKTRONIC warning
display
208
C
Overhead control panel 37
D
Climate control systems 144
E
Ignition lock 159
Start/Stop button
159 Function Page
F
Adjusts the steering wheel
electrically
119
Steering wheel heating 120
G
Cruise control lever 190
H
Parking brake 183
I
Diagnostics connection 26
J
Opens the hood 336
K
Releases the parking brake 183
L
Light switch 12830
Dashboa
rdAt a glance
ProCarManuals.com
Page 80 of 430
STEER CONTROL
General information STEER CONTROL helps you by transmitting a
noticeable steering force to the steering
wheel in the direction required for vehicle
stabilization.
This steering assistance is provided in
particular if:
R both right wheels or both left wheels are on
a slippery road surface when you brake
heavily.
R the vehicle starts to skid.
Important safety notes i
Observe the "Important safety notes"
section (Y page 67).
If ESP ®
is malfunctioning, you will not receive
steering support from STEER CONTROL.
Power steering will, however, continue to
function. Theft deterrent locking system
Immobilizer
The immobilizer prevents your vehicle from
being started without the correct SmartKey.
X To activate with the SmartKey: remove
the SmartKey from the ignition lock.
X To activate with KEYLESS-GO: switch the
ignition off and open the driver's door.
X To deactivate: switch on the ignition.
When leaving the vehicle, always take the
SmartKey with you and lock the vehicle.
Anyone can start the engine if a valid
SmartKey has been left inside the vehicle.
i The immobilizer is always deactivated
when you start the engine.
In the event that the engine cannot be
started when the starter battery is fully
charged, the immobilizer may be faulty.
Contact an authorized Mercedes-Benz Center or call 1-800-FOR-MERCedes (in the
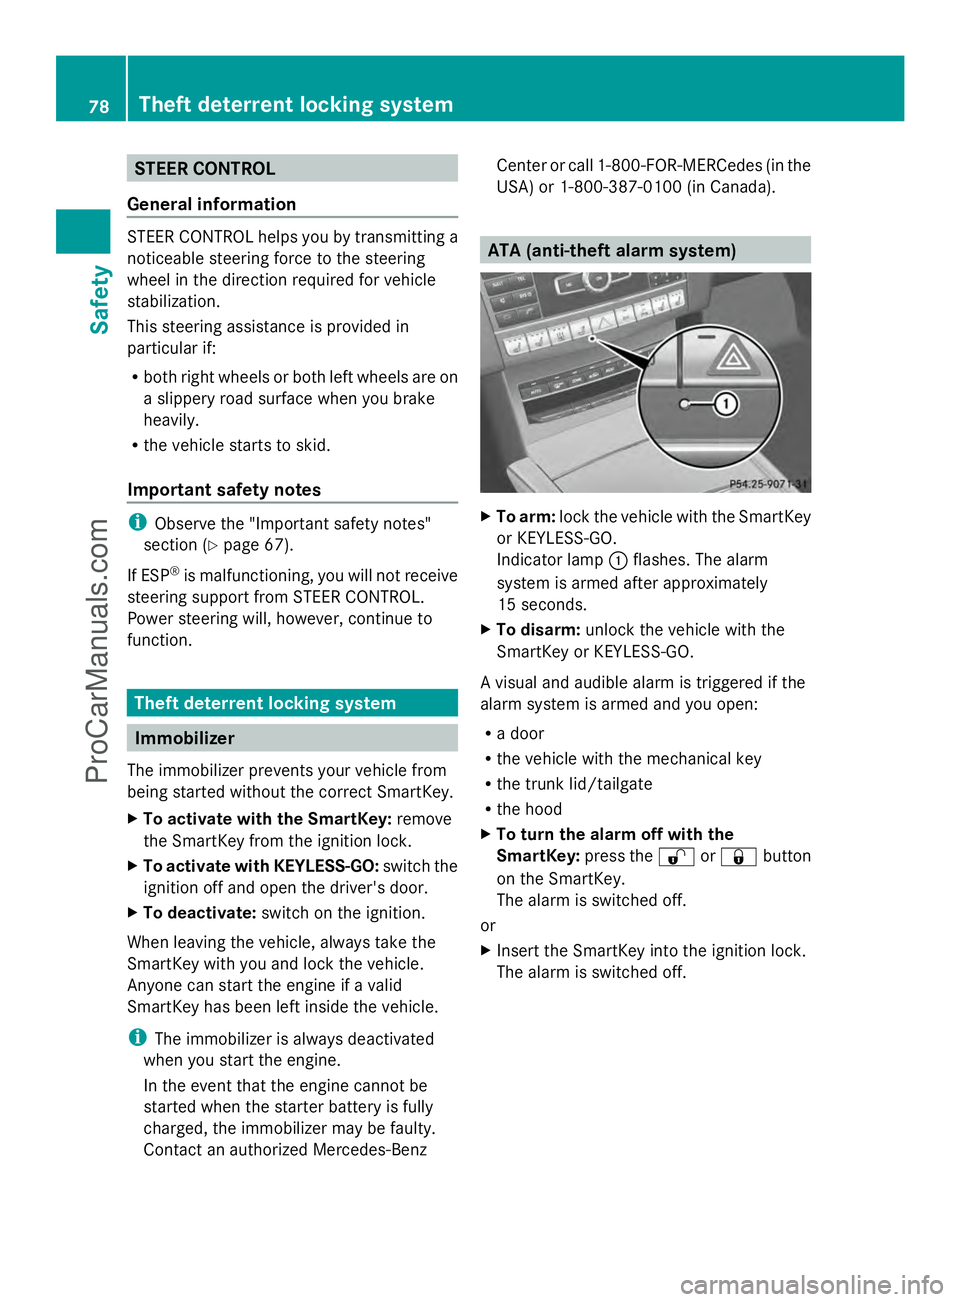
USA) or 1-800-387-0100 (in Canada). ATA (anti-theft alarm system)
X
To arm: lock the vehicle with the SmartKey
or KEYLESS-GO.
Indicator lamp :flashes. The alarm
system is armed after approximately
15 seconds.
X To disarm: unlock the vehicle with the
SmartKey or KEYLESS-GO.
A visual and audible alarm is triggered if the
alarm system is armed and you open:
R a door
R the vehicle with the mechanical key
R the trunk lid/tailgate
R the hood
X To turn the alarm off with the
SmartKey: press the%or& button
on the SmartKey.
The alarm is switched off.
or
X Insert the SmartKey into the ignition lock.
The alarm is switched off. 78
Theft deterrent locking systemSafety
ProCarManuals.com
Page 140 of 430
X
Switch off the lights.
X Open the hood.
X Turn housing cover :counter-clockwise
and pull it out.
X Using the handle extension, turn bulb
holder ;counter-clockwise and pull it out.
X Take the bulb out of bulb holder ;.
X Insert the new bulb into bulb holder ;.
X Insert bulb holder ;into the lamp and turn
it clockwise.
X Align housing cover :and turn it
clockwise until it engages.
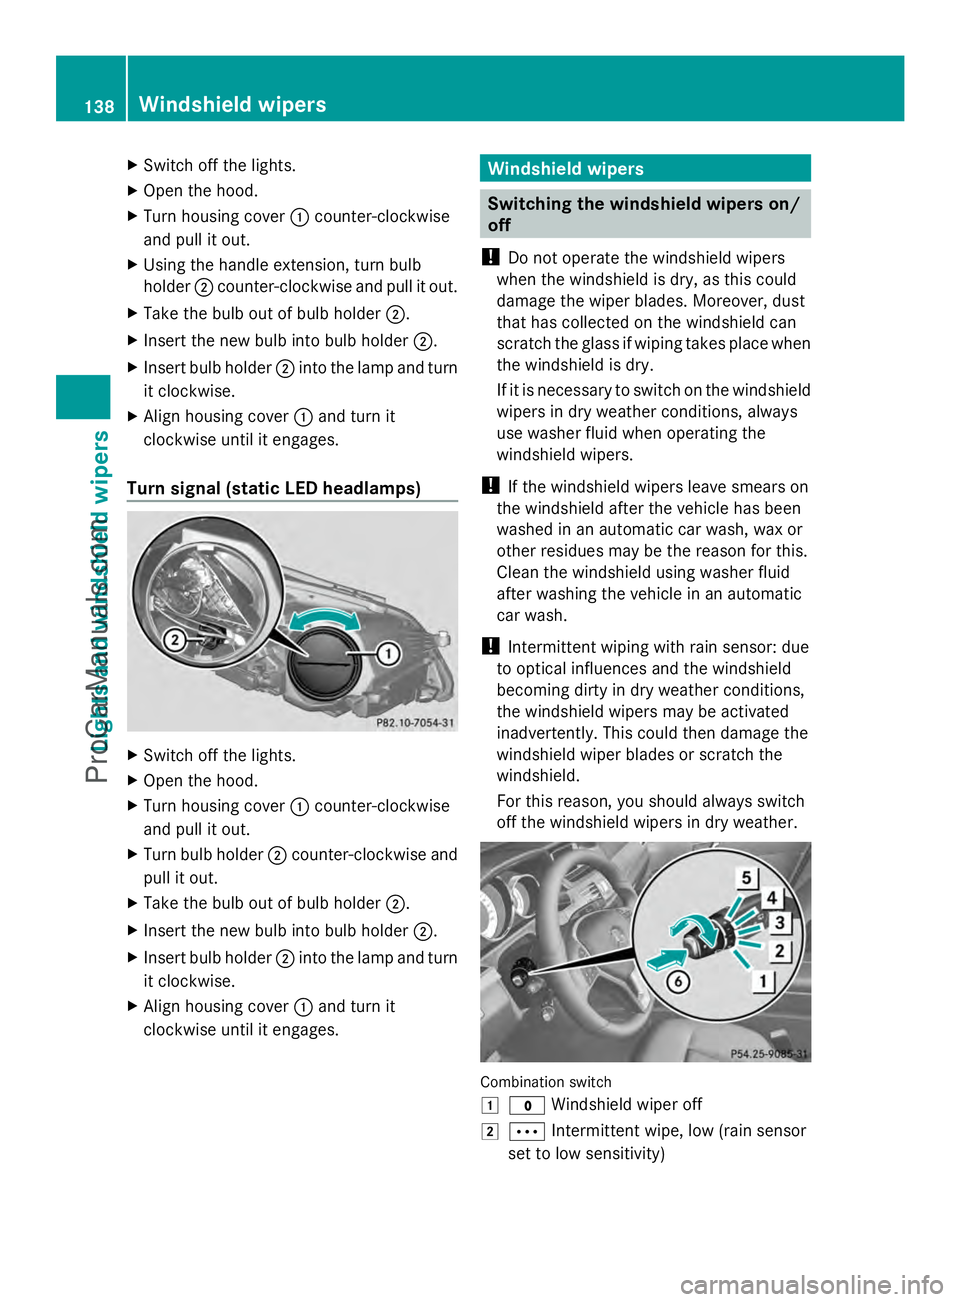
Turn signal (static LED headlamps) X
Switch off the lights.
X Open the hood.
X Turn housing cover :counter-clockwise
and pull it out.
X Turn bulb holder ;counter-clockwise and
pull it out.
X Take the bulb out of bulb holder ;.
X Insert the new bulb into bulb holder ;.
X Insert bulb holder ;into the lamp and turn
it clockwise.
X Align housing cover :and turn it
clockwise until it engages. Windshield wipers
Switching the windshield wipers on/
off
! Do not operate the windshield wipers
when the windshield is dry, as this could
damage the wiper blades. Moreover, dust
that has collected on the windshield can
scratch the glass if wiping takes place when
the windshield is dry.
If it is necessary to switch on the windshield
wipers in dry weather conditions, always
use washer fluid when operating the
windshield wipers.
! If the windshield wipers leave smears on
the windshield after the vehicle has been
washed in an automatic car wash, wax or
other residues may be the reason for this.
Clean the windshield using washer fluid
after washing the vehicle in an automatic
car wash.
! Intermittent wiping with rain sensor: due
to optical influences and the windshield
becoming dirty in dry weather conditions,
the windshield wipers may be activated
inadvertently. This could then damage the
windshield wiper blades or scratch the
windshield.
For this reason, you should always switch
off the windshield wipers in dry weather. Combination switch
1
$ Windshield wiper off
2 Ä Intermittent wipe, low (rain sensor
set to low sensitivity) 138
Windshield wipersLights and windshield wipers
ProCarManuals.com
Page 141 of 430
3
Å Intermittent wipe, high (rain sensor
set to high sensitivity)
4 ° Continuous wipe, slow
5 ¯ Continuous wipe, fast
B í Single wipe/î To wipe the
windshield using washer fluid
X Switch on the ignition.
X Turn the combination switch to the
corresponding position.
In the ÄorÅ position, the appropriate
wiping frequency is set automatically
according to the intensity of the rain. In
the Å position, the rain sensor is more
sensitive than in the Äposition, causing
the windshield wipers to wipe more
frequently.
If the wiper blades are worn, the windshield
will no longer be wiped properly. This could
prevent you from observing the traffic
conditions. Replace the wiper blades twice a
year, ideally in spring and fall. Switching the rear window wiper on/
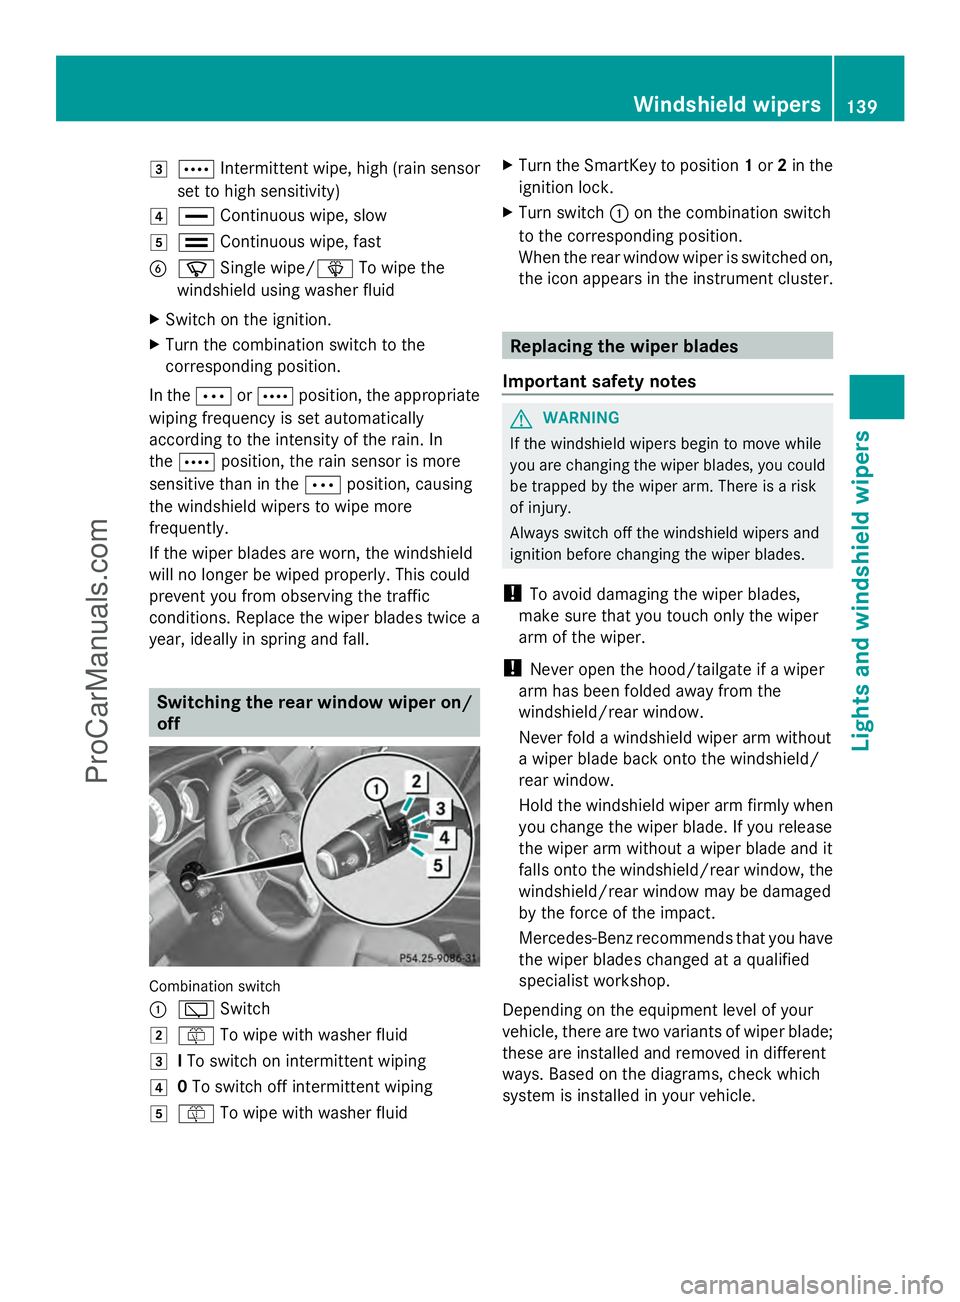
off
Combination switch
:
è Switch
2 ô To wipe with washer fluid
3 ITo switch on intermittent wiping
4 0To switch off intermittent wiping
5 ô To wipe with washer fluid X
Turn the SmartKey to position 1or 2in the
ignition lock.
X Turn switch :on the combination switch
to the corresponding position.
When the rear window wiper is switched on,
the icon appears in the instrument cluster. Replacing the wiper blades
Important safety notes G
WARNING
If the windshield wipers begin to move while
you are changing the wiper blades, you could
be trapped by the wiper arm. There is a risk
of injury.
Always switch off the windshield wipers and
ignition before changing the wiper blades.
! To avoid damaging the wiper blades,
make sure that you touch only the wiper
arm of the wiper.
! Never open the hood/tailgate if a wiper
arm has been folded away from the
windshield/rear window.
Never fold a windshield wiper arm without
a wiper blade back onto the windshield/
rear window.
Hold the windshield wiper arm firmly when
you change the wiper blade. If you release
the wiper arm without a wiper blade and it
falls onto the windshield/rear window, the
windshield/rear window may be damaged
by the force of the impact.
Mercedes-Benz recommends that you have
the wiper blades changed at a qualified
specialist workshop.
Depending on the equipment level of your
vehicle, there are two variants of wiper blade;
these are installed and removed in different
ways. Based on the diagrams, check which
system is installed in your vehicle. Windshield wipers
139Lights and windshield wipers Z
ProCarManuals.com
Page 157 of 430
Activating/deactivating
X
Turn the SmartKey to position 0in the
ignition lock or remove it (Y page 159).
X To activate: press theÌbutton.
The indicator lamp above the Ìbutton
lights up.
i If the residual heat function is activated,
the windows may fog up on the inside.
i The blower will run at a low speed
regardless of the airflow setting.
i If you activate the residual heat function
at high temperatures, only the ventilation
will be activated. The blower runs at
medium speed.
X To deactivate: press theÌbutton.
The indicator lamp above the Ìbutton
goes out.
Residual heat is deactivated automatically:
R after approximately 30 minutes
R when the ignition is switched on
R if the battery voltage drops Setting the air vents
Important safety notes
G
WARNING
Very hot or very cold air can flow from the air
vents. This could result in burns or frostbite in
the immediate vicinity of the air vents. There
is a risk of injury.
Make sure that all vehicle occupants always
maintain a sufficient distance to the air
outlets. If necessary, redirect the airflow to
another area of the vehicle interior. In order to ensure the direct flow of fresh air
through the air vents into the vehicle interior,
please observe the following notes:
R
keep the air inlet between the windshield
and the hood free of blockages, such as ice,
snow or leaves.
R never cover the air vents or air intake grilles
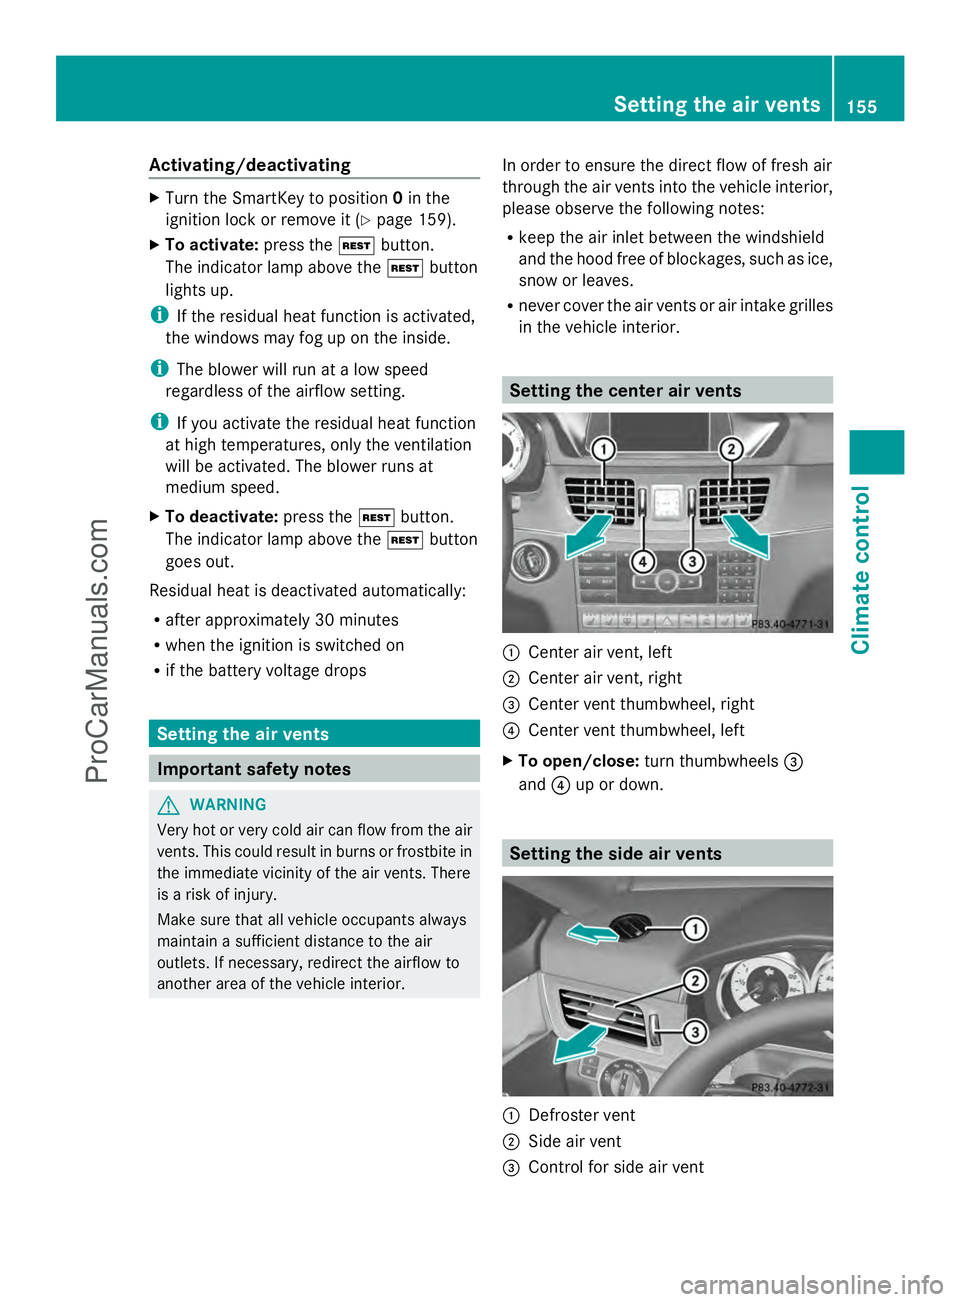
in the vehicle interior. Setting the center air vents
:
Center air vent, left
; Center air vent, right
= Center vent thumbwheel, right
? Center vent thumbwheel, left
X To open/close: turn thumbwheels =
and ?up or down. Setting the side air vents
:
Defroster vent
; Side air vent
= Control for side air vent Setting the air vents
155Climate control Z
ProCarManuals.com
Page 240 of 430
Useful information
i This Operator's Manual describes all
models and all standard and optional
equipment of your vehicle available at the
time of publication of the Operator's
Manual. Country-specific differences are
possible. Please note that your vehicle may
not be equipped with all features
described. This also applies to safety-
related systems and functions.
i Read the information on qualified
specialist workshops: (Y page 26).Important safety notes
G
WARNING
If you operate information systems and
communication equipment integrated in the
vehicle while driving, you will be distracted
from traffic conditions. You could also lose
control of the vehicle. There is a risk of an
accident.
Only operate the equipment when the traffic
situation permits. If you are not sure that this
is possible, park the vehicle paying attention
to traffic conditions and operate the
equipment when the vehicle is stationary. G
WARNING
If the instrument cluster has failed or
malfunctioned, you may not recognize
function restrictions in systems relevant to
safety. The operating safety of your vehicle
may be impaired. There is a risk of an
accident.
Drive on carefully. Have the vehicle checked
at a qualified specialist workshop
immediately.
You must observe the legal requirements for
the country in which you are currently driving
when operating the on-board computer.
The on-board computer only shows messages
or warnings from certain systems in the multifunction display. You should therefore
make sure your vehicle is operating safely at
all times. Otherwise, a vehicle that is not
operating safely may cause an accident.
Hybrid vehicles: Always read the HYBRID
operating instructions. You could otherwise
fail to recognize dangers, e.g. due to high-
voltage.
For an overview, see the instrument panel
illustration (Y
page 31). Displays and operation
Coolant temperature display
G
WARNING
Opening the hood when the engine is
overheated or when there is a fire in the
engine compartment could expose you to hot
gases or other service products. There is a
risk of injury.
Let an overheated engine cool down before
opening the hood. If there is a fire in the
engine compartment, keep the hood closed
and contact the fire department.
! A display message is shown if the coolant
temperature is too high.
If the coolant temperature is over
248 ‡(120 †), do not continue driving. The
engine will otherwise be damaged.
The coolant temperature gauge is in the
instrument cluster on the left-hand side
(Y page 31).
Under normal operating conditions and with
the specified coolant level, the coolant
temperature may rise to 248 ‡ (120 †). Tachometer
! Do not drive in the overrevving range, as
this could damage the engine.
The red band in the tachometer indicates the
engine's overrevving range. 238
Displays and operationOn-board computer and displays
ProCarManuals.com
Page 272 of 430
Display messages Possible causes/consequences and
M
MSolutions ?
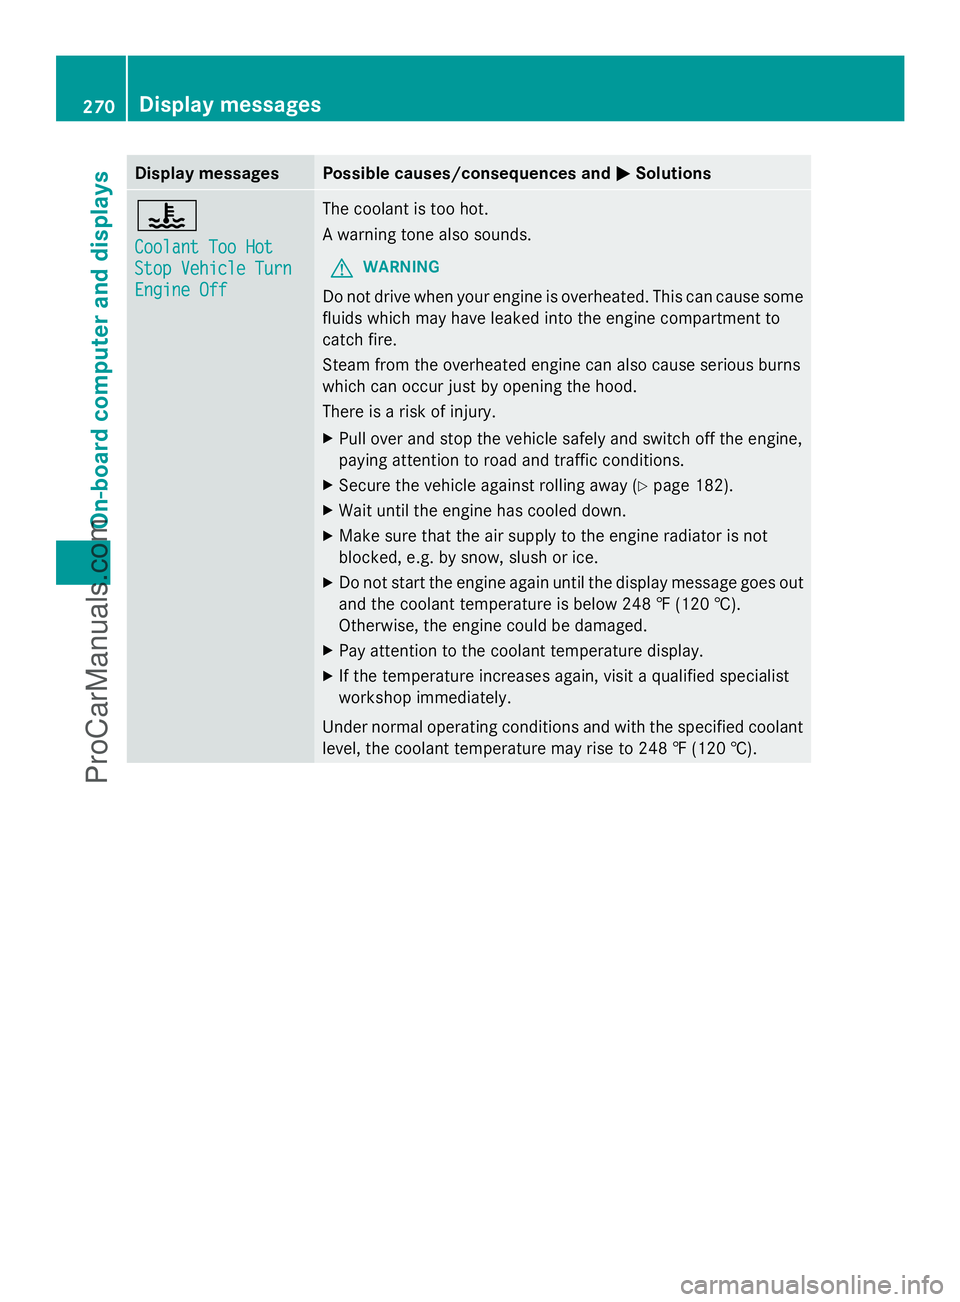
Coolant Too Hot Coolant Too Hot
Stop Vehicle Turn Stop Vehicle Turn
Engine Off Engine Off The coolant is too hot.
A warning tone also sounds.
G WARNING
Do not drive when your engine is overheated. This can cause some
fluids which may have leaked into the engine compartment to
catch fire.
Steam from the overheated engine can also cause serious burns
which can occur just by opening the hood.
There is a risk of injury.
X Pull over and stop the vehicle safely and switch off the engine,
paying attention to road and traffic conditions.
X Secure the vehicle against rolling away ( Ypage 182).
X Wait until the engine has cooled down.
X Make sure that the air supply to the engine radiator is not
blocked, e.g. by snow, slush or ice.
X Do not start the engine again until the display message goes out
and the coolant temperature is below 248 ‡ (120 †).
Otherwise, the engine could be damaged.
X Pay attention to the coolant temperature display.
X If the temperature increases again, visit a qualified specialist
workshop immediately.
Under normal operating conditions and with the specified coolant
level, the coolant temperature may rise to 248 ‡ (120 †). 270
Display
messagesOn-board computer and displays
ProCarManuals.com