2014 MERCEDES-BENZ E-SEDAN snow chains
[x] Cancel search: snow chainsPage 210 of 430
lowers; with an increase in temperature,
the vehicle level rises.
Changing the rear axle ride height
This function is only available for the E 63
AMG 4MATIC.
The vehicle level at the rear axle depends on
the selected suspension tuning and the
vehicle speed.
The vehicle level at the rear axle changes
during the journey depending on the selected
suspension tuning:
R Comfort: +0.4 in (+10 mm)
R Sport + and Sport: -0.6 in (-15 mm)
When switching from Comfort to Sport or
Sport +, the rear axle lowers by approximately
1.0 in (25 mm). When switching from Sport
or Sport + to Comfort, the rear axle raises by
approximately 1.0 in (25 mm). This level
change also takes place when the vehicle is
stationary.
If you drive faster than 105 mph (170 km/h),
the rear axle ride height is set to a medium
level. This increases driving safety and
reduces air resistance. If you then drive at
speeds below 93 mph (150 km/h), the rear
axle ride height is readjusted to the selected
suspension tuning.
Load compensation
The vehicle can compensate differences in
the vehicle level by raising or lowering the
rear axle. This is the case, for example, if
people get out or if luggage is being loaded.
Load compensation takes place if:
R a door or the trunk lid/tailgate is opened
R the parked vehicle is unlocked
For larger level changes, the engine must be
running. 4MATIC (permanent four-wheel drive)
If you fail to adapt your driving style, 4MATIC
can neither reduce the risk of accident nor
override the laws of physics. 4MATIC cannot take account of road, weather and traffic
conditions. 4MATIC is only an aid. You are
responsible for the distance to the vehicle in
front, for vehicle speed, for braking in good
time and for staying in your lane.
If a drive wheel spins due to insufficient grip:
R
Only depress the accelerator pedal as far
as necessary when pulling away.
R Accelerate less when driving.
! Never tow the vehicle with one axle
raised. This may damage the transfer case.
Damage of this sort is not covered by the
Mercedes-Benz Limited Warranty. All
wheels must remain either on the ground
or be fully raised. Observe the instructions
for towing the vehicle with all wheels in full
contact with the ground.
i In wintry driving conditions, the maximum
effect of 4MATIC can only be achieved if
you use winter tires (M+S tires), with snow
chains if necessary.
4MATIC ensures that all four wheels are
permanently driven. Together with ESP ®
, it
improves the traction of your vehicle
whenever a drive wheel spins due to
insufficient grip. PARKTRONIC
Important safety notes PARKTRONIC is an electronic parking aid with
ultrasonic sensors. It indicates visually and
audibly the distance between your vehicle
and an object.
PARKTRONIC is only an aid. It is not a
replacement for your attention to your
immediate surroundings. You are always
responsible for safe maneuvering, parking
and exiting a parking space. When
maneuvering, parking or pulling out of a
parking space, make sure that there are no
persons, animals or objects in the area in
which you are maneuvering. 208
Driving systemsDriving and parking
ProCarManuals.com
Page 215 of 430
Parking tips:
R
On narrow roads, drive as close to the
parking space as possible.
R Parking spaces that are littered or
overgrown might be identified or measured
incorrectly.
R Parking spaces that are partially occupied
by trailer drawbars might not be identified
as such or be measured incorrectly.
R Snowfall or heavy rain may lead to a parking
space being measured inaccurately.
R Pay attention to the PARKTRONIC
(Y page 210) warning messages during the
parking procedure.
R You can intervene in the steering procedure
to correct it at any time. Active Parking
Assist will then be canceled.
R When transporting a load which protrudes
from your vehicle, you should not use
Active Parking Assist.
R Never use Active Parking Assist when snow
chains are installed.
R Make sure that the tire pressures are
always correct. This has a direct influence
on the parking characteristics of the
vehicle.
Use Active Parking Assist for parking spaces:
R that are parallel or at right-angles to the
direction of travel
R that are on straight roads, not bends
R that are on the same level as the road, e.g.
not on the pavement
Detecting parking spaces Objects located above the height range of
Active Parking Assist will not be detected
when the parking space is measured. These
are not taken into account when the parking
procedure is calculated, e.g. overhanging
loads, tail sections or loading ramps of goods
vehicles. G
WARNING
If there are objects above the detection range:
R Active Park Assist may steer too early
R the vehicle may not stop in front of these
objects.
You may cause a collision as a result. There is
a risk of an accident.
If there are objects above the detection range,
stop and deactivate Active Parking Assist.
For further information on the detection
range (Y page 209).
Active Parking Assist does not support you
with parking spaces at right-angles to the
direction of travel if:
R two parking spaces are located directly
next to one another
R the parking space is directly next to a low
obstacle such as a low curb
R you park forwards
Active Parking Assist does not support you
with parking spaces that are parallel or at
right-angles to the direction of travel if:
R the parking space is on a curb
R the system reads the parking space as
being blocked, for example by foliage or
grass paving blocks
R the area is too small for the vehicle to
maneuver into
R the parking space is bordered by an
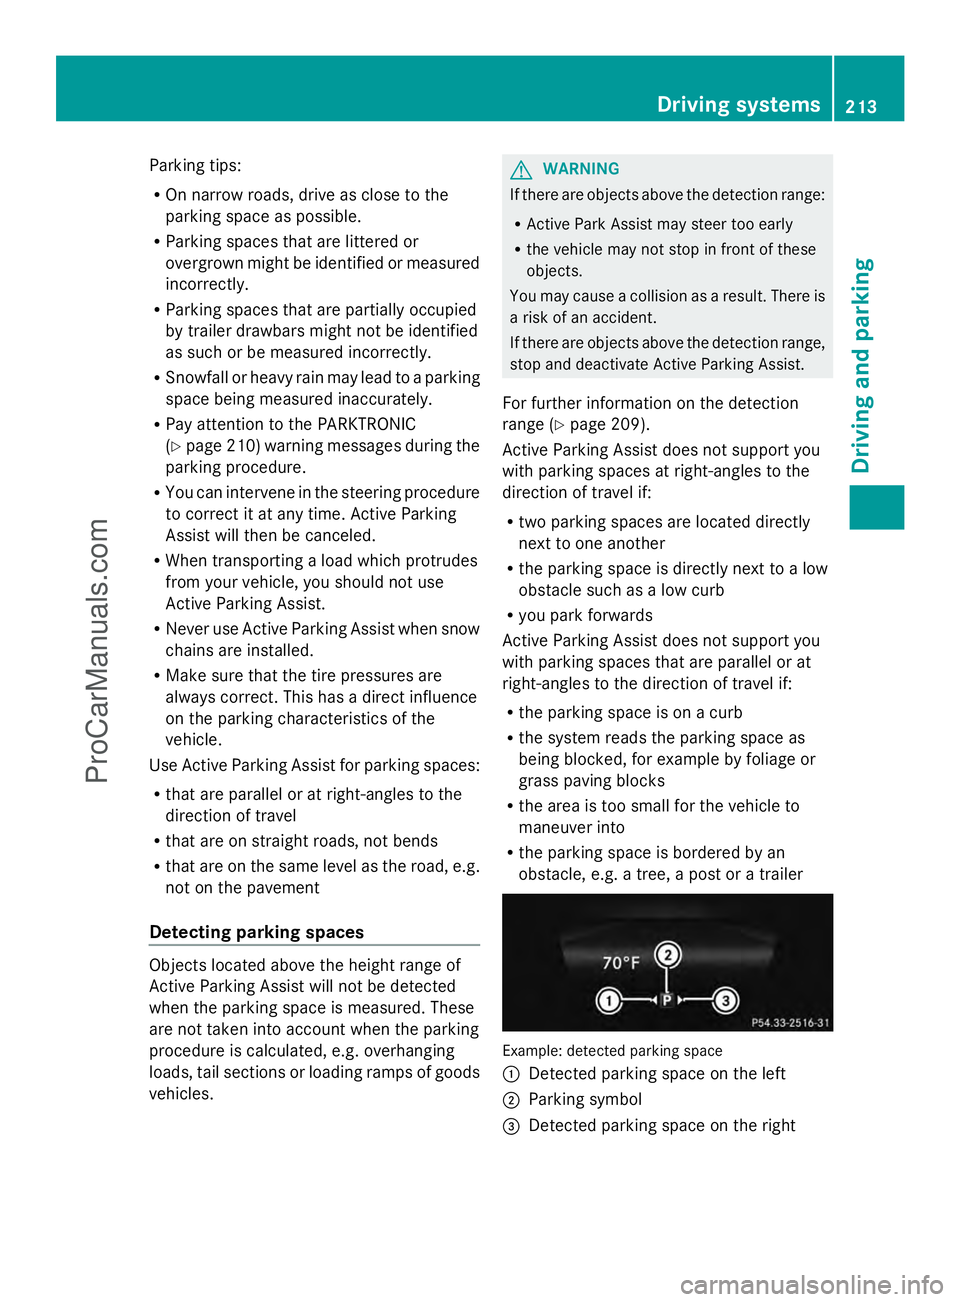
obstacle, e.g. a tree, a post or a trailer Example: detected parking space
:
Detected parking space on the left
; Parking symbol
= Detected parking space on the right Driving systems
213Driving and parking Z
ProCarManuals.com
Page 249 of 430
The assistance graphic can display the status
of and information from other driving systems
or driving safety systems.
The assistance graphic shows:
R the é symbol when ATTENTION ASSIST
(Y page 225) is deactivated.
R the lane markings as bright lines when Lane
Keeping Assist (Y page 228) or Active Lane
Keeping Assist (Y page 233) is activated.
R the æ symbol when the distance
warning function (Y page 70) is
deactivated.
R the æ symbol when PRE-SAFE ®
Brake
(Y page 76) is deactivated.
Deactivating/activating ESP ®i
Observe the "Important safety notes"
section in the description of ESP
(Y page 72). G
WARNING
If you deactivate ESP ®
, ESP ®
no longer
stabilizes the vehicle. There is an increased
risk of skidding and an accident.
Only deactivate ESP ®
in the situations
described in the following.
It may be best to deactivate ESP ®
in the
following situations:
R when using snow chains
R in deep snow
R on sand or gravel
Activating/deactivating ESP ®
on AMG
vehicles (Y page 74).
For further information about ESP ®
, see
(Y page 72).
X Start the engine.
X Press the =or; button on the
steering wheel to select the DriveAssist
DriveAssist
menu.
X Press the 9or: button to select
ESP
ESP. X
Press the abutton.
The current selection is displayed.
X To activate/deactivate: press thea
button again.
ESP ®
is deactivated if the åwarning lamp
in the instrument cluster lights up
continuously when the engine is running.
If the ÷ warning lamp and the å
warning lamp are lit continuously, ESP ®
is not
available due to a malfunction.
Observe the information on warning lamps
(Y page 289).
Observe the information on display messages
(Y page 258).
Activating/deactivating PRE-SAFE ®
Brake PRE-SAFE
®
Brake is only available in vehicles
with DISTRONIC PLUS.
X Press =or; on the steering wheel
to select the DriveAssist DriveAssist menu.
X Press the 9or: button to select
PRE-SAFE Brake
PRE-SAFE Brake .
X Press the abutton.
The current selection is displayed.
X To activate/deactivate: press thea
button again.
When PRE-SAFE ®
Brake is deactivated, the
assistance graphic shows the æsymbol
in the multifunction display.
For more information on PRE-SAFE ®
Brake,
see (Y page 76).
Activating/deactivating the distance
warning function X
Press the =or; button on the
steering wheel to select the DriveAssist
DriveAssist
menu.
X Press 9or: to select Distance Distance
Warning
Warning . Menus and submenus
247On-board computer and displays Z
ProCarManuals.com
Page 377 of 430
Only winter tires bearing the
isnowflake
symbol in addition to the M+S marking
provide the best possible grip in wintry road
conditions.
Only these tires will allow driving safety
systems such as ABS and ESP ®
to function
optimally in winter. These tires have been
developed specifically for driving in snow.
Use M+S tires of the same make and tread on
all wheels to maintain safe handling
characteristics.
Always observe the maximum permissible
speed specified for the M+S tires you have
mounted.
Once the winter tires are mounted:
X Check the tire pressures (Y page 379).
X Vehicles for Canada: restart the tire
pressure loss warning system
(Y page 380).
X Restart the tire pressure monitor
(Y page 380).
For more information on driving with the
emergency spare wheel, see (Y page 410).Snow chains
G
WARNING
If snow chains are installed to the front
wheels, they may drag against the vehicle
body or chassis components. This could
cause damage to the vehicle or the tires.
There is a risk of an accident.
To avoid hazardous situations:
R never install snow chains to the front
wheels
R always install snow chains in pairs to the
rear wheels.
! On vehicles with AIRMATIC, you must
drive at raised vehicle level if snow chains
have been mounted. The vehicle may
otherwise be damaged.
! On some tire sizes there is not enough
space for snow chains. To avoid damage to the vehicle or tires, observe the "Wheel and
tire combinations" section under "Tires and
wheels".
! Vehicles with steel wheels: if you wish
to mount snow chains on steel wheels,
make sure that you remove the respective
wheels' hubcaps first. The hubcaps may
otherwise be damaged.
For safety reasons, Mercedes-Benz
recommends that you only use snow chains
that have been specially approved for your
vehicle by Mercedes-Benz, or are of a
corresponding standard of quality.
If you intend to mount snow chains, please
bear the following points in mind:
R Snow chains may not be mounted on all
wheel/tire combinations. Permissible
wheel-tire combinations (Y page 400).
R Only use snow chains when driving on
roads completely covered by snow.
Remove the snow chains as soon as
possible when you come to a road that is
not snow-covered.
R Local regulations may restrict the use of
snow chains. Observe the appropriate
regulations if you wish to mount snow
chains.
R Do not exceed the maximum permissible
speed of 30 mph (50 km/h).
i You may wish to deactivate ESP ®
when
pulling away with snow chains installed
(Y page 73). This way you can allow the
wheels to spin in a controlled manner,
achieving an increased driving force
(cutting action).
For more information on driving with the
emergency spare wheel, see (Y page 410). Winter operation
375Wheels and tires Z
ProCarManuals.com
Page 381 of 430
when adjusting the tire pressure
(Y
page 376).
i The actual values for tires are vehicle-
specific and may deviate from the values in
the illustration. Checking the tire pressures
Important safety notes Observe the notes on tire pressure
(Y
page 376).
Information on air pressure for the tires on
your vehicle can be found:
R on the vehicle's Tire and Loading
Information placard on the B-pillar
(Y page 383)
R on the tire pressure label on the fuel filler
flap ( Ypage 176)
R in the "Tire pressure" section
R under "Tire pressure" (Y page 376)
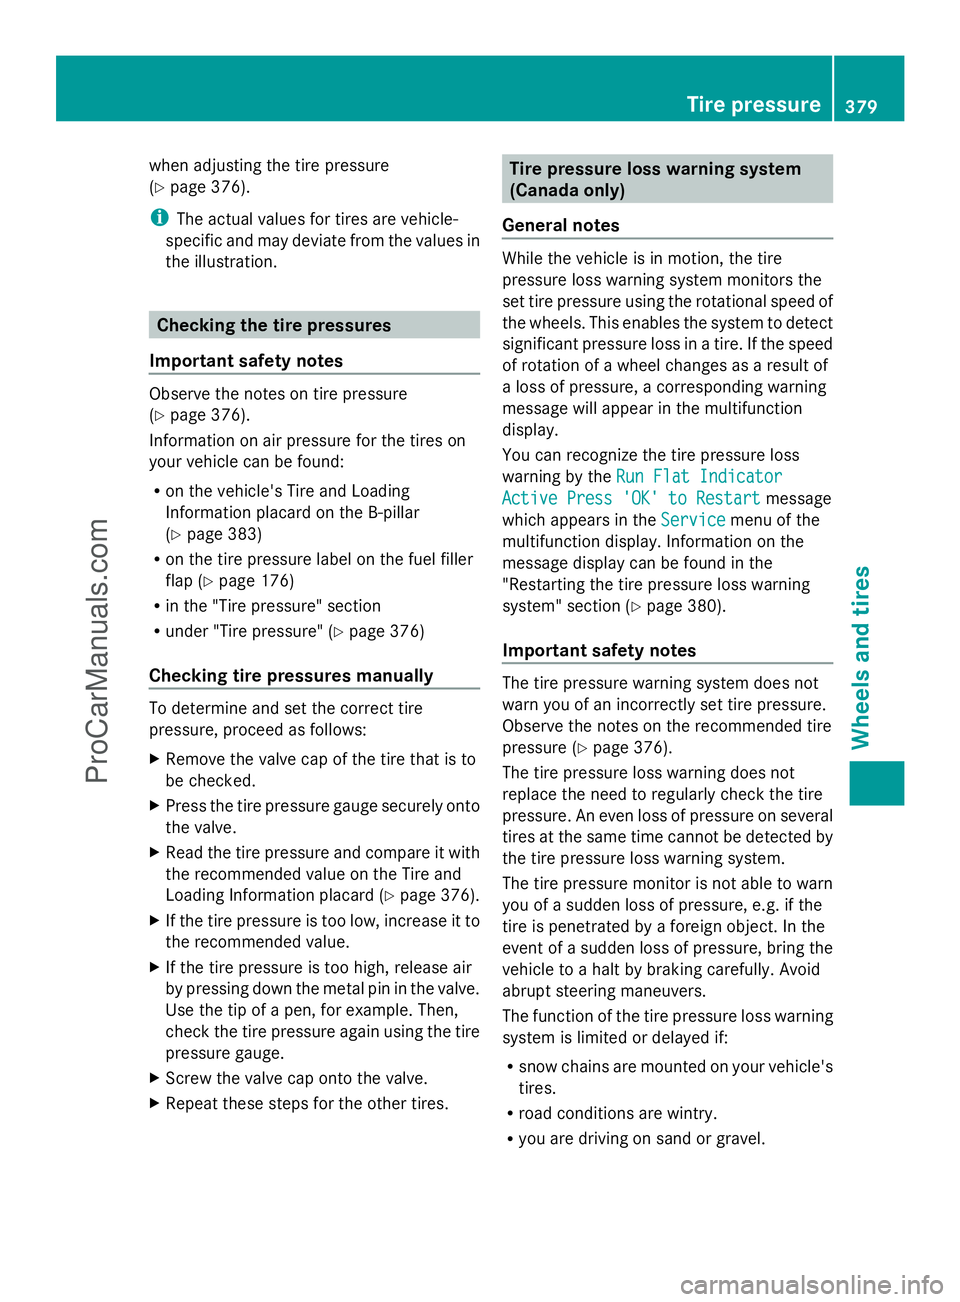
Checking tire pressures manually To determine and set the correct tire
pressure, proceed as follows:
X Remove the valve cap of the tire that is to
be checked.
X Press the tire pressure gauge securely onto
the valve.
X Read the tire pressure and compare it with
the recommended value on the Tire and
Loading Information placard (Y page 376).
X If the tire pressure is too low, increase it to
the recommended value.
X If the tire pressure is too high, release air
by pressing down the metal pin in the valve.
Use the tip of a pen, for example. Then,
check the tire pressure again using the tire
pressure gauge.
X Screw the valve cap onto the valve.
X Repeat these steps for the other tires. Tire pressure loss warning system
(Canada only)
General notes While the vehicle is in motion, the tire
pressure loss warning system monitors the
set tire pressure using the rotational speed of
the wheels. This enables the system to detect
significant pressure loss in a tire. If the speed
of rotation of a wheel changes as a result of
a loss of pressure, a corresponding warning
message will appear in the multifunction
display.
You can recognize the tire pressure loss
warning by the Run Flat Indicator Run Flat Indicator
Active Press 'OK' to Restart
Active Press 'OK' to Restart message
which appears in the Service
Servicemenu of the
multifunction display. Information on the
message display can be found in the
"Restarting the tire pressure loss warning
system" section (Y page 380).
Important safety notes The tire pressure warning system does not
warn you of an incorrectly set tire pressure.
Observe the notes on the recommended tire
pressure (Y
page 376).
The tire pressure loss warning does not
replace the need to regularly check the tire
pressure. An even loss of pressure on several
tires at the same time cannot be detected by
the tire pressure loss warning system.
The tire pressure monitor is not able to warn
you of a sudden loss of pressure, e.g. if the
tire is penetrated by a foreign object. In the
event of a sudden loss of pressure, bring the
vehicle to a halt by braking carefully. Avoid
abrupt steering maneuvers.
The function of the tire pressure loss warning
system is limited or delayed if:
R snow chains are mounted on your vehicle's
tires.
R road conditions are wintry.
R you are driving on sand or gravel. Tire pressure
379Wheels and tires Z
ProCarManuals.com
Page 404 of 430
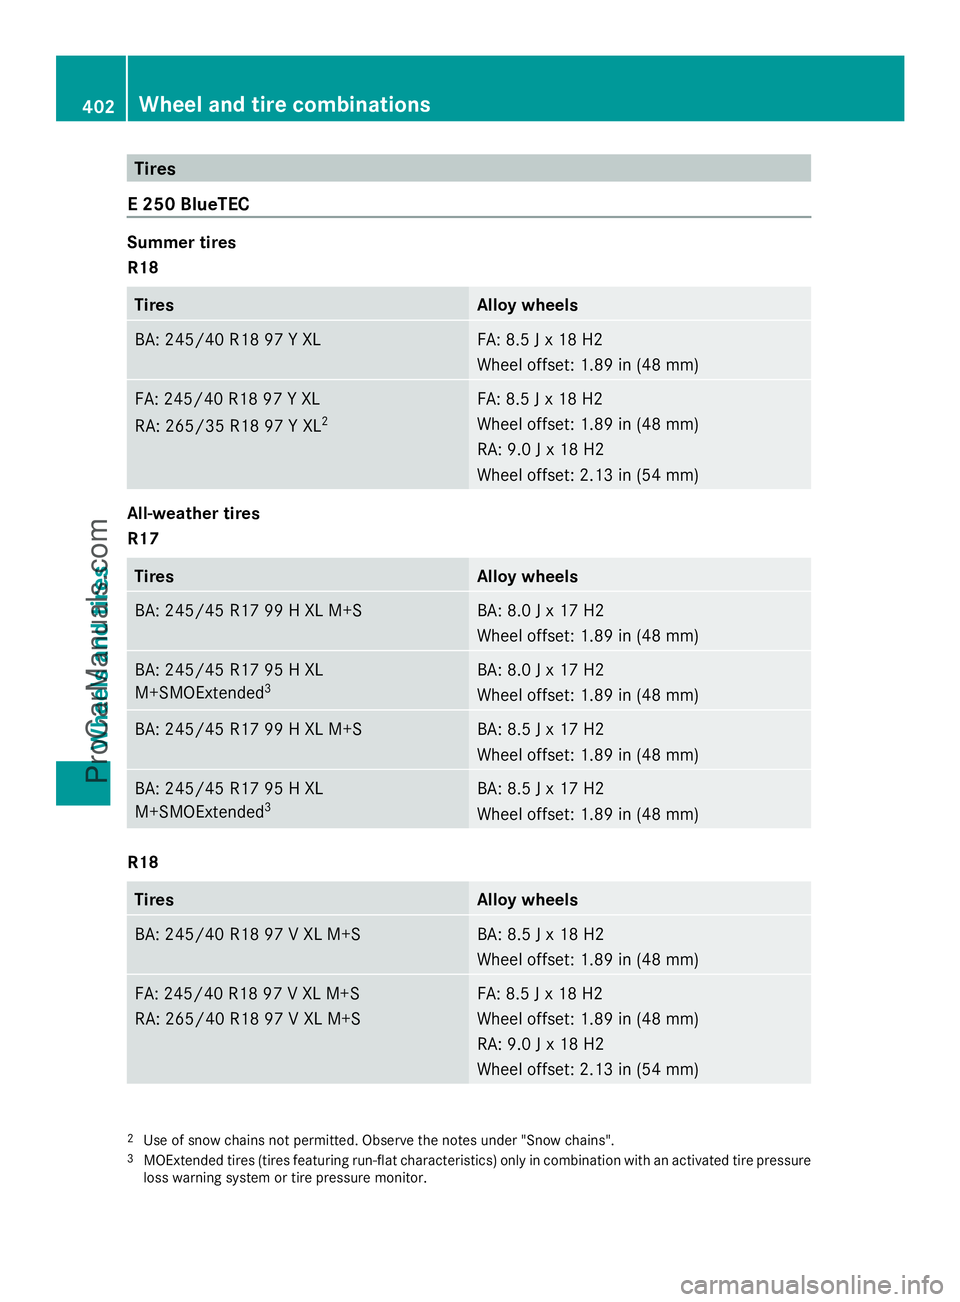
Tires
E 250 BlueTEC Summer tires
R18
Tires Alloy wheels
BA: 245/4
0 R18 97 Y XL FA: 8.5 J x 18 H2
Wheel offset: 1.89 in (48 mm) FA: 245/40 R18 97 Y XL
RA: 265/35 R18 97 Y XL
2 FA: 8.5 J x 18 H2
Wheel offset: 1.89 in (48 mm)
RA: 9.0 J x 18 H2
Wheel offset: 2.13 in (54 mm) All-weather tires
R17 Tires Alloy wheels
BA: 245/45 R17 99 H XL M+S BA: 8.0 J x 17 H2
Wheel offset: 1.89 in (48 mm) BA: 245/45 R17 95 H XL
M+SMOExtended
3 BA: 8.0 J x 17 H2
Wheel offset: 1.89 in (48 mm) BA: 245/45 R17 99 H XL M+S BA: 8.5 J x 17 H2
Wheel offset: 1.89 in (48 mm) BA: 245/45 R17 95 H XL
M+SMOExtended
3 BA: 8.5 J x 17 H2
Wheel offset: 1.89 in (48 mm) R18
Tires Alloy wheels
BA: 245/40 R18 97 V XL M+S BA: 8.5 J x 18 H2
Wheel offset: 1.89 in (48 mm) FA: 245/40 R18 97 V XL M+S
RA: 265/40 R18 97 V XL M+S FA: 8.5 J x 18 H2
Wheel offset: 1.89 in (48 mm)
RA: 9.0 J x 18 H2
Wheel offset: 2.13 in (54 mm) 2
Use of snow chains not permitted. Observe the notes under "Snow chains".
3 MOExtended tires (tires featuring run-flat characteristics) only in combination with an activated tire pressure
loss warning system or tire pressure monitor. 402
Wheel and tire combinationsWheels and tires
ProCarManuals.com
Page 411 of 430
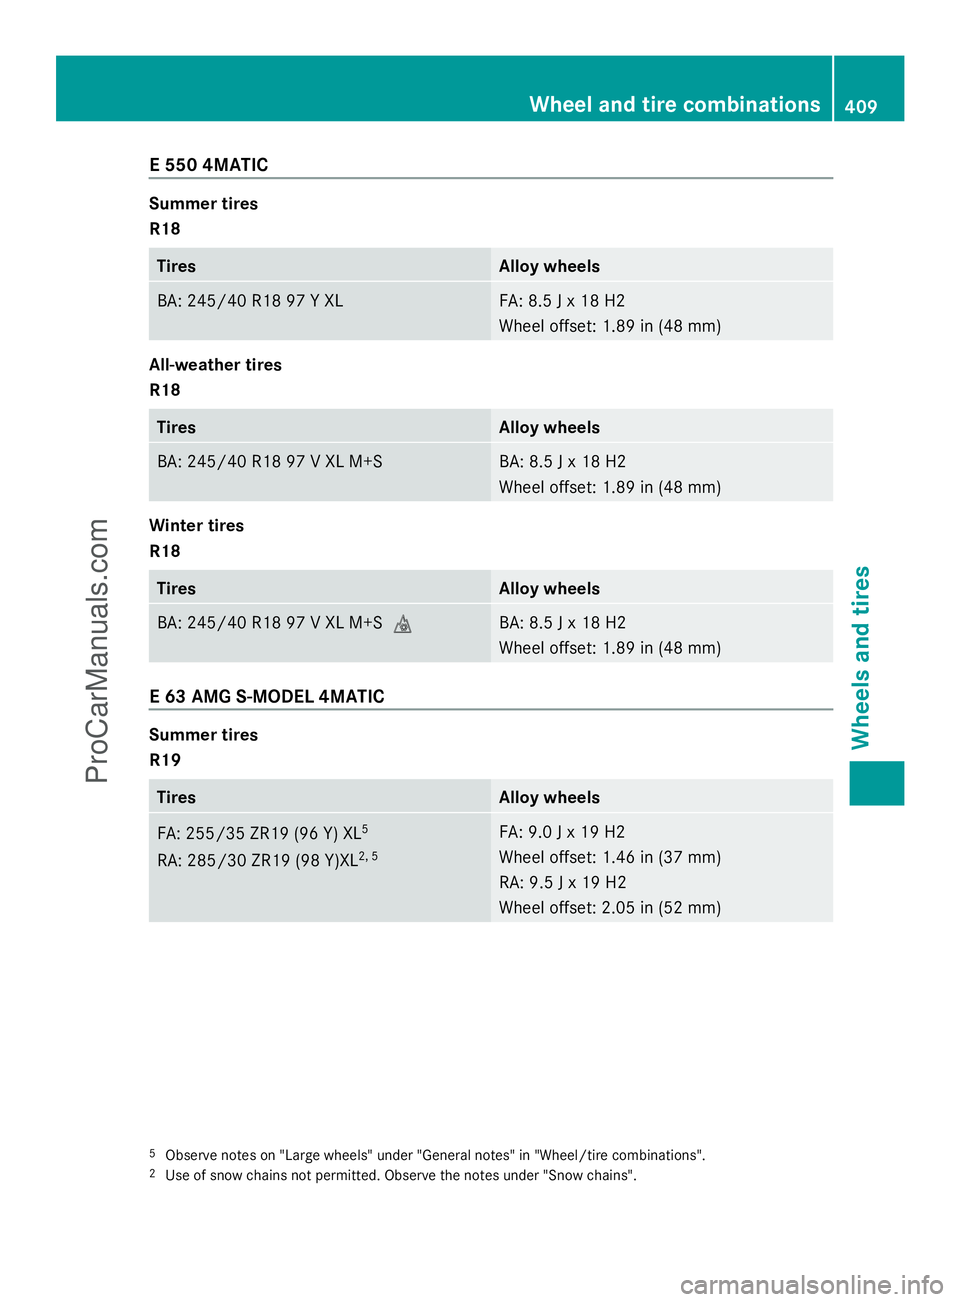
E 550 4MATIC
Summer tires
R18
Tires Alloy wheels
BA: 245/40 R18 97 Y XL FA: 8.5 J x 18 H2
Wheel offset: 1.89 in (48 mm)
All-weather tires
R18 Tires Alloy wheels
BA: 245/40 R18 97 V XL M+S BA: 8.5 J x 18 H2
Wheel offset: 1.89 in (48 mm)
Winter tires
R18
Tires Alloy wheels
BA: 245/40 R18 97 V XL M+Si BA: 8.5 J x 18 H2
Wheel offset: 1.89 in (48 mm)
E 63 AMG S-MODEL 4MATIC
Summer tires
R19
Tires Alloy wheels
FA: 255/35 ZR19 (96 Y) XL
5
RA: 285/30 ZR19 (98 Y)XL 2, 5 FA: 9.0 J x 19 H2
Wheel offset: 1.46 in (37 mm)
RA: 9.5 J x 19 H2
Wheel offset: 2.05 in (52 mm) 5
Observe notes on "Large wheels" under "General notes" in "Wheel/tire combinations".
2 Use of snow chains not permitted. Observe the notes under "Snow chains". Wheel and tire combinations
409Wheels and tires Z
ProCarManuals.com
Page 412 of 430
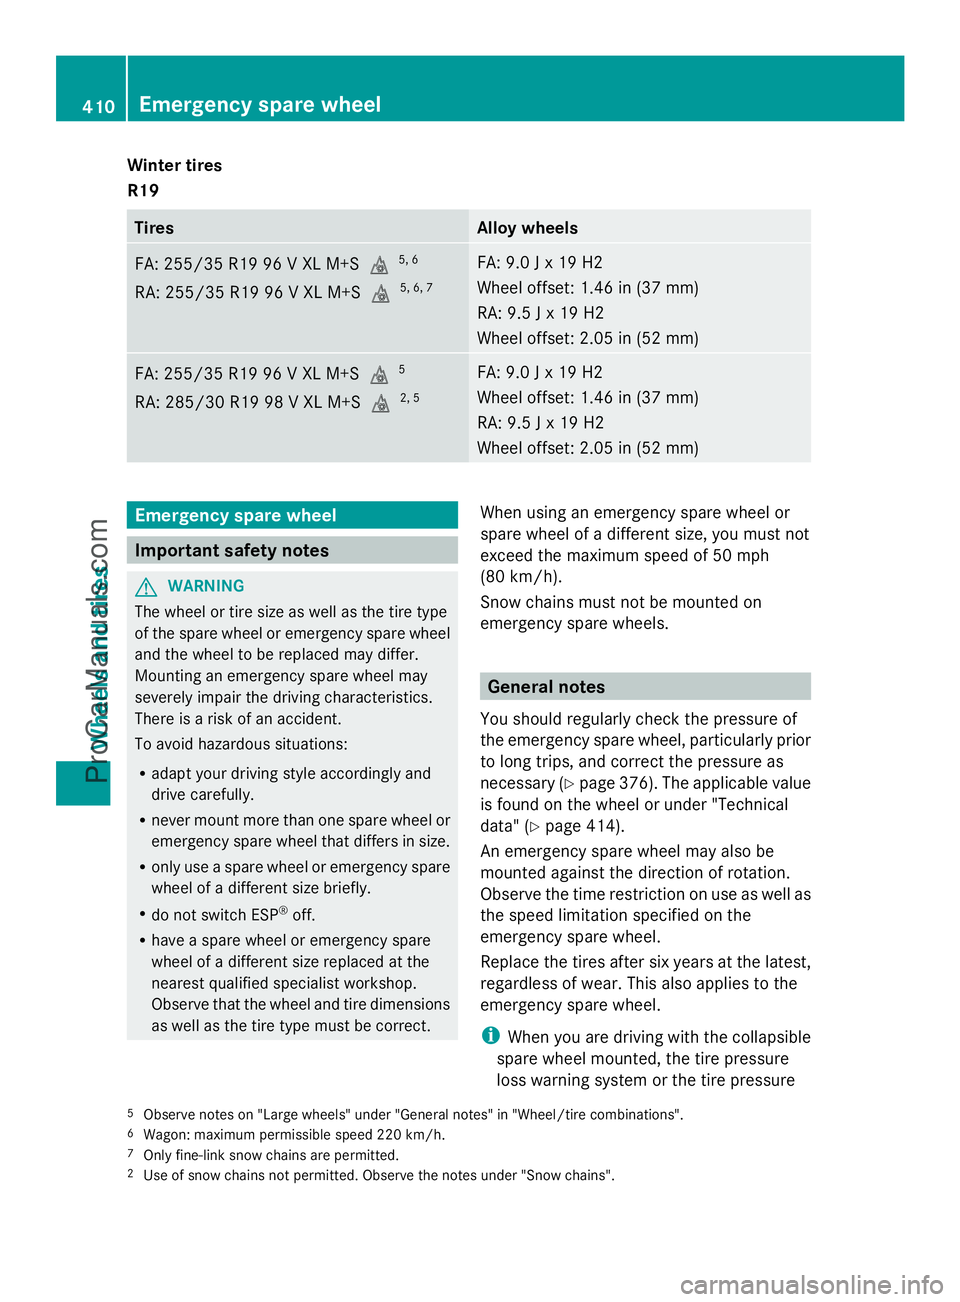
Winter tires
R19
Tires Alloy wheels
FA: 255/35 R19 96 V XL M+S
i5, 6
RA: 255/35 R19 96 V XL M+S i5, 6, 7 FA: 9.0 J x 19 H2
Wheel offset: 1.46 in (37 mm)
RA: 9.5 J x 19 H2
Wheel offset: 2.05 in (52 mm) FA: 255/35 R19 96 V XL M+S
i5
RA: 285/30 R19 98 V XL M+S i2, 5 FA: 9.0 J x 19 H2
Wheel offset: 1.46 in (37 mm)
RA: 9.5 J x 19 H2
Wheel offset: 2.05 in (52 mm) Emergency spare wheel
Important safety notes
G
WARNING
The wheel or tire size as well as the tire type
of the spare wheel or emergency spare wheel
and the wheel to be replaced may differ.
Mounting an emergency spare wheel may
severely impair the driving characteristics.
There is a risk of an accident.
To avoid hazardous situations:
R adapt your driving style accordingly and
drive carefully.
R never mount more than one spare wheel or
emergency spare wheel that differs in size.
R only use a spare wheel or emergency spare
wheel of a different size briefly.
R do not switch ESP ®
off.
R have a spare wheel or emergency spare
wheel of a different size replaced at the
nearest qualified specialist workshop.
Observe that the wheel and tire dimensions
as well as the tire type must be correct. When using an emergency spare wheel or
spare wheel of a different size, you must not
exceed the maximum speed of 50 mph
(80 km/h).
Snow chains must not be mounted on
emergency spare wheels. General notes
You should regularly check the pressure of
the emergency spare wheel, particularly prior
to long trips, and correct the pressure as
necessary (Y page 376). The applicable value
is found on the wheel or under "Technical
data" (Y page 414).
An emergency spare wheel may also be
mounted against the direction of rotation.
Observe the time restriction on use as well as
the speed limitation specified on the
emergency spare wheel.
Replace the tires after six years at the latest,
regardless of wear. This also applies to the
emergency spare wheel.
i When you are driving with the collapsible
spare wheel mounted, the tire pressure
loss warning system or the tire pressure
5 Observe notes on "Large wheels" under "General notes" in "Wheel/tire combinations".
6 Wagon: maximum permissible speed 220 km/h.
7 Only fine-link snow chains are permitted.
2 Use of snow chains not permitted. Observe the notes under "Snow chains". 410
Emergency spare wheelWheels and tires
ProCarManuals.com