2014 MERCEDES-BENZ CLS COUPE clock
[x] Cancel search: clockPage 93 of 417
If the vehicle has been locked using the lock-
ing button for the central locking, or has been locked automatically, and a door is opened
from the inside:
R the vehicle will be fully unlocked if it had
previously been fully unlocked
R only the door which has been opened form
the inside is unlocked if only the driver's
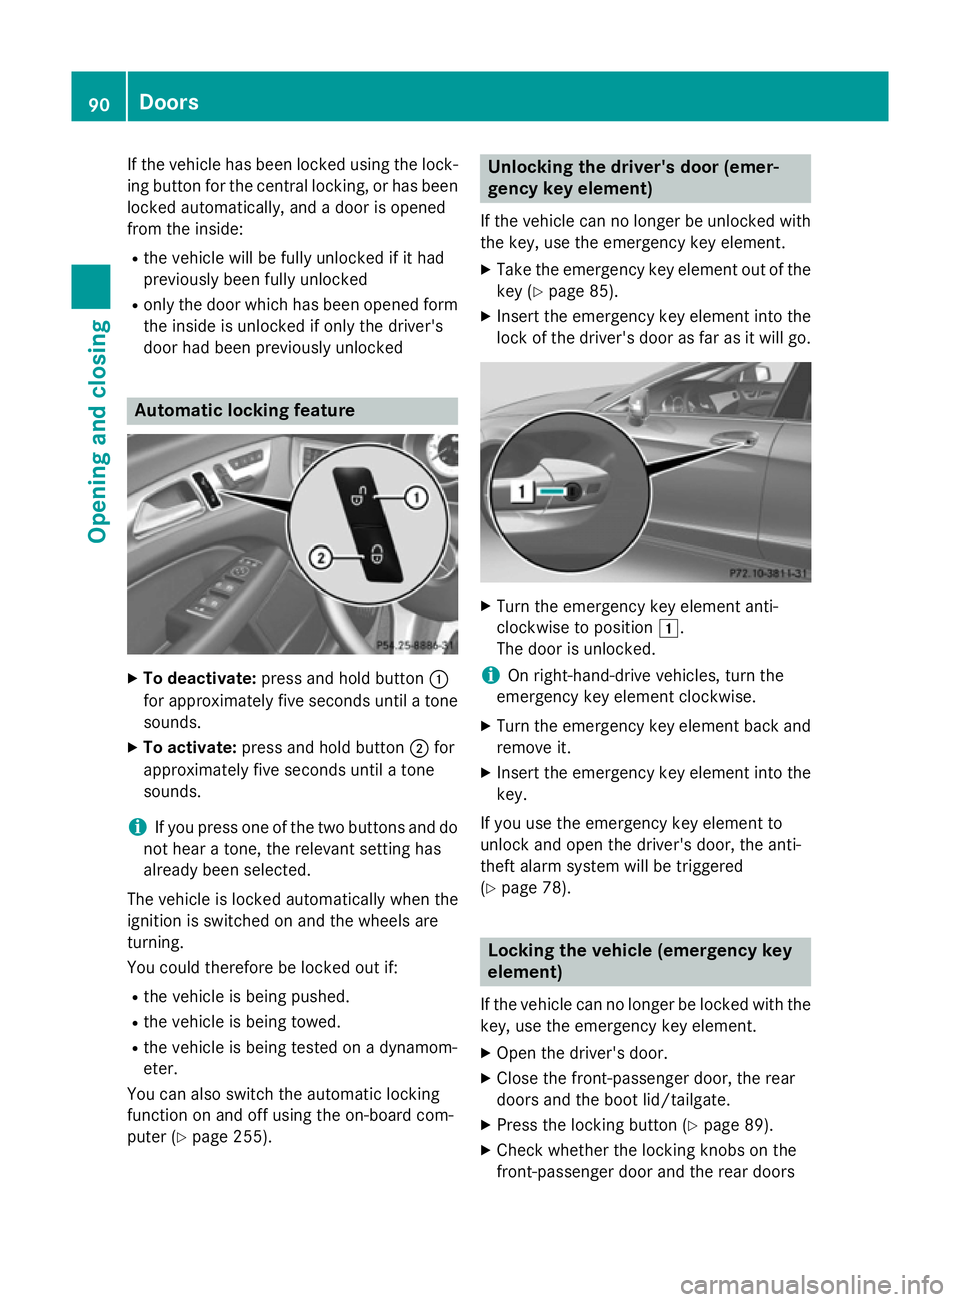
door had been previously unlocked Automatic locking feature
X
To deactivate: press and hold button :
for approximately five seconds until a tone sounds.
X To activate: press and hold button ;for
approximately five seconds until a tone
sounds.
i If you press one of the two buttons and do
not hear a tone, the relevant setting has
already been selected.
The vehicle is locked automatically when the
ignition is switched on and the wheels are
turning.
You could therefore be locked out if:
R the vehicle is being pushed.
R the vehicle is being towed.
R the vehicle is being tested on a dynamom-
eter.
You can also switch the automatic locking
function on and off using the on-board com-
puter (Y page 255). Unlocking the driver's door (emer-
gency key element)
If the vehicle can no longer be unlocked with
the key, use the emergency key element.
X Take the emergency key element out of the
key (Y page 85).
X Insert the emergency key element into the
lock of the driver's door as far as it will go. X
Turn the emergency key element anti-
clockwise to position 1.
The door is unlocked.
i On right-hand-drive vehicles, turn the
emergency key element clockwise.
X Turn the emergency key element back and
remove it.
X Insert the emergency key element into the
key.
If you use the emergency key element to
unlock and open the driver's door, the anti-
theft alarm system will be triggered
(Y page 78). Locking the vehicle (emergency key
element)
If the vehicle can no longer be locked with the
key, use the emergency key element.
X Open the driver's door.
X Close the front-passenger door, the rear
doors and the boot lid/tailgate.
X Press the locking button (Y page 89).
X Check whether the locking knobs on the
front-passenger door and the rear doors 90
DoorsOpening and closing
Page 94 of 417
are still visible. Press down the locking
knobs by hand, if necessary.
X Close the driver's door.
X Take the emergency key element out of the
key (Y page 85).
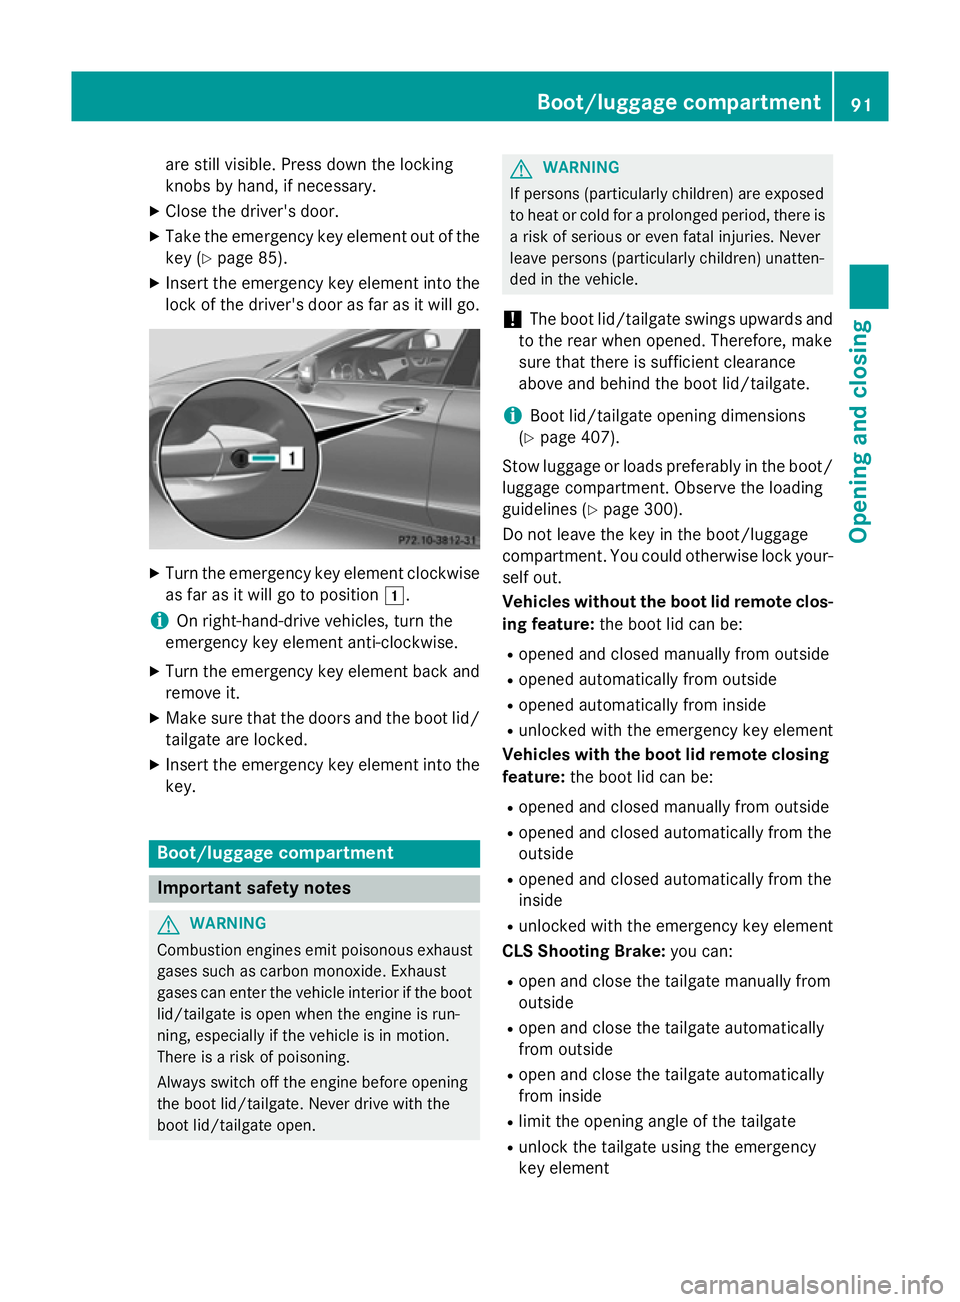
X Insert the emergency key element into the
lock of the driver's door as far as it will go. X
Turn the emergency key element clockwise
as far as it will go to position 1.
i On right-hand-drive vehicles, turn the
emergency key element anti-clockwise.
X Turn the emergency key element back and
remove it.
X Make sure that the doors and the boot lid/
tailgate are locked.
X Insert the emergency key element into the
key. Boot/luggage compartment
Important safety notes
G
WARNING
Combustion engines emit poisonous exhaust
gases such as carbon monoxide. Exhaust
gases can enter the vehicle interior if the boot
lid/tailgate is open when the engine is run-
ning, especially if the vehicle is in motion.
There is a risk of poisoning.
Always switch off the engine before opening
the boot lid/tailgate. Never drive with the
boot lid/tailgate open. G
WARNING
If persons (particularly children) are exposed
to heat or cold for a prolonged period, there is a risk of serious or even fatal injuries. Never
leave persons (particularly children) unatten-
ded in the vehicle.
! The boot lid/tailgate swings upwards and
to the rear when opened. Therefore, make
sure that there is sufficient clearance
above and behind the boot lid/tailgate.
i Boot lid/tailgate opening dimensions
(Y page 407).
Stow luggage or loads preferably in the boot/ luggage compartment. Observe the loading
guidelines (Y page 300).
Do not leave the key in the boot/luggage
compartment. You could otherwise lock your- self out.
Vehicles without the boot lid remote clos-
ing feature: the boot lid can be:
R opened and closed manually from outside
R opened automatically from outside
R opened automatically from inside
R unlocked with the emergency key element
Vehicles with the boot lid remote closing feature: the boot lid can be:
R opened and closed manually from outside
R opened and closed automatically from the
outside
R opened and closed automatically from the
inside
R unlocked with the emergency key element
CLS Shooting Brake: you can:
R open and close the tailgate manually from
outside
R open and close the tailgate automatically
from outside
R open and close the tailgate automatically
from inside
R limit the opening angle of the tailgate
R unlock the tailgate using the emergency
key element Boot/luggage compartment
91Opening and closing Z
Page 98 of 417
X
To open the tailgate: pull the handle on
the tailgate.
X To stop the opening procedure at the
desired position: press the closing button
(Y page 92) in the tailgate or pull the handle
on the outside of the tailgate again.
X To store the position: press and hold the
closing button in the tailgate until you hear a short tone.
The opening angle limiter is activated. The
tailgate then stops in the stored position
when opened.
Deactivating X
Press and hold the closing button
(Y page 92) in the tailgate until you hear
two short tones. Unlocking the boot (CLS Coupé)
! The boot lid swings upwards when
opened. Therefore, make sure that there is sufficient clearance above the boot lid.
If the boot cannot be unlocked with the key or
KEYLESS-GO, use the emergency key ele-
ment.
If you use the emergency key element to
unlock and open the boot lid, the anti-theft
alarm system will be triggered (Y page 78).
X Take the emergency key element out of the
key (Y page 85).
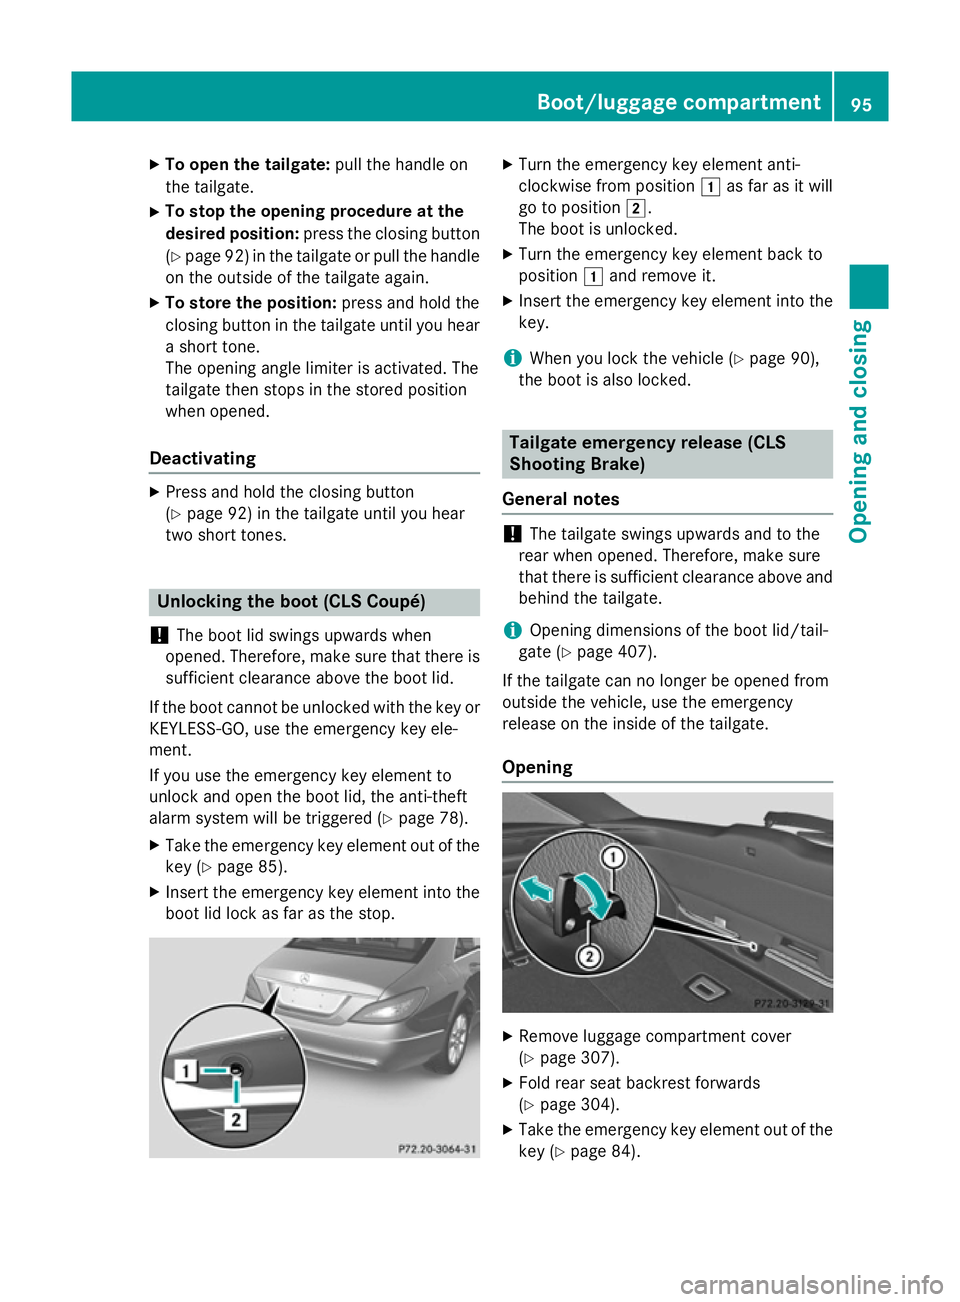
X Insert the emergency key element into the
boot lid lock as far as the stop. X
Turn the emergency key element anti-
clockwise from position 1as far as it will
go to position 2.
The boot is unlocked.
X Turn the emergency key element back to
position 1and remove it.
X Insert the emergency key element into the
key.
i When you lock the vehicle (Y
page 90),
the boot is also locked. Tailgate emergency release (CLS
Shooting Brake)
General notes !
The tailgate swings upwards and to the
rear when opened. Therefore, make sure
that there is sufficient clearance above and behind the tailgate.
i Opening dimensions of the boot lid/tail-
gate (Y page 407).
If the tailgate can no longer be opened from
outside the vehicle, use the emergency
release on the inside of the tailgate.
Opening X
Remove luggage compartment cover
(Y page 307).
X Fold rear seat backrest forwards
(Y page 304).
X Take the emergency key element out of the
key (Y page 84). Boot/luggage compartment
95Opening and closing Z
Page 99 of 417
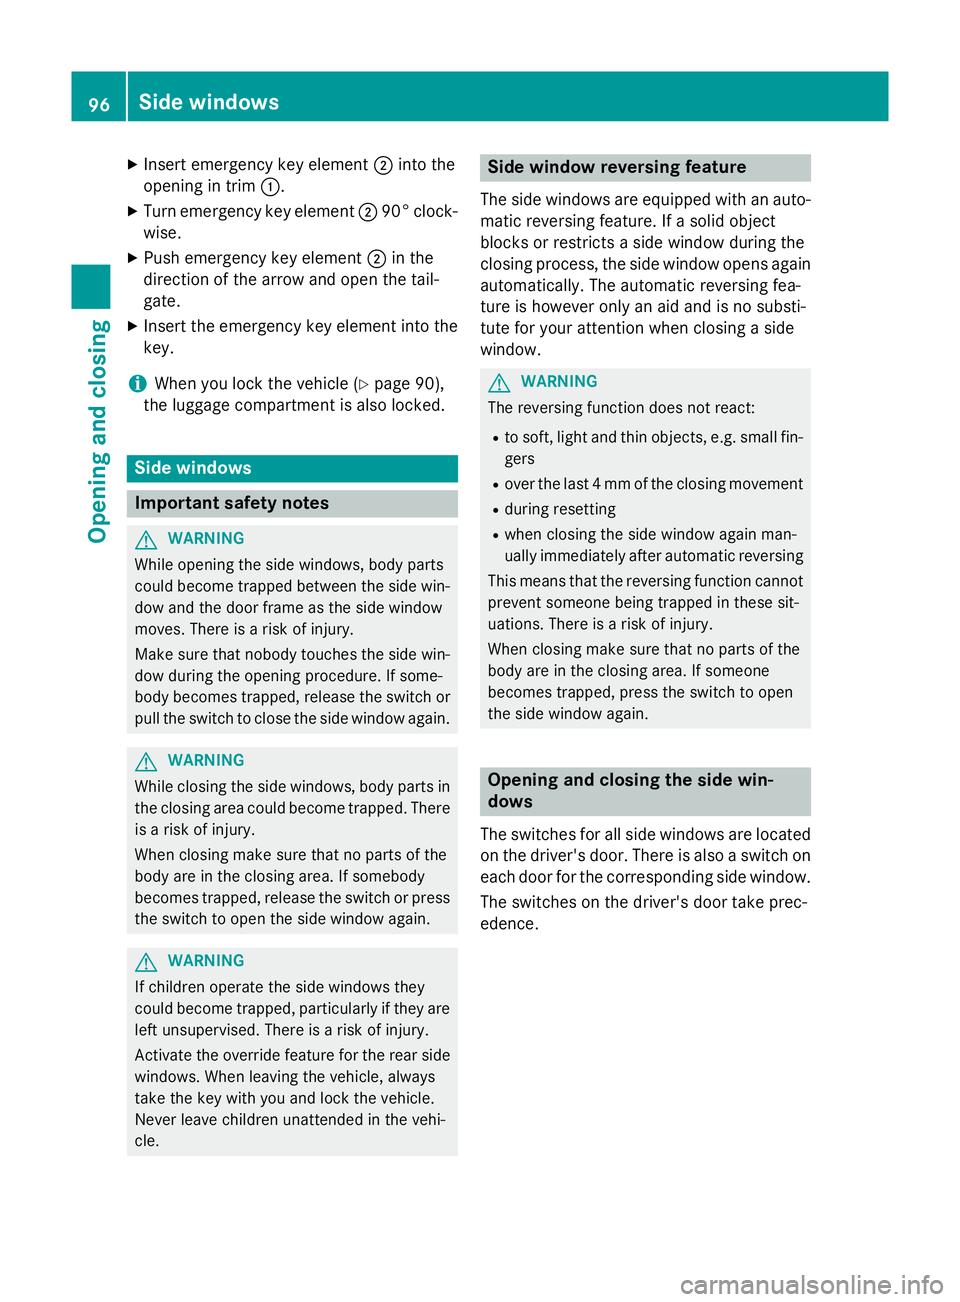
X
Insert emergency key element ;into the
opening in trim :.
X Turn emergency key element ;90° clock-
wise.
X Push emergency key element ;in the
direction of the arrow and open the tail-
gate.
X Insert the emergency key element into the
key.
i When you lock the vehicle (Y
page 90),
the luggage compartment is also locked. Side windows
Important safety notes
G
WARNING
While opening the side windows, body parts
could become trapped between the side win- dow and the door frame as the side window
moves. There is a risk of injury.
Make sure that nobody touches the side win-
dow during the opening procedure. If some-
body becomes trapped, release the switch or pull the switch to close the side window again. G
WARNING
While closing the side windows, body parts in the closing area could become trapped. There is a risk of injury.
When closing make sure that no parts of the
body are in the closing area. If somebody
becomes trapped, release the switch or press
the switch to open the side window again. G
WARNING
If children operate the side windows they
could become trapped, particularly if they are left unsupervised. There is a risk of injury.
Activate the override feature for the rear side
windows. When leaving the vehicle, always
take the key with you and lock the vehicle.
Never leave children unattended in the vehi-
cle. Side window reversing feature
The side windows are equipped with an auto- matic reversing feature. If a solid object
blocks or restricts a side window during the
closing process, the side window opens again
automatically. The automatic reversing fea-
ture is however only an aid and is no substi-
tute for your attention when closing a side
window. G
WARNING
The reversing function does not react:
R to soft, light and thin objects, e.g. small fin-
gers
R over the last 4 mm of the closing movement
R during resetting
R when closing the side window again man-
ually immediately after automatic reversing
This means that the reversing function cannot prevent someone being trapped in these sit-
uations. There is a risk of injury.
When closing make sure that no parts of the
body are in the closing area. If someone
becomes trapped, press the switch to open
the side window again. Opening and closing the side win-
dows
The switches for all side windows are located on the driver's door. There is also a switch on
each door for the corresponding side window.
The switches on the driver's door take prec-
edence. 96
Side windowsOpening and closing
Page 135 of 417
R
you drop it
R you scratch it
Only operate bulbs in enclosed lamps
designed for that purpose. Only fit spare
bulbs of the same type and the specified volt- age.
Marks on the glass tube reduce the service
life of the bulbs. Do not touch the glass tube
with your bare hands. If necessary, clean the
glass tube when cold with alcohol or spirit and
rub it off with a lint-free cloth.
Protect bulbs from moisture during opera-
tion. Do not allow bulbs to come into contact
with liquids.
You can neither replace xenon bulbs nor LED bulbs. Have LED bulbs replaced at a qualified
specialist workshop.
Replace only the bulbs listed (Y page 132).
Have the bulbs that you cannot replace your-
self replaced at a qualified specialist work-
shop.
If you require assistance replacing bulbs, con-
sult a qualified specialist workshop.
If the new bulb still does not light up, consult a qualified specialist workshop.
Bulbs and lamps are an important aspect of
vehicle safety. You must therefore make sure
that these function correctly at all times.
Have the headlamp setting checked regularly. Overview of bulb replacement – bulbs
You can replace the following bulbs. The
details for the bulb type can be found in the
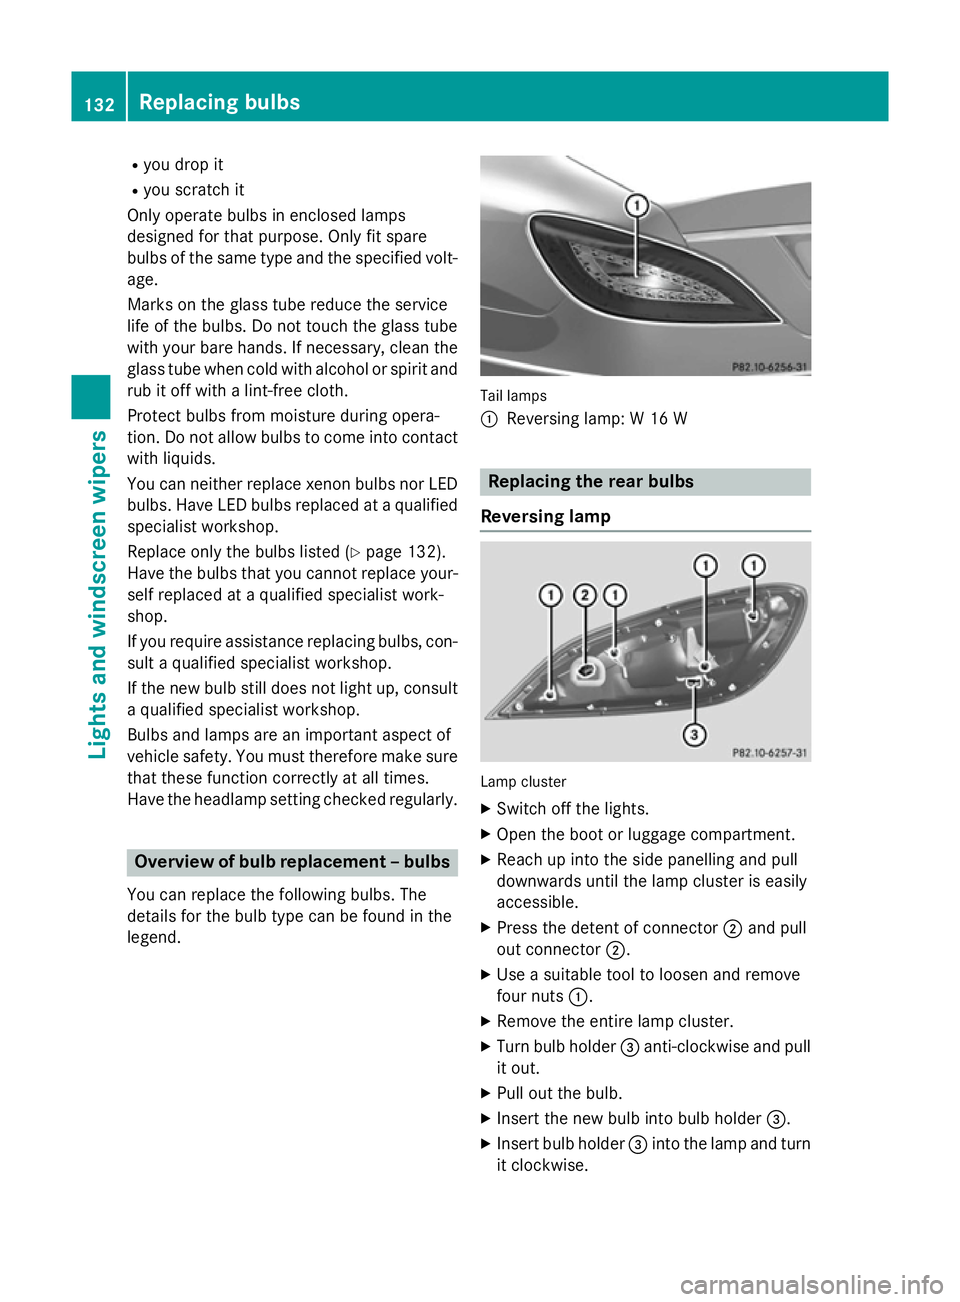
legend. Tail lamps
:
Reversing lamp: W 16 W Replacing the rear bulbs
Reversing lamp Lamp cluster
X
Switch off the lights.
X Open the boot or luggage compartment.
X Reach up into the side panelling and pull
downwards until the lamp cluster is easily
accessible.
X Press the detent of connector ;and pull
out connector ;.
X Use a suitable tool to loosen and remove
four nuts :.
X Remove the entire lamp cluster.
X Turn bulb holder =anti-clockwise and pull
it out.
X Pull out the bulb.
X Insert the new bulb into bulb holder =.
X Insert bulb holder =into the lamp and turn
it clockwise. 132
Replacing bulbsLigh
ts and windscreen wipers
Page 148 of 417
Setting the temperature
THERMATIC automatic climate control Different temperatures can be set for the
driver's and front-passenger sides.
X Turn the key to position 2in the ignition
lock (Y page 159).
X To increase/reduce: turn temperature
control :orB clockwise or anti-clock-
wise (Y page 139).
Only change the temperature setting in
small increments. Start at 22 †.
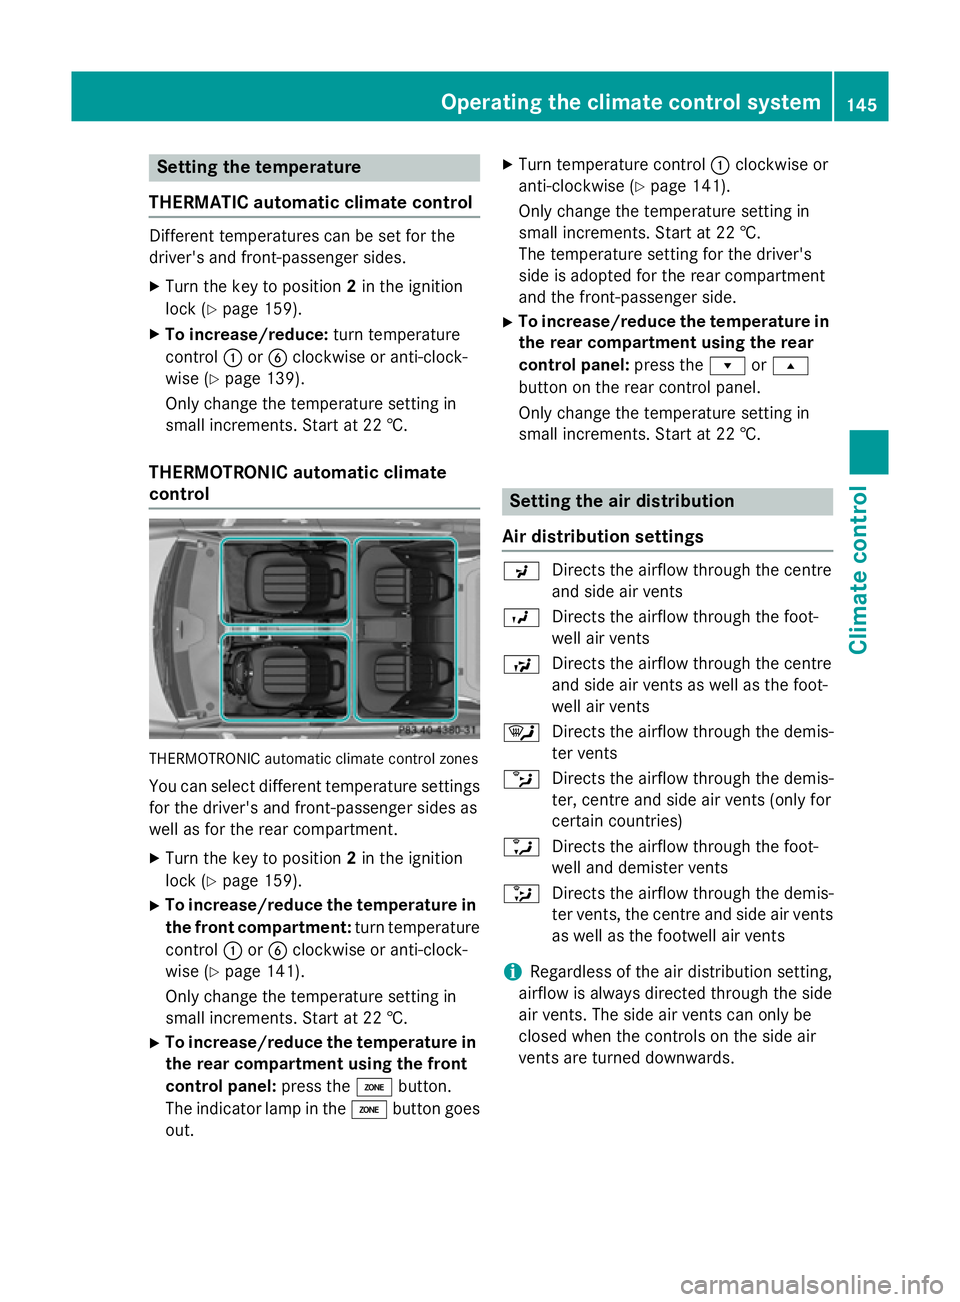
THERMOTRONIC automatic climate
control THERMOTRONIC automatic climate control zones
You can select different temperature settings for the driver's and front-passenger sides as
well as for the rear compartment.
X Turn the key to position 2in the ignition
lock (Y page 159).
X To increase/reduce the temperature in
the front compartment: turn temperature
control :orB clockwise or anti-clock-
wise (Y page 141).
Only change the temperature setting in
small increments. Start at 22 †.
X To increase/reduce the temperature in
the rear compartment using the front
control panel: press theábutton.
The indicator lamp in the ábutton goes
out. X
Turn temperature control :clockwise or
anti-clockwise (Y page 141).
Only change the temperature setting in
small increments. Start at 22 †.
The temperature setting for the driver's
side is adopted for the rear compartment
and the front-passenger side.
X To increase/reduce the temperature in
the rear compartment using the rear
control panel: press therors
button on the rear control panel.
Only change the temperature setting in
small increments. Start at 22 †. Setting the air distribution
Air distribution settings P
Directs the airflow through the centre
and side air vents
O Directs the airflow through the foot-
well air vents
S Directs the airflow through the centre
and side air vents as well as the foot-
well air vents
¯ Directs the airflow through the demis-
ter vents
b Directs the airflow through the demis-
ter, centre and side air vents (only for
certain countries)
a Directs the airflow through the foot-
well and demister vents
_ Directs the airflow through the demis-
ter vents, the centre and side air vents as well as the footwell air vents
i Regardless of the air distribution setting,
airflow is always directed through the side
air vents. The side air vents can only be
closed when the controls on the side air
vents are turned downwards. Operating the climate control system
145Climate control
Page 149 of 417
Setting the air distribution
X
Turn the key to position 2in the ignition
lock (Y page 159).
X Press the _button repeatedly until the
desired symbol appears in the display. Setting the airflow
X Turn the key to position 2in the ignition
lock (Y page 159).
X To increase: press theKbutton.
X To reduce: press theIbutton.
i You can use THERMOTRONIC automatic
climate control to set the airflow in the rear compartment separately.
If the battery is not charged sufficiently, the
blower output may be reduced. Once the bat-
tery is sufficiently charged again, full blower
output will be available. Switching the ZONE function on/off
X To switch on: press theábutton.
The indicator lamp above the ábutton
lights up.
THERMATIC automatic climate control: the temperature setting for the driver's side is
not adopted for the front-passenger side.
THERMOTRONIC automatic climate con-
trol: the temperature setting for the driver's
side is not adopted for the front-passenger
side and the rear compartment.
X To switch off: press theábutton.
The indicator lamp above the ábutton
goes out.
THERMATIC automatic climate control: the
temperature setting for the driver's side is
adopted for the front-passenger side.
THERMOTRONIC automatic climate con-
trol: the temperature setting for the driver's
side is adopted for the front-passenger side and the rear compartment. Demisting the windscreen
You can use this function to defrost the wind-
screen or to demist the inside of the wind-
screen and the side windows.
Switch off the windscreen demisting function
as soon as the windscreen is clear again.
X Turn the key to position 2in the ignition
lock (Y page 159).
X To activate: press the¬button.
The indicator lamp in the ¬button lights
up.
The climate control system switches to the
following functions:
R high airflow
R high temperature
R air distribution to the windscreen and
front side windows
R air-recirculation mode off
If the battery is not charged sufficiently, the
blower output may be reduced. Once the bat- tery is sufficiently charged again, full blower
output will be available again.
X To deactivate: press the¬button.
The indicator lamp in the ¬button goes
out. The previous settings are reactivated.
Air-recirculation mode remains deactiva-
ted.
or
X Press the Ãbutton.
The indicator lamp in the ¬button goes
out. Airflow and air distribution are set to
automatic mode.
or
X THERMATIC automatic climate control:
turn temperature controls :orB clock-
wise or anti-clockwise (Y page 139).
THERMOTRONIC automatic climate con-
trol: turn temperature controls :orB
clockwise or anti-clockwise (Y page 141).
or X Press the KorI button. 146
Operating the climate control systemClimate control
Page 158 of 417
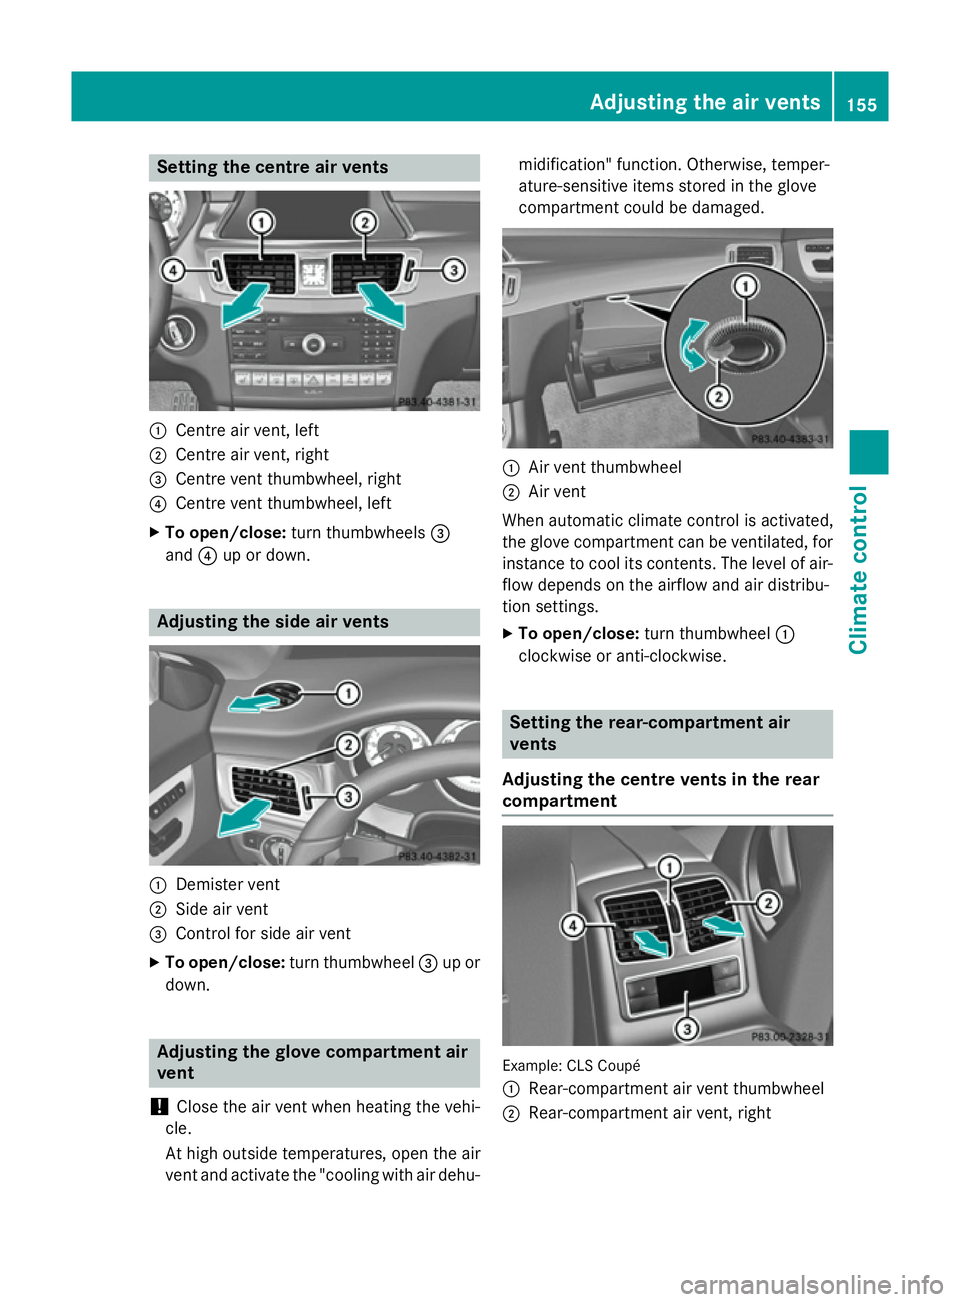
Setting the centre air vents
:
Centre air vent, left
; Centre air vent, right
= Centre vent thumbwheel, right
? Centre vent thumbwheel, left
X To open/close: turn thumbwheels =
and ?up or down. Adjusting the side air vents
:
Demister vent
; Side air vent
= Control for side air vent
X To open/close: turn thumbwheel =up or
down. Adjusting the glove compartment air
vent
! Close the air vent when heating the vehi-
cle.
At high outside temperatures, open the air
vent and activate the "cooling with air dehu- midification" function. Otherwise, temper-
ature-sensitive items stored in the glove
compartment could be damaged.
:
Air vent thumbwheel
; Air vent
When automatic climate control is activated,
the glove compartment can be ventilated, for
instance to cool its contents. The level of air-
flow depends on the airflow and air distribu-
tion settings.
X To open/close: turn thumbwheel :
clockwise or anti-clockwise. Setting the rear-compartment air
vents
Adjusting the centre vents in the rear
compartment Example: CLS Coupé
:
Rear-compartment air vent thumbwheel
; Rear-compartment air vent, right Adjusting the air vents
155Climate control Z