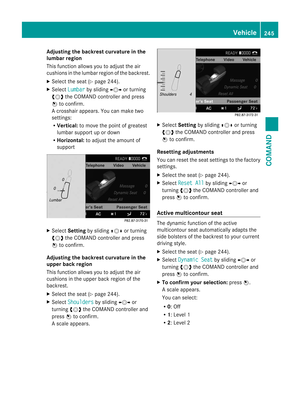
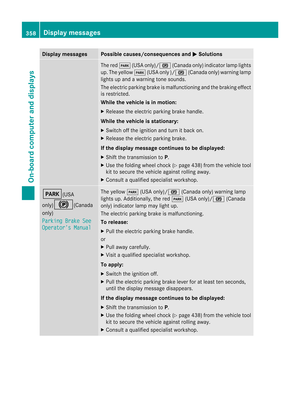
Page 161 of 494

Avoiding
asection of the route blocked
by a traffic jam This function blocks a sectio
nofthe route
ahead of you. You can set the length of the
blocked route section. If possible, COMAND
calculates a detour around the blocked
section of the route.
X To activate navigation mode: press the
S function button once or twice.
X To show the menu: pressWthe COMAND
controller.
X Select Route in the navigation system
menu bar by turning cVdthe COMAND
controller and press Wto confirm.
X Select Detour and press
Wto confirm.
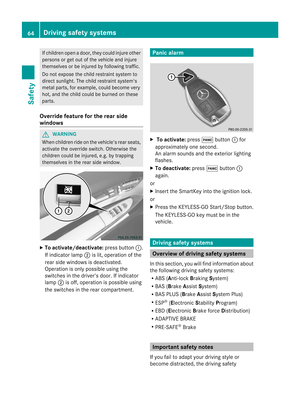
X To block a section of the route: select
More or
Less repeatedly and confirm using
W until the desired section has been
selected.
i The total length of the section that can be
blocked is defined by the digital map. The
menu items are available accordingly.
X To start route calculation: selectStart and press
Wto confirm.
X To delete the blockeds ection:select
Delete while the message is shown and
press Wto confirm.
COMAND calculates the rout ewithout the
block.
Selecting an alternative route With the "Alternative route" function, routes
other than the original one can be calculated.
X To activate navigation mode: press the
S function button once or twice.
X To show the menu: pressWthe COMAND
controller.
X Select Route in the navigation system
menu bar by turning cVdthe COMAND
controller and press Wto confirm. X
Select Alternative Route and press
W
to confirm.
You see the selected route. The display now
shows a split-screen view. On the left-hand
side, one or more alternative routes are
shown from start to destination. The
current route is highlighted dark blue; other
alternative routes appear light blue. :
Distance, expected arrival time and
expected journey duration
; Displays incidents which are on the route
= Displays the selected route settings
X To select the next or previous
alternative route: selectNext or
Previous and press
Wto confirm.
Possible alternative routes are shown in the
following order: Current Route ,
Fast Route ,
Eco Route ,
Short Route and
Alternative Route .
X To select the original route: selectBack a corresponding number of times and press
W
to confirm.
X To start route guidance using the
selected alternative route: selectStart and press
Wto confirm.
COMAND accepts the alternative route.
i The change of route mode in the
alternative route menu only applies to the
current route guidance. For example, if the
original route was a shor troute, the next
route will also be calculated as a short
route. This is also the case if a dynamic
route is selected in the alternative route
menu. Navigation
159COMAND Z
Page 162 of 494

Displaying destination information
Prerequisite: you have entered a destination
(Y page 140) and possibly an intermediate
stop (Y page 148).
X To activate navigation mode: press the
S function button once or twice.
X To show the menu: pressWthe COMAND
controller.
X Select Info in the menu bar by turning
cVd the COMAND controller and press
W to confirm.
Destination information is displayed. Example display: destination information
:
Distance to intermediate stop
; Estimated time of arrival at the
intermediate stop
= Expected remaining journey time to
intermediate stop
? Intermediate stop
A Distance to main destination
B Estimated time of arrival at the main
destination
C Expected remaining journey time to main
destination
D Main destination
If a telephone number is entered for the
address displayed, you can also selec tand
call the numbe rusing COMAND.
X To call the destination: select the
telephone number using the COMAND
controller and press Wto confirm. X
To close the destination information:
slide XVY the COMAND controller or press
the % back button.
Route overview You can use the overview of the route to move
along the route section by section and to see
details of the route sections.
You have entered a destination
(Y
page 140) or a point of interest
(Y page 150) and possibly an intermediate
stop (Y page 148).
X To activate navigation mode: press the
S function button once or twice.
X To show the menu: pressWthe COMAND
controller.
X Select Route in the navigation system
menu bar by turning cVdthe COMAND
controller and press Wto confirm.
X Select Route Info and press
Wto
confirm. Example display: route overview
:
Marked route sections
At the top of the display, you will see
information aboutt he highlighted route
section, for example the distance to be driven
on the road and road designation. The
highlighted route section is marked in white
with a red border on the map.
X To view the next or previous route
section: selectNext or
Previous and
press Wto confirm. 160
NavigationCOMAND
Page 163 of 494

i
If the first or last route section is
highlighted, you cannot select Previous or
Next .
X To zoom in or out of the map: selectN
or M and press Wto confirm.
X To close the route overview: select
Back and press
Wto confirm.
Where am I? You can view yourc
urrentposition whether
or not route guidance has been interrupted. :
Current position
; Next intersection or exit
= Most recent intersection or exit
? Current street
X To activate navigation mode: press the
S function button once or twice.
X To show the menu: pressWthe COMAND
controller.
X Select Position in the navigation system
menu bar by turning cVdthe COMAND
controller and press Wto confirm.
X Select Where am I? and press
Wto
confirm.
Off-road Important safety note
G
WARNING
The COMAND navigation system may direct
you to off-road routes that your vehicle may not be capable of traversing through without
damaging your tires, wheels or vehicle. It is
the driver's sole responsibility to determine
the suitability of the route. Off-road routes
may be of varying conditions and their
appropriateness for use may be affected by
various factors such as time of day, time of
year and immediate weather conditions that
cannot be judged or taken into consideration
by the COMAND system.
Route guidance to adestination that is not
on a digitized road
COMAND can guide you to destinations
which are within the area covered by the
digital map, but which are not themselves
recorded on the map.
These destinations are known as off-road
destinations, which you can enter using the
map, for example. In these cases, COMAND
guides you for as long as possible with
navigation announcements and displays on
roads known to the system. Example display: route guidance to an off-road
destination
:
Off-road destination
; Off-road route sectio n(dashed blue)
= Current vehicle position (the tip of the
triangle indicates the vehicle’s direction
of travel)
? Off-road (no street names available)
If the vehicle reaches an area which is not part
of the digital map, the display appears as a
split-screen view. On the right-hand side, an
arrow appears which points to off-road Navigation
161COMAND Z
Page 164 of 494

destination
:.You will hear the
announcement:" Please follow the arrow on
the display".
Route guidance from an off-road location
to a destination
If the vehicle position is within the area
covered by the digital map, but the map does
not contain any information about that
location, the vehicle is in an off-road location.
COMAND is also able to guide you to a
destination even from an off-road location.
At the start of the route guidance, you will see
the Street unknown message, an arrow and
the distance to the destination. The direction
arrow shows the linear direction to the actual
destination.
The continuous blue line on the map starts at
the street which you left last.
As soon as the vehicle is back on a road
known to the system, route guidance
continues in the usual way.
Off-road during route guidance
Due to roadworks, for example, there may be
differences between the data on the digital
map and the actual course of the road.
In such cases, the system will temporarily be
unable to locate the vehicle position on the
digital map and thus considers the vehicle to
be in an off-road position.
In the display, you will see the Streetunknown message, an arrow and the distance
to the destination. The arrow shows the
compass heading to the last road you were
driving on.
As soon as the system can assign the vehicle
position to the map again, route guidance
continues in the usual way.
Route guidance on roads that are not
completely digitalized
COMAND attempts to avoid roads that have
not been completely digitalized. If the
vehicle's position or the destination is located
in an area that has not been completely digitalized, then no active route guidance is
performed. Instead, the map shows a dashed
route along the roads and the target direction
is shown with an arrow. You hear the
announcement
:"You will enter an area,
where turn-by-turn guidance can not be
provided. Please follow the arrow on the
display". Once these roads have been left,
regular route guidance is resumed. Traffic reports
Prerequisite i
The SatRadio mode described below
requires optional satellite radio equipment
and a subscription to SIRIUS XM Satellite
Radio Traffic Message Service .Further
details on SatRadio are available in the
"SatRadio" section (Y page 205).
COMAND can receive traffic reports via
SatRadio and incorporate them in the
navigation system. Traffic messages and map
symbols can then be shown in the COMAND
display.
COMAND uses high quality traffic data.
Nevertheless, there may be differences
between the traffic reports received and the
actual road and traffic conditions.
Switching traffic reports on/off X
To switch on: set the route type to
Dynamic Route 6
(Y page 139).
X To switch off: select theFast Route or
Short Route route type (Y
page 139).
i COMAND calculates a new route if you
change the route type setting with route
guidance active. If you change the route
type setting when route guidance is
inactive, COMAND uses th enew setting for
the nextr oute guidance.
6 Traffic reports are not available in all countries. 162
NavigationCOMAND
Page 165 of 494
Real-time traffic reports on the map
COMAND can show certain traffic incidents
on the map .The incidents are shown on the
map at a scale from 1/16 mi to 20 mi.
X Set the map scale (Y page 170).12
Icon display for the section of route
affected
3 Icon for incident on the route
4 Current position and direction of travel
5 Map scale
i COMAND uses corresponding icons to
highlight the entire section of the affected
route, regardless of how long the incident
actually is. The icons are placed on the side
of the road affected by the incident. Navigation
163COMAND Z
Page 166 of 494

Icon for real-time traffic reports
Icon Description Traffic reports in the map display
Warning (red) Aw
arning appears, for example, relating to lost
cargo. Cautio
n(yellow) Aw
arning appears, for example, relating to
roadwork that does not affect the flow of traffic. Slow-moving traffic This appears at the beginning of a traffic jam
(average speed 25
-45mph) if route guidance is
active and the route leads through an area of
congested traffic.
Yellow car icons may appear in conjunction with
this icon. Traffic jam on the
route This appears at the beginning of a traffic jam
(average speed
5-20mph) if route guidance is
active and the route leads through an area of
congested traffic.
Red car icons may appear in conjunction with this
icon. Blocked route section
on the route Appears at the beginning of a blocked route
section if route guidance is active and the route
leads through the blocked section.
The XXXX icons may appear in conjunction with
this icon. Yellow line
with arrows Incidents Possible traffic blocks (e.g. roadwork)
Appears on the side of the road affected (direction
of travel) Green line
with arrows Unimpeded traffic
flow No delays
Only appears on the side of the road (direction of
travel) on which traffic flow is unimpeded Slow-moving traffic
(stop/start traffic)
(yellow vehicle) High volume of traffic, average speed
40 – 72 km/
h(25 – 45 mph). In order to indicate
the volume of traffic, more than one symbol may
appear. Traffic jam on the
route (stop/start
traffic) (red vehicle) Very high volume of traffic, average speed
8 – 32 km/h (5 – 20 mph). XXXX Blocked route section Unusable section of road. In order to indicate the
length of the blocked section, more than one
symbol may appear.164
NavigationCOMAND
Page 167 of 494

Displaying real-time traffic reports
X
If necessary, switch to navigation mode
and show the menu (Y page 139).
X Select Traffic in the navigation system
menu bar by turning cVdthe COMAND
controller and press Wto confirm.
If you see the No traffic messages. message:
This means that:
R
no traffic reports have been received yet.
R no traffic reports are available.
X To cancel the search: selectCancel .
X To close the message window: select
OK .
If there are any traffic reports, a list is shown.
The conten tofthe list varies depending on
whether route guidance is active or not.
List of traffic reports X
To show the traffic report list: select
Display All Messages by turning
cVd
the COMAND controller and press Wto
confirm.
The list shows all the roads, areas or regions
for which traffic reports are available. 1
State or province recognition
2 Road affected
i A traffic report may refer to an area or a
region, e.g. if visibility is impaired due to
fog.
X To read a traffic report: select a road, an
area or a region.
X To show a traffic report: select a road, an
area or a region and press Wto confirm.
You will find an example of a traffic report
below.
X To exit the list: slideXVY the COMAND
controller once or several times.
Example: traffic report 1
Country code
2 Road, area or region affected by traffic
reports
3 Direction
4 Report 1 of 8 for the road affected
5 Last exit/intersection before the affected
route section starts Navigation
165COMAND Z
Page 168 of 494

6
Repor ttext
C First exit/intersection after the affected
route section ends
X To scroll within arepor tort o access
the next report: turncVd the COMAND
controller.
X To return to the list of messages: press
W or slide XVYthe COMAND controller.
Showing icon information Example display
:
Affected section of freeway
; Icon for an event
X To show the next/previous incident:
select Next or
Previous (if available) and
press Wto confirm.
X To show the detailed view: select
Details and press
Wto confirm.
X To scroll the map: selectMap and press
W to confirm.
You can move the map (Y page 147) to
enable further traffic reports to be
displayed. Destination memory
Home address (My address) Entering the home address via address
entry
X Enter the home address as a destination,
e.g .as a city, street and house number
(Y page 140). Then, save the home address without starting route guidance
(Y
page 144).
Adopting an address book entry as a
home address
X To activate navigation mode: press the
S function button once or twice.
X To show the menu: pressWthe COMAND
controller.
X Select Destination in the navigation
system menu bar by turning cVdthe
COMAND controller and press Wto
confirm.
X Select From Memory and press
Wto
confirm.
X Slide ZVthe COMAND controller
repeatedly until the destination memory
list appears as a selection list. X
Select My Address by turning
cVdthe
COMAND controller and press Wto
confirm.
i If you have not yet entered any
characters, the My Address entry is
automatically highlighted in the selection
list.
If no home address has been stored yet, you
can now assign an address book entry. If a
home address already exists, it is displayed
and you can alter it.
i If you select New Entry , you are also
offered the option of entering the home
address for the first time. You can then 166
NavigationCOMAND