Page 129 of 494

Switching the sound on or off
Switching audio and video sources on/off
X Press the 8button on the multifunction
steering wheel.
The sound from the respective audio or
video source is switched on or off.
i When the sound is off, the system
displays the ,symbol in the status line.
When you change the audio or video
source, or adjust the volume, sound
automatically switches on again.
i Even if the sound is switched off, you will
still hear traffic and navigation system
announcements.
Switching off traffic and navigation
announcements completely
X Traffic announcements: press the8
button until the .message disappears
from the status bar of the display.
A confirmation tone sounds.
X Navigation announcements: during an
announcement, press the 8button on
the multifunction steering wheel.
Switching traffic and navigation
announcements on again
X Traffic announcements: press and hold
down the 8button until the .display
appears in the status bar.
A confirmation tone sounds.
X Navigation announcements: select the
y symbol in the navigation menu bar
and press Wto confirm.
i The navigation announcements are
activated again if you switch COMAND off
and on again or start a new route guidance. Adjusting the volume Adjusting the volume for the audio or
video source
X
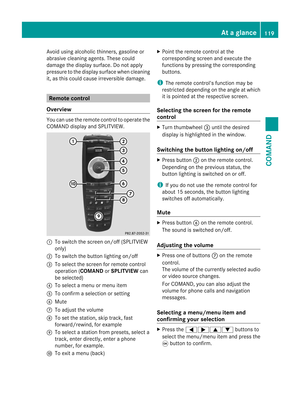
To adjust: turn thumbwheel :.
or
X Press the WorX button on the
multifunction steering wheel.
The volume of the currently selected audio
or video source changes.
You can also adjust the volume for the
following:
R traffic announcements
R navigation announcements
R phone calls
R the Voice Control System (see the separate
operating instructions)
Adjusting the volume for navigation
announcements
During a navigation announcement:
X Turn thumbwheel :.
or
X Press the WorX button on the
multifunction steering wheel.
Adjusting the volume for phone calls
You can adjust the volume for hands-free
mode during a telephone call.
X Turn thumbwheel :.
or
X Press the WorX button on the
multifunction steering wheel. At
ag lance
127COMAND Z
Page 130 of 494

Adjusting the soun
dsettings Calling up the sound menu
You can make various sound settings for the
differen taudio and video sources. This means
that it is possible to set more bass for radio
mode than for audio CD mode, for example.
You can call up the respective sound menu
from the menu of the desired mode.
The example describes how to call up the
sound menu in radio mode.
X Press the Rfunction button.
The radio display appears. You will hear the
last station played on the last waveband. X
Select Sound by sliding
VÆand turning
cVd the COMAND controller and press
W to confirm.
You can now set the treble and bass or the
balance and fade rfor radio mode.
Adjusting treble and bass
X Select Treble or
Bass in the sound menu
by turning cVdthe COMAND controller
and press Wto confirm.
An adjustmen tscale appears. Setting the treble
:
Lastsetting selected
; Current setting
X Select a setting by turning cVdthe
COMAND controller and press Wto
confirm.
The setting is stored and you exit the menu.
Adjusting balance and fader
With the balance function, you can control
whether the sound is louder on the driver's or
front-passenger side.
The fader function is used to control whether
the sound is louder in the fron torthe rear of
the vehicle.
X Select Balance/Fader in the sound menu
by turning cVdand press Wto confirm. :
Current setting
X Select a setting by sliding ZVÆorXVY the
COMAND controller and press Wto
confirm.
The setting is stored and you exit the menu. 128
At
ag lanceCOMAND
Page 131 of 494

Surround sound
General information
If your vehicle is equipped with the harman/
kardon
®
Logic 7 ®
surround sound system,
you can provide the optimum sound
experience for every passenger.
The harman/kardon ®
Logic7 ®
surround
sound system is available for the following
operating modes:
R radio (FM only)
R satellite radio
R audio CD
R audio DVD (MLP™, dts™, PCM and
Dolby ®
Digital audio formats)
R MP3
R Media Interface
R video DVD (PCM, dts™ and Dolby ®
Digital
audio formats)
R AUX
Because some DVDs contain both stereo and
multichannel audio formats, it may be
necessary to set the audio format
(Y page 216).
i The Logic7 ®
ON function enables
playback of stereo recordings, for instance,
with a surround sound experience for every
passenger. It enables optimum playback of
music and films on CDs, audio DVDs or
video DVDs with multichannel audio
formats, such as MLP™, dts™ or Dolby ®
Digital. This results in sound
characteristics like those intended by the
sound engineer when the original was
recorded.
i If you select Logic7 ®
OFF , the sound
system plays all playable formats as stored
on the medium. Due to the design of the
passenger compartment, an optimum
audio experience cannot be guaranteed for
all passengers.
i Discs which support the audio formats
mentioned have the following logos: Dolby
®
Digital dts™
Switching surround sound on/off
Example: switching on surround sound for
radio mode
X
Press the Rfunction button.
The radio display appears. You will hear the
last station played on the last waveband. X
Select Sound by sliding
VÆand turning
cVd the COMAND controller and press
W to confirm.
X Select 3D Sound and press
Wto confirm. At
ag lance
129COMAND Z
Page 132 of 494

:
Current setting
X Selec tthe Logic7 ®
ON or
Logic7 ®
OFF
setting by turning
cVdthe COMAND
controller and press Wto confirm.
Depending on your selection, surround
sound is switched on or off and the menu
is exited.
X To exit the menu without saving: press
the % back button or slide XVYthe
COMAND controller.
i Please bear the following in mind:
When Logic7 ®
is switched on, the balance
and fader settings should be set to the
center of the vehicle interior to provide the
optimum audio experience for all
passengers.
You will achieve the best sound results by
playing high-quality audio and video DVDs.
MP3 tracks should have abit rate of at least
128 kbit/s.
Surround sound playback does not
function for mono signal sources, such as
for AM radio mode.
If radio receptio nis poor, e.g. in a tunnel,
you should switch off Logic7 ®
, since it may
otherwise switch dynamically between
stereo and mono and cause temporary
sound distortions.
On some stereo recordings, the sound
characteristics may differ from
conventional stereo playback. System settings
Display settings
Switching the display on/off X
Select Vehicle by turning
cVdthe
COMAND controller and press Wto
confirm.
X Select Display OFF by turning
cVdthe
COMAND controller and press Wto
confirm.
X To switch on the display: pressWor
cVd turn the COMAND controller.
Display design Your COMAND display features optimized
designs for operation during daytime and
night-time hours. You can customize the
design to suit your personal preferences by
manually selecting day or night design or opt
for an automatic setting.
X
Select Vehicle by turning
cVdthe
COMAND controller and press Wto
confirm.
X Select System by turning
cVdthe
COMAND controller and press Wto
confirm.
X Select Display and press
Wto confirm.
X Select Day Mode ,
Night Mode or
Automatic by turning
cVdthe COMAND
controller and press Wto confirm.
The #icon indicates the current setting. 130
System settingsCOMAND
Page 133 of 494

Design Explanation
Day Mode The display is set
permanently to day
design.
Night Mode The display is set
permanently to night
design.
Automatic The display design
changes depending on
the brightness around
the vehicle.
i
In the Automatic setting, COMAND
evaluates the readings from the automatic
vehicle ligh tsensor and switches between
the display designs automatically. Time settings
General information If COMAND is equipped with a navigation
system and has GPS reception, COMAND
automatically sets the time and date. You can
also adjust the time yourself in 30-minute
increments, but the date cannot be changed.
i If you set the time in 30-minute
increments, any time zone settings and
settings for changing between summer and
standard time are lost (Y page 132).
i The following navigation system functions
require the time, time zone and summer/
standard time to be set correctly in order
to work properly:
R route guidance on routes with time-
dependen ttraffic guidance
R calculation of expected time of arrival Setting the time X
Select Vehicle in the main function bar by
turning cVdthe COMAND controller and
press Wto confirm.
X Select System by turning
cVdthe
COMAND controller and press Wto
confirm.
X Select Time by turning
cVdthe COMAND
controller and press Wto confirm.
X Select Time and press
Wto confirm. :
Setting the time
; Current date (set automatically by
COMAND)
X Set the time by turning cVdthe COMAND
controller and press Wto confirm.
Setting the time/date format X
Select Vehicle in the main function bar by
turning cVdthe COMAND controller and
press Wto confirm.
X Select System by turning
cVdthe
COMAND controller and press Wto
confirm.
X Select Time by turning
cVdthe COMAND
controller and press Wto confirm.
X Select Format and press
Wto confirm.
The #symbols show the current settings. System settings
131COMAND Z
Page 134 of 494

Abbreviation Meaning
DD /MM /YYYY Day/Month/Year
(date format)
HH /MM Hours/Minutes
(time format)
You can set the 24-hour or the AM/PM
format.
X
Set the format by turning cVdthe
COMAND controller and press Wto
confirm.
Setting the time zone and switching
between summer and standard time X
Select Vehicle in the main function bar by
turning cVdthe COMAND controller and
press Wto confirm.
X Select System by turning
cVdthe
COMAND controller and press Wto
confirm.
X Select Time by turning
cVdthe COMAND
controller and press Wto confirm.
X Select Time Zone and press
Wto confirm.
You will see a list of time zones. The #dot
indicates the current setting.
X Selec tthe time zone and press Wto
confirm.
X To switch automatic changeovero n/
off: select Automatic Daylight Savings Time or
Automatic Daylight Savings Time by turning
cVdthe
COMAND controller and press Wto
confirm.
The #dot indicates the current setting. Text reader settings
Setting the text reader speed X
Select Vehicle by turning
cVdthe
COMAND controller and press Wto
confirm.
X Select System and press
Wto confirm.
X Select Text Reader and press
Wto
confirm.
X Select Set text reader speed and press
W to confirm.
Al ist appears. The #dot indicates the
current setting.
X Select a setting by turning cVdthe
COMAND controller and press Wto
confirm. Voice Control System settings
Opening/closing the help window In additio
nto the audible instructions, the
help window will show you other information
during voice control operation and the
individualization process.
X Select Vehicle in the main function bar by
turning cVdthe COMAND controller and
press Wto confirm.
X Select System by turning
cVdthe
COMAND controller and press Wto
confirm.
X Select Voice Control by turning
cVdthe
COMAND controller and press Wto
confirm.
X Select Help Window and press
Wto
confirm.
You have switched the help window on
O or off ª. 132
System settingsCOMAND
Page 135 of 494

Individualization
Introduction
You can use the individualization function to
fine tune the Voice Control System to your
voice and therefore improve voice
recognition .This means that other users'
voices will not be recognized as easily.F or
this reason this function can be switched off.
Individualization comprises two parts and
takes approximately 5minutes. It consists of
training the system to recognize a certain
number of digit sequences and voice
commands.
Starting new individualization
Individualization can only be started when the
vehicle is stationary. Before starting, switch
off all devices or functions which could
interfere, such as the radio or the navigation
system. After starting the session, the system
guides you through the training with spoken
instructions.
X Select Vehicle in the main function bar by
turning cVdthe COMAND controller and
press Wto confirm.
X Select System by turning
cVdthe
COMAND controller and press Wto
confirm.
X Select Voice Control and press
Wto
confirm. X
Select Start New Individualization and press
Wto confirm.
You see and hear a prompt asking whether
you would like further information.
X Select Yes or
No and press
Wto confirm.
If you select No , the first part of
individualization begins. You will be asked
whether you would like to train digits or
voice commands.
If you select Yes , you will see and hear
information on the individualization
process. The firs tpart of individualization
then begins automatically.
X To close the display: pressWthe
COMAND controller.
You will be asked whether you would like
to train digits or voice commands. At the end of the first part, a prompt will
appear asking whether you wish to begin the
second part.
X
Select Yes or
No and press
Wto confirm.
If you select No , individualization will be
canceled. The dat afrom the first part is
stored automatically.
If you select Yes , the second part will begin.
Individualization is completed at the end of
the second part. You will see a message to
this effect. The data from the second part is
stored automatically. System settings
133COMAND Z
Page 136 of 494

Canceling the first or second part of
individualization
X
Confirm Cancel by pressing
Wthe
COMAND controller.
Ap rompt appears asking whethe ryou
really wish to cancel.
X Select Yes or
No and press
Wto confirm.
If you select Yes , individualization will be
canceled. The data from the part during
which you exited is not stored.
If you select No , the current part begins
again.
Deleting existing individualization data
X Select Vehicle by turning
cVdthe
COMAND controller and press Wto
confirm.
X Select System and press
Wto confirm.
X Select Voice Control and press
Wto
confirm.
X Select Delete Individualization and
press Wto confirm.
Ap rompt appears asking whethe ryou
really wish to delete.
X Select Yes or
No and press
Wto confirm.
If you select No , the process will be aborted.
If you select Yes , the individualization is
deleted. You will see a message to this
effect. Bluetooth
®
settings
General information about Bluetooth ® Bluetooth
®
technology is the standard for
short-range wireless data transmission of up
to approximately 10 meters. Bluetooth ®
allows, for example, the exchange of vCards.
Bluetooth ®
is a registered trademark of
Bluetooth Special Interest Group (SIG) Inc. Requirements for a Bluetooth
®
connection You can connect mobile phones and
notebooks to COMAND.
To do so, the following conditions need to be
met:
R
Bluetooth ®
-capable devices, e.g. mobile
phones, must comply with a certain profile
in order to be connected to COMAND.
Every Bluetooth ®
device has its own
specific Bluetooth ®
name.
R Bluetooth ®
must be activated in COMAND
and on the respective Bluetooth ®
device;
see the separate operating instructions.
R the Bluetooth ®
device must be "visible" to
COMAND in order for COMAND to find and
display it. For the setting procedures,
please see the operating instructions for
the Bluetooth ®
device.
i Once a mobile phone has been
connected, reception and transmission
volume may change. 134
System settingsCOMAND