2014 MERCEDES-BENZ CL-Class navigation
[x] Cancel search: navigationPage 92 of 274

0013
Map orientation selected
0011 Map scale selected
Lane recommendations Example: lane recommendations
0001 Point of the next change of direction
0002 Point of the change of direction after next
0014 Next change of direction (in this case, turn
off to the right)
0013 Graphic representation of the distance to
the next change of direction
0011 Distance to the next change of direction
0012 Possible lane (light blue)
0005 Recommended lane (dark blue)
0006 Lane not recommended (gray)
0007 Current vehicle position, the tip of the
triangle indicating the vehicle’s direction
of travel
On multi-lane roads, COMAND can display
lane recommendations for the next change of
direction. The corresponding data must be
available in the digital map.
COMAND displays lane recommendation 0005,
based on the next two changes of direction.
The number of lanes applies to the point at
which the next change of direction is
required.
i The multifunction display also shows lane
recommendations.
Only the recommended lanes are displayed
here, see the separate vehicle Operator's
Manual. Display and description of lane
recommendations Lane Day
mode Night
mode
Recommended lane
In this lane, you will
be able to complete
the next two
changes of direction
without changing
lanes. Dark
blue Light
blue
Possible lane
In this lane, you will
only be able to
complete the next
change of direction
without changing
lanes. Light
blue Dark
blue
Lane not
recommended
In this lane, you will
not be able to
complete the next
change of direction
without changing
lanes. Light
brown or
light gray Gray
i
The colors used in the lane
recommendation display vary depending
on whether day or night mode is switched
on. 90
Route guidanceNavigation
Page 93 of 274

HOV or carpool lanes
0001
HOV symbol on the road sign
0002 HOV symbol on the car pool lane
Ar oute may be calculated taking the use of
HOV or carpool lanes into account. You can
use HOV or carpool lanes depending on the
number of persons in the vehicle as well as
the local and time limitation conditions.
i This information is stored in the map data.
i You can enter the number of people in the
vehicle (Y page 62). In this section, you can
also find more information on HOV or
carpool lanes.
If the system guides you to or from a carpool
lane, COMAND provides you with visual and
acoustic driving instructions. Navigation announcements
Repeating navigation announcements G
WARNING
Navigation announcements are intended to
direct you while driving without diverting your
attention from the road and driving.
Please always use this feature instead of
consulting the map display for directions.
Looking at the icons or map display can
distract you from traffic conditions and
driving, and increase the risk of an accident.
If you have missed an announcement, you can
call up the current announcement at any
time. X
To show the menu: press0037the COMAND
controller.
X Select RPT in the navigation system menu
bar by turning 003C0012003Dthe COMAND
controller and press 0037to confirm.
Switching navigation announcements
on/off X
To switch off: press the001Cbutton
during an announcement.
You will briefly see the message: The driving instructions have been
muted.
X
To switch on: press0037the COMAND
controller.
X Select RPT in the navigation system menu
bar by turning 003C0012003Dthe COMAND
controller and press 0037to confirm.
i COMAND automatically switches the
navigation announcements back on when:
R you have a new route calculated.
R you switch COMAND on again or start the
engine.
Switching announcements and audio
fadeout on/off X
Select Navi in the main function bar by
sliding 00360012and turning 003C0012003Dthe COMAND
controller and press 0037to confirm.
X Select Announcements and press
0037to
confirm.
Am enu appears.
You can activate/deactivat ethe following
functions:
R Announce Street Names Street names are announced during
route guidance.
R Audible Info During Phone Call During a phone call, navigation
announcements and traffic reports are
audible in the background.
R Audio Fadeout Route guidance
91Navigation Z
Page 94 of 274

The volume of an active audio or video
source is automatically reduced during a
navigation announcement.
R Gas on Reserve Once you have reached reserve fuel
level, you will see a prompt asking
whether you wish to start the search for
a gas station (Y page 76).
X Select the function and press 0037to confirm.
Switch the function on 0010or off 0003.
Setting the volume manually X
Adjust the volume using the 0002control
knob during a navigation announcement.
or
X Select RPT in the map view with the menu
shown and adjust the volume using the
0002 control knob.
Announcing street names If the function is switched on, the name of the
street which you are turning into is
announced.
Announcements are not made in the chosen
language in all countries. They are made when
relevant street names for the selected
language are available in the database.
X
To switch to navigation mode: press the
0012 button.
X To show the menu: press0037the COMAND
controller.
X Select Navi in the main function bar by
sliding 00360012the COMAND controller and
press 0037to confirm.
X Select Announce Street Names and press
0037 to confirm.
The function is switched on 0010or off 0003,
depending on the previous status. Canceling route guidance
Canceling or continuing route guidance X
To switch to navigation mode: press the
0012 button.
X To show the menu: press0037the COMAND
controller.
X Select Destination in the navigation
system menu bar by turning 003C0012003Dthe
COMAND controller and press 0037to
confirm.
X To cancel route guidance: selectCancel Route Guidance and press
0037to confirm.
or
X To continue route guidance: select
Continue Route Guidance and press
0037
to confirm.
COMAND calculates the route.
Destination or area of destination
reached When you reach your destination, COMAND
displays a checkered flag and route guidance
is automatically ended.
If the destination is not in close proximity to
a digitized street, the
Area of destination reached message appears
when the destination is reached. Influencing route guidance
Avoiding asection of the route blocked
by a traffic jam This function blocks a sectio
nofthe route
ahead of you. You can set the length of the
blocked route section. If possible, COMAND
calculates a detour around the blocked
section of the route.
X To switch to navigation mode: press the
0012 button.
X To show the menu: press0037the COMAND
controller. 92
Route guidanceNavigation
Page 95 of 274

X
Select Route in the navigation system
menu bar by turning 003C0012003Dthe COMAND
controlle rand press 0037to confirm.
X Select Detour and press
0037to confirm.
X To block a section of the route: select
Longer or
Shorter repeatedly and confirm
using 0037until the desired sectio nhas been
selected.
i The total length of the sectio nthat can be
blocked is defined by the digital map. The
menu items are available accordingly.
X To start route calculation: selectStart and press
0037to confirm.
X To delete the blockeds ection:select
Delete while the message is shown and
press 0037to confirm.
COMAND calculates the rout ewithout the
block.
Selecting an alternative route With the "Alternative route" function, routes
other than the original one can be calculated.
Routes 1to3a re calculated with the current
settings for the route type and route options
and are show nwith a dark blue line
(Y page 62).
Route 4is the economic route (eco route) and
is shown with a green line.
On the right-hand side, you will see
information on the currently selected
alternative route, e.g. distance, estimated
remaining driving time and estimated time of
arrival. Route sections used (e.g. highways,
tunnels) are displayed as symbols.
Option 1
X To switch to navigation mode: press the
0012 button.
X To show the menu: press0037the COMAND
controller.
X Select Route in the navigation system
menu bar by turning 003C0012003Dthe COMAND
controller and press 0037to confirm. X
Select Alternative Route and press
0037
to confirm. Examples for route
1(above) and route 4(eco
route)
Option 2:
X To switch to navigation mode: press the
0012 button.
X To show the menu: press0037the COMAND
controller.
X Select Navi in the main function bar by
sliding 00360012the COMAND controller and
press 0037to confirm.
X Select Calculate Alternative Routes and press
0037to confirm.
The function is switched on 0010or off 0003,
depending on the previous status.
Function is activated: alternative routes
are calculated directly after the destination
is entered. Route guidance
93Navigation Z
Page 96 of 274

Menu functions
X
To selectt he next or previous
alternative route: selectNext or
Previous and press
0037to confirm.
X To start route guidance using the
selected alternative route: selectStart and press
0037to confirm.
COMAND begins route guidance on the
selected alternative route. Route information
Displaying destination information Example
:destination information
The example shows information on distance,
estimated time of arrival and estimated
remaining driving time to the destination 000B
and two way points.
X To switch to navigation mode: press the
0012 button.
X To show the menu: press0037the COMAND
controller.
X Select Route in the navigation system
menu bar by turning 003C0012003Dthe COMAND
controller and press 0037to confirm.
X Select Destination Information and
press 0037to confirm.
Destination information is displayed.
X To call up further destination
information: turn003C0012003D the COMAND
controller. X
To close the destination information:
slide 003400120035 the COMAND controller or press
the 000A back button.
i You can display destination information
for the destination, for both waypoints and
for the intermediate stop, if they are part of
the route.
If a mobile phone is connected to COMAND
and a phone number is included in the
destination information, you can call it
(Y page 128).
Route overview You can use the route overview to move along
the active route section by section and view
information and details about each section of
the route.
You can see information relevant to the
section of the route, such as the length of the
road section you will be driving along and the
road name. The highlighted route section is
marked in white with a red border on the map.
X
To switch to navigation mode: press the
0012 button.
X To show the menu: press0037the COMAND
controller.
X Select Route in the navigation system
menu bar by turning 003C0012003Dthe COMAND
controller and press 0037to confirm.
X Select Route Browser and press
0037to
confirm.
X To view the next or previous route
section: selectNext or
Previous and
press 0037to confirm.
i If the first or last route section is
highlighted, you cannot select Previous or
Next .
X To zoom in or out of the map: select000A
or 0007 and press 0037to confirm.
X To close the route overview: select
Back and press
0037to confirm. 94
Route guidanceNavigation
Page 97 of 274

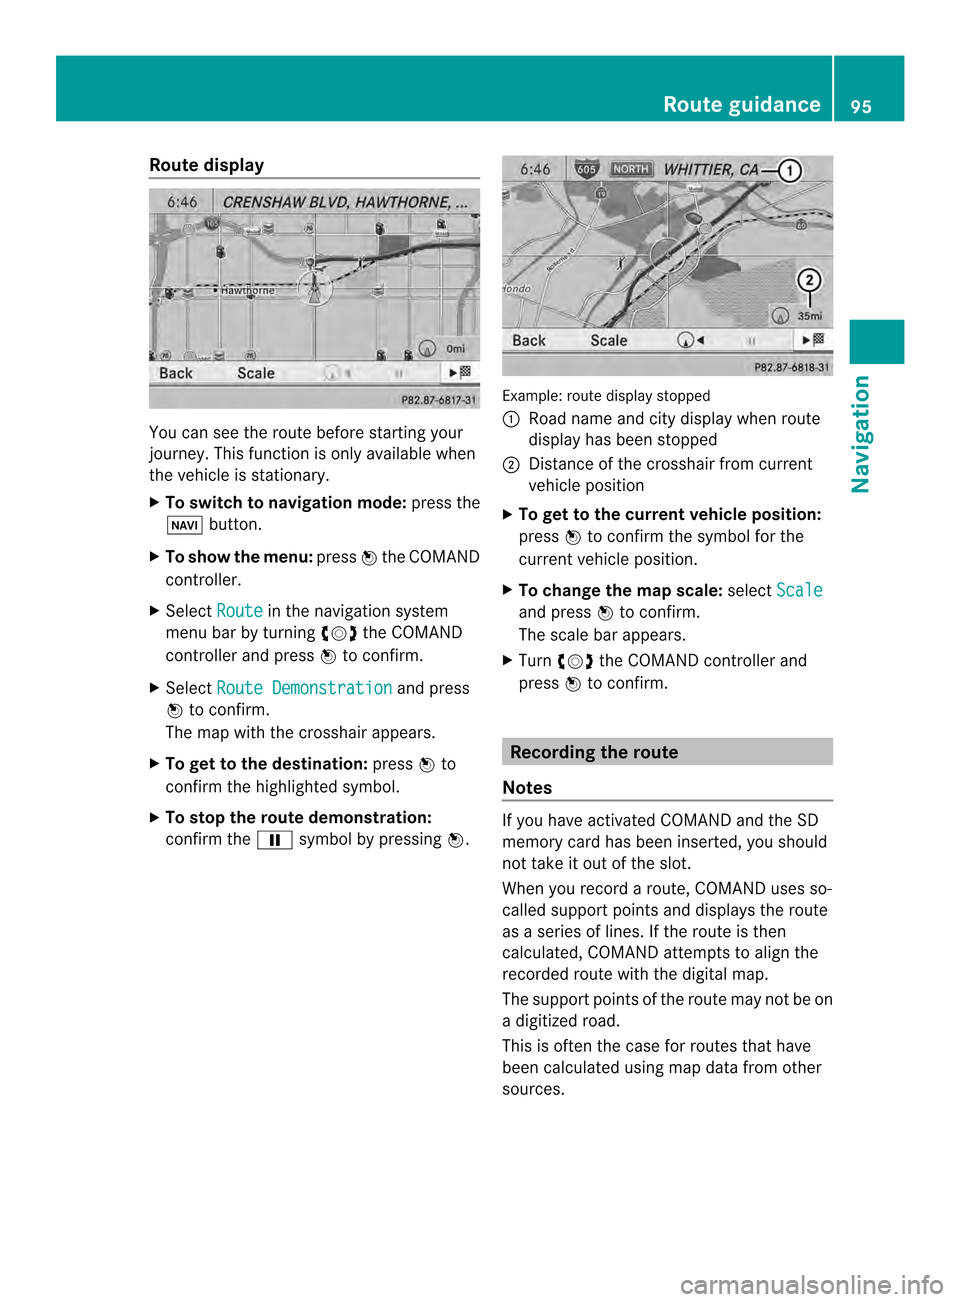
Route display
You can see the route before starting your
journey .This function is only available when
the vehicle is stationary.
X To switch to navigation mode: press the
0012 button.
X To show the menu: press0037the COMAND
controller.
X Select Route in the navigation system
menu bar by turning 003C0012003Dthe COMAND
controller and press 0037to confirm.
X Select Route Demonstration and press
0037 to confirm.
The map with the crosshair appears.
X To get to the destination: press0037to
confirm the highlighted symbol.
X To stop the route demonstration:
confirm the 0009symbol by pressing 0037. Example: route display stopped
0001
Road name and city display when route
display has been stopped
0002 Distance of the crosshair from current
vehicle position
X To get to the current vehicle position:
press 0037to confirm the symbol for the
current vehicle position.
X To change the map scale: selectScale and press
0037to confirm.
The scale bar appears.
X Turn 003C0012003D the COMAND controller and
press 0037to confirm. Recording the route
Notes If you have activated COMAND and the SD
memory card has been inserted, you should
not take it out of the slot.
When you record a route, COMAND uses so-
called support points and displays the route
as a series of lines. If the route is then
calculated, COMAND attemptst
o align the
recorded route with the digital map.
The support points of the route may not be on
a digitized road.
This is often the case for routes that have
been calculated using map data from other
sources. Route guidance
95Navigation Z
Page 98 of 274

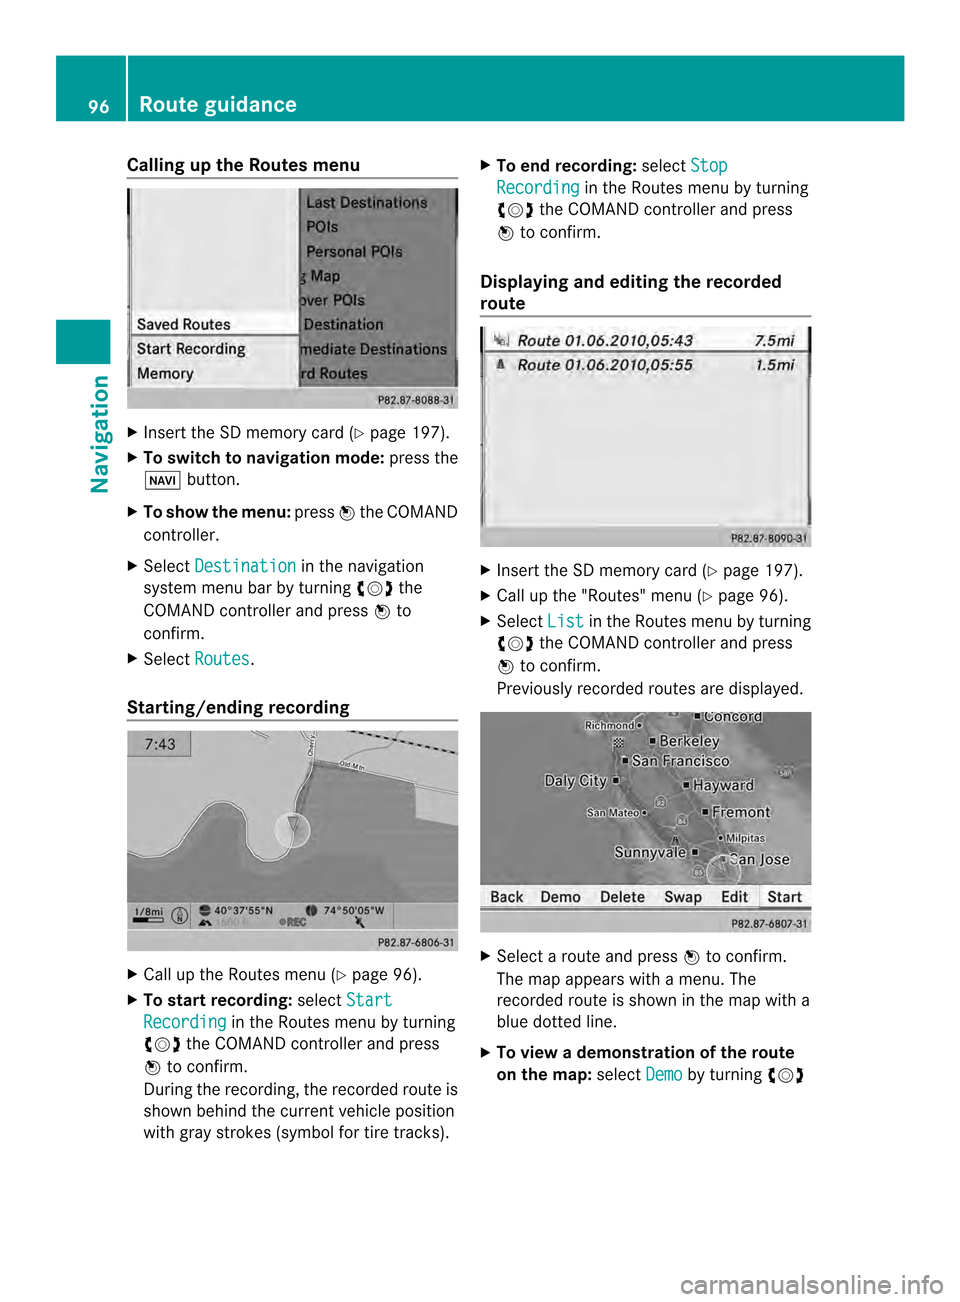
Calling up the Routes menu
X
Insert the SD memory car d(Ypage 197).
X To switch to navigation mode: press the
0012 button.
X To show the menu: press0037the COMAND
controller.
X Select Destination in the navigation
system menu bar by turning 003C0012003Dthe
COMAND controller and press 0037to
confirm.
X Select Routes .
Starting/ending recording X
Call up the Routes menu (Y page 96).
X To start recording: selectStart Recording in the Routes menu by turning
003C0012003D the COMAND controller and press
0037 to confirm.
During the recording, the recorded route is
shown behind the curren tvehicle position
with gray strokes (symbol for tire tracks). X
To end recording: selectStop Recording in the Routes menu by turning
003C0012003D the COMAND controller and press
0037 to confirm.
Displaying and editing the recorded
route X
Insert the SD memory card (Y page 197).
X Call up the "Routes" menu (Y page 96).
X Select List in the Routes menu by turning
003C0012003D the COMAND controller and press
0037 to confirm.
Previously recorded routes are displayed. X
Select a route and press 0037to confirm.
The map appears with a menu. The
recorded route is shown in the map with a
blue dotted line.
X To view a demonstration of the route
on the map: selectDemo by turning
003C0012003D 96
Route guidanceNavigation
Page 99 of 274

the COMAND controlle
rand press 0037to
confirm.
The map with the crosshair appears.
X Proceed as described in the "Route
demonstration" section (Y page 95).
X To begin route calculation: selectStart in the menu by turning
003C0012003Dthe COMAND
controller and press 0037to confirm.
COMAND attempts to alig nthe recorded
route with the digital map. Changing route names and icons
X
Select Edit in the menu by turning
003C0012003D
the COMAND controller and press 0037to
confirm.
X To change the route name: select
Rename and press
0037to confirm.
i The name cannot be changed while the
vehicle is in motion.
X To change the icon: selectChange Icon and press
0037to confirm.
Observe the further information on managing
categories for personal POIs (Y page 84).
To change direction for route
calculation: you can set the icon for the
route to the starting point or to the
destination, thereby changing the direction
for route calculation.
During route calculation, one-way streets or
turn restrictions, for example, are taken into
account. Therefore, the outward and return
routes may differ from each other. X
Select Swap in the menu by turning
003C0012003D
the COMAND controller and press 0037to
confirm.
X To delete a route: selectDelete in the
menu by turning 003C0012003Dthe COMAND
controller and press 0037to confirm.
Ap rompt appears asking whethe rthe route
should be deleted.
X Select Yes or
No and press
0037to confirm.
If you select Yes , the route will be deleted.
If you select No , the process will be
canceled.
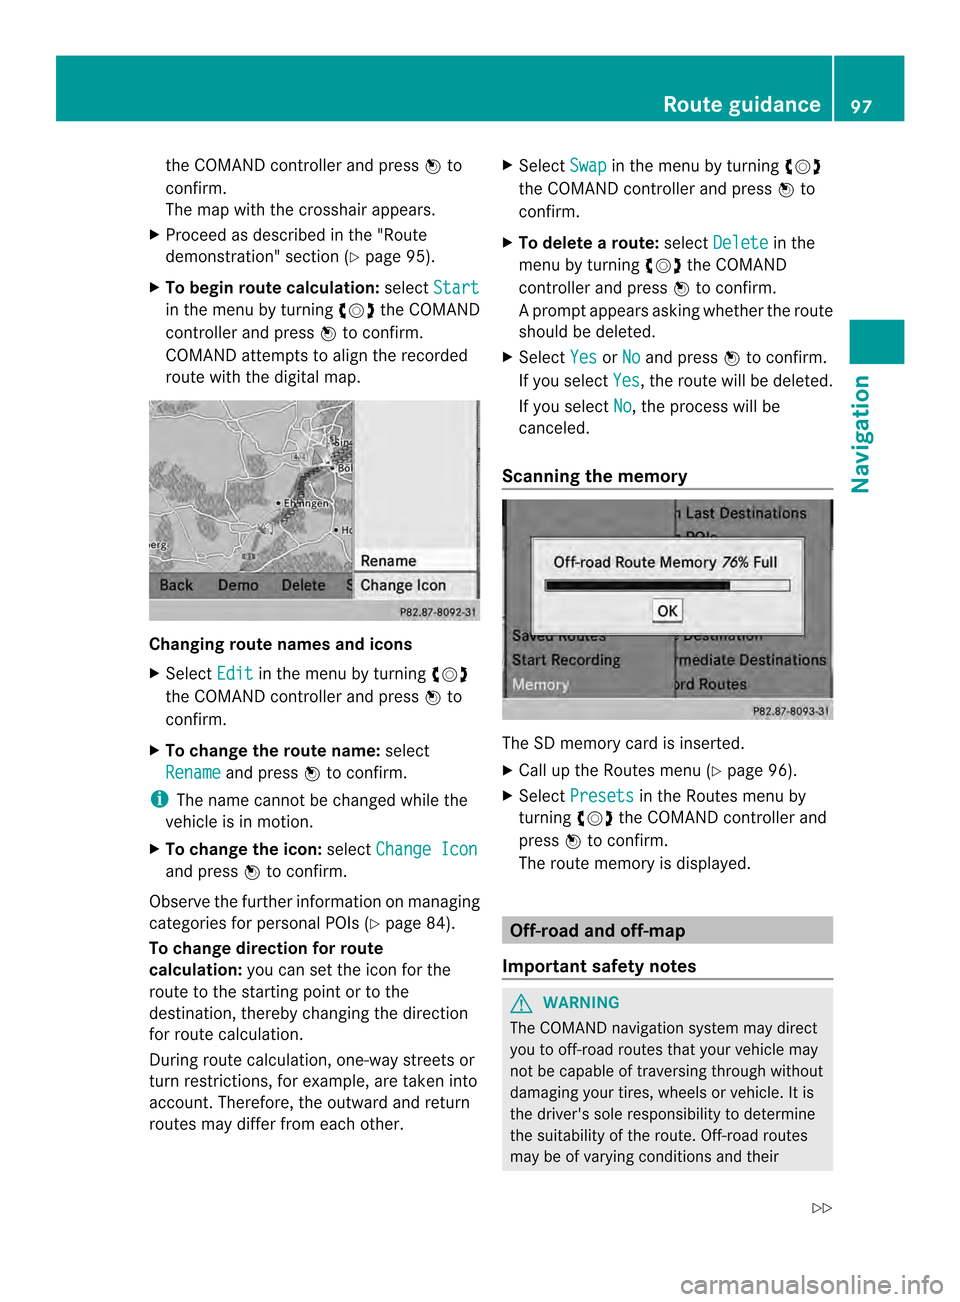
Scanning the memory The SD memory card is inserted.
X
Call up the Routes menu (Y page 96).
X Select Presets in the Routes menu by
turning 003C0012003Dthe COMAND controller and
press 0037to confirm.
The route memory is displayed. Off-road and off-map
Important safety notes G
WARNING
The COMAND navigation system may direct
you to off-road routes that your vehicle may
not be capable of traversing through without
damaging your tires, wheels or vehicle. It is
the driver's sole responsibility to determine
the suitability of the route. Off-road routes
may be of varying conditions and their Route guidance
97Navigation
Z