2014 MERCEDES-BENZ B-CLASS SPORTS tow bar
[x] Cancel search: tow barPage 182 of 360
Important safety notes
The rear view camera is only an aid. It is not
ar eplacemen tfor your attention to your
immediat esurroundings. You are always
responsible for saf emaneuverin gand
parking .When maneuvering or parking, make
sure that there are no persons, animals or
objectsint he area in which you are
maneuvering.
Under the following circumstances, the rear
view camera will not function, or will function
in alimited manner:
R the tailgate is open
R in heavy rain, snow or fog
R at night or in very dark places
R if the camera is exposed to very bright light
R if the area is lit by fluorescent light or LED
lighting (the displaym ay flicker)
R if there is asudden change in temperature,
e.g. when driving into aheated garage in
winter
R if the camera lens is dirty or obstructed
R if the rear of your vehicle is damaged. In
this event, have the camera position and
settingc hecked at aqualified specialist
workshop
The field of vision and other functions of the
rear view camera may be restricted due to
additional accessories on the rear of the
vehicle (e.g. license plate holder, bicycle
rack).
Activating/deactivating the rear view
camera X
To activate: make sure that the SmartKey
is in position 2in the ignition lock.
X Make sure that in the audios ystem/
COMAND ,the "Activation by Rgear"
function is selected; see th eseparate operatin
ginstructions fort he audio
system/COMAND.
X Engage reverse gear.
Guidel ines are used to show the area
behind the vehicle in the Audio/COMAND
display.
To deactivate: the rear view camera
deactivates if you shift the transmission to P
on vehicles with automatic transmission or
after driving forwards ashort distance.
Displays in the Audio/COMAND display The rear view camera may show
adistorted
view of obstacles, show them incorrectly or
not at all. The rear view camera does not show
objectsint he following positions:
R very close to the rear bumper
R under the rear bumper
R in the area immediately above the tailgate
handle
! Objectsn ot at ground level may appearto
be further away than they actually are, e.g.:
R the bumper of aparked vehicle
R the drawbar of atrailer
R the ball coupling of atrailer tow hitch
R the rear section of an HGV
R as lanted post
Use the guidelines only for orientation.
Approac hobjects no further than the
bottom-most guideline. 180
Driving systemsDriving and parking
Page 297 of 360
X
Open the tailgate.
X Lift the cargo compartment floor up
(Y page 259).
i Towing eye 0010is located under tire
inflation compressor 001A.
Vehiclesw ithatire-change tool kit X
Open the tailgate.
X Lift the carg ocompartmen tfloor up
(Y page 259).
X Remove the tire-change too lkit.
The tire-chang etoolkit contains:
R Jack
R Lug wrench
R One pair of gloves
R Foldin gwheel chock Flat tire
Preparing th
evehicle
Your vehicle may be equipped with:
R MOExtende dtires (tires with run-flat
properties )(Y page 295)
Vehicle preparation is not necessary on
vehicles with MOExtende dtires.
R aT IREFIT kit (Y page 294)
Information on changing/mounting awheel
(Y page 337).
X Stop the vehicle on solid, non-slippery and
level ground, as far away as possible from
traffic.
X Switch on the hazar dwarnin glamps.
X Secure the vehicle against rollin gaway
(Y page 152).
X If possible ,brin gthe front wheels int othe
straight-ahead position.
X Switch off the engine.
X Remove the SmartKey fro mthe ignition
lock. X
All occupant smust get out of the vehicle.
Make sure that the yare not endangered as
the ydos o.
X Make sure that no one is near the danger
area while awheel is being changed.
Anyone who is not directly assisting in the
wheel change should, for example, stand
behin dthe barrier.
X Get out of the vehicle. Pay attention to
traffic conditions when doing so.
X Close the driver's door.
i Vehicles equipped with MOExtende dtires
are not equipped with aTIREFIT kit at the
factory. It is therefore recommende dthat
you additionally equip your vehicle with a
TIREFIT kit if you moun ttires that do not
feature run-flat properties ,e.g. winter tires.
AT IREFIT kit can be obtained fro ma
qualified specialist workshop. MOExtended tires (tires with run-flat
properties)
General notes With MOExtende
dtires (tires with run flat
characteristics), you can continue to drive
your vehicle even if there is atotal loss of
pressure in one or mor etires. The affected
tir em ust not show any clearly visible damage.
You can recognize MOExtende dtires by the
MOExtende dmarking which appears on the
sidewall of the tire. You will fin dthis marking
nex ttot he tire size designation, the load-
bearing capacity and the speed index
(Y page 330).
MOExtended tires may only be used in
conjunction with an active tire pressure loss
warning system.
If the pressur eloss warning message
appears in the multifunction display:
R Observe the instructions in the display
messages (Y page 231).
R Check the tire for damage.
R If driving on, observe the following notes. Flat tire
295Breakdown assistance
Page 300 of 360
X
Press on/of fswitch 0021on th etirei nflation
compressor to ON.
The tir einflatio ncompressor is switched
on. The tire is inflated.
i First,t ire sealant is pumped into the tire.
The pressure can briefly rise to
approximately 500 kPa (5 bar/73 psi).
Do not switch off the tire inflation
compressor during this phase.
X Let the tire inflation compressor run for a
maximum of ten minutes. The tire should
then have attained apressure of at least
200 kPa (2.0 bar/29 psi).
! Do not operate the tire inflation
compressor for longer than ten minutes at
at ime without abreak. It may otherwise
overheat.
The tire inflation compressor can be
operated again once it has cooled down.
If at ire pressure of 200 kPa (2.0 ba r/29 psi)
is achieved after amaximu moften minutes,
see (Y page298).
If at ire pressure of 200 kPa (2.0 ba r/29 psi)
is not achieved after amaximu moften
minutes, see (Y page298).
i If tire sealant leaks out, allow it to dry .It
can then be removed like alayer of film.
If yourc lothes are soiled with tir esealant,
have the mcleaned with perchloroethylene
at ad ry cleaner as soon as possible.
Tir ep ressur enot reached If
ap ressure of 200 kPa (2.0 ba r/29 psi )has
not bee nachieved after ten minutes:
X Switch off the tire inflation compressor.
X Unscrew the filler hose from the valve of
the faulty tire.
X Very slowly drive forwards or reverse
approximately 30 ft (10 m).
X Pump up the tire again.
After amaximu moften minutes, the tire
pressure must be at least 200 kPa (2.0 bar/
29 psi). G
WARNING
If the required tire pressure is not reached
after the specified time, the tire is too badly
damaged. The tire sealant cannot repair the
tire in this instance. Damaged tires and atire
pressure that is too low can significantly
impair the vehicle's braking and driving
characteristics .There is arisk of accident.
Do not continue driving. Contact aqualified
specialist workshop.
Tire pressure reached G
WARNING
At ire temporarily sealed with tir esealant
impairs the drivin gcharacteristics and is not
suitable for higher speeds. There is arisk of
accident.
You should therefore adapt your drivin gstyle
accordingly and drive carefully. Do not exceed
the specified maximum speed with atiret hat
has been repaire dusing tir esealant.
! After use, excess tir esealant may run out
of the filler hose. This could cause stains.
Therefore, place the filler hose in the plastic
bag that contained the TIREFIT kit. H
Environmental note
Have the used tir esealant bottle dispose dof
professionally, e.g. at aqualifie dspecialist
workshop.
If at ire pressure of 200 kPa (2.0 ba r/29 psi)
has bee nachieved afte rten minutes:
X Switc hoff the tire inflation compressor.
X Unscrew the filler hose from the valve of
the faulty tire.
X Stow the tire sealant bottle and the tire
inflation compressor.
X Pull away immediately.
The maximum speed for atire sealed with tire
sealant is 50 mph (80k m/h). The upper part
of the TIREFIT sticker must be affixed to the
instrument cluster in the driver' sfieldof
vision. 298
Flat tireBreakdown assistance
Page 301 of 360
X
Stop afte rdriving for approximatel yten
minutes and check the tire pressure with
the tire inflation compressor.
The tire pressure mus tnow be at least
130 kPa (1.3 bar/19 psi). G
WARNING
If the required tire pressure is not reached
after driving for ashort period, the tire is too
badly damaged. The tire sealant cannot repair
the tire in this instance. Damaged tires and a
tire pressure that is too low can significantly
impair the vehicle's braking and driving
characteristics. There is arisk of accident.
Do not continue driving. Contact aqualified
specialist workshop.
X Correct the tire pressure if it is still at least
130 kPa (1.3 bar/19 psi) (for the values,
see the Tire and Loading Information
placard on the driver's side B-pillar or tire
pressure table on the fuel filler flap).
X To increase the tire pressure: switch on
the tire inflation compressor. X
To reduce the tire pressure: depress
pressure release button 001Anext to
pressure gauge 0010. X
To remove the tire sealant bottle from the
tire inflation compressor ,press together
the lockin gtabs on the yellow cap.
X Pull the tire sealant bottle out of the tire
inflation compressor.
The filler hose remains attached to the tire
sealant bottle.
X Stow the tire sealant bottle and the tire
inflation compressor.
X Drive to the nearest qualified specialist
workshop and have the tire changed there.
X Have the tire sealant bottle and the filler
hose replaced as soon as possible at a
qualified specialist workshop.
X Have the tire sealant bottle replaced every
four years at aqualified specialist
workshop. Battery (vehicle)
Important safety notes
Special tools and expert knowledge are
required when working on the battery, e.g.
removal and installing. You should therefore
have all work involving the battery carried out
at aq ualified specialist workshop. Battery (vehicle)
299Breakdown assistance Z
Page 307 of 360
Position number
0024identifies the charged batter yofthe other vehicle or an equivalent jump-
starting device.
X Press together cover 001Aof positive clamp 0010and slide it back.
X Connec tpositive terminal 0010on your vehicle to positive terminal 0023of donor battery 0024
using the jumper cable, beginning with your own battery.
X Start the engine of the donor vehicle and run it at idling speed.
X Connect negative terminal 0021of donor battery 0024to ground point 001Eof your vehicle using
the jumper cable, connectingt he jumper cable to battery of other vehicle 0024first.
X Start the engine.
X Before disconnectingt he jumper cables, let the engine run for several minutes.
X First,r emove the jumper cables from earth point 001Eand negative terminal 0021,then from
positive clamp 0010and positive terminal 0023.Begin each time at the contacts on your own
vehicle first.
X Close cover 001Aof positive terminal 0010after removing the jumper cables.
X Have the battery checked at aqualified specialist workshop.
i Jump-starting is not considered to be anormal operating condition.
i Jumper cables and further information regarding jump-starting can be obtained at any
qualified specialist workshop. Towing and tow-starting
Important safety notes
G
WARNING
Functions relevant to safety are restricted or
no longer available if:
R the engine is not running.
R the brake system or the power steerin gis
malfunctioning.
R there is amalfunction in the voltage supply
or the vehicle's electrical system.
If your vehicle is being towed, much more
force may be necessary to steer or brake.
There is arisk of an accident.
In such cases, use atow bar. Before towing,
make sure that the steering moves freely. G
WARNING
If the weight of the vehicle to be towed or tow-
started is greater than the permissible gross
weight of your vehicle:
R the towing eye could detach itself
R the vehicle/trailer combination could
rollover.
There is arisk of an accident.
When towing or tow-starting another vehicle,
its weight should not be greater than the
permissible gross weight of your vehicle.
Information on your vehicle's gross vehicle
weight rating can be found on the vehicle
identification plate (Y page 346). Towing and tow-starting
305Breakdown assistance Z
Page 308 of 360
!
When COLLISION PREVENTION ASSIST
PLUS, DISTRONIC PLUS or the HOLD
function is activated, the vehicle brakes
automaticallyinc ertain situations. To avoid
damage to the vehicle, deactivate these
systems in the following or similar
situations:
R when towing the vehicle
R in the car wash
! Only secure the tow rope or tow bar at the
towing eyes. Otherwise, the vehicle could
be damaged.
! Do not use the towing eyes for recovery
purposes as this could damage the vehicle.
If in doubt, recover the vehicle with acrane.
! When towing, pull aways lowlyand
smoothly. If the tractive power is too high,
the vehicles could be damaged.
! The vehicle can be towed amaximum of
30 miles (50km). The towing speed of
30 mph (50km/h) must not be exceeded.
If the vehicle has to be towed more than
30 miles (50km), the front axle must be
raised or the entire vehicle raised and
transported.
! Do not tow with sling-type equipment.
This could damage the vehicle.
! Vehicles with automatic transmission
must not be started by tow-starting. This
could otherwise damage the transmission.
It is better to have the vehicle transported
than to have it towed.
When towing avehicle, the transmission must
be in position N.
The battery must be connected and charged.
Otherwise, you:
R cannot turn the SmartKey to position 2in
the ignition lock
R cannot shift the transmission to position
N.
i Disarm the automatic locking feature
before the vehicle is towed (Y page 205).You could otherwise be locked out when
pushing or towing the vehicle. Installing/removing the towing eye
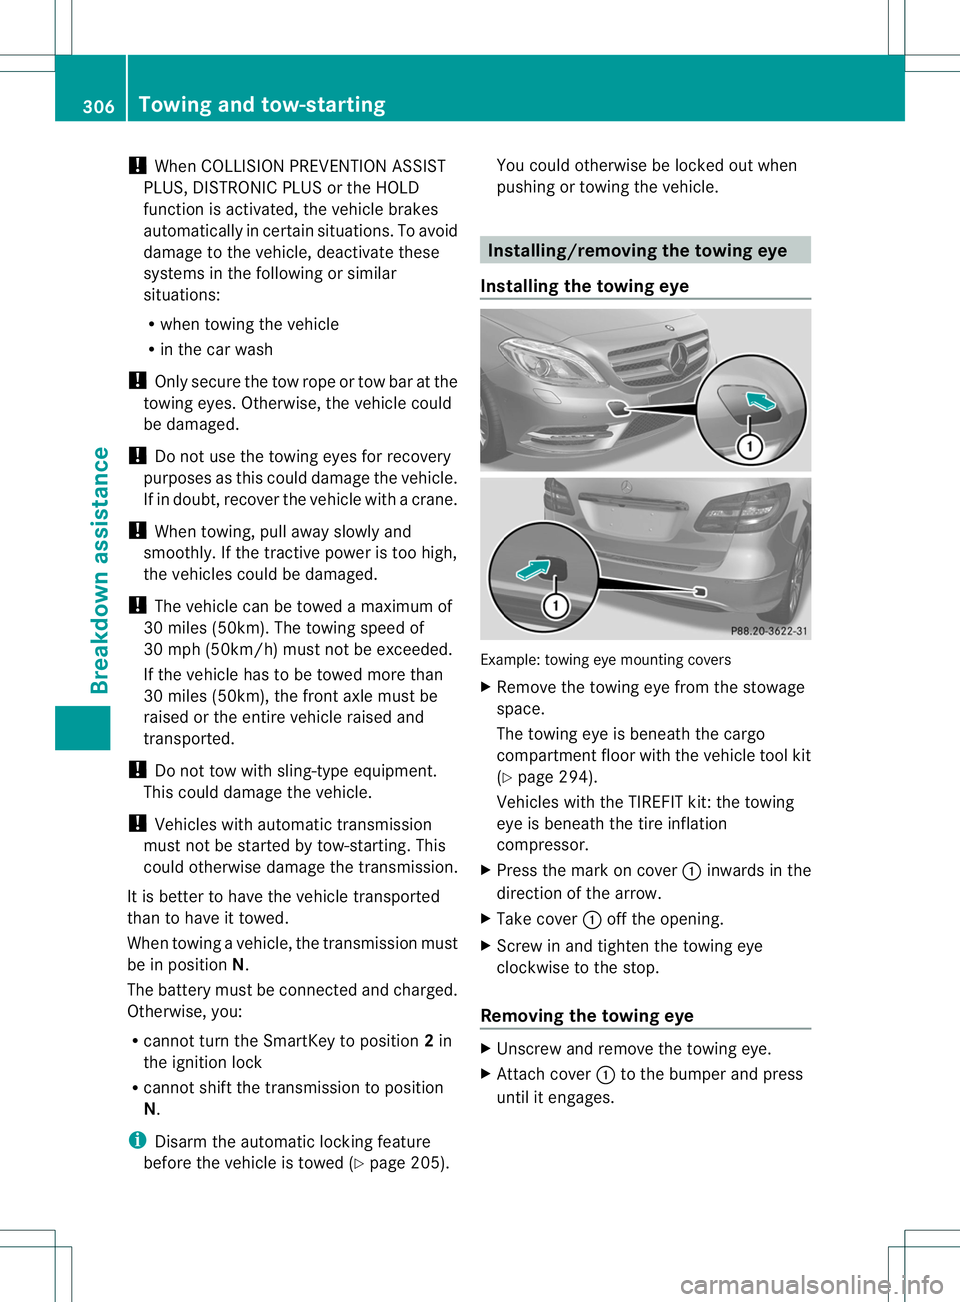
Installingt he towing eye Example: towing eye mounting covers
X
Remove the towing eye from the stowage
space.
The towing eye is beneath the cargo
compartment floor with the vehicle tool kit
(Y page 294).
Vehicles with the TIREFIT kit: the towing
eye is beneath the tire inflation
compressor.
X Press the mark on cover 001Ainwards in the
direction of the arrow.
X Take cover 001Aoff the opening.
X Screw in and tighten the towing eye
clockwise to the stop.
Removing the towing eye X
Unscrew and remove the towing eye.
X Attach cover 001Ato the bumper and press
until it engages. 306
Towing and tow-startingBreakdown assistance
Page 342 of 360
Have the tightening torqu
eimmediately
checked at aqualifie dspecialist workshop
after awheel is changed. X
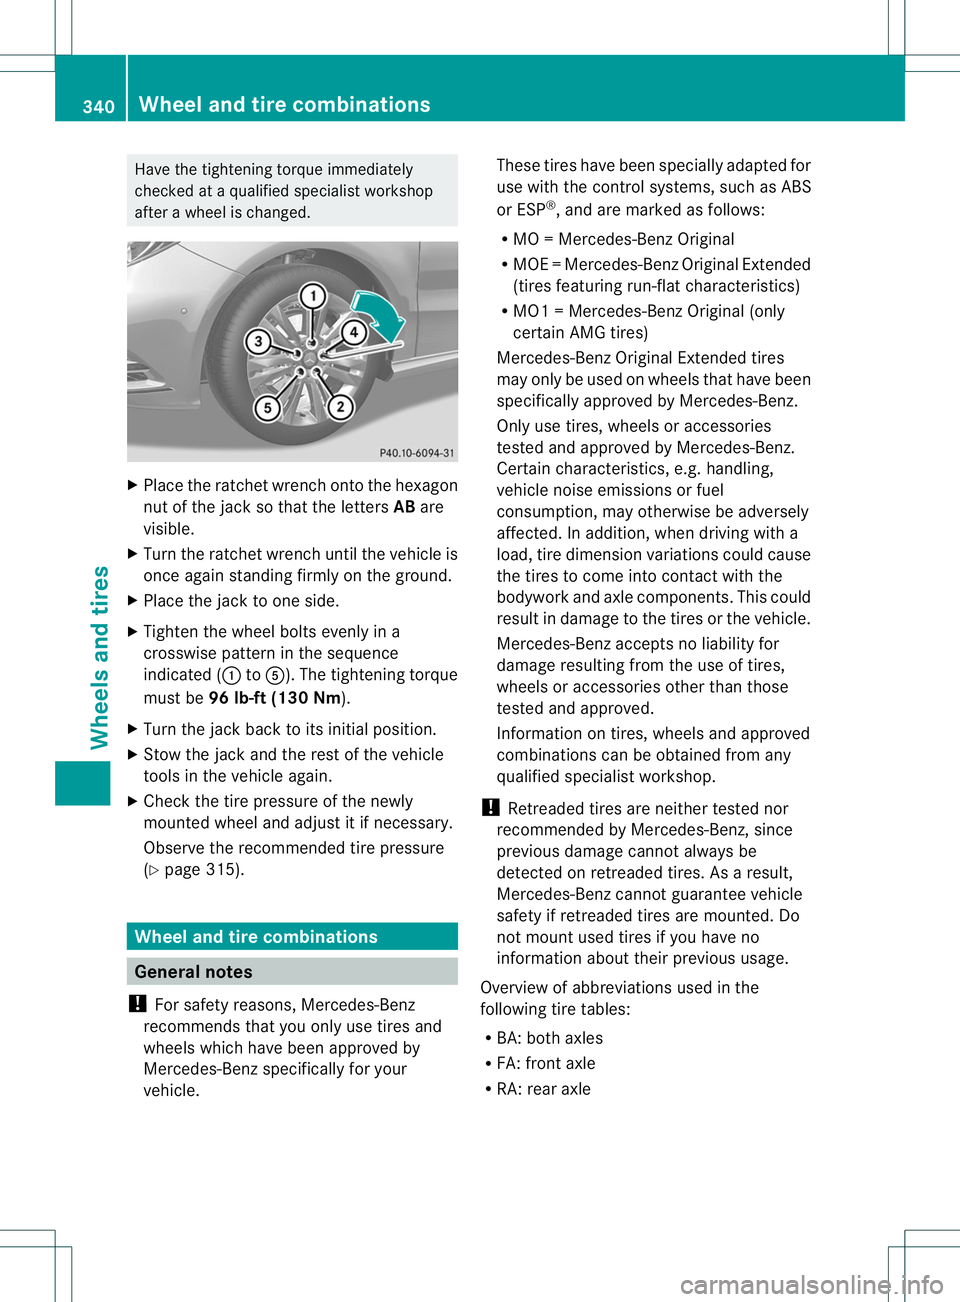
Place the ratche twrench onto the hexagon
nut of the jack so that the letters ABare
visible.
X Turn the ratchet wrench until the vehicl eis
once again standing firmly on the ground.
X Place the jack to one side.
X Tighten the whee lbolts evenly in a
crosswise pattern in the sequence
indicated ( 001Ato001E). The tightening torque
must be 96 lb-ft (130Nm ).
X Turn the jack back to its initia lposition.
X Stow the jack and the rest of the vehicle
tools in the vehicl eagain.
X Check the tire pressure of the newly
mounted whee land adjust it if necessary.
Observe the recommende dtire pressure
(Y page3 15). Wheel and tire combinations
General notes
! For safety reasons, Mercedes-Benz
recommends that you only use tires and
wheels which have been approved by
Mercedes-Benz specifically for your
vehicle. These tires have been speciallya
dapted for
use with the control systems ,such as ABS
or ESP ®
,a nd are marked as follows:
R MO =Mercedes-BenzO riginal
R MOE =Mercedes-BenzO riginal Extended
(tires featuring run-flat characteristics)
R MO1 =Mercedes-BenzO riginal (only
certain AMG tires)
Mercedes-Benz Original Extended tires
may only be used on wheels that have been
specificall yapproved by Mercedes-Benz.
Only use tires, wheels or accessories
tested and approved by Mercedes-Benz.
Certain characteristics, e.g. handling,
vehicl enoise emissions or fuel
consumption, may otherwise be adversely
affected. In addition, when driving with a
load, tire dimension variations coul dcause
the tires to come into contact with the
bodywork and axle components. This could
resul tind amage to th etires or th evehicle.
Mercedes-Ben zaccepts no liability for
damag eresulting from the us eoftires,
wheel soraccessorie sothe rthan those
tested and approved.
Information on tires, wheels and approved
combinations can be obtained from any
qualified specialist workshop.
! Retreaded tires are neither tested nor
recommended by Mercedes-Benz, since
previous damage cannot always be
detected on retreaded tires. As aresult,
Mercedes-Ben zcannot guarante evehicle
safety if retreade dtires are mounted. Do
no tm ount used tires if you have no
information about their previous usage.
Overview of abbreviations used in the
following tire tables:
R BA: both axles
R FA: front axle
R RA: rear axle 340
Wheel and tirec
ombinationsWheels and tires