2014 Lancia Voyager phone
[x] Cancel search: phonePage 174 of 364

INFORMATION MODE DISPLAY...........209
NUMERIC KEYPAD MENU ................209
DISC MENU .......................... .209
DISPLAY SETTINGS ................... .209
LISTENING TO AUDIO WITH THE SCREEN CLOSED ............................. .210
DISC FORMATS ....................... .210
DISPLAY ............................ .213
PRODUCT AGREEMENT .................215
STEERING WHEEL AUDIO CONTROLS .......217
RADIO OPERATION .................... .218
CDPLAYER...........................218
CD/DVD DISC MAINTENANCE ..............218
RADIO OPERATION AND MOBILE PHONES . . . .218
CLIMATE CONTROLS .................... .219
AUTOMATIC TEMPERATURE CONTROL (ATC) ............................... .219
SUMMER OPERATION ...................224
WINTER OPERATION ...................225
VACATION/STORAGE ...................225
WINDOW FOGGING ................... .225
OUTSIDE AIR INTAKE ...................225
A/CAIRFILTER .......................225
OPERATING TIPS ..................... .225
168
Page 193 of 364
may need to be driven several min-
utes before the updated tempera-
ture is displayed. Engine tempera-
ture can also affect the displayed
temperature; therefore, tempera-
ture readings are not updated
when the vehicle is not moving.
Automatic Compass Calibration
This compass is self-calibrating,
which eliminates the need to manu-
ally reset the compass. When the ve-
hicle is new, the compass may appear
erratic and the EVIC will display CAL
until the compass is calibrated. You
may also calibrate the compass by
completing one or more 360–degree
turns (in an area free from large metal
or metallic objects) until the CAL in-
dicator displayed in the EVIC turns
off. The compass will now function
normally.
NOTE: A good calibration re-
quires a level surface and an envi-
ronment free from large metallic
objects such as buildings, bridges,
underground cables, railroad
tracks, etc.Manual Compass Calibration (for
versions/markets, where
provided)
If the compass appears erratic and the
CAL indicator does not appear in the
EVIC display, you must put the com-
pass into the Calibration Mode manu-
ally, as follows:
1. Turn ON the ignition switch.
2. Press the UP or DOWN button un-
til the Setup (Customer-
Programmable Features) menu is
reached, then press the SELECT but-
ton.
3. Press the DOWN button until
“Calibrate Compass” is displayed in
the EVIC.
4. Press and release the SELECT
button to start the calibration. The
“CAL” indicator will be displayed in
the EVIC.
5. Complete one or more 360–degree
turns (in an area free from large metal
or metallic objects) until the “CAL”
indicator turns off. The compass will
now function normally.Compass Variance
Compass Variance is the difference
between Magnetic North and Geo-
graphic North. To compensate for the
differences the variance should be set
for the zone where the vehicle is
driven, per the zone map. Once prop-
erly set, the compass will automati-
cally compensate for the differences,
and provide the most accurate com-
pass heading. For the most accurate
compass performance, the compass
must be set using the following steps.
NOTE: Keep magnetic materials
away from the top of the instru-
ment panel, such as iPod's, Mobile
Phones, Laptops and Radar Detec-
tors. This is where the compass
module is located, and it can cause
interference with the compass sen-
sor, and it may give false readings.
187
Page 197 of 364
highlighted, then press and release the
SELECT button until a check-mark
appears next to the setting, showing
that the setting has been selected.
Headlamps with Wipers
(Available with Auto Headlights
Only) (for versions/markets,
where provided)
When ON is selected, and the head-
light switch is in the AUTO position,
the headlights will turn on approxi-
mately 10 seconds after the wipers are
turned on. The headlights will also
turn off when the wipers are turned
off if they were turned on by this
feature. To make your selection, press
and release the SELECT button until
a check-mark appears next to the set-
ting, showing that the setting has been
selected.
NOTE: Turning the headlights on
during the daytime causes the in-
strument panel lights to dim. To
increase the brightness, refer to
“Lights” in “Understanding The
Features Of Your Vehicle.”Intermittent Wiper Options (for
versions/markets, where
provided)
When this feature is selected, the
driver can choose to have the stan-
dard intermittent wiper operation or
rain sensing auto wiper operation that
senses moisture on the windshield and
automatically activates the wipers. To
make your selection, scroll up or
down until the preferred setting is
highlighted, then press and release the
SELECT button until a check-mark
appears next to the setting showing
that the setting has been selected.
Key-Off Power Delay
When this feature is selected, the
power window switches, radio,
Uconnect® phone (for versions/
markets, where provided), DVD video
system (for versions/markets, where
provided), power sunroof (for
versions/markets, where provided),
and power outlets will remain active
for up to 10 minutes after the ignition
switch is turned OFF. Opening either
front vehicle door will cancel this fea-
ture. To make your selection, scroll upor down until the preferred setting is
highlighted, then press and release the
SELECT button until a check-mark
appears next to the setting, showing
that the setting has been selected.
Illuminated Approach
When this feature is selected, the
headlights will activate and remain on
for up to 90 seconds when the doors
are unlocked with the RKE transmit-
ter. To make your selection, scroll up
or down until the preferred setting is
highlighted, then press and release the
SELECT button until a check-mark
appears next to the setting, showing
that the setting has been selected.
Flashers with Sliding Door (for
versions/markets, where
provided)
When this feature is selected the sig-
nal lamps activate when power or
manual sliding doors are in operation,
signaling other drivers that someone
may be exiting or entering the vehicle.
To make your selection, press and re-
lease the SELECT button until a
191
Page 199 of 364
NOTE: If your vehicle has experi-
enced any damage in the area
where the sensor is located, even if
the fascia is not damaged, the sen-
sor may have become misaligned.
Take your vehicle to an authorized
dealer to verify sensor alignment.
Having a sensor that is misaligned
will result in the BSM not operat-
ing to specification.
Calibrate Compass (for
versions/markets, where
provided)
Refer to “Compass Display” for more
information.
Compass Variance (for
versions/markets, where
provided)
Refer to “Compass Display” for more
information.
Turn Menu Off
Press and release SELECT to turn the
menu off.SOUND SYSTEMS
Refer to your Sound Systems Booklet.
NAVIGATION SYSTEM
(for versions/markets,
where provided)
Refer to your Uconnect® User Manual.
iPod®/USB/MP3
CONTROL (for
versions/markets, where
equipped)
NOTE: This section is for sales
code RES and REQ/REL/RET ra-
dios only with Uconnect®. For
sales code RBZ/RHB, RHR, RHP,
RHW or RB2 touch-screen radio
iPod®/USB/MP3 control feature,
refer to the separate RBZ/RHB,
RHR, RHP, RHW or RB2 User's
Manual. iPod®/USB/MP3 control
is available only for versions/
markets, where provided with
these radios.This feature allows an iPod® or exter-
nal USB device to be plugged into the
USB port, located in the glove com-
partment.
iPod® control supports Mini, 4G,
Photo, Nano, 5G iPod® and iPhone®
devices. Some iPod® software ver-
sions may not fully support the iPod®
control features. Please visit Apple’s
website for software updates.
NOTE:
If the radio has a USB port, refer
to the appropriate Uconnect®
Multimedia radio User’s Manual
for iPod® or external USB de-
vice support capability.
Connecting an iPod® or con- sumer electronic audio device to
the AUX port located in the ra-
dio faceplate, plays media, but
does not use the iPod® /MP3
control feature to control the
connected device.
193
Page 203 of 364
WARNING!
Do not plug in or remove the iPod®
or external USB device while driv-
ing. Failure to follow this warning
could result in an accident.
BLUETOOTH STREAMING
AUDIO (BTSA)
Music can be streamed from your cel-
lular phone to the Uconnect® phone
system.
Uconnect® MULTIMEDIA
VIDEO
ENTERTAINMENT
SYSTEM (VES™) (for
versions/markets, where
provided)
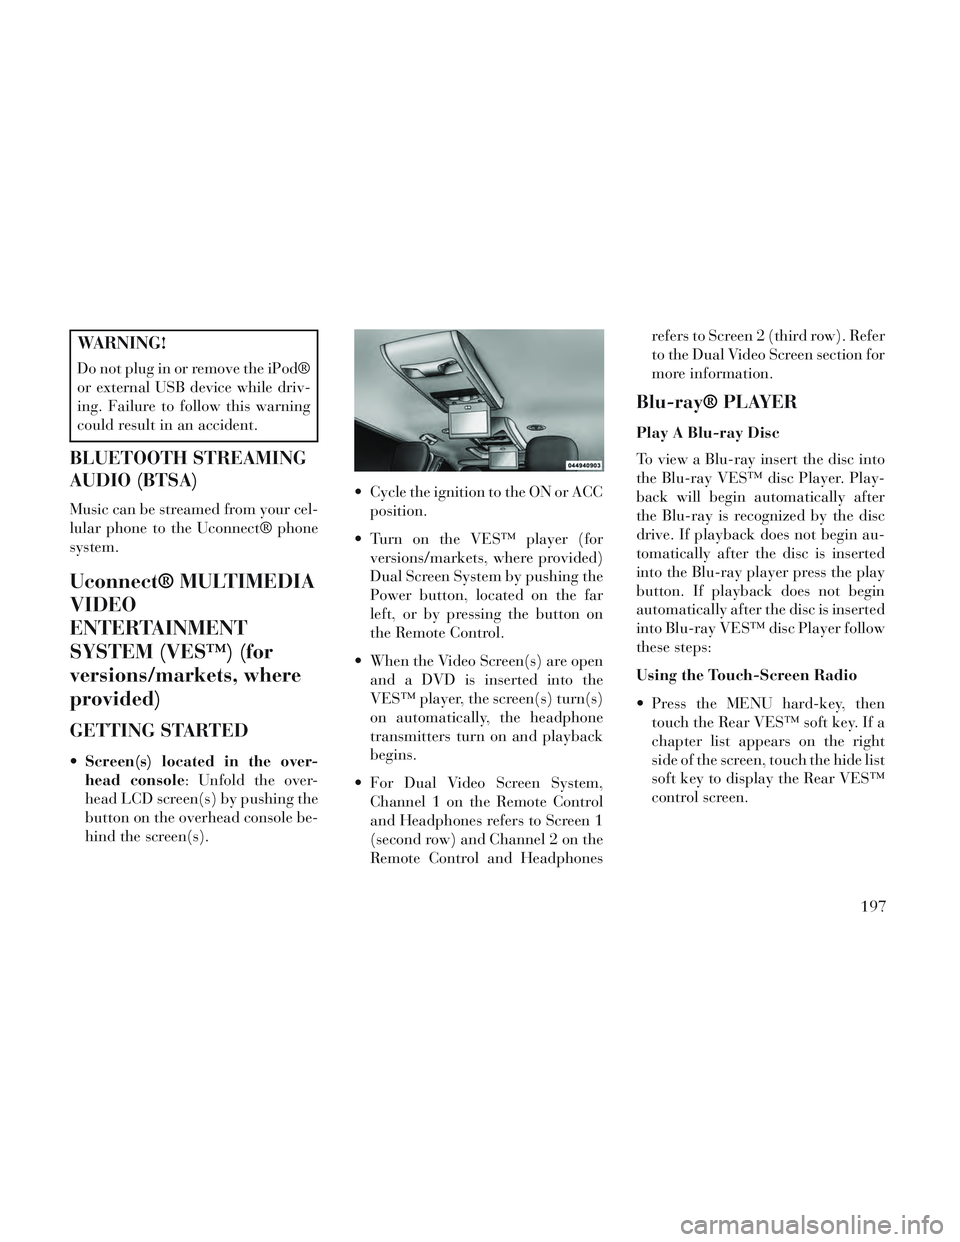
GETTING STARTED
Screen(s) located in the over-
head console: Unfold the over-
head LCD screen(s) by pushing the
button on the overhead console be-
hind the screen(s). Cycle the ignition to the ON or ACC
position.
Turn on the VES™ player (for versions/markets, where provided)
Dual Screen System by pushing the
Power button, located on the far
left, or by pressing the button on
the Remote Control.
When the Video Screen(s) are open and a DVD is inserted into the
VES™ player, the screen(s) turn(s)
on automatically, the headphone
transmitters turn on and playback
begins.
For Dual Video Screen System, Channel 1 on the Remote Control
and Headphones refers to Screen 1
(second row) and Channel 2 on the
Remote Control and Headphones refers to Screen 2 (third row). Refer
to the Dual Video Screen section for
more information.
Blu-ray® PLAYER
Play A Blu-ray Disc
To view a Blu-ray insert the disc into
the Blu-ray VES™ disc Player. Play-
back will begin automatically after
the Blu-ray is recognized by the disc
drive. If playback does not begin au-
tomatically after the disc is inserted
into the Blu-ray player press the play
button. If playback does not begin
automatically after the disc is inserted
into Blu-ray VES™ disc Player follow
these steps:
Using the Touch-Screen Radio
Press the MENU hard-key, then
touch the Rear VES™ soft key. If a
chapter list appears on the right
side of the screen, touch the hide list
soft key to display the Rear VES™
control screen.
197
Page 204 of 364
Touch the 1 soft-key to select anaudio channel, then touch the
VES™ Disc soft-key in the media
column.
Using the Remote Control
Select an audio channel (Channel 1 for 2nd row screen and Channel 2
for 3rd row screen), then press the
source key and select VES™ Disc
from the menu.
Press popup/menu key to navigate disc menu and options.
NOTE: Due to the size of the con-
tent on a Blu-ray disc, the disc may
not start playing immediately.
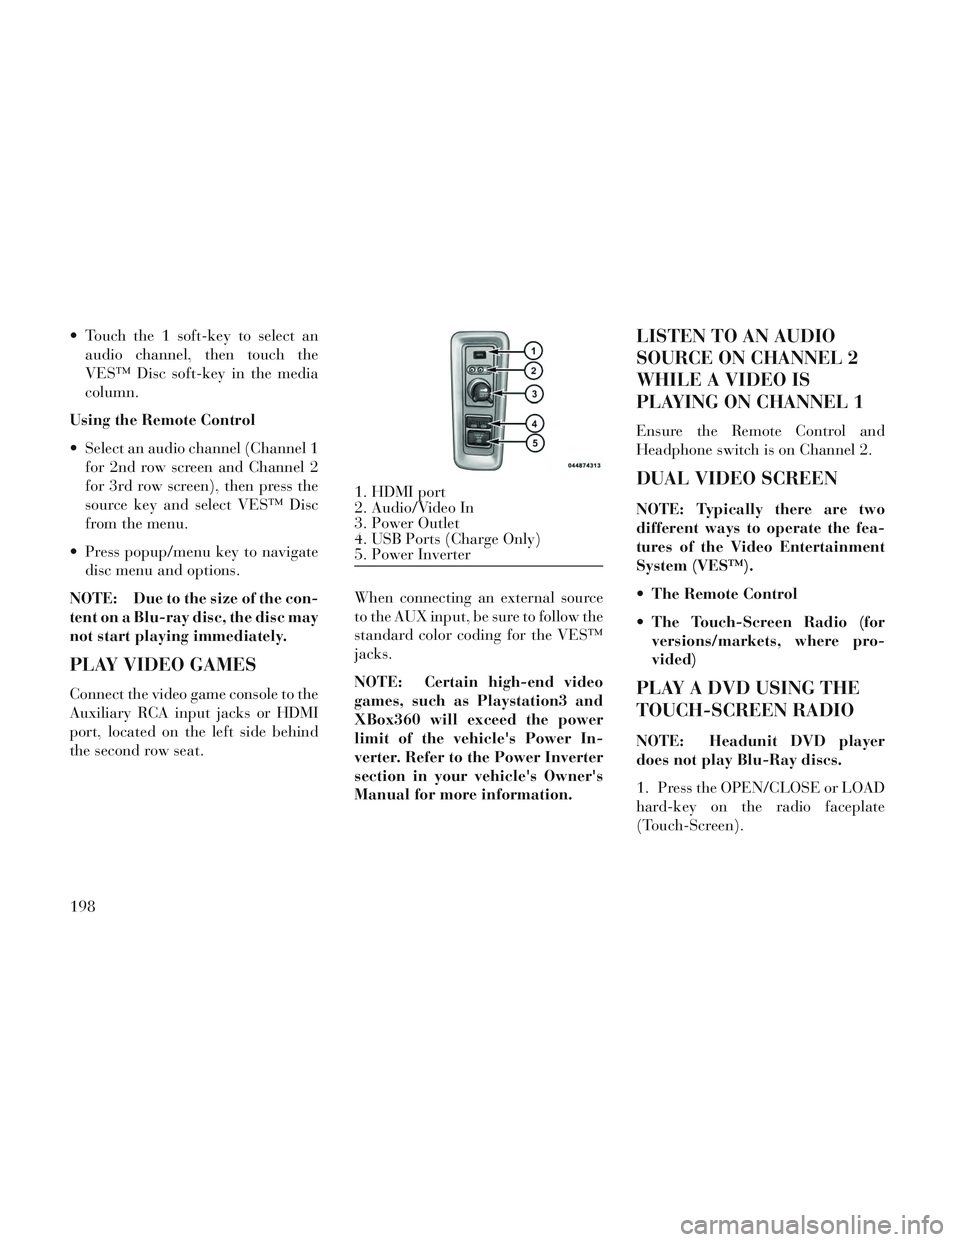
PLAY VIDEO GAMES
Connect the video game console to the
Auxiliary RCA input jacks or HDMI
port, located on the left side behind
the second row seat. When connecting an external source
to the AUX input, be sure to follow the
standard color coding for the VES™
jacks.
NOTE: Certain high-end video
games, such as Playstation3 and
XBox360 will exceed the power
limit of the vehicle's Power In-
verter. Refer to the Power Inverter
section in your vehicle's Owner's
Manual for more information.
LISTEN TO AN AUDIO
SOURCE ON CHANNEL 2
WHILE A VIDEO IS
PLAYING ON CHANNEL 1
Ensure the Remote Control and
Headphone switch is on Channel 2.
DUAL VIDEO SCREEN
NOTE: Typically there are two
different ways to operate the fea-
tures of the Video Entertainment
System (VES™).
The Remote Control
The Touch-Screen Radio (for
versions/markets, where pro-
vided)
PLAY A DVD USING THE
TOUCH-SCREEN RADIO
NOTE: Headunit DVD player
does not play Blu-Ray discs.
1. Press the OPEN/CLOSE or LOAD
hard-key on the radio faceplate
(Touch-Screen).
1. HDMI port
2. Audio/Video In
3. Power Outlet
4. USB Ports (Charge Only)
5. Power Inverter
198
Page 205 of 364
2. Insert the DVD with the label fac-
ing up. The radio automatically se-
lects the appropriate mode after the
disc is recognized and displays the
menu screen or starts playing the first
track.
3. To watch a DVD on Screen 1 for
second row passengers, ensure the Re-
mote Control and Headphone switch
is on Channel 1.
4. To watch a DVD on Screen 2 for
third row passengers, ensure the Re-
mote Control and Headphone switch
is on Channel 2.
Using The Remote Control
1. Press the SOURCE button on the
Remote Control.
2. While looking at Screen 1 or 2,
highlight DISC by either pressing Up/
Down/Left/Right buttons or by re-
peatedly pressing the SOURCE but-
ton, then press ENTER/OK.NOTE:
Channel/Screen 1 select mode
information is shown on the left
side of the screen.
Channel/Screen 2 select mode information is shown on the
right side of the screen.
The VES™ will retain the last setting when turned off.
Using The Touch-Screen Radio
Controls
1. Press the MENU hard-key on the
radio faceplate.
2. Touch the Rear VES soft-key to
display the Rear VES Controls. If a
channel list is displayed, press the
HIDE LIST soft-key to display the
Rear VES Controls screen.
3. Touch the 1 or 2 soft-key and then
the DISC soft-key in the MEDIA col-
umn. To exit touch the back arrow at
the top left of the screen. NOTE:
To view a DVD on the radio
press the RADIO/MEDIA hard-
key, on the radio faceplate, then
touch the DISC tab soft-key and
then the VIEW VIDEO soft-key.
Viewing a DVD on the Touch- Screen radio screen is not avail-
able in all states/provinces. If
available, the vehicle must be
stopped and the shift lever must
be in the PARK position for ve-
hicles with an automatic trans-
mission. In vehicles with a
manual transmission the park-
ing brake must be engaged.
Touching the screen on a Touch- Screen radio while a DVD is
playing brings up basic remote
control functions for DVD play
such as scene selection, Play,
Pause, FF, RW, and Stop. Press-
ing the X in the upper corner
will turn off the remote control
screen functions.
199
Page 206 of 364
PLAY A DVD USING THE
VES™ PLAYER (for
versions/markets, where
provided)
1. Insert the DVD with the label fac-
ing up. The VES™ player automati-
cally selects the appropriate mode af-
ter the disc is recognized and starts
playing the DVD.
NOTE: The VES™ player has ba-
sic DVD control function such as
Menu, Play, Pause, FF, RW and
Stop.
2. To watch a DVD on Screen 1 for
second row passengers, ensure the Re-
mote Control and Headphone switch
is on Channel 1.
3. To watch a DVD on Screen 2 for
third row passengers, ensure the Re-
mote Control and Headphone switch
is on Channel 2.
Using The Remote Control
1. Press the SOURCE button on the
Remote Control.2. While looking at Screen 1 or 2,
highlight VES DISC by either press-
ing Up/Down/Left/Right buttons or
by repeatedly pressing the SOURCE
button, then press ENTER/OK on the
Remote Control.
NOTE:
Channel/Screen 1 select mode
information is shown on the left
side of the screen.
Channel/Screen 2 select mode information is shown on the
right side of the screen.
The VES™ will retain the last setting when turned off.
Using The Touch-Screen Radio
Controls
1. Press the MENU hard-key on the
radio faceplate.
2. Touch the Rear VES soft-key to
display the Rear VES Controls. If a
channel list is displayed, touch the
HIDE LIST soft-key to display the
Rear VES Controls screen. 3. Touch the 1 or 2 soft-key and then
the DISC soft-key in the VES column.
To exit touch the back arrow soft-key
at the top left of the screen.
NOTE:
To view a DVD on the radio
press the RADIO/MEDIA hard-
key, on the radio faceplate, then
touch the DISC tab soft-key and
then the VIEW VIDEO soft-key.
Viewing a DVD on the Touch- Screen radio screen is not avail-
able in all states/provinces. If
available, the vehicle must be
stopped and the shift lever must
be in the PARK position for ve-
hicles with an automatic trans-
mission. In vehicles with a
manual transmission the park-
ing brake must be engaged.
200