2014 Lancia Voyager remote control
[x] Cancel search: remote controlPage 215 of 364

1. CD: Ability to Fast Forward, Re-
wind, Scan, and Track Up/Down.
2. CD Changer (in radio): Ability to
Disk Up/Down and program all listed
CD controls (Fast Forward, Rewind,
Scan, and Track Up/Down).
The VES™ can even control radio
modes or video modes while the radio
is turned off. The VES™ can access
the radio modes or disc modes by
navigating to those modes on the
VES™ and activating a radio mode or
disc mode.
INFORMATION MODE
DISPLAY
1. Channel 1 Mode2. Channel 1 Audio Only/Mute
3. Channel 2 Audio Only/Mute
4. Channel 2 Mode
5. Remote Control Lock Out
6. Clock
7. Source Mode
NUMERIC KEYPAD MENU
When the display for either Channel 1
or Channel 2 shows DIRECT TUNE,
pressing the remote control’s OK but-
ton activates a numeric keypad menu.
This screen makes it easy to enter a
specific tuner frequency, or track
number. To enter the desired digit:
1. Press the remote control’s naviga-
tion buttons (▲,
▼,►,◄) to navi-
gate to the desired digit.
2. When the digit is highlighted,
press the remote control’s
ENTER/OK button to select the digit.
Repeat these steps until all digits are
entered. 3. To delete the last digit, navigate to
the Del button and press the remote
control’s ENTER/OK button.
4. After all of the digits are entered,
navigate to the Go button and press
the remote control’s ENTER/OK but-
ton.
DISC MENU
When listening to a CD Audio or CD
Data disc, pressing the remote con-
trol’s POP UP/MENU button displays
a list of all commands which control
playback of the disc. Using the op-
tions you can activate or cancel Scan
play and Random play.
DISPLAY SETTINGS
When watching a video source (DVD
Video with the disc in Play mode, Aux
Video, etc.), pressing the remote con-
trol’s SETUP button activates the
Display Settings menu. These settings
control the appearance of the video on
the screen. The factory default set-
tings are already set for optimum
viewing, so there is no need to change
these settings under normal circum-
stances.
Information Mode Video Screen
Display
209
Page 216 of 364

To change the settings, press the re-
mote control’s navigation buttons (▲,
▼) to select an item, then press the
remote control’s navigation buttons
(►, ◄) to change the value for the
currently selected item. To reset all
values back to the original settings,
select the Default Settings menu op-
tion and press the remote control’s
ENTER/OK button.
Disc Features control the remote DVD
/ Blu-ray Disc player's (for versions/
markets, where provided) settings of
DVD being watched in the remote
player.
LISTENING TO AUDIO
WITH THE SCREEN
CLOSED
To listen to only audio portion of the
channel with the screen closed:
Set the audio to the desired source and channel.
Close the video screen.
To change the current audio mode, press the remote control’s MODE button. This will automatically se-
lect the next available audio mode
without using the MODE/SOURCE
Select menu.
If the screen is closed and there is no
audio heard, verify that the head-
phones are turned on (the ON indica-
tor is illuminated) and the headphone
selector switch is on the desired chan-
nel. If the headphones are turned on,
press the remote control’s power but-
ton to turn audio on. If audio is still
not heard, check that fully charged
batteries are installed in the head-
phones.
DISC FORMATS
The VES™ DVD player is capable of
playing the following types of discs
(12 cm or 8 cm diameter):
DVD-Video discs (MPEG-2 video compression) (see notes about DVD
Region Codes)
DVD-Audio discs (2 channel audio output only)
Audio Compact Discs (CDs) CD Data discs with MP3 and WMA
compressed audio format files
Video CDs (MPEG-1 video com- pression)
The Blu-Ray player is capable of the
playing the following types of discs
(12 cm diameter):
BD: BDMV (Profile 1.1), BDAV,
DVD: DVD-Video, DVD-Audio, AVCREC, AVCHD, DVD-VR
CD: CD-DA, VCD, CD-TEXT
DVD/CD: MP3, WMA, AAC, DivX (versions3–6)pr ofile 3.0
Compressed Video Files (DivX)
The Blu-ray player is capable of play-
ing DivX files from a CD disc (usually
a CD-R, CD-RW) or a DVD disc (usu-
ally a DVD-R, DVD+R, DVD-RW or
DVD+RW).
The Blu-ray player always uses the file extension to determine the
video format, so DivX files must
always end with the extension
“.div”, “divx” or “.avi”. To prevent
210
Page 217 of 364
incorrect playback, do not use these
extensions for any other types of
files.
For DivX files, only DivX Home Theater Profile Ver.3.0 is
supported.
Any file that is copy protected will not play. The Blu-ray player will
automatically skip the file and be-
gin playing the next available file.
Other compression formats such as Xvid and RMP4 will not play. The
Blu-ray player will automatically
skip the file and begin playing the
next available file.
For the lack of indexes DivX files, “Resume Play, “Fast Forward” and
“Fast Rewind” cannot be
supported.
DivX Home Theater Profile 3.0 re- quires:
Maximum resolution 720 x 480 @ 30fps or 720 x 576 @ 25fps
Minimum resolution 16 x 16 Maximum frame rate for pro-
gressive source 30 frames per
second
Maximum field rate for inter- laced source 60 fields per second
To change the current chapter, use the remote control’s or Blu-ray
player’s “Fast Forward” button to
advance to the next chapter, or the
“Fast Rewind” button to return to
the start of the current or previous
chapter.
DVD/Blu-ray/BD Region Codes
The VES™ DVD player/Blu-ray
player and many DVD/Blu-ray discs
are coded by geographic region. These
region codes must match in order for
the disc to play. If the region code for
the DVD/Blu-ray disc does not match
the region code for the player, the disc
will stop playing and a warning will
be displayed.
DVD Audio Support
When a DVD-Audio disc is inserted in
the VES™ DVD player, the DVD-
Audio title on the disc is played by
default (most DVD-Audio discs also have a Video title, but the Video title is
ignored). All multi - channel program
material is automatically mixed down
to two channels, which may result in a
lowered apparent volume level. If you
increase the volume level to account
for this change in level, remember to
lower the volume before changing the
disc or to another mode.
Recorded Discs
The VES™ DVD player will play
CD-R and CD-RW discs recorded in
CD-Audio or Video-CD format, or as
a CD-ROM containing MP3, WMA or
AAC (Blu-ray Disc Player only) files.
The player will also play DVD-Video
content recorded to a DVD-R or
DVD-RW disc. DVD-ROM discs (ei-
ther pressed or recorded) are not sup-
ported.
If you record a disc using a personal
computer, there may be cases where
the VES™ DVD player may not be
able to play some or the entire disc,
even if it is recorded in a compatible
211
Page 219 of 364
player will automatically skip the
file and begin playing the next
available file.
If you are creating your own files, the recommended fixed bit rate for
MP3 files is between 96 and 192
Kbps and the recommended fixed
bit rate for WMA files is between 64
and 192 Kbps. Variable bit rates
are also supported. For both for-
mats, the recommended sample
rate is either 44.1 kHz or 48 kHz.
To change the current file, use the DVD player’s ▲button to advance
to the next file, or the ▼button to
return to the start of the current or
previous file.
To change the current directory, use the remote control’s PROG UP and
Down buttons or Rewind/skip back
and fast fwd/skip forward.
Disc Errors
If the DVD player is unable to read the
disc, a "Disc Error" message is dis-
played on the VES™ and Radio dis-
plays and the disc is automatically ejected. A dirty, damaged, or incom-
patible disc format are all potential
causes for a "Disc Error" message.
If a disc has a damaged track which
results in audible or visible errors that
persists for 2.0 seconds, the DVD
player will attempt to continue play-
ing the disc by skipping forward 1.0
to 3.0 seconds at a time. If the end of
the disc is reached, the DVD player
will return to the beginning of the disc
and attempt to play the start of the
first track.
The DVD player may shut down dur-
ing extremely hot conditions, such as
when the vehicle’s interior tempera-
ture is above 120° F. The Blu-ray
player may shut down when the vehi-
cle's interior temperature exceeds
140° F. When this occurs, the DVD /
Blu-ray player will display "VES
High Temp" and will shut off the
VES™ displays until a safe tempera-
ture is reached. This shutdown is nec-
essary to protect the optics of the DVD
/ Blu-ray player.
The Blu-ray player may require addi-
tional reading time during extremelycold weather conditions. When this
occurs, allow the vehicles interior
temperature to warm, then insert disc
into player.
DISPLAY
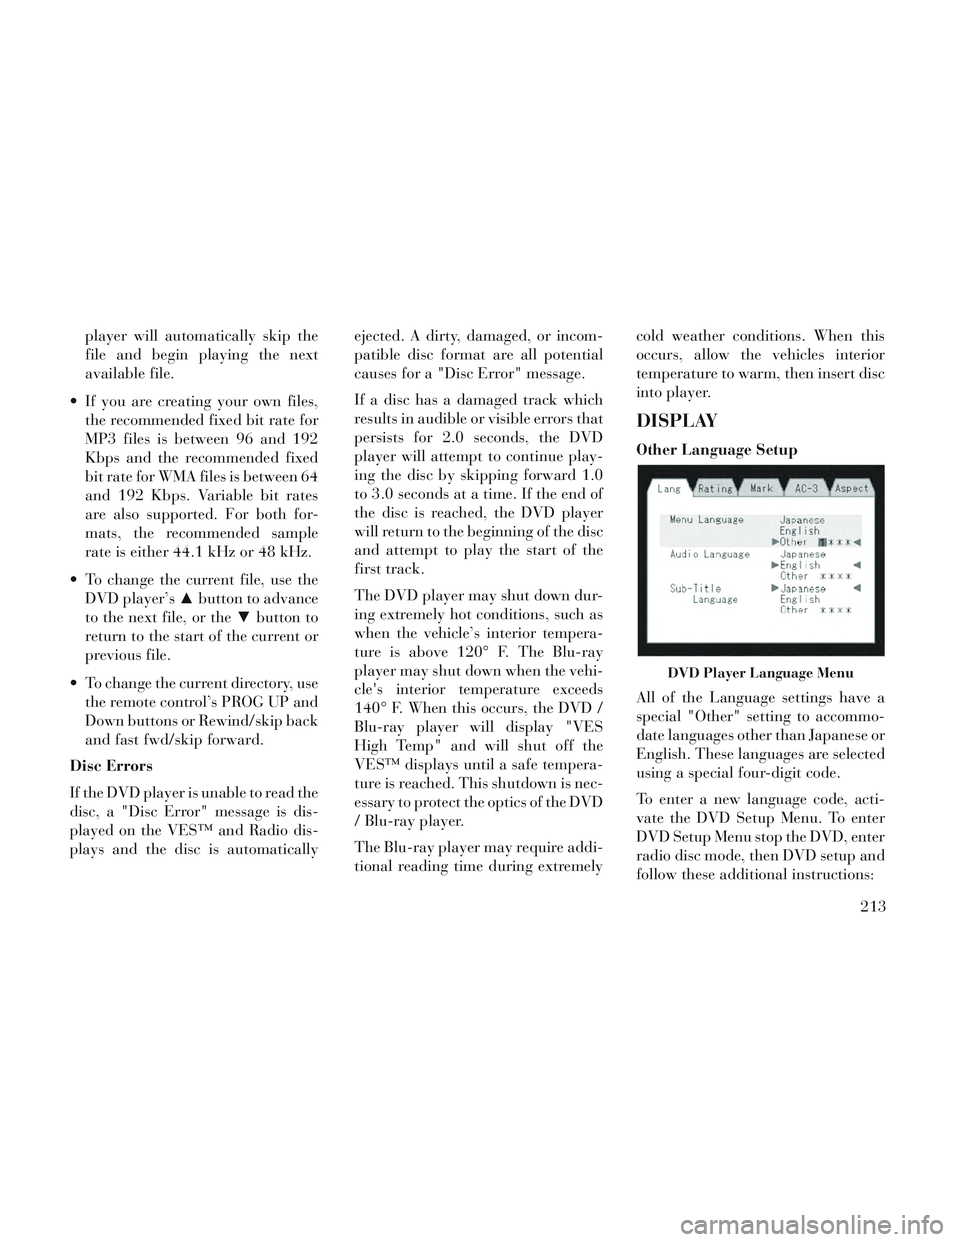
Other Language Setup
All of the Language settings have a
special "Other" setting to accommo-
date languages other than Japanese or
English. These languages are selected
using a special four-digit code.
To enter a new language code, acti-
vate the DVD Setup Menu. To enter
DVD Setup Menu stop the DVD, enter
radio disc mode, then DVD setup and
follow these additional instructions:
DVD Player Language Menu
213
Page 220 of 364
Using the remote control Up andDown cursor buttons, highlight the
Language item you want to edit,
and then press the remote control
ENTER/OK button.
Using the remote control Down cur- sor button, select the "Other" set-
ting, then press the remote control’s
Right cursor button to begin editing
the setting.
Using the remote control Up and Down cursor buttons, select a digit
for the current position. After se-
lecting the digit, press the remote
control’s Right cursor button to se-
lect the next digit. Repeat this digit
selection sequence for all four
digits.
When the entire four-digit code is entered, press the remote control’s
ENTER/OK button. If the language
code is not valid, the numbers all
change back to "*". If the digits are
visible after this step, then the lan-
guage code is valid.
Here is an abbreviated list of language
codes. For more language codes, please contact the dealer where the
vehicle was purchased.
Lan-
guage
Code Lan-
guageCode
Dutch 2311 French 1517
Ger-
man 1304 Ital-
ian1819
Portu-
guese 2519 Span-
ish1418
Rating and Password Setup
The Rating and Password settings
work together to control the types of
DVDs that your family watches. Most
DVD-Video discs have a rating (from
1 to 8) assigned to them where lower
numbers are designated for all audi-
ences and higher numbers are desig-
nated for more adult audiences.
When a DVD-Video disc is loaded, its
rating is compared to the setting in the
DVD player. If the rating of the disc is
higher than the setting in the player, a
Password screen is displayed. In order
to watch the disc, the rear passenger must enter the correct password using
the password entry method described
below.
To play all discs without requiring a
password, set the DVD player’s rating
to Level 8. Setting the rating to Level
1 always requires the password to
play any DVD disc. Not all DVD discs
encode a Rating, so it is still possible
that discs designed for adult audi-
ences can still play without requiring
a password.
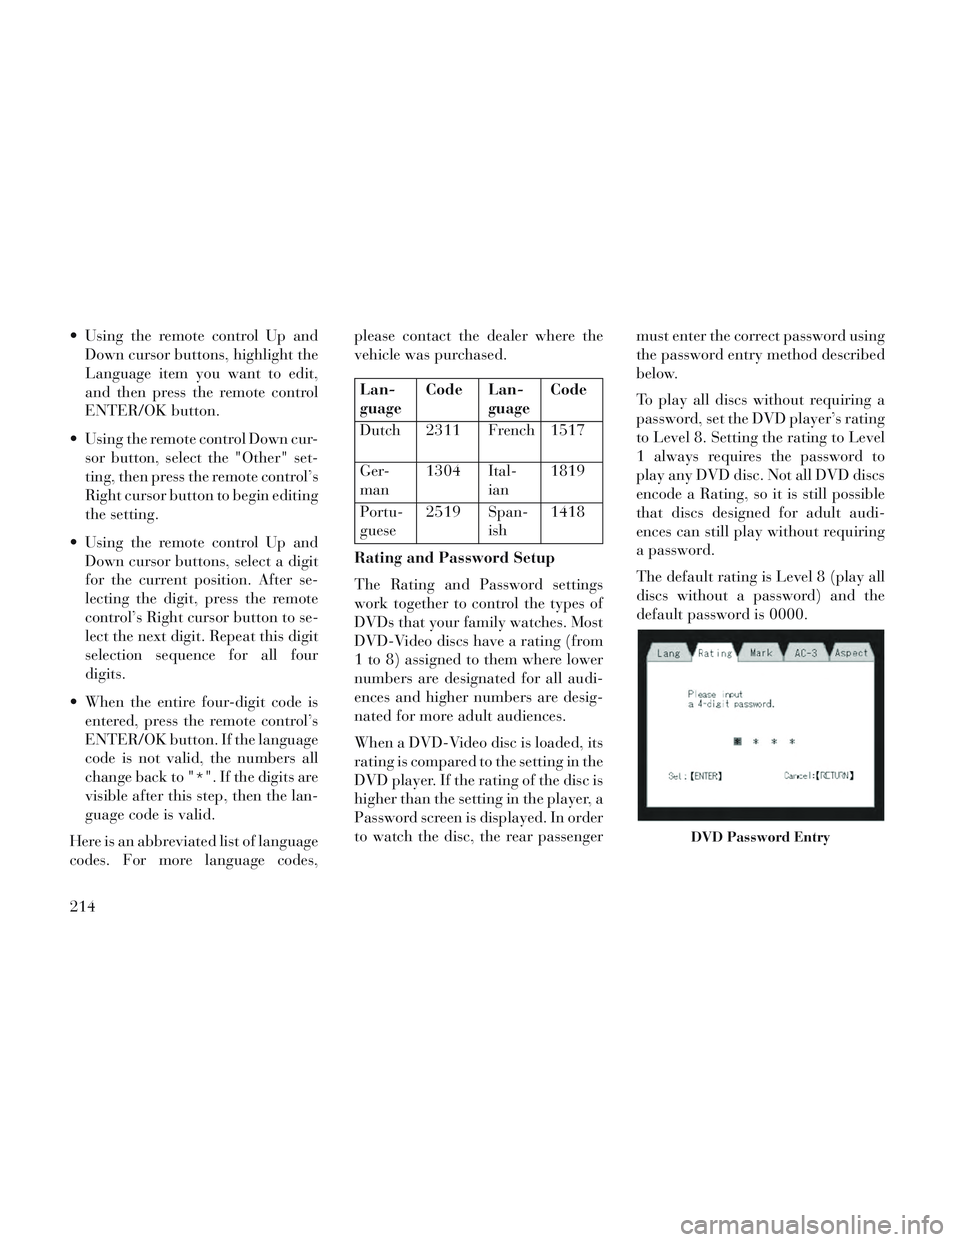
The default rating is Level 8 (play all
discs without a password) and the
default password is 0000.
DVD Password Entry
214
Page 221 of 364
To set the password, activate the DVD
Setup Menu and follow these addi-
tional instructions:
Using the remote control Left andRight cursor buttons, select the
Rating tab.
Highlight "Change Password", and then press the remote control’s
ENTER/OK button.
Enter the current password. Select a digit, use the remote control Up
and Down cursor buttons to set the
value for the current digit, and then
press the remote control’s Right
cursor button to select the next
digit. Repeat this digit selection se-
quence for all four digits.
After the four-digit password is en- tered, press the remote control’s
ENTER/OK button. If the pass-
word is correct, the set password
screen is displayed.
Using the remote control’s Up and Down cursor buttons to set the
value for the current digit and the remote control’s Right cursor but-
ton to select digits, enter the new
password.
After the four-digit password is en- tered, press the remote control’s
ENTER/OK button to accept the
change.
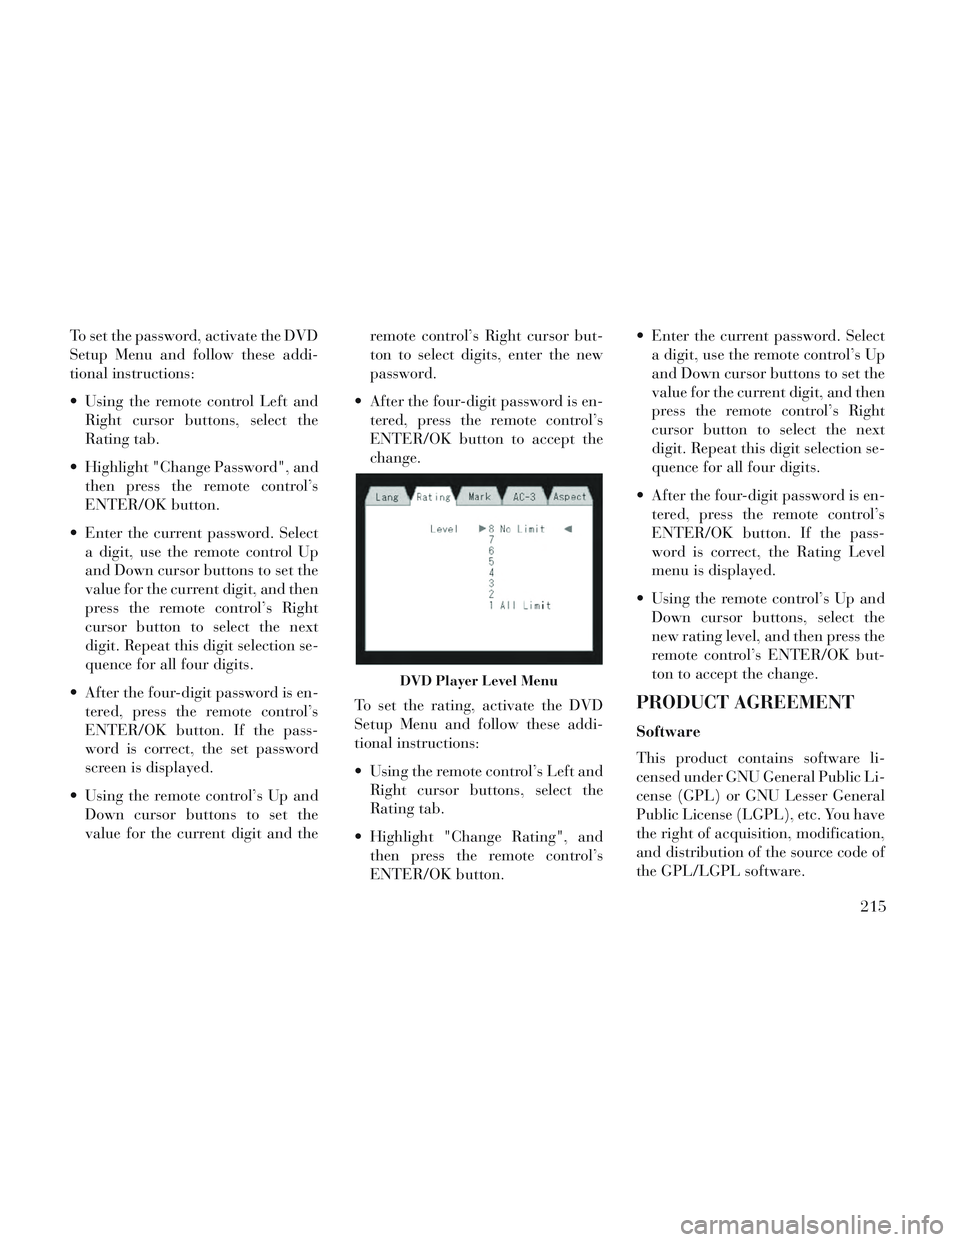
To set the rating, activate the DVD
Setup Menu and follow these addi-
tional instructions:
Using the remote control’s Left and Right cursor buttons, select the
Rating tab.
Highlight "Change Rating", and then press the remote control’s
ENTER/OK button. Enter the current password. Select
a digit, use the remote control’s Up
and Down cursor buttons to set the
value for the current digit, and then
press the remote control’s Right
cursor button to select the next
digit. Repeat this digit selection se-
quence for all four digits.
After the four-digit password is en- tered, press the remote control’s
ENTER/OK button. If the pass-
word is correct, the Rating Level
menu is displayed.
Using the remote control’s Up and Down cursor buttons, select the
new rating level, and then press the
remote control’s ENTER/OK but-
ton to accept the change.
PRODUCT AGREEMENT
Software
This product contains software li-
censed under GNU General Public Li-
cense (GPL) or GNU Lesser General
Public License (LGPL), etc. You have
the right of acquisition, modification,
and distribution of the source code of
the GPL/LGPL software.
DVD Player Level Menu
215
Page 223 of 364
Macrovision. Reverse engineering
or disassembly is prohibited.
Manufactured under license under U.S. Patent #’s: 5,451,942;
5,956,674; 5,974,380; 5,978,762;
6,487,535 & other U.S. and world-
wide patents issued & pending.
DTS is a registered trademark and
the DTS logos, Symbol and DTS
2.0 Channel are trademarks of
DTS, Inc. © 1996-2007 DTS, Inc.
All Rights Reserved.
Manufactured under license from Dolby Laboratories. Dolby and the
double-D symbol are trademarks of
Dolby Laboratories.
ABOUT DIVX VIDEO: DivX® is a
digital video format created by DivX,
LLC, a subsidiary of Rovi
Corporation. This is an official DivX
Certified® device that plays DivX
video. Visit divx.com for more infor-
mation and software tools to convert
your files into DivX videos.
ABOUT DIVX VIDEO-ON-
DEMAND: This DivX Certified® de-
vice must be registered in order to play purchased DivX Video-on-
Demand (VOD) movies. To obtain
your registration code, locate the
DivX VOD section in your device
setup menu. Go to vod.divx.com for
more information on how to complete
your registration.
DivX®, DivX Certified® and associ-
ated logos are trademarks of Rovi
Corporation or its subsidiaries and
are used under license.
Trademark
Blu-ray Disc™, Blu-ray™ and the
logos are trademarks of the Blu-ray
Disc Association.
Java is a registered trademark of Oracle and/or its affiliates.
CAUTION!
Use of controls or adjustments or
performance of procedures other
than those specified herein may re-
sult in hazardous radiation expo-
sure.
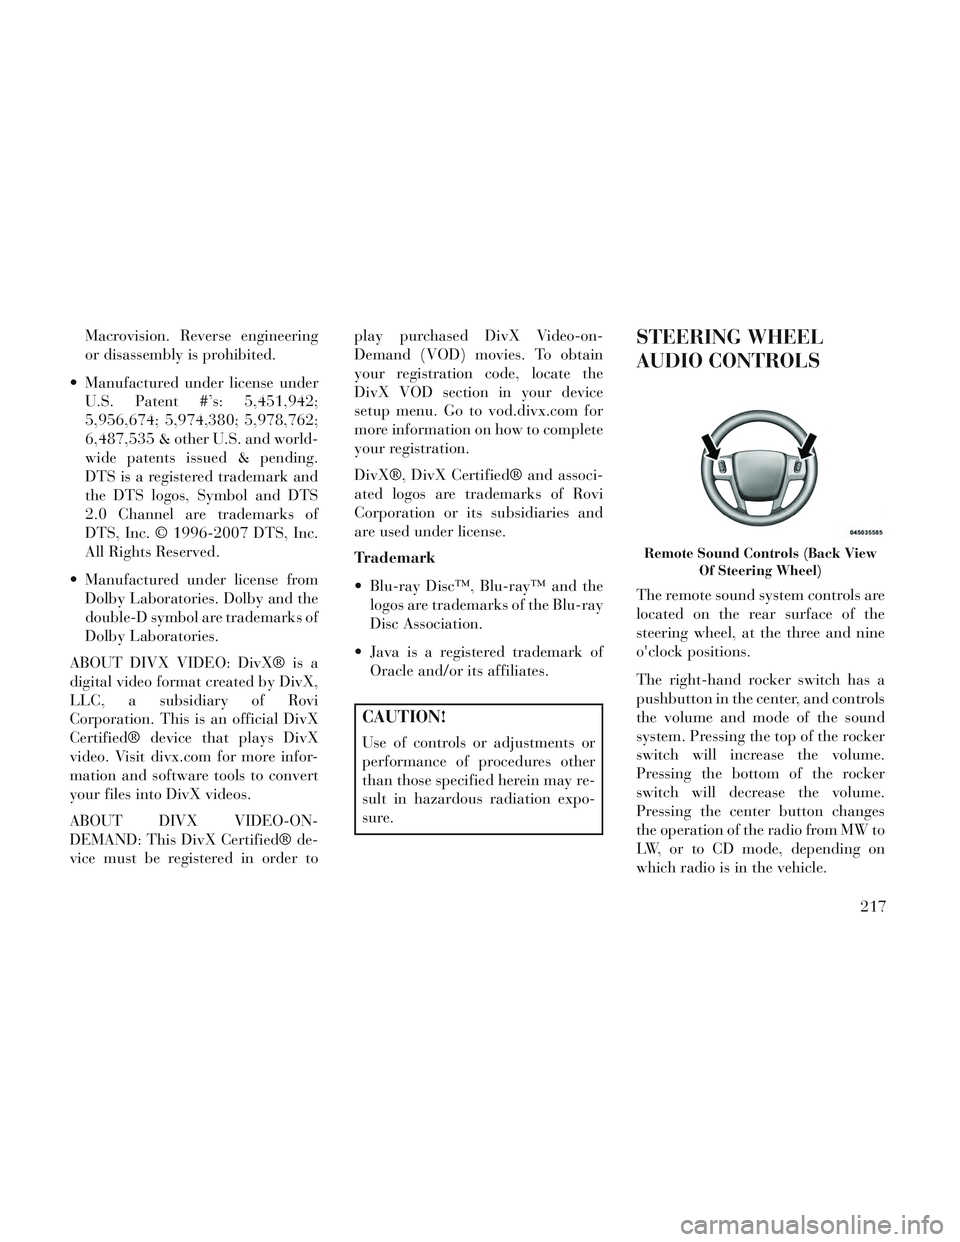
STEERING WHEEL
AUDIO CONTROLS
The remote sound system controls are
located on the rear surface of the
steering wheel, at the three and nine
o'clock positions.
The right-hand rocker switch has a
pushbutton in the center, and controls
the volume and mode of the sound
system. Pressing the top of the rocker
switch will increase the volume.
Pressing the bottom of the rocker
switch will decrease the volume.
Pressing the center button changes
the operation of the radio from MW to
LW, or to CD mode, depending on
which radio is in the vehicle.
Remote Sound Controls (Back View
Of Steering Wheel)
217
Page 355 of 364

Cellular Phone...........89, 218
Center High Mounted StopLight
..................333
Chains, Tire.............. .265
Changing A Flat Tire.........287
Chart, Tire Sizing............253
Check Engine Light (Malfunction
Indicator Light)
...........174
Checking Your Vehicle For Safety. .68
Checks, Safety...............68
Child Restraint..............56
Child Safety Locks............31
Clean Air Gasoline...........274
CleaningWheels
................322
Climate Control.............219
Coat Hook................156
Coin Holder.............. .156
Cold Weather Operation.......233
Compact Disc (CD) Maintenance. .218
Compact Spare Tire..........262
Compass..................186
Compass Calibration..........187
Compass Variance...........187
Computer, Trip/Travel.........185
Connector
UCI
................. .193
Universal Consumer Interface
(UCI)
.................193
Conserving Fuel.............184
Console..................156
Console, Floor..............156
Console, Overhead...........144
Console, Removable..........159
Cool Down, Turbo...........235
Cooling System.............315
Adding Coolant (Antifreeze). .317
Coolant Capacity..........333
Coolant Level........315, 317
Disposal of Used Coolant. . . .317
Drain, Flush, and Refill.....316
Inspection..............317
Points to Remember.......318
Selection of Coolant
(Antifreeze)
......316, 333, 334
Corrosion Protection..........321
Cupholders............151, 324
Data Recorder, Event..........55
Defroster, Windshield..........69
Diagnostic System, Onboard.....307
Diesel Fuel.............275, 334
Diesel Fuel Requirements.......275
Dipsticks
Automatic Transaxle
.......320
Oil (Engine).............308
Power Steering...........245
Disabled Vehicle Towing.......299
DisposalAntifreeze (Engine Coolant)
. .317
Door Locks.................22
Door Locks, Automatic.........24
DrivingThrough Flowing, Rising, or
Shallow Standing Water
.....243
Driving to Achieve Maximum Fuel
Economy
................184
Electrical Power Outlets.......149
Electric Remote Mirrors.........83
Electronic Brake Control System. .248
Brake Assist System........249
Electronic Speed Control (CruiseControl)
................136
Electronic Stability Control(ESC)
..................249
Electronic Vehicle Information Center(EVIC)
.............143, 178
Emergency, In Case ofHazard Warning Flasher
.....286
Jacking............287, 291
Jump Starting............296
Overheating.............286
Engine.................. .306
Air Cleaner.............309
Break-In Recommendations. . .68
Checking Oil Level........308
349