2014 JEEP GRAND CHEROKEE lock
[x] Cancel search: lockPage 55 of 220
3. The Uconnect®Access Registration App will open and display step-by-step
instructions to start your registration.
4. Enter your email address into the radio touchscreen.
5. A message will display on the touchscreen indicating your email submission was
accepted.
6. At home, or wherever you access your email, look for an email from Uconnect
®
Access that contains your personalized registration link. If you don't see it, check
your spam or junk email folder. Open the email and click on the link to continue
registering online.
NOTE:
For security reasons, this link is valid for 72 hours from the time you submit your
email address into the radio touchscreen. If the link has expired, start the process
over (see step 1).
7. You are now registered for your Uconnect
®Access Trial! Apps will be downloaded
the next time you start your vehicle. It may take over 30 minutes for all of the
Apps to install. If the Apps have not appeared after 72 hours, please contact
Uconnect
®Care at 855-792-4241.
8. Get to know Uconnect
®Access! We recommend:
• Go to moparownerconnect.com and log in using the email address and password
you established while registering. Go to the Learn & Use tab for complete
information on using Uconnect
®Access.
• If you have a smartphone, download the Uconnect
®Access App and set up your
Via Mobile features. See instructions below.
Download The Uconnect® Access App
If you own a compatible Apple or Android®powered device, the Uconnect Access
App allows you to remotely lock or unlock your doors, start your engine or activate
your horn and lights from virtually anywhere (Vehicle must be within the United
States and have network coverage). You can download the App from Mopar Owner
Connect or from the Apple App or Google Play store. For Uconnect
®phone
compatibility - visit UconnectPhone.com or call 1–877–855–8400.
Set Up Your Via Mobile Profile — If Equipped
Setting up your Via Mobile profile means entering your login information for each app
so that they can work in your vehicle. Complete your Via Mobile Profile online during
registration of your Uconnect
®Access system. Access this page by logging into your
Mopar Owner Connect account (moparownerconnect.com), going to Edit Profile,
then Via Mobile Profile.
If you already have an account with these apps, click “SetUp” to enter your
information. If you do not have an account, you can create a new one.
ELECTRONICS
53
Page 61 of 220

Uconnect® Access Remote Features
If you own a compatible iPhone®or Android®powered device, the Uconnect®Access
App allows you to remotely lock or unlock your doors, start your engine or activate your
horn and lights from virtually anywhere (Vehicle must be within the United States and
have network coverage). You can download the App from Mopar Owner Connect or from
the App Store (iPhone) or Google Play store. Visit UconnectPhone.com to determine
if your device is compatible. For Uconnect
®Phone customer support and to determine
if your device is compatible.
U.S. residents - visit UconnectPhone.com or call 1–877–855–8400
Remote Start— This feature provides the ability to start the engine on your vehicle,
without the keys and from virtually any distance. You can send a request to your
vehicle in one of two ways:
1. Using the Uconnect
®Access App from a compatible smartphone.
2. From the Mopar Owner Connect website.
• You can also send a command to turn-off an engine that has been remote
started.
• After 15 minutes if you have not entered your vehicle with the key, the engine
will shut off automatically.
• This remote function requires your vehicle to be equipped with a factory-
installed Remote Start system. To use this feature after the Uconnect
®Access
App is downloaded, login with your user name and Uconnect®Security PIN.
• You can set-up notifications for your account to receive an email or text (SMS)
message every time a command is sent. Login to Mopar Owner Connect
(moparownerconnect.com) and click on Edit Profile to manage Uconnect
®
Notifications.
Remote Door Lock/Unlock— This feature provides the ability to lock or unlock the door
on your vehicle, without the keys and from virtually any distance. You can send a
request to your vehicle in one of three ways:
1. Using the Uconnect
®Access App from a compatible smartphone.
2. From the Mopar Owner Connect website.
3. By contacting the Uconnect
®Care on the phone.
To use this feature after the Uconnect
®Access App is downloaded, login using your
user name and Uconnect®Security PIN. Press the “App” button on your smartphone
with the closed lock icon to lock the door, and press the “open lock” icon to unlock
the driver’s door.
You can set-up notifications for your account to receive an email or text (SMS) message
every time a command is sent. Login to Mopar Owner Connect (moparownerconnect.com)
and click on Edit Profile to manage Uconnect
®Notifications.
ELECTRONICS
59
Page 67 of 220

Uconnect® 5.0
Setting The Time
1. Press the “MORE” hard-key on the right side of the display, next press the
“Settings” soft-key and then the “Time” soft-key.ORPress the “Settings”
hard-key on the right side of the display, then press the “Clock” soft-key. The Time
setting screen is displayed and the clock can be adjusted as described in the
following procedure.
NOTE:
In the Clock Setting Menu you can also select “Display Clock”. Display Clock turns
the clock display in the status bar on or off.
2. Touch the “Up” or “Down” arrows to adjust the hours or minutes, next select the
AM or PM soft-key. You can also select 12hr or 24hr format by touching the
desired soft-key.
3. Once the time is set press the “Done” soft-key to exit the time screen.
Uconnect® 5.0
ELECTRONICS
65
Page 75 of 220
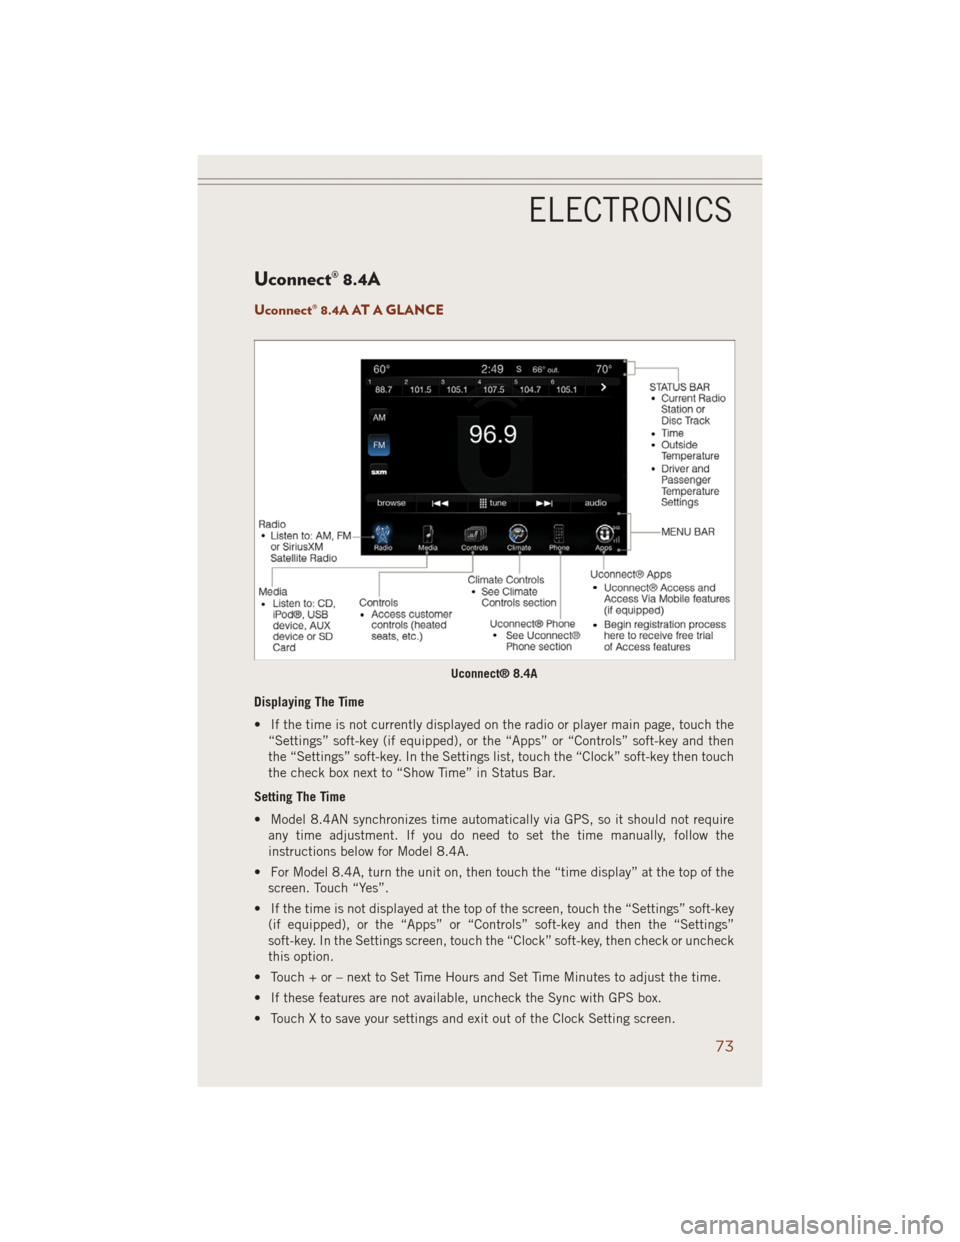
Uconnect® 8.4A
Uconnect® 8.4A AT A GLANCE
Displaying The Time
• If the time is not currently displayed on the radio or player main page, touch the
“Settings” soft-key (if equipped), or the “Apps” or “Controls” soft-key and then
the “Settings” soft-key. In the Settings list, touch the “Clock” soft-key then touch
the check box next to “Show Time” in Status Bar.
Setting The Time
• Model 8.4AN synchronizes time automatically via GPS, so it should not require
any time adjustment. If you do need to set the time manually, follow the
instructions below for Model 8.4A.
• For Model 8.4A, turn the unit on, then touch the “time display” at the top of the
screen. Touch “Yes”.
• If the time is not displayed at the top of the screen, touch the “Settings” soft-key
(if equipped), or the “Apps” or “Controls” soft-key and then the “Settings”
soft-key. In the Settings screen, touch the “Clock” soft-key, then check or uncheck
this option.
• Touch + or – next to Set Time Hours and Set Time Minutes to adjust the time.
• If these features are not available, uncheck the Sync with GPS box.
• Touch X to save your settings and exit out of the Clock Setting screen.
Uconnect® 8.4A
ELECTRONICS
73
Page 79 of 220
Fav
• Activates the favorites menu. You can add up to 50 favorite artists or songs. Just
touch “Add Fav Artist” or “Add Fav Song” while the song is playing. You will then
be alerted any time one of these songs, or works by these artists, is playing on other
SiriusXM channels.
SiriusXM Parental Controls
• You can skip or hide certain channels from view if you do not want access to them.
Touch the “More” soft-key, then the “Settings” soft-key, next touch the “Sirius
Setup” soft-key, then select “Channel Skip”. Touch the box, check-mark, next to
the channel you want skipped. They will not show up in normal usage.
• SiriusXM also offers the option to permanently block selected channels. Call
(1-888-601-6297 for U.S. customers, 1-877-438-9677 for Canadian custom-
ers) and request the Family - Friendly Package.
Browse
• Lets you browse the SiriusXM channel listing or Genre listing. Favorites, Game
Zone, Weather and Jump settings also provide a way to browse the SiriusXM
channel list.
Browse
Sub-MenuSub-Menu Description
All Shows the channel listing.
Genre Provides a list of all genres, and lets you jump to a channel within the
selected genre.
Presets Lets you scroll the list of Preset satellite channels. Touch the channel, or
press Enter on the Tune knob, to go to that channel. Touch the trash can
icon to delete a preset. Your presets are also shown at the top of the main
Satellite Radio screen.
Favorites Lets you manage artists and songs in the Favorites list and configure Alert
Settings to let you know when favorite songs or artists are playing on other
channels. Also, view a list of channels airing any of your Favorites.
Game Zone Provides alerts when your favorite sports teams are starting a game which
is being aired on other SiriusXM channels, or when their game score is
announced. You can select and manage your Teams list here, and
configure alerts.
Jump Lets you select your favorite cities for Traffic & Weather information,
which is used by the Jump feature on the main satellite radio screen.
ELECTRONICS
77
Page 95 of 220
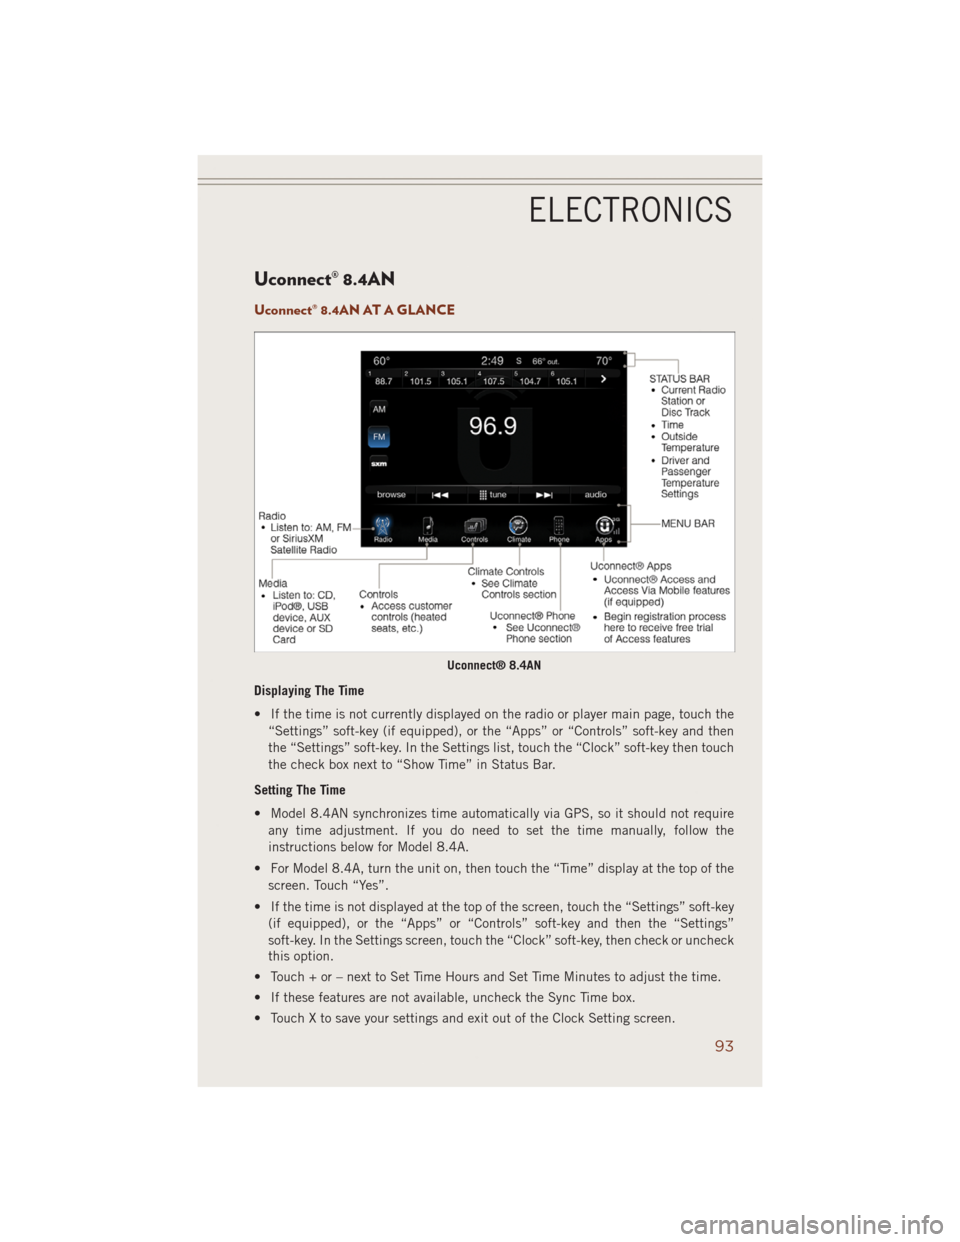
Uconnect® 8.4AN
Uconnect® 8.4AN AT A GLANCE
Displaying The Time
• If the time is not currently displayed on the radio or player main page, touch the
“Settings” soft-key (if equipped), or the “Apps” or “Controls” soft-key and then
the “Settings” soft-key. In the Settings list, touch the “Clock” soft-key then touch
the check box next to “Show Time” in Status Bar.
Setting The Time
• Model 8.4AN synchronizes time automatically via GPS, so it should not require
any time adjustment. If you do need to set the time manually, follow the
instructions below for Model 8.4A.
• For Model 8.4A, turn the unit on, then touch the “Time” display at the top of the
screen. Touch “Yes”.
• If the time is not displayed at the top of the screen, touch the “Settings” soft-key
(if equipped), or the “Apps” or “Controls” soft-key and then the “Settings”
soft-key. In the Settings screen, touch the “Clock” soft-key, then check or uncheck
this option.
• Touch + or – next to Set Time Hours and Set Time Minutes to adjust the time.
• If these features are not available, uncheck the Sync Time box.
• Touch X to save your settings and exit out of the Clock Setting screen.
Uconnect® 8.4AN
ELECTRONICS
93
Page 99 of 220
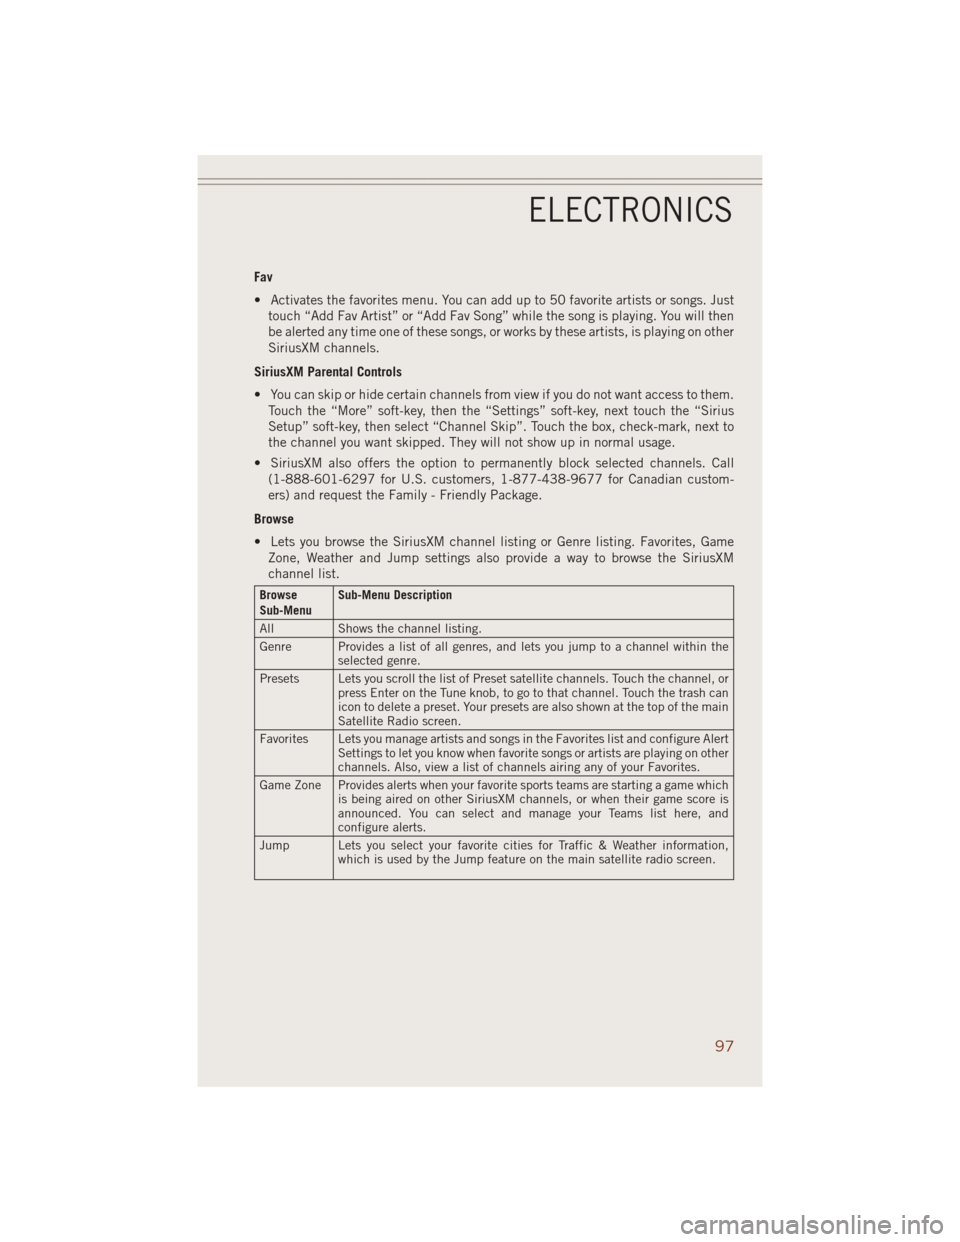
Fav
• Activates the favorites menu. You can add up to 50 favorite artists or songs. Just
touch “Add Fav Artist” or “Add Fav Song” while the song is playing. You will then
be alerted any time one of these songs, or works by these artists, is playing on other
SiriusXM channels.
SiriusXM Parental Controls
• You can skip or hide certain channels from view if you do not want access to them.
Touch the “More” soft-key, then the “Settings” soft-key, next touch the “Sirius
Setup” soft-key, then select “Channel Skip”. Touch the box, check-mark, next to
the channel you want skipped. They will not show up in normal usage.
• SiriusXM also offers the option to permanently block selected channels. Call
(1-888-601-6297 for U.S. customers, 1-877-438-9677 for Canadian custom-
ers) and request the Family - Friendly Package.
Browse
• Lets you browse the SiriusXM channel listing or Genre listing. Favorites, Game
Zone, Weather and Jump settings also provide a way to browse the SiriusXM
channel list.
Browse
Sub-MenuSub-Menu Description
All Shows the channel listing.
Genre Provides a list of all genres, and lets you jump to a channel within the
selected genre.
Presets Lets you scroll the list of Preset satellite channels. Touch the channel, or
press Enter on the Tune knob, to go to that channel. Touch the trash can
icon to delete a preset. Your presets are also shown at the top of the main
Satellite Radio screen.
Favorites Lets you manage artists and songs in the Favorites list and configure Alert
Settings to let you know when favorite songs or artists are playing on other
channels. Also, view a list of channels airing any of your Favorites.
Game Zone Provides alerts when your favorite sports teams are starting a game which
is being aired on other SiriusXM channels, or when their game score is
announced. You can select and manage your Teams list here, and
configure alerts.
Jump Lets you select your favorite cities for Traffic & Weather information,
which is used by the Jump feature on the main satellite radio screen.
ELECTRONICS
97
Page 117 of 220
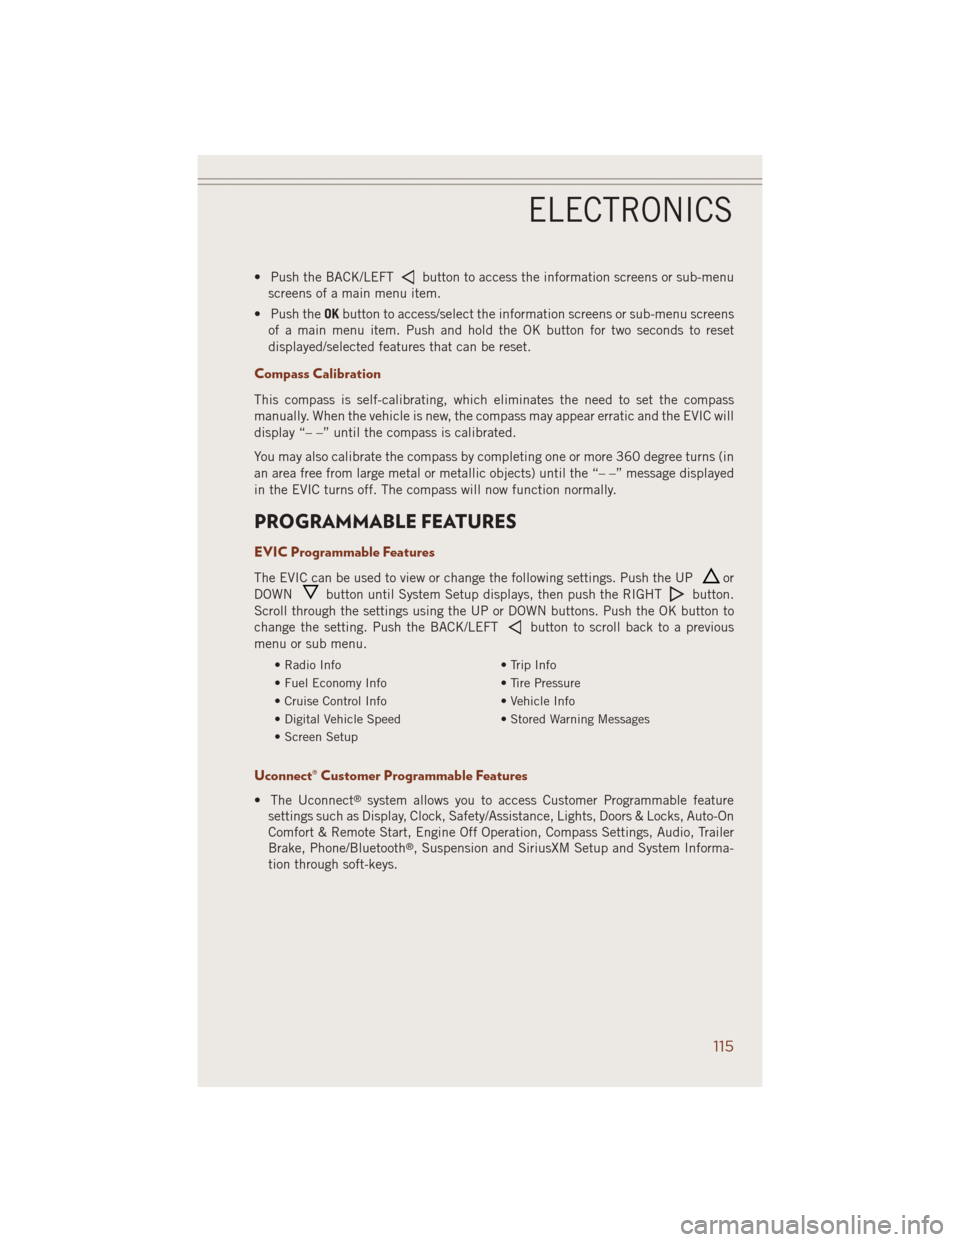
• Push the BACK/LEFTbutton to access the information screens or sub-menu
screens of a main menu item.
• Push theOKbutton to access/select the information screens or sub-menu screens
of a main menu item. Push and hold the OK button for two seconds to reset
displayed/selected features that can be reset.
Compass Calibration
This compass is self-calibrating, which eliminates the need to set the compass
manually. When the vehicle is new, the compass may appear erratic and the EVIC will
display “– –” until the compass is calibrated.
You may also calibrate the compass by completing one or more 360 degree turns (in
an area free from large metal or metallic objects) until the “– –” message displayed
in the EVIC turns off. The compass will now function normally.
PROGRAMMABLE FEATURES
EVIC Programmable Features
The EVIC can be used to view or change the following settings. Push the UPor
DOWN
button until System Setup displays, then push the RIGHTbutton.
Scroll through the settings using the UP or DOWN buttons. Push the OK button to
change the setting. Push the BACK/LEFT
button to scroll back to a previous
menu or sub menu.
• Radio Info • Trip Info
• Fuel Economy Info • Tire Pressure
• Cruise Control Info • Vehicle Info
• Digital Vehicle Speed • Stored Warning Messages
• Screen Setup
Uconnect® Customer Programmable Features
• The Uconnect®system allows you to access Customer Programmable feature
settings such as Display, Clock, Safety/Assistance, Lights, Doors & Locks, Auto-On
Comfort & Remote Start, Engine Off Operation, Compass Settings, Audio, Trailer
Brake, Phone/Bluetooth
®, Suspension and SiriusXM Setup and System Informa-
tion through soft-keys.
ELECTRONICS
115