2014 HYUNDAI IX35 bonnet
[x] Cancel search: bonnetPage 302 of 1534

Maintenance
8
7
At least monthly:
Check coolant level in the engine
coolant reservoir.
Check the operation of all exterior lights, including the stoplights, turn sig-
nals and hazard warning flashers.
Check the inflation pressures of all tyres including the spare.
At least twice a year
(i.e., every Spring and Fall) :
Check radiator, heater and air condi- tioning hoses for leaks or damage.
Check windscreen washer spray and wiper operation. Clean wiper blades
with clean cloth dampened with wash-er fluid.
Check headlight alignment.
Check muffler, exhaust pipes, shields and clamps.
Check the lap/shoulder belts for wear and function.
Check for worn tyres and loose wheel lug nuts.
At least once a year :
Clean body and door drain holes.
Lubricate door hinges and checks, andbonnet hinges.
Lubricate door and bonnet locks and latches.
Lubricate door rubber weatherstrips.
Check the air conditioning system.
Check the power steering fluid level.
Inspect and lubricate automatic transaxle linkage and controls.
Clean battery and terminals.
Check the brake (and clutch) fluid level.
EL(FL) Aust 7.QXP 7/26/2013 2:22 PM Page 8
Page 358 of 1534

Maintenance
64
7
Headlight, position light, turn sig-
nal light, front fog light bulbreplacement
(1) Front turn signal light
(2) Headlight (High/Low)
(3) Position light (LED) (if equipped)
(4) Daytime running light (if equipped)
(5) Front fog light (if equipped)Headlight (High/Low)
1. Open the bonnet.
2. Remove the headlight bulb cover by
turning it counterclockwise.
3. Disconnect the headlight bulb socket- connector. 4. Unsnap the headlight bulb retaining
wire by depressing the end and push-
ing it upward.
5. Remove the bulb from the headlight assembly.
6. Install a new headlight bulb and snap the headlight bulb retaining wire into
position by aligning the wire with the
groove on the bulb.
7. Connect the headlight bulb socket- connector.
8. Install the headlight bulb cover by turn- ing it clockwise.✽✽ NOTICE
We recommend that the headlight aim-
ing be adjusted after an accident or
after the headlight assembly is rein-stalled at an authorised HYUNDAI
dealer.
OEL073029OEL074101
EL(FL) Aust 7.QXP 7/26/2013 2:25 PM Page 64
Page 400 of 1534
I3
Index
Battery ..............................................................................7-37
Battery saver function ......................................................4-88
Before driving ....................................................................5-4
Bonnet ..............................................................................4-25
Brake system ....................................................................5-31
Anti-lock brake system (ABS) ..................................5-34
Downhill brake control (DBC) ..................................5-41
Electronic stability control (ESC) ..............................5-36
Emergency Stop Signal (ESS)....................................5-43
Hill-start assist control (HAC) ..................................5-41
Parking brake..............................................................5-32
Power brakes ..............................................................5-31
TSA (Trailer stability assist) ......................................5-43
Vehicle stability management ....................................5-39
Brake/clutch fluid ............................................................7-26
Bulb replacement ............................................................7-63
Bulb wattage ......................................................................8-3
Button start/stop, see engine start/stop button ..................5-9 Camera (Rear view) ........................................................4-87
Capacities (Lubricants) ......................................................8-6Care
Exterior care ..............................................................7-77
Interior care ................................................................7-82
Tyre care ....................................................................7-40
Cargo security screen ....................................................4-131
Centre console storage ..................................................4-123
Central door lock switch ..................................................4-16
Certification label ..............................................................8-9Chains Tyre chains ................................................................5-58
Checking tyre inflation pressure ......................................7-42
Child restraint system ......................................................3-31 ISOFIX system ..........................................................3-36
Seat belt ......................................................................3-33
Tether anchor system..................................................3-34
Child-protector rear door lock ........................................4-18
Cigarette lighter ............................................................4-126
Climate control air filter ..................................................7-32
Combined instrument, see instrument cluster..................4-46
Compact spare tyre replacement ......................................7-45
Compass with Electric chromic mirror ............................4-40
Cool box ........................................................................4-124
Coolant ............................................................................7-23
Cooling fluid, see engine coolant ....................................7-23
BC
EL(FL) Aust Index.qxp 7/26/2013 2:14 PM Page 3
Page 1001 of 1534
Your vehicle at a glance
2
2
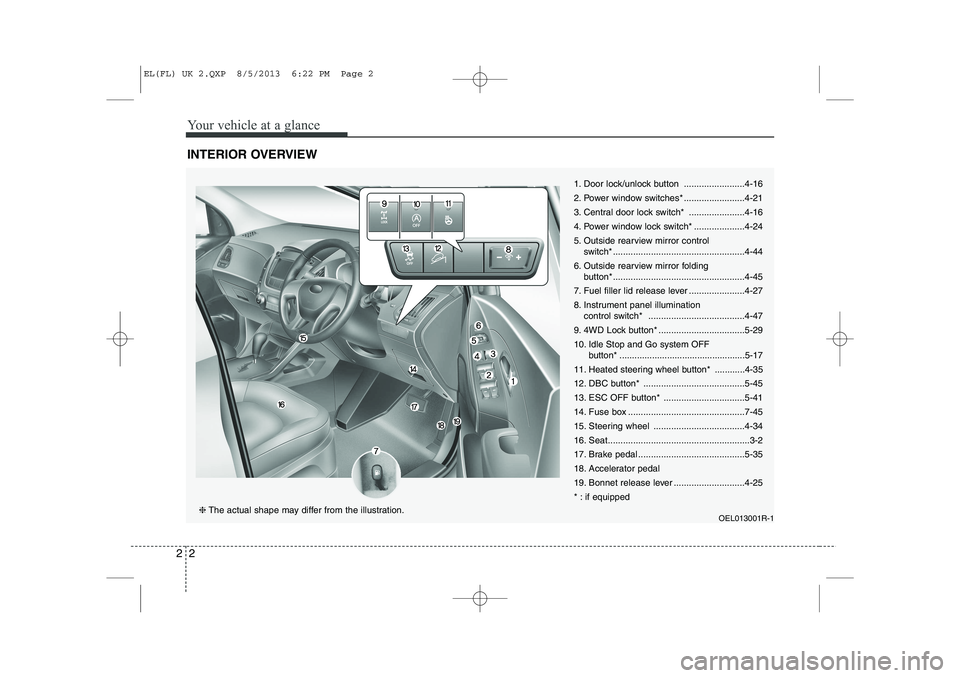
INTERIOR OVERVIEW
1. Door lock/unlock button ........................4-16
2. Power window switches* ........................4-21
3. Central door lock switch* ......................4-16
4. Power window lock switch* ....................4-24
5. Outside rearview mirror control
switch* ....................................................4-44
6. Outside rearview mirror folding button* ....................................................4-45
7. Fuel filler lid release lever ......................4-27
8. Instrument panel illumination control switch* ......................................4-47
9. 4WD Lock button* ..................................5-2910.
Idle Stop and Go system OFF
button* ..................................................5-17
11. Heated steering wheel button* ............4-35
12. DBC button* ........................................5-45
13. ESC OFF button* ................................5-41
14. Fuse box ..............................................7-45
15. Steering wheel ....................................4-34
16. Seat........................................................3-2
17. Brake pedal ..........................................5-35
18. Accelerator pedal
19. Bonnet release lever ............................4-25
* : if equipped
OEL013001R-1
❈The actual shape may differ from the illustration.
EL(FL) UK 2.QXP 8/5/2013 6:22 PM Page 2
Page 1084 of 1534
413
Features of your vehicle
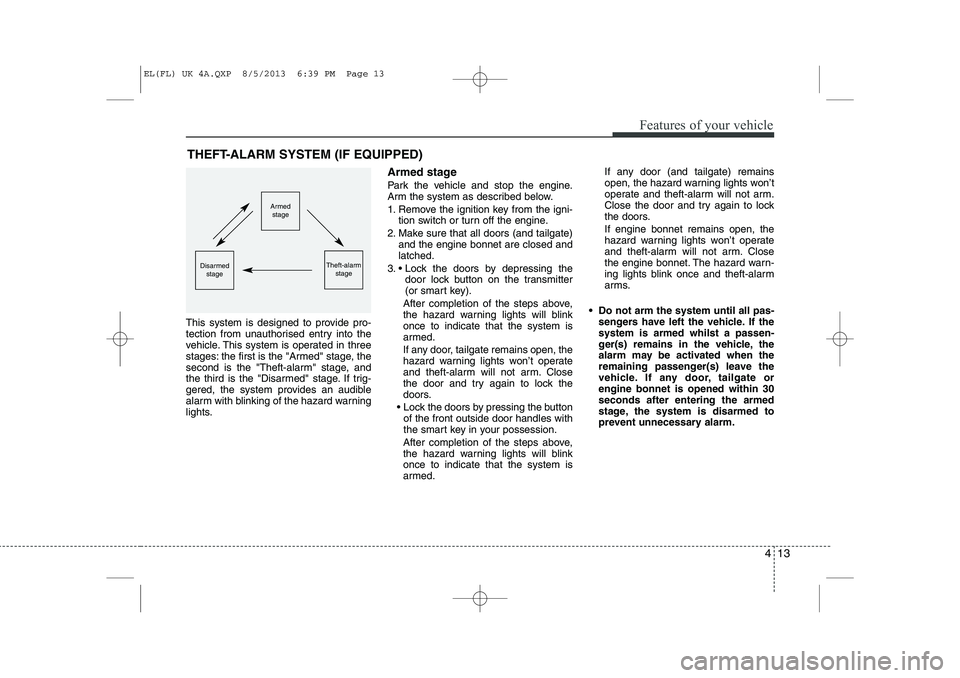
This system is designed to provide pro-
tection from unauthorised entry into the
vehicle. This system is operated in three
stages: the first is the "Armed" stage, the
second is the "Theft-alarm" stage, and
the third is the "Disarmed" stage. If trig-
gered, the system provides an audible
alarm with blinking of the hazard warning
lights.Armed stage
Park the vehicle and stop the engine.
Arm the system as described below.
1. Remove the ignition key from the igni-
tion switch or turn off the engine.
2. Make sure that all doors (and tailgate) and the engine bonnet are closed and latched.
3. Lock the doors by depressing the door lock button on the transmitter
(or smart key).
After completion of the steps above,
the hazard warning lights will blinkonce to indicate that the system is
armed.
If any door, tailgate remains open, the
hazard warning lights won’t operate
and theft-alarm will not arm. Close
the door and try again to lock the
doors.
Lock the doors by pressing the button of the front outside door handles with
the smart key in your possession.
After completion of the steps above,
the hazard warning lights will blinkonce to indicate that the system is
armed. If any door (and tailgate) remains
open, the hazard warning lights won’t
operate and theft-alarm will not arm.
Close the door and try again to lock
the doors. If engine bonnet remains open, the
hazard warning lights won’t operate
and theft-alarm will not arm. Close
the engine bonnet. The hazard warn-
ing lights blink once and theft-alarm
arms.
Do not arm the system until all pas- sengers have left the vehicle. If thesystem is armed whilst a passen-
ger(s) remains in the vehicle, the
alarm may be activated when the
remaining passenger(s) leave the
vehicle. If any door, tailgate orengine bonnet is opened within 30seconds after entering the armed
stage, the system is disarmed to
prevent unnecessary alarm.
THEFT-ALARM SYSTEM (IF EQUIPPED)
Armed
stage
Theft-alarm stageDisarmedstage
EL(FL) UK 4A.QXP 8/5/2013 6:39 PM Page 13
Page 1085 of 1534
Features of your vehicle
14
4
Theft-alarm stage
The alarm will be activated if any of the
following occurs whilst the system is
armed.
A front or rear door is opened without
using transmitter (or smart key).
The tailgate is opened without using transmitter (or smart key).
The engine bonnet is opened.The siren will sound and the hazard
warning lights will blink continuously for
27 seconds, unless the system is dis-
armed. To turn off the system, unlock the
doors with the transmitter. (or smart key) Disarmed stage
The system will be disarmed when:
Transmitter
- The door unlock button is pressed.
- The engine is started.
- The ignition switch is in the “ON” posi-
tion for 30 seconds or more.
Smart key
- The door unlock button is pressed.
- The button of the front outside door ispressed whilst carrying the smart key.
- The engine is started.
After the doors are unlocked, the hazard
warning lights will blink twice to indicate
that the system is disarmed.
After pressing the unlock button, if anydoor (or tailgate) is not opened within 30
seconds, the system will be rearmed.
✽✽ NOTICE - Immobiliser system
Page 1096 of 1534
425
Features of your vehicle
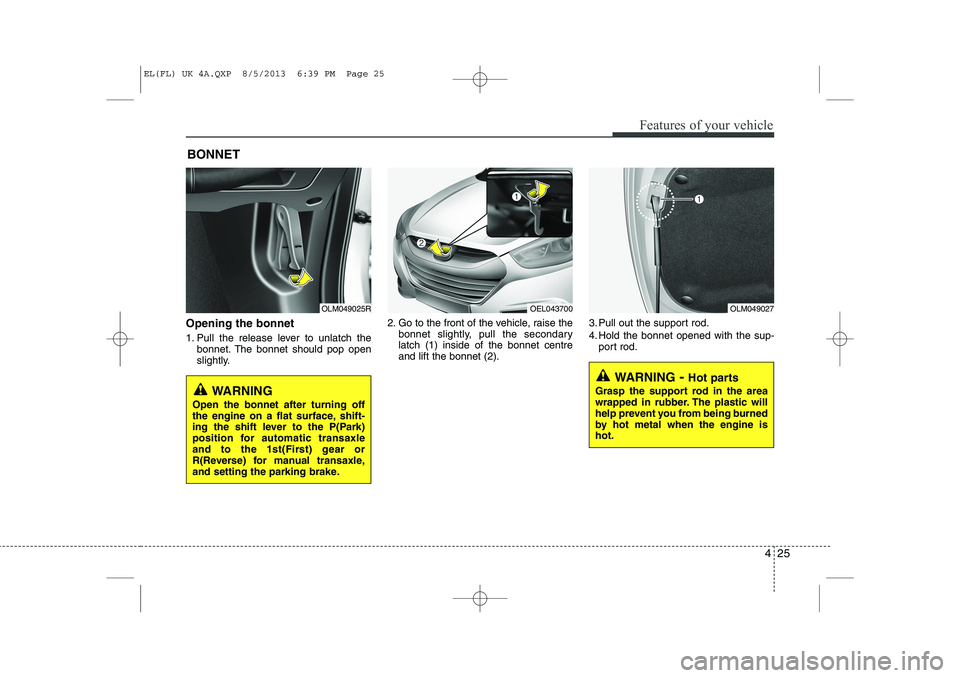
Opening the bonnet
1. Pull the release lever to unlatch thebonnet. The bonnet should pop open
slightly. 2. Go to the front of the vehicle, raise the
bonnet slightly, pull the secondarylatch (1) inside of the bonnet centreand lift the bonnet (2). 3. Pull out the support rod.
4. Hold the bonnet opened with the sup-
port rod.
BONNET
OLM049025ROLM049027
WARNING
- Hot parts
Grasp the support rod in the area
wrapped in rubber. The plastic will
help prevent you from being burned
by hot metal when the engine ishot.
WARNING
Open the bonnet after turning off
the engine on a flat surface, shift-
ing the shift lever to the P(Park)
position for automatic transaxle
and to the 1st(First) gear or
R(Reverse) for manual transaxle,
and setting the parking brake.
OEL043700
EL(FL) UK 4A.QXP 8/5/2013 6:39 PM Page 25
Page 1097 of 1534
Features of your vehicle
26
4
Closing the bonnet
1. Before closing the bonnet, check the
following:
All filler caps in engine compartment must be correctly installed.
Gloves, rags or any other com- bustible material must be removed
from the engine compartment.
2. Return the support rod to its clip to prevent it from rattling.
3. Lower the bonnet until it is about 12 in. (30 cm) above the closed position and
let it drop. Make sure that it locks into
place.
WARNING - Bonnet
Before closing the bonnet, ensure that all obstructions are
removed from the bonnet open-
ing. Closing the bonnet with anobstruction present in the bonnet
opening may result in property
damage or severe personal
injury.
Do not leave gloves, rags or any other combustible material in the
engine compartment. Doing so
may cause a heat-induced fire.WARNING
Always double check to be sure that the bonnet is firmly latched
before driving away. If it is not
latched, the bonnet could fly
open whilst the vehicle is being
driven, causing a total loss of vis-
ibility, which might result in anaccident.
The support rod must be inserted completely into the hole whenev-
er you inspect the engine com-
partment. This will prevent the
bonnet from falling and possibly
injuring you.
Do not move the vehicle with the bonnet raised. The view will be
blocked and the bonnet could fall
or be damaged.
EL(FL) UK 4A.QXP 8/5/2013 6:39 PM Page 26