2014 HYUNDAI IX35 battery replacement
[x] Cancel search: battery replacementPage 81 of 1534

49
Features of your vehicle
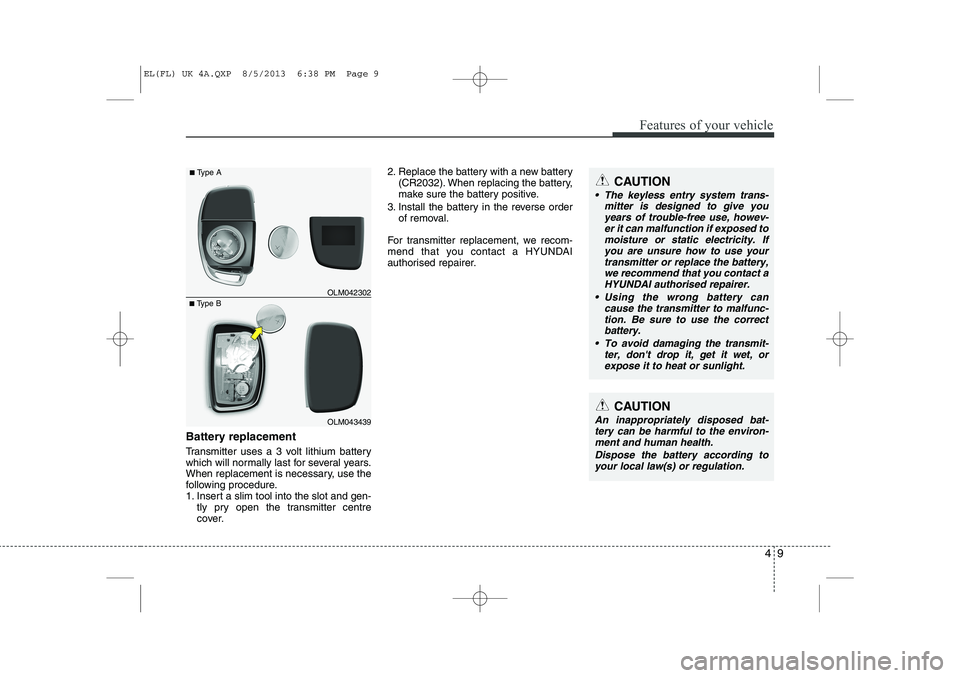
Battery replacement
Transmitter uses a 3 volt lithium battery
which will normally last for several years.
When replacement is necessary, use the
following procedure.
1. Insert a slim tool into the slot and gen-tly pry open the transmitter centre
cover. 2. Replace the battery with a new battery
(CR2032). When replacing the battery,
make sure the battery position.
3. Install the battery in the reverse order of removal.
For transmitter replacement, we recom-
mend that you contact an authorised
HYUNDAI dealer.
■ Type B OLM042302
■
Type A
OLM043439
CAUTION
The keyless entry system trans-
mitter is designed to give you
years of trouble-free use, howev- er it can malfunction if exposed tomoisture or static electricity. Ifyou are unsure how to use your
transmitter or replace the battery,we recommend that you contact an authorised HYUNDAI dealer.
Using the wrong battery can cause the transmitter to malfunc-tion. Be sure to use the correctbattery.
To avoid damaging the transmit- ter, don't drop it, get it wet, orexpose it to heat or sunlight.
CAUTION
An inappropriately disposed bat- tery can be harmful to the environ- ment and human health.
Dispose the battery according toyour local law(s) or regulation.
EL(FL) Aust 4a.QXP 7/26/2013 2:31 PM Page 9
Page 345 of 1534

751
Maintenance
FUSESA vehicle’s electrical system is protected
from electrical overload damage by
fuses.
This vehicle has 3 (or 4) fuse panels, one
located in the driver’s side panel bolster,
the other in the engine compartment
near the battery.
If any of your vehicle’s lights, acces-
sories, or controls do not work, check the
appropriate circuit fuse. If a fuse has
blown, the element inside the fuse will bemelted.
If the electrical system does not work,
first check the driver’s side fuse panel.
Before replacing a blown fuse, discon-
nect the negative battery cable.
Always replace a blown fuse with one of
the same rating.
If the replacement fuse blows, this indi-
cates an electrical problem. Avoid using
the system involved and we recommend
that you consult an authorised HYUNDAI
dealer.
Four kinds of fuses are used: blade typefor lower amperage rating, cartridge type, and fusible link for higher amperage rat-ings.✽✽ NOTICE
The actual fuse/relay panel label may
differ from equipped items.
WARNING - Fuse replace-
ment
Never replace a fuse with any- thing but another fuse of the same rating.
A higher capacity fuse could cause damage and possibly a
fire.
Never install a wire or aluminum foil instead of the proper fuse -
even as a temporary repair. It may
cause extensive wiring damage
and a possible fire.
CAUTION
Do not use a screwdriver or any
other metal object to remove fusesbecause it may cause a short circuitand damage the system.
OLM079051N
Normal
Normal
■
Blade type
■ Cartridge type
■ Multi fuse Blown
Blown
Normal Blown
Normal Blown
■
BFT (Battery fuse terminal)
EL(FL) Aust 7.QXP 7/26/2013 2:24 PM Page 51
Page 400 of 1534

I3
Index
Battery ..............................................................................7-37
Battery saver function ......................................................4-88
Before driving ....................................................................5-4
Bonnet ..............................................................................4-25
Brake system ....................................................................5-31
Anti-lock brake system (ABS) ..................................5-34
Downhill brake control (DBC) ..................................5-41
Electronic stability control (ESC) ..............................5-36
Emergency Stop Signal (ESS)....................................5-43
Hill-start assist control (HAC) ..................................5-41
Parking brake..............................................................5-32
Power brakes ..............................................................5-31
TSA (Trailer stability assist) ......................................5-43
Vehicle stability management ....................................5-39
Brake/clutch fluid ............................................................7-26
Bulb replacement ............................................................7-63
Bulb wattage ......................................................................8-3
Button start/stop, see engine start/stop button ..................5-9 Camera (Rear view) ........................................................4-87
Capacities (Lubricants) ......................................................8-6Care
Exterior care ..............................................................7-77
Interior care ................................................................7-82
Tyre care ....................................................................7-40
Cargo security screen ....................................................4-131
Centre console storage ..................................................4-123
Central door lock switch ..................................................4-16
Certification label ..............................................................8-9Chains Tyre chains ................................................................5-58
Checking tyre inflation pressure ......................................7-42
Child restraint system ......................................................3-31 ISOFIX system ..........................................................3-36
Seat belt ......................................................................3-33
Tether anchor system..................................................3-34
Child-protector rear door lock ........................................4-18
Cigarette lighter ............................................................4-126
Climate control air filter ..................................................7-32
Combined instrument, see instrument cluster..................4-46
Compact spare tyre replacement ......................................7-45
Compass with Electric chromic mirror ............................4-40
Cool box ........................................................................4-124
Coolant ............................................................................7-23
Cooling fluid, see engine coolant ....................................7-23
BC
EL(FL) Aust Index.qxp 7/26/2013 2:14 PM Page 3
Page 499 of 1534

49
Features of your vehicle
Battery replacement
Transmitter uses a 3 volt lithium battery
which will normally last for several years.
When replacement is necessary, use the
following procedure.
1. Insert a slim tool into the slot and gen-tly pry open the transmitter center
cover. 2. Replace the battery with a new battery
(CR2032). When replacing the battery,
make sure the battery position.
3. Install the battery in the reverse order of removal.
For transmitter replacement, we recom-
mend that you contact an authorized
HYUNDAI dealer.
■ Type B OLM042302
■
Type A
OLM043439
CAUTION
The keyless entry system trans-
mitter is designed to give you
years of trouble-free use, howev- er it can malfunction if exposed tomoisture or static electricity. Ifyou are unsure how to use your
transmitter or replace the battery,we recommend that you contact an authorized HYUNDAI dealer.
Using the wrong battery can cause the transmitter to malfunc-tion. Be sure to use the correctbattery.
To avoid damaging the transmit- ter, don't drop it, get it wet, orexpose it to heat or sunlight.
CAUTION
An inappropriately disposed bat- tery can be harmful to the environ- ment and human health.
Dispose the battery according toyour local law(s) or regulation.
EL(FL) Eng 4A.QXP 7/11/2013 11:30 AM Page 9
Page 834 of 1534

What to do in an emergency
6
6
Jump starting procedure
1. Make sure the booster battery is 12-volt
and that its negative terminal is ground- ed. 2. If the booster battery is in another vehi-
cle, do not allow the vehicles to touch.
3. Turn off all unnecessary electrical
loads.
4. Connect the jumper cables in the exact sequence shown in the illustration. First
connect one end of a jumper cable to
the positive terminal of the discharged
battery (1), then connect the other end
to the positive terminal on the booster
battery (2). Proceed to connect one end
of the other jumper cable to the nega-
tive terminal of the booster battery (3),
then the other end to a solid, stationary,
metallic point (for example, the engine
lifting bracket) away from the battery
(4). Do not connect it to or near any part
that moves when the engine is cranked.
Do not allow the jumper cables to con-
tact anything except the correct battery
terminals or the correct ground. Do not
lean over the battery when making con-
nections.
5. Start the engine of the vehicle with the booster battery and let it run at 2,000
rpm, then start the engine of the vehi-
cle with the discharged battery.
If the cause of your battery discharging is
not apparent, we recommend that thesystem be checked by an authorizedHYUNDAI dealer.
Push-starting
Your manual transaxle-equipped vehicle
should not be push-started because itmight damage the emission control sys-
tem. Vehicles equipped with automatic
transaxle cannot be push-started. Follow
the directions in this section for jump-
starting.
WARNING
Never tow a vehicle to start it
because the sudden surge forward
when the engine starts could cause
a collision with the tow vehicle.
CAUTION - Battery cables
Do not connect the jumper cable
from the negative terminal of the booster battery to the negative ter-minal of the discharged battery. This
can cause the discharged battery tooverheat and crack, releasing bat- tery acid.
CAUTION -AGM battery (if equipped)
Absorbent Glass Matt (AGM) bat-
teries are maintenance-free andwe recommend that the system
be serviced by an authorizedHYUNDAI dealer. For chargingyour AGM battery, use only fully
automatic battery chargers that are specially developed for AGMbatteries.
When replacing the AGM battery, we recommend that you use parts
for replacement from an author- ized HYUNDAI dealer.
Do not open or remove the cap on top of the battery. This may cause
leaks of internal electrolyte thatcould result in severe injury.
If the AGM battery is reconnected or replaced, ISG function will notoperate immediately.
If you want to use the ISG func-tion, the battery sensor needs tobe calibrated for approximately 4 hours with the ignition off.
EL(FL) Eng 6.QXP 7/11/2013 10:52 AM Page 6
Page 945 of 1534

Maintenance
80
7
FUSES
A vehicle’s electrical system is protected
from electrical overload damage by
fuses.
This vehicle has 3 (or 4) fuse panels, one
located in the driver’s side panel bolster,
the other in the engine compartment
near the battery.
If any of your vehicle’s lights, acces-
sories, or controls do not work, check the
appropriate circuit fuse. If a fuse has
blown, the element inside the fuse will bemelted.
If the electrical system does not work,
first check the driver’s side fuse panel.
Before replacing a blown fuse, discon-
nect the negative battery cable.
Always replace a blown fuse with one of
the same rating.
If the replacement fuse blows, this indi-
cates an electrical problem. Avoid using
the system involved and we recommend
that you consult an authorized HYUNDAI
dealer.
Four kinds of fuses are used: blade typefor lower amperage rating, cartridge type, and fusible link for higher amperage rat-ings.✽✽ NOTICE
The actual fuse/relay panel label may
differ from equipped items.
WARNING - Fuse replace-
ment
Never replace a fuse with any- thing but another fuse of the same rating.
A higher capacity fuse could cause damage and possibly a
fire.
Never install a wire or aluminum foil instead of the proper fuse -
even as a temporary repair. It may
cause extensive wiring damage
and a possible fire.
CAUTION
Do not use a screwdriver or any
other metal object to remove fusesbecause it may cause a short circuitand damage the system.
OLM079051N
Normal
Normal
■
Blade type
■ Cartridge type
■ Multi fuse Blown
Blown
Normal Blown
Normal Blown
■
BFT (Battery fuse terminal)
EL(FL) Eng 7.QXP 10/7/2013 9:31 AM Page 80
Page 1080 of 1534

49
Features of your vehicle
Battery replacement
Transmitter uses a 3 volt lithium battery
which will normally last for several years.
When replacement is necessary, use the
following procedure.
1. Insert a slim tool into the slot and gen-tly pry open the transmitter centre
cover. 2. Replace the battery with a new battery
(CR2032). When replacing the battery,
make sure the battery positive.
3. Install the battery in the reverse order of removal.
For transmitter replacement, we recom-
mend that you contact a HYUNDAI
authorised repairer.
CAUTION
The keyless entry system trans- mitter is designed to give you
years of trouble-free use, howev-er it can malfunction if exposed tomoisture or static electricity. If you are unsure how to use your
transmitter or replace the battery, we recommend that you contact aHYUNDAI authorised repairer.
Using the wrong battery can cause the transmitter to malfunc-tion. Be sure to use the correct battery.
To avoid damaging the transmit- ter, don't drop it, get it wet, orexpose it to heat or sunlight.
CAUTION
An inappropriately disposed bat-tery can be harmful to the environ- ment and human health.
Dispose the battery according toyour local law(s) or regulation.
■ Type B OLM042302
■
Type A
OLM043439
EL(FL) UK 4A.QXP 8/5/2013 6:38 PM Page 9
Page 1414 of 1534

What to do in an emergency
6
6
Jump starting procedure 1. Make sure the booster battery is 12-volt
and that its negative terminal is grounded.
2. If the booster battery is in another vehicle, do not allow the vehicles to touch.
3. Turn off all unnecessary electrical loads.
4. Connect the jumper cables in the exact sequence shown in the illustration. First
connect one end of a jumper cable to
the positive terminal of the discharged
battery (1), then connect the other end
to the positive terminal on the booster
battery (2). Proceed to connect one end
of the other jumper cable to the negative
terminal of the booster battery (3), then
the other end to a solid, stationary,
metallic point (for example, the engine
lifting bracket) away from the battery (4).
Do not connect it to or near any part that
moves when the engine is cranked.
Do not allow the jumper cables to con-
tact anything except the correct battery
terminals or the correct ground. Do not
lean over the battery when making con-
nections. 5. Start the engine of the vehicle with the
booster battery and let it run at 2,000
rpm, then start the engine of the vehi-
cle with the discharged battery.If the cause of your battery discharging is
not apparent, we recommend that the system be checked by a HYUNDAI
authorised repairer.
Push-starting
Your manual transaxle-equipped vehicle
should not be push-started because itmight damage the emission control sys-tem.
Vehicles equipped with automatic
transaxle cannot be push-started.
Follow the directions in this section for
jump-starting.
WARNING
Never tow a vehicle to start it
because the sudden surge forward
when the engine starts could cause
a collision with the tow vehicle.
CAUTION - Battery cables
Do not connect the jumper cable
from the negative terminal of the booster battery to the negative ter-minal of the discharged battery. This can cause the discharged bat-tery to overheat and crack, releas-ing battery acid.
CAUTION -AGM battery (if equipped)
AAbsorbent Glass Matt (AGM)
batteries are maintenance-free
and we recommend that the sys-tem be serviced by a HYUNDAIauthorised repairer. For chargingyour AGM battery, use only fully
automatic battery chargers thatare specially developed for AGM batteries.
When replacing the AGM battery, we recommend that you use partsfor replacement from a HYUNDAIauthorised repairer.
Do not open or remove the cap on top of the battery. This may cause
leaks of internal electrolyte thatcould result in severe injury.
If the AGM battery is reconnected or replaced, ISG function will not
operate immediately.
If you want to use the ISG func-tion, the battery sensor needs to be calibrated for approximately 4hours with the ignition off.
EL(FL) UK 6.QXP 8/5/2013 6:53 PM Page 6