2014 HYUNDAI IX35 mirror
[x] Cancel search: mirrorPage 10 of 1534

Your vehicle at a glance
2
2
INTERIOR OVERVIEW
1. Door lock/unlock button ........................4-16
2. Power window switches* ........................4-21
3. Central door lock switch* ......................4-16
4. Power window lock switch* ....................4-24
5. Outside rearview mirror control
switch* ....................................................4-44
6. Outside rearview mirror folding button* ....................................................4-45
7. Fuel filler lid release lever ......................4-27
8. Instrument panel illumination control switch* ......................................4-47
9. 4WD Lock button* ..................................5-24
10. Heated steering wheel button* ............4-35
11. DBC button* ........................................5-41
12. ESC OFF button* ................................5-36
13. Fuse box ..............................................7-51
14. Steering wheel ....................................4-34
15. Seat........................................................3-2
16. Brake pedal ..........................................5-31
17. Accelerator pedal
18. Bonnet release lever ............................4-25
* : if equipped
OEL013001R-3
❈The actual shape may differ from the illustration.
EL(FL) Aust 2.QXP 7/26/2013 2:01 PM Page 2
Page 111 of 1534

439
Features of your vehicle
Inside rearview mirror
Adjust the rearview mirror to centre on
the view through the rear window. Make
this adjustment before you start driving.
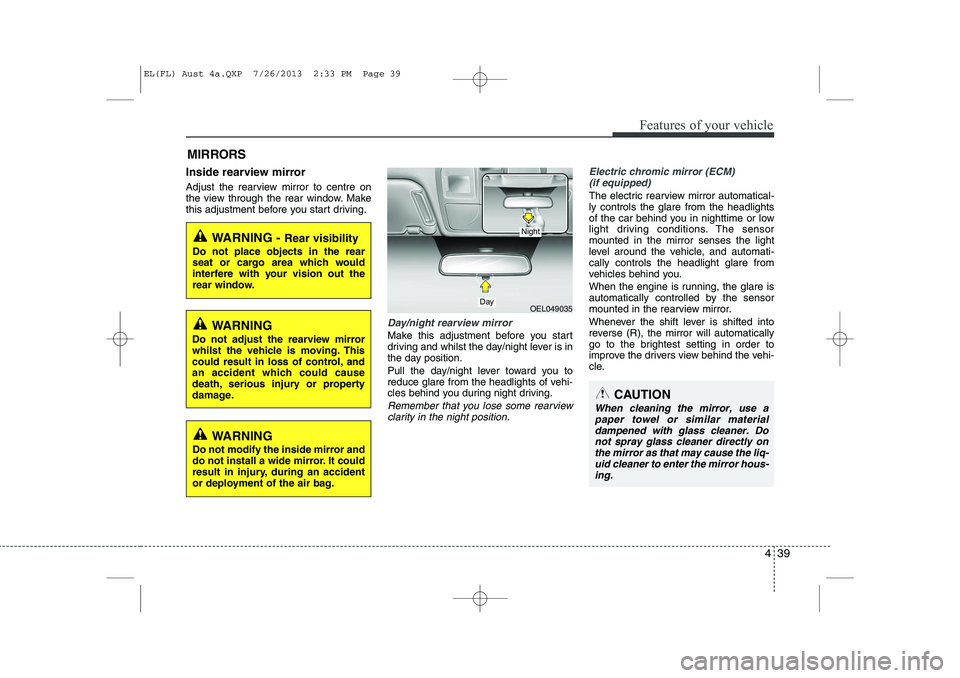
Day/night rearview mirror
Make this adjustment before you start
driving and whilst the day/night lever is in
the day position.
Pull the day/night lever toward you to
reduce glare from the headlights of vehi-
cles behind you during night driving.
Remember that you lose some rearviewclarity in the night position.
Electric chromic mirror (ECM) (if equipped)
The electric rearview mirror automatical- ly controls the glare from the headlights
of the car behind you in nighttime or low
light driving conditions. The sensormounted in the mirror senses the light
level around the vehicle, and automati-cally controls the headlight glare from
vehicles behind you.
When the engine is running, the glare is
automatically controlled by the sensor
mounted in the rearview mirror.
Whenever the shift lever is shifted into
reverse (R), the mirror will automatically
go to the brightest setting in order to
improve the drivers view behind the vehi-
cle.
MIRRORS
WARNING -
Rear visibility
Do not place objects in the rear
seat or cargo area which would
interfere with your vision out the
rear window.
OEL049035
CAUTION
When cleaning the mirror, use a paper towel or similar materialdampened with glass cleaner. Do not spray glass cleaner directly on
the mirror as that may cause the liq- uid cleaner to enter the mirror hous-ing.
Day
Night
WARNING
Do not adjust the rearview mirror
whilst the vehicle is moving. This
could result in loss of control, and
an accident which could cause
death, serious injury or property
damage.
WARNING
Do not modify the inside mirror and
do not install a wide mirror. It could
result in injury, during an accident
or deployment of the air bag.
EL(FL) Aust 4a.QXP 7/26/2013 2:33 PM Page 39
Page 112 of 1534

Features of your vehicle
40
4
To operate the electric rearview mirror
Press the ON/OFF button (1) to turn the
automatic dimming function on. The mir-
ror indicator light will illuminate.
Press the ON/OFF button to turn the
automatic dimming function off. The mir-
ror indicator light will turn off.
The mirror defaults to the ON position whenever the ignition switch is turned on.Electric chromic mirror (ECM) with
compass
1. Feature Control Button
2. Status Indicator LED
3. Rear Light Sensor
4. Display Window
Automatic dimming rear view mirror con- trols automatically the glare of headlights
of the vehicle behind you when it turned
on by pressing and holding the button for
more than 3 but less than 6 seconds. It is
turned off by pressing and holding the
button for same time once more. 1. To operate Compass feature
Press and release the button, then the
vehicle's directional heading will be dis-
played. Pressing and releasing the button
again will turn off the display.
Heading display
- E : East
- W : West
- S : South
- N : North
ex) NE : North East
2. Calibration procedure
Press and hold the button for more than
9 but less than 12 seconds. When the
compass memory is cleared a "C" will
appear in the display.
- Driving the vehicle in a circle at less
than 8km/h 2 times or until the compass
heading appears.
- Driving in a circle in right-handed direc- tion and opposite direction are possible,
and if the calibration is completed, the
compass heading will appear.
- Keep driving in a circle until a compass heading appears.
OLM049037L
IndicatorSensor
Rearview display
OLM049036L
EL(FL) Aust 4a.QXP 7/26/2013 2:33 PM Page 40
Page 114 of 1534

Features of your vehicle
42
4
3. Setting the compass zone
1. Find your current location and vari-
ance zone number on the zone map.
2. Press and hold the button for more than 6 but less than 9 seconds. The
current zone number will appear in the
display.
3. Press the button until the new zone number appears in the display. After
you stop pressing the button in, the
display will show a compass direction
within a few seconds. 4. Changing Mirror Angle setting
(if equipped):
Due to mirror positions being angled
towards the driver, the compass mirror
can also compensate for drivers seated
on the Left Hand side of the vehicle
(steering wheel on the LH side of the
vehicle) or Right Hand side of the vehicle
(steering wheel on the RH side of the
vehicle).
To adjust the Left Hand, “L” or Right
Hand, “R”, setting:
1. Press and hold the button for more than 12 seconds.
2. Release then press the button to tog- gle between “L” and “R”.
✽✽ NOTICE
This procedure also causes the compass to be de-calibrated.
3. To re-calibrate the compass, drive the vehicle in 2 complete circles at less than 8km/h (5mph).
CAUTION
1. Do not install the ski rack, anten-
na, etc. which are attached to thevehicle by means of a magnet.They affect the operation of thecompass.
2. If the compass deviates from the correct indication soon after
repeated adjustment, we recom-mend that the system be checked by an authorised HYUNDAI dealer.
3. The compass may not indicate the correct compass point in tun-nels or whilst driving up or down a steep hill.
(The compass returns to the cor-rect compass point when thevehicle moves to an area wherethe geomagnetism is stabilized.)
4. When cleaning the mirror, use a paper towel or similar material
dampened with glass cleaner. Do not spray glass cleaner directlyon the mirror as that may causethe liquid cleaner to enter the mir-
ror housing.
EL(FL) Aust 4a.QXP 7/26/2013 2:33 PM Page 42
Page 115 of 1534

443
Features of your vehicle
Outside rearview mirror
Be sure to adjust mirror angles before
driving.
Your vehicle is equipped with both left-
hand and right-hand outside rearview
mirrors. The mirrors can be adjusted
remotely with the remote switch. The mir-
ror heads can be folded back to prevent
damage during an automatic car wash or
when passing in a narrow street.CAUTION
If the mirror is jammed with ice, donot adjust the mirror by force. Use
an approved spray de-icer (not radi-ator antifreeze) to release thefrozen mechanism or move the vehicle to a warm place and allow
the ice to melt.
WARNING
Do not adjust or fold the outside
rearview mirrors whilst the vehicle
is moving. This could result in loss
of control, and an accident which
could cause death, serious injury
or property damage.
WARNING - Rearview mir-
rors
The outside rearview mirrors are convex. Objects seen in the mir-
ror are closer than they appear.
Use your interior rearview mirror or direct observation to deter-
mine the actual distance of fol-
lowing vehicles when changinglanes.
CAUTION
Do not scrape ice off the mirror
face; this may damage the surface of the glass. If ice should restrictmovement of the mirror, do not
force the mirror for adjustment. To remove ice, use a deicer spray, or asponge or soft cloth with very warmwater.
EL(FL) Aust 4a.QXP 7/26/2013 2:33 PM Page 43
Page 116 of 1534

Features of your vehicle
44
4
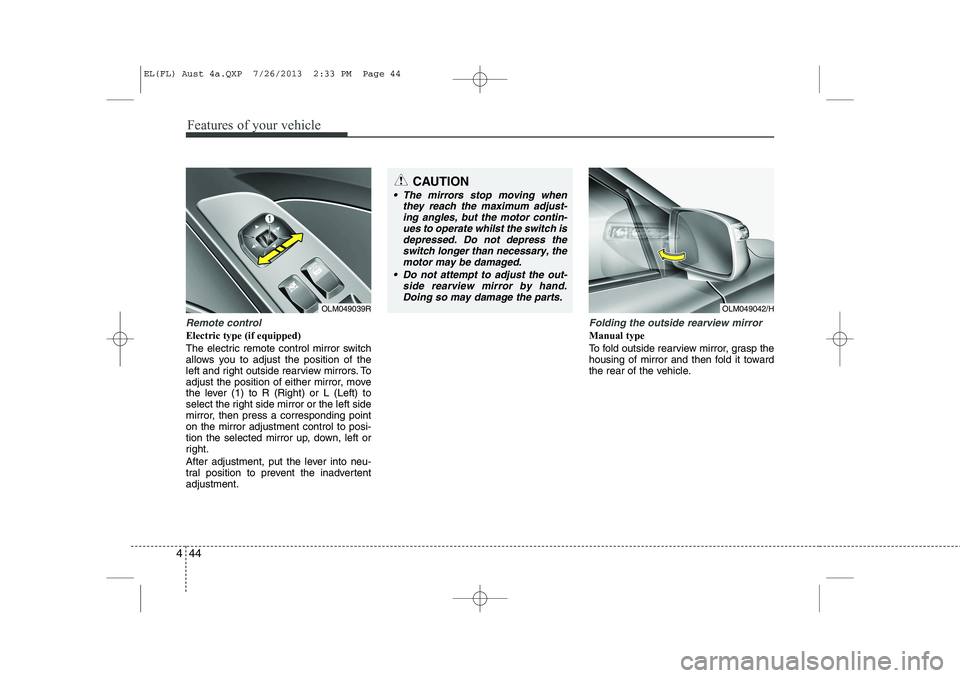
Remote control
Electric type (if equipped)
The electric remote control mirror switch
allows you to adjust the position of the
left and right outside rearview mirrors. To
adjust the position of either mirror, move
the lever (1) to R (Right) or L (Left) to
select the right side mirror or the left side
mirror, then press a corresponding pointon the mirror adjustment control to posi-
tion the selected mirror up, down, left or
right.
After adjustment, put the lever into neu-
tral position to prevent the inadvertentadjustment.
Folding the outside rearview mirror
Manual type
To fold outside rearview mirror, grasp the
housing of mirror and then fold it toward
the rear of the vehicle.
CAUTION
The mirrors stop moving when
they reach the maximum adjust-
ing angles, but the motor contin- ues to operate whilst the switch isdepressed. Do not depress theswitch longer than necessary, the
motor may be damaged.
Do not attempt to adjust the out- side rearview mirror by hand.Doing so may damage the parts.
OLM049039ROLM049042/H
EL(FL) Aust 4a.QXP 7/26/2013 2:33 PM Page 44
Page 117 of 1534

445
Features of your vehicle
Electric type (if equipped)
To fold the outside rearview mirror,
depress the button.
To unfold it, depress the button again.
CAUTION
In case it is an electric type outsiderearview mirror, don’t fold it by
hand. It could cause motor failure.
CAUTION
The electric type outside rearviewmirror operates even though the ignition switch is in the OFF posi-
tion. However, to prevent unneces-sary battery discharge, do not adjust the mirrors longer than nec-essary whilst the engine is not run-
ning.
OLM049041R
EL(FL) Aust 4a.QXP 7/26/2013 2:33 PM Page 45
Page 159 of 1534

487
Features of your vehicle
The rearview camera will activate when
the back-up light is ON with the ignition
switch ON and the shift lever in the R
(Reverse) position.This system is a supplemental system
that shows behind the vehicle through the
rearview display mirror whilst backing-up.
Type B
The rearview camera may be turned off
by pressing the ON/OFF button when the
rearview camera is activated.
To turn the camera on again, press the
ON/OFF button again when the ignition
switch is on and the shift lever in R
(Reverse). Also, the camera will turn on
automatically whenever the ignition
switch is turned off and on again.The hazard warning flasher should be
used whenever you find it necessary tostop the car in a hazardous location.
When you must make such an emer-
gency stop, always pull off the road as far
as possible.
The hazard warning lights are turned on
by pushing in the hazard switch. This
causes all turn signal lights to blink. The
hazard warning lights will operate even
though the key is not in the ignition
switch.
To turn the hazard warning lights off,
push the switch a second time.
REARVIEW CAMERA (IF EQUIPPED)
WARNING
This system is a supplementary function only. It is the responsibil-
ity of the driver to always check
the inside/outside rearview mirror
and the area behind the vehicle
before and whilst backing upbecause there is a dead zone that
can't see through the camera.
Always keep the camera lens clean. If lens is covered with for-
eign matter, the camera may not
operate normally.
HAZARD WARNING FLASHER
OLM049081
OEL043084R
OEL049083R
■Type BOEL049082R
■Type A
Rear view display
Rear view display
EL(FL) Aust 4a.QXP 7/26/2013 2:35 PM Page 87