Page 164 of 488
163
uu Interior Lights/Interior Convenience Items u Interior Convenience Items
Continued
Controls
■Second row seat heaters *
The outer second row seat cushions and seat-
backs are equipped with seat heaters. Turning
the switch on the driver side warms the outer
seat behind the driver’s seat. The passenger
side switch warms the outer seat behind the
front passenger seat. u Press the
right side of the switch, HI, to
rapidly heat up the seat.
When a comfortable temperature is
reac
hed, select LO to keep the seat
warm.
* Not available on all models
Page 169 of 488
168
uu Climate Control System u Rear Climate Control System
Controls
Rear Climate Control System
Use the system when the engine is running.
1. Press the RE
ARLOCK button.
u LOCK appea
rs on the front control panel. The rear system changes to AUTO
mode.
2. The system automatically adjusts the fan sp e
ed and airflow levels to maintain the
set rear temperature.
u Change the t
emperature if necessary.
3. To turn off t
he rear climate control system, press and hold the REARLOCK button
for a few seconds.
■Using the Rear Climate Control System From the Front Panel1 Rear Climate Control System
AUTO LOCK appears on the rear control panel while
the rear lock is on.
If the rear lock is on while in SYNC mode, the rear
control panel is disabled. AUTO LOCK SYNC appears
on the rear control panel.
Rear Temperature
Control ButtonRear Temperature
Control Button
Page 174 of 488

173
uu Audio System u USB Adapter Cable
Features
USB Adapter Cable
1. Unclip the USB connec tor and loosen the
adapter cable.
2. In
stall the iPod® dock connector or the USB
flash drive to the USB connector.
Auxiliary Input Jack
Use the jack to connect standard audio devices. 1.Open
the AUX cover.
2.Connect
a standard audio device to the
input jack using a 1/8 inch (3.5 mm) stereo
miniplug.
u The
audio system auto matically switches
to the AUX mode.
1 USB Adapter Cable
•Do not leave the iPod ® or USB flash drive in the
vehicle. Direct sunlight and high temperatures may
damage it.
•Do not use an extension cable with the USB
adapter cable.
•Do not connect the iPod ® or USB flash drive using a
hub.
•Do not use a device such as a card reader or hard
disk drive, as the device or your files may be
damaged.
•We recommend backing up yo ur data before using
the device in your vehicle.
•Displayed messages may vary depending on the
device model and software version.
If the audio system does not recognize the iPod®, try
reconnecting it a few times or reboot the device. To
reboot, follow the manufac turer's instructions
provided with the iPod ® or visit www.apple.com/
ipod .
1Auxiliary Input Jack
To switch the mode, pres s any of the audio mode
buttons. You can return to the AUX mode by
pressing the AUX button.
You cannot use the auxiliary input jack if you replace
the audio system.
State or local laws may li mit the circumstances in
which you can launch or cont rol your attached audio
device.
Page 175 of 488
174
uu Audio System u Audio System Theft Protection *
Features
Audio System Theft Protection *
The audio system is disabled when it is di sconnected from the power source, such as
when the battery is disconnected or goes dead. In certain conditions, the system
may display “enter code”. If this occurs, reactivate the audio system.
■Reactivate the audio system
1. Turn the
ignition switch to ON (w
.
2. Turn on
the audio system.
3.Press and hold
the audio system power button for more than two seconds.
u The audio
system is reac tivated when the audio co ntrol unit establishes a
connection with the vehicle control unit. If the control unit fails to recognize
the audio unit, you must go to a dealer and have the audio unit checked.
* Not available on all models
Page 187 of 488

186
uu Audio System Basic Operation u Playing the AM/FM Radio
Features
Playing the AM/FM Radio
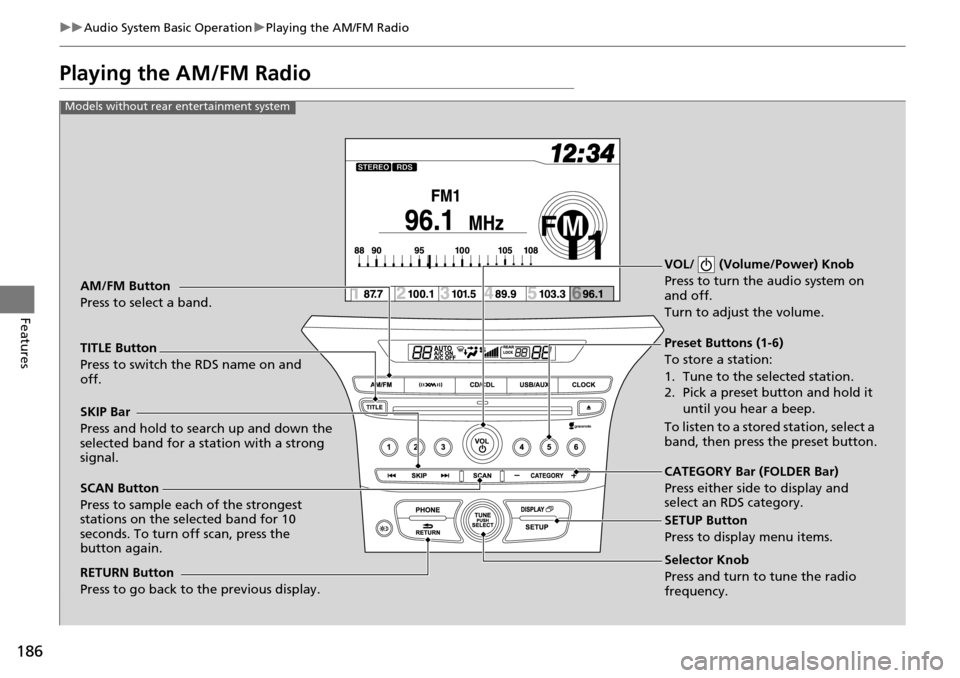
Selector Knob
Press and turn to tune the radio
frequency.
SCAN Button
Press to sample each of the strongest
stations on the selected band for 10
seconds. To turn off scan, press the
button again. VOL/ (Volume/Power) Knob
Press to turn the
audio system on
and off.
Turn to adjust the volume.
Preset Buttons (1-6)
To store a station:
1. Tune to the selected station.
2. Pick a preset button and hold it
until you hear a beep.
To listen to a stored station, select a
band, then press the preset button.
SKIP Bar
Press and hold to search up and down the
selected band for a station with a strong
signal.
CATEGORY Bar (FOLDER Bar)
Press either side to display and
select an RDS category.
TITLE Button
Press to switch the RDS name on and
off. AM/FM Button
Press to select a band.
RETURN Button
Press to go back to the previous display.
SETUP Button
Press to display menu items.
Models without rear entertainment system
Page 188 of 488
187
uu Audio System Basic Operation u Playing the AM/FM Radio
Continued
Features
Selector Knob
Press and turn to tune the radio
frequency.
SCAN Button
Press to sample each of the strongest
stations on the selected band for 10
seconds. To turn off scan, press the
button again. VOL/ (Volume/Power) Knob
Press to turn the audio system on
and off.
Turn to adjust the volume.
Preset Buttons (1-6)
To store a station:
1. Tune to the selected station.
2. Pick a preset button and hold it
until you hear a beep.
To listen to a stored station, select a
band, then press the preset button.
SKIP Bar
Press and hold to search up and down the
selected band for a station with a strong
signal.
CATEGORY Bar
Press either side to display and
select an RDS category.
TITLE Button
Press to switch the RDS name on and off. AM/FM Button
Press to select a band.
RETURN Button
Press to go back to the previous display.
SETUP Button
Press to display menu items.
Models with rear entertainment system
Page 191 of 488

190
uu Audio System Basic Operation u Playing the XM ® Radio *
Features
Playing the XM ® Radio *
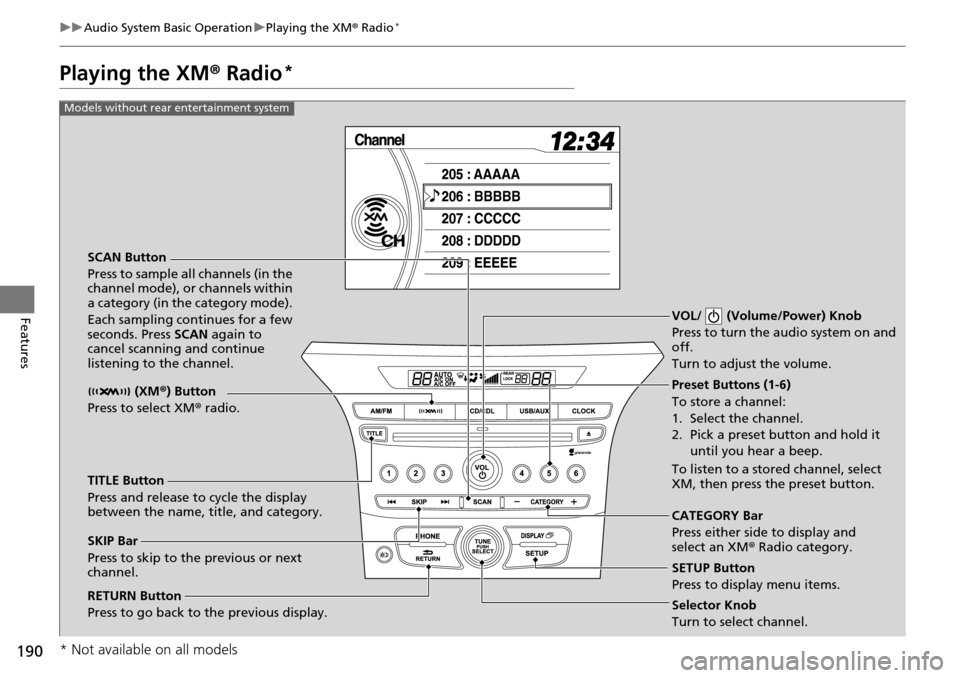
SCAN Button
Press to sample all channels (in the
channel mode), or channels within
a category (in the category mode).
Each sampling continues for a few
seconds. Press SCAN again to
cancel scanning and continue
listening to the channel. VOL/ (Volume/Power) Knob
Press to turn the audio system on and
off.
Turn to adjust the volume.
Preset Buttons (1-6)
To store a channel:
1. Select the channel.
2. Pick a preset button and hold it
until you hear a beep.
To listen to a stored channel, select
XM, then press the preset button.
SKIP Bar
Press to skip to the previous or next
channel. CATEGORY Bar
Press either side to display and
select an XM
® Radio category.
TITLE Button
Press and release to cycle the display
between the name, title, and category. (XM
®) Button
Press to select XM ® radio.
RETURN Button
Press to go back to the previous display.Selector Knob
Turn to select channel. SETUP Button
Press to display menu items.
Models without rear entertainment system
* Not available on all models
Page 192 of 488

191
uu Audio System Basic Operation u Playing the XM ® Radio *
Continued
Features
SCAN Button
Press to sample all channels (in the
channel mode), or channels within
a category (in the category mode).
Each sampling continues for a few
seconds. Press SCAN again to cancel
scanning and continue listening to
the channel.
VOL/ (Volume/Power) Knob
Press to turn the audio system on and off.
Turn to adjust the volume.
Preset Buttons (1-6)
To store a channel:
1. Select the channel.
2. Pick a preset button and hold it until you hear a beep.
To listen to a stored channel, select
XM, then press the preset button.
SKIP Bar
Press to skip to the previous or next
channel. CATEGORY Bar
Press either side to display and
select an XM
® Radio category.
TITLE Button
Press and release to cycle the display
between the name, title, and category.
(XM
®) Button
Press to select XM ® radio.
RETURN Button
Press to go back to the previous display.Selector Knob
Turn to select channel. SETUP Button
Press to display menu items.
Models with rear entertainment system