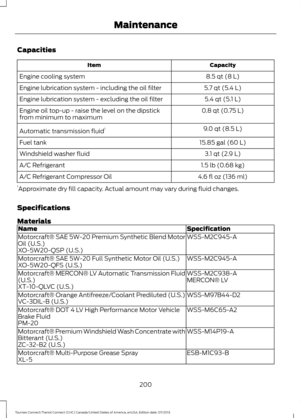
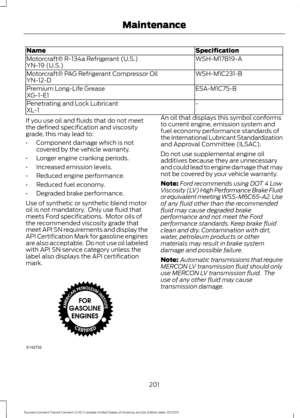
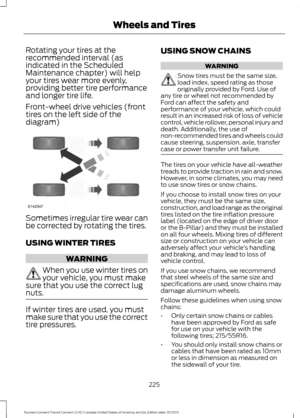
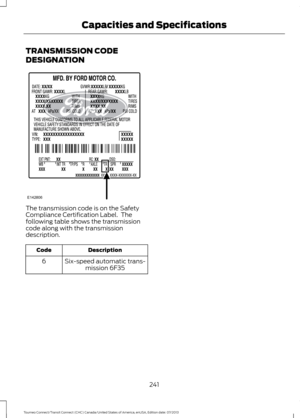
Page 57 of 411

1.
Insert the first previously programmed
correctly coded key into the ignition.
2. Switch the ignition from off to on. Keep
the ignition on for at least three
seconds, but no more than 10 seconds.
3. Switch the ignition off and remove the
first correctly coded key from the
ignition.
4. After three seconds but within 10 seconds of switching the ignition off,
insert the second previously correctly
coded key into the ignition.
5. Switch the ignition from off to on. Keep
the ignition on for at least three
seconds, but no more than 10 seconds.
6. Switch the ignition off and remove the
second previously programmed
correctly coded key from the ignition.
7. After three seconds but within 10 seconds of switching the ignition off
and removing the previously
programmed correctly coded key,
insert the new unprogrammed key into
the ignition.
8. Switch the ignition from off to on. Keep
the ignition on for at least six seconds.
9. Remove the newly programmed correctly coded key from the ignition.
If the key has been successfully
programmed it will start the engine and
operate the remote entry system (if the
new key is an integrated keyhead
transmitter).
If the key was not successfully
programmed, wait 10 seconds and repeat
Steps 1 through 8. If you are still
unsuccessful, take your vehicle to an
authorized dealer.
Note: You can program a maximum of eight
coded keys to your vehicle. All eight can be
integrated keyhead transmitters. ANTI-THEFT ALARM (If Equipped)
Alarm System
The perimeter alarm is a deterrent against
unauthorized access to your vehicle
through the doors, luggage compartment
and the hood. It also protects the audio
unit.
Triggering the Alarm
Once armed, the alarm is triggered in any
of the following ways:
• If someone opens a door, luggage
compartment or the hood without a
valid key or remote control.
• If someone removes the audio or
navigation system.
• If you switch the ignition on without a
valid key.
If the alarm is triggered, the horn will sound
for 30 seconds and the hazard warning
flasher will flash for five minutes.
Any further attempts to perform one of the
above will trigger the alarm again.
Arming the Alarm
To arm the alarm, lock your vehicle. See
Locks
(page 48).
Disarming the Alarm
Disarm and silence the alarm by unlocking
the doors with the key and switching the
ignition on with a correctly coded key
within 12 seconds, or by unlocking the
doors or the luggage compartment with
the remote control.
54
Tourneo Connect/Transit Connect (CHC) Canada/United States of America, enUSA, Edition date: 07/2013 Security
Page 58 of 411
ADJUSTING THE STEERING
WHEEL
WARNING
Do not adjust the steering wheel
when your vehicle is moving.
Note:
Make sure that you are sitting in the
correct position. See Sitting in the Correct
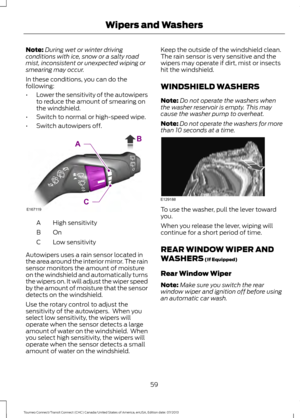
Position (page 96). 1. Unlock the steering column.
2.
Adjust the steering wheel to the desired
position. 3. Lock the steering column.
AUDIO CONTROL
(If Equipped)
Select the required source on the audio
unit.
55
Tourneo Connect/Transit Connect (CHC) Canada/United States of America, enUSA, Edition date: 07/2013 Steering Wheel122E95178 3E95179
Page 59 of 411
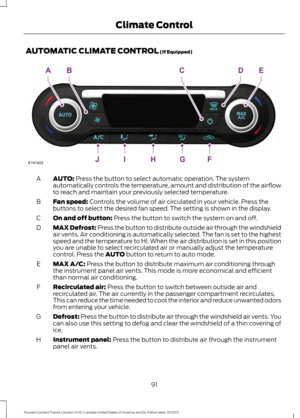
You can operate the following functions
with the control:
Volume up
A
Seek up, next or end call
B
Volume down
C
Seek down, previous or accept
call
D
Seek, Next or Previous
Press the seek button to:
• tune the radio to the next or previous
stored preset
• play the next or the previous track.
Press and hold the seek button to:
• tune the radio to the next station up or
down the frequency band
• seek through a track. VOICE CONTROL (If Equipped)
Press the button to select or deselect voice
control. See
SYNC™ (page 258).
CRUISE CONTROL
(If Equipped) See
Cruise Control (page 132).
56
Tourneo Connect/Transit Connect (CHC) Canada/United States of America, enUSA, Edition date: 07/2013 Steering WheelE159789
A
B
C
D E159531 E142437
Page 60 of 411
INFORMATION DISPLAY
CONTROL
See Information Displays (page 77).
57
Tourneo Connect/Transit Connect (CHC) Canada/United States of America, enUSA, Edition date: 07/2013 Steering WheelE130248
Page 61 of 411

WINDSHIELD WIPERS
Note:
Fully defrost the windshield before
you switch the windshield wipers on.
Note: Make sure you switch the windshield
wipers and ignition off before using an
automatic car wash.
Note: If streaks or smears appear on the
windshield, clean the windshield and the
wiper blades. If that does not resolve the
issue, install new wiper blades.
Note: Do not operate the wipers on a dry
windshield. This may scratch the glass,
damage the wiper blades or cause the wiper
motor to burn out. Always use the
windshield washers before wiping a dry
windshield. Single wipe
A
Intermittent wipe
B
Normal wipe
C
High speed wipe
D Intermittent Wipe Short wipe interval
A
Intermittent wipe
B
Long wipe interval
C
Use the rotary control to adjust the
intermittent wipe interval.
Speed Dependent Wipers (If Equipped)
When your vehicle speed increases, the
interval between wipes decreases.
AUTOWIPERS (If Equipped)
Note: Fully defrost the windshield before
you switch the windshield wipers on.
Note: Make sure you switch the windshield
wipers and ignition off before using an
automatic car wash.
Note: If streaks or smears appear on the
windshield, clean the windshield and the
wiper blades. If that does not resolve the
issue, install new wiper blades.
Note: If you switch autolamps and
autowipers on, the headlamps will
automatically turn on when the windshield
wipers continuously operate.
58
Tourneo Connect/Transit Connect (CHC) Canada/United States of America, enUSA, Edition date: 07/2013 Wipers and WashersD
C
A
BE167118 E167119C
AB
Page 62 of 411

Note:
During wet or winter driving
conditions with ice, snow or a salty road
mist, inconsistent or unexpected wiping or
smearing may occur.
In these conditions, you can do the
following:
• Lower the sensitivity of the autowipers
to reduce the amount of smearing on
the windshield.
• Switch to normal or high-speed wipe.
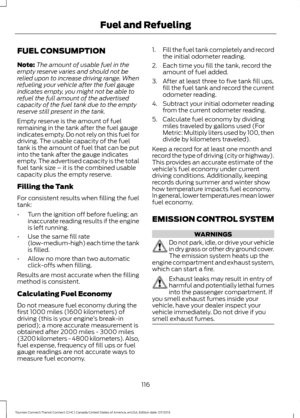
• Switch autowipers off. High sensitivity
A
OnB
Low sensitivity
C
Autowipers uses a rain sensor located in
the area around the interior mirror. The rain
sensor monitors the amount of moisture
on the windshield and automatically turns
the wipers on. It will adjust the wiper speed
by the amount of moisture that the sensor
detects on the windshield.
Use the rotary control to adjust the
sensitivity of the autowipers. When you
select low sensitivity, the wipers will
operate when the sensor detects a large
amount of water on the windshield. When
you select high sensitivity, the wipers will
operate when the sensor detects a small
amount of water on the windshield. Keep the outside of the windshield clean.
The rain sensor is very sensitive and the
wipers may operate if dirt, mist or insects
hit the windshield.
WINDSHIELD WASHERS
Note:
Do not operate the washers when
the washer reservoir is empty. This may
cause the washer pump to overheat.
Note: Do not operate the washers for more
than 10 seconds at a time. To use the washer, pull the lever toward
you.
When you release the lever, wiping will
continue for a short period of time.
REAR WINDOW WIPER AND
WASHERS (If Equipped)
Rear Window Wiper
Note: Make sure you switch the rear
window wiper and ignition off before using
an automatic car wash.
59
Tourneo Connect/Transit Connect (CHC) Canada/United States of America, enUSA, Edition date: 07/2013 Wipers and WashersE167119C
AB E129188
Page 63 of 411
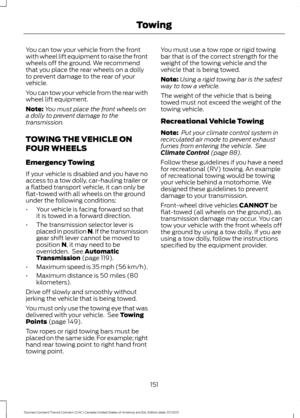
Intermittent wipe.
A
Low speed wipe.
B
Off.C
Press the top of the button to switch
intermittent wipe on. Press the top of the
button again to switch low speed wipe on.
Press the bottom of the button to switch
the rear window wiper off.
When you switch on the front wipers and
move the gearshift lever to reverse (R),
rear intermittent wipe automatically turns
on.
Rear Window Washer Push the lever away from you to operate
the rear window washer. When you release
the lever, wiping continues for a short
period of time.
60
Tourneo Connect/Transit Connect (CHC) Canada/United States of America, enUSA, Edition date: 07/2013 Wipers and WashersAB
C
E171615 E167407
Page 64 of 411

GENERAL INFORMATION
Condensation in Lamp Assemblies
Exterior lamps have vents to
accommodate normal changes in air
pressure.
Condensation can be a natural by-product
of this design. When moist air enters the
lamp assembly through the vents, there is
a possibility that condensation can occur
when the temperature is cold. When
normal condensation occurs, a fine mist
can form on the interior of the lens. The
fine mist eventually clears and exits
through the vents during normal operation.
Clearing time may take as long as 48 hours
under dry weather conditions.
Examples of acceptable condensation are:
•
The presence of a fine mist (no streaks,
drip marks or large droplets).
• A fine mist covers less than 50% of the
lens.
Examples of unacceptable condensation
are:
• A water puddle inside the lamp.
• Streaks, drip marks or large droplets
present on the interior of the lens.
If you see any unacceptable condensation,
have your vehicle checked by an authorized
dealer. LIGHTING CONTROL OffA
Parking lamps, instrument panel
lamps, license plate lamps and
tail lamps
B
Headlamps
C
Parking Lamps (If Equipped)
Note: Prolonged use of the parking lamps
will cause the battery to run out of charge.
Switch the ignition off.
Both Sides
Set the lighting control to position B.
61
Tourneo Connect/Transit Connect (CHC) Canada/United States of America, enUSA, Edition date: 07/2013 LightingE142449